
Abstract
Background and Aim:
The objective of this study was to describe the manual fabrication of a transparent facial pressure mask for treating facial deformities. The mask combines the use of a silicone inner liner and mechanical pressure in the facial region.
Technique:
A negative mold is formed by covering the face with plaster. Manipulation of soft tissue is a crucial part in this process. After hardening and removal of the negative mold, the positive mold is formed and dried. Next a rolled silicone sheet is placed over the positive mold in a vacuum environment. Subsequently, the silicones are vulcanized. Then the rigid outside of the mask is created. The silicone inner liner and outside shell are then affixed.
Discussion:
This described technique results in accurate facemasks with precise fitting. During therapy, the mask is adjusted multiple times to keep excellent fit, as remodeling of scars and deformities takes place.
Clinical relevance:
Facemasks are a reputable therapeutic modality to reduce excessive facial scarring. They require excellent fitting to give pleasing results. To provide a better understanding of facemask therapy, this study describes the manual fabrication technique.
Background
Facial burns are known to cause severe physical and emotional impairment. In many cases, rigid hypertrophic scars and contractions develop as a result. Until the 1980s, roughly the elastic “Jobst hood” (Beiersdorf Jobst Inc. Charlotte, NC) was the norm in conservative treatment of these scars. Since then, this technique has been replaced in many cases by the rigid transparent plastic face mask.1–4 Multiple types of masks, differing in material and fixation methods, are now used in daily practice. 5
There are two basic principles that have laid the ground stone for the development of this mask. The first principle is based on exerting mechanical pressure on the face. Mechanical pressure has proven that it can lead to flattening of scars.6–9 The principal (hypothetical) effect of exerted pressure on the skin is hypoxia. Hypoxia can result in fibroblast degeneration and reduction of collagen synthesis.10,11 Another suggested effect of pressure therapy is reduction of edema.12,13 Furthermore, mechanical pressure may facilitate scar maturation and reduce pain and itchiness.14,15
The second principle is the use of silicones in scar therapy. Silicones have become standard practice in the treatment of scars. Silicone sheets and gels have demonstrated to have scar improving effects, primarily by smoothening and flattening of scars probably caused by an increase of hydration.16–19 Although evidence is limited, combined use of both silicones and pressure therapy is suggested to deliver greater scar enhancing results than pressure therapy alone.13,20
A facemask combining silicones and pressure therapy has proven to deliver long-lasting results in a non-invasive way with limited adverse effects.2,9,21 It is a reliable modality that is suggested to be effective in avoiding surgical revision of protruding hypertrophic scars. Furthermore, by means of accurate manual refinements of soft tissue parts during the molding process, this mask provides an optimal fitting.
Aim
In our specialized scar outpatient clinic of the Maastricht University Medical Center (MUMC+), we presume a combined use of pressure and silicones applied in a facemask is the most effective way of treating hypertrophic facial scars and facial deformities. This therapy has recently proven to be effective as an adjuvant therapy for treating unaesthetic results after facial flap surgery. 21 In this article, the fabrication process of this facial mask is put apart. The study was approved by the local ethics committee of the MUMC+.
Technique
Part one: fabrication of the negative mold
Duration: approximately 50 min.
The patient is positioned in an upright seated position. Vaseline is now applied to the face to prevent plaster from sticking to the skin and facial hair. The area where the scar or deformity is located is marked on the face with a copying pencil (Faber-Castell®). In this way, this marking is mirrored in the negative mold. Sedation during fabrication is not necessary. However, for young children (generally under 6 years of age), sedation is desirable. When sedation is necessary, patients will be placed in High Fowler’s position (a semi-upright position). Nasal intubation is preferred, although the mouth has to be closed when fabricating a full-face facemask. When these steps for sedation of young children are followed, fabrication of the negative mold is comparable to the normal situation when patients are awake. Relaxation of the facial tissue during general anesthesia will be less of a problem at young children because of the absence of skin laxity in general.
Plaster (Cellona®) is cut in strips varying in width and length to copy each facial contour and detail as precisely as possible. The plaster strips are now wetted and the orthotist now proceeds with covering the face in two layers of plaster strips. Covering the face starts cranially working the way down and laterally progressively. Nostrils and the oral cavity are kept free of plaster to ensure patients’ air passage.
During the application of the plaster strips, the patient is advised not to move and to prevent facial expressions, in order to reduce irregularities in the negative mold. During this process, the hardening plaster and underlying soft tissue parts are steered. The expected result of this shifting of the plaster and underlying tissue is to increase the pressure on the shifted facial area where additional pressure is desirable. This occurs when the orthotist manually shifts the soft plaster just before it hardens. Consequently, because of this manipulation, the soft tissue under the plaster shifts. The orthotist holds this position for a few moments until the plaster hardens. When the plaster hardens, the plaster and shifted soft tissue underneath the plaster remain in the desired position the orthotist put it. Eventually, this position can be found in the positive mold and in the eventual Uvex outside of the mask.
Before removal of the negative mold, the location of the buckle anchors that will be attached later on in the process will be marked. From these reference points, the length of the elastic Velcro straps will be determined. The resulting negative mold is now carefully pulled from the face and the face is cleaned from plaster residues with water and soap (Image 1(a)).

(a) The negative mold obtained after part one of the fabrication process. (b) The positive mold after part two of the fabrication process.
Part two: fabrication of the positive mold
Duration: approximately 2 h.
The holes around the eyes, nostrils, and mouth are sealed with plaster strips and the sides of the negative mold are raised with plaster strips, making it possible to fill it with liquid plaster later in the process. Then, in a container with 2 L of tap water, approximately 400 g of porous plaster (Otto Bock®) is mixed. The resulting mixture is still very liquid and contains a lot of air bubbles. Therefore, the container is placed on a vibration machine (Wasserman Dental-Maschinen GmbH KV-26) to remove air bubbles out of the mixture. After 5 min of vibration, the mixture is now poured into the negative mold. A metal cylindrical bar fixed in a plastic cup is placed into the mixture in order to secure it in the vise. After approximately 20 min, the mixture has become solid.
The positive plaster mold is then carefully dismantled. This mold now contains all the contours and irregularities of the facial scars and deformities. Subsequently, these irregularities and deformities are smoothened with a rasp, scrapers, and mesh. In this way, the orthotist corrects and reduces the thickness of the hypertrophic scars or facial reconstruction site out of the mold.
By means of sandpaper with very fine grit, the mold is wetly sanded. The positive mold is now finished and dried in an oven at 55°C for 2–3 h (Image 1(b)).
Part three: production of the Uvex mask
Duration: approximately 14 h.
In this part, the final mask is fabricated. This process consists of two parts. The first part is customization of the silicone inner liner. This material contains two components of medical silicones (Ottobock® HTV (High Temperature Vulcanizing)-silicones, 35 Shore), which are merged and rolled together (while air bubbles are removed) until a thickness of 1 mm is reached (Image 2). Then the silicones are applied to the positive plaster mold on a vacuum forming platform and air between the plaster model and the silicone liner is removed (Image 3). The silicone liner is now placed in an oven at 55°C during 8 h until the material is vulcanized.
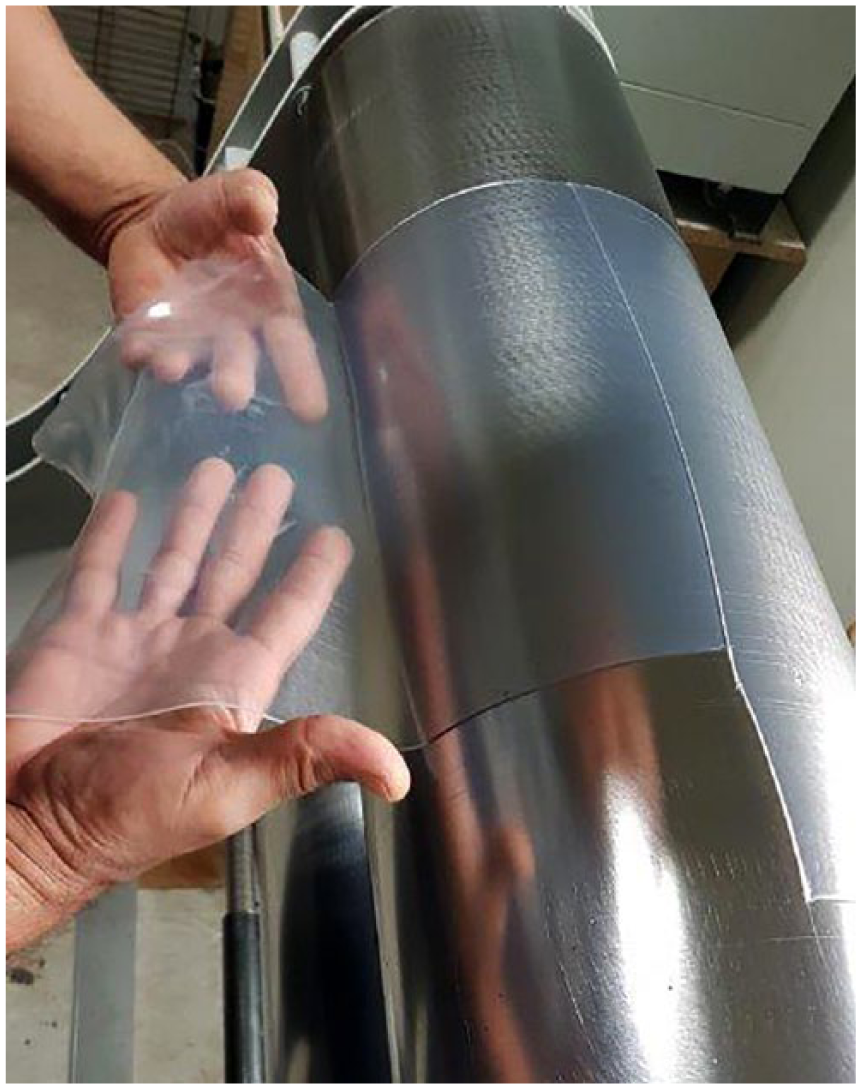
The rolling process of the silicones.
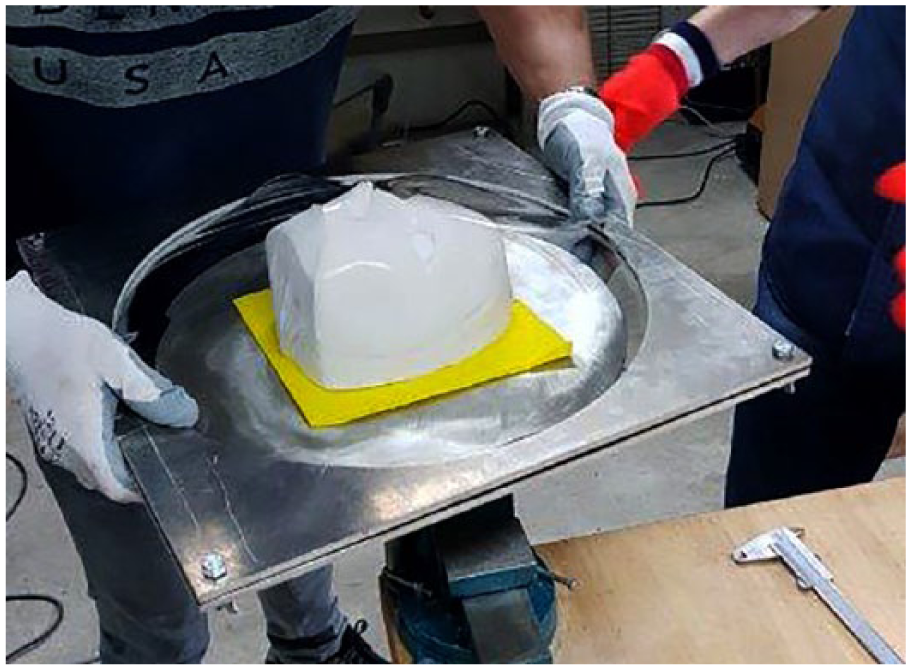
Silicones are placed on the positive mold and air is removed.
The second part consists of fabrication of the rigid Uvex outside of the mask. An Uvex polycarbonate plate with a thickness of 4 mm is heated in an oven at 120°C–160°C. The plate is fixated in a double sandwiched ring system. When the Uvex plate is sufficiently heated and becomes pliable, it is applied to the positive mold and placed on the vacuum forming platform and air is removed. The outside of the mask is now formed. Next, the edges of the silicone liner and the Uvex are trimmed with a hand-held circular saw and smoothened with sandpaper (Image 4). Then buckle anchors with nickel loops are attached to the Uvex outside. The Velcro straps on the silicone go through the loops on the Uvex outside. In this way, the two parts are combined and the silicones are fixated to the transparent plastic shell (Image 5).
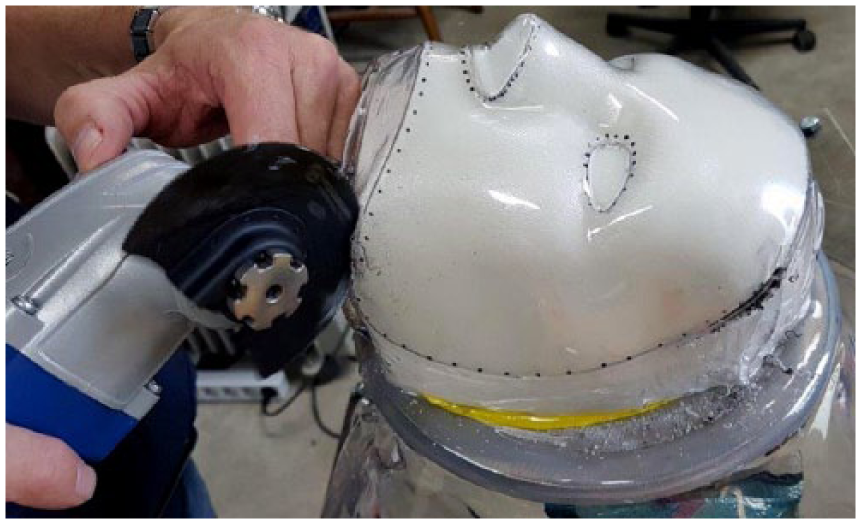
Finalization of the fabrication of the rigid outside of the facemask.
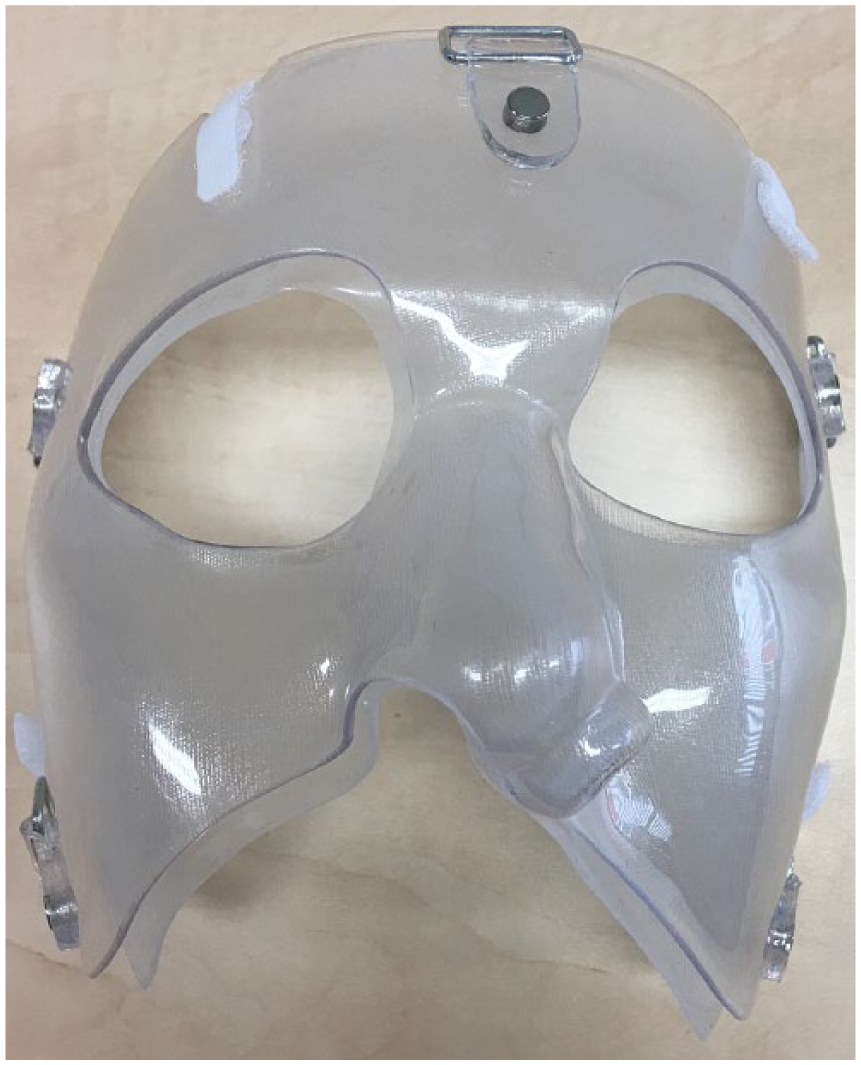
End product of the facial pressure mask.
Part 4: fitting and delivery of the facemask
Duration: approximately 1.5 h.
Now the facemask can be delivered and fitted onto the patient. In most cases, a 5-point design is chosen for an optimal and even pressure distribution. 6 Then the patient applies and fits the mask, and pressure on the face is visually checked by looking for blanching of scars by adjusting the tightness of the bandages placed through the loops. Pressure exerted underneath the mask can also be measured by means of a pressure sensor. 22 As remodeling of hypertrophic scars and deformities progresses during therapy, on average, the mask is adjusted seven times in total in order to provide the most optimal pressure distribution at all times during therapy. As a result of remodeling of scars during therapy, pressure underneath the mask decreases and fitting of the mask alters. Modification of the mask is aimed to keep fitting and pressure adequate. During follow-up visits, the treated areas are observed and the effect of the mask on the skin is assessed. An indication for facemask modification is when the height or thickness of the treated zone is significantly diminished since the last visit. This can be checked by means of the absence of blanching (as a result of decreased pressure) on the treated area when the mask is put on. When the thickness of the treated zone is significantly decreased, the technician uses sandpaper and other scraping tools to remove small parts of plaster on the positive mold at the same place the thickness decreased on the skin. Then, the outside Uvex of the mask is heated by means of a small blow dryer and placed on the altered positive mold. Next, the mask is put on after cooling of the Uvex, and when blanching is observed, modification of the mask is completed. The main criterion for adjustment of the mask is maintaining adequate pressure underneath the mask (at least 20 mm Hg).
Discussion
In this technical note, the fabrication process of a unique transparent facemask for treating facial hypertrophic scars and deformities is described. Pressure mask therapy is a very demanding therapy and therefore only highly motivated patients are selected for this therapy. Another limitation of this technique is that in some cases, the silicones can cause skin irritation. Therefore, a steady build-up phase of therapy is advised (2–3 h after 1 day, increased to at least 12 h daily in the next 14 days). Also, patients should take apart and rinse the silicone inner liner by means of putting it in boiling water for 3 min once a day.
The mean total duration of facemask therapy mainly depends on the amount of hours of daily wearing, the severity and the extent of the treated zone, and the skin color type. The mean daily wearing is advised to be at least 12 h. The mean total therapy duration is between 9 and 12 months for Caucasian patients with hypertrophic scars. Patients who have a dark skin type (Fitzpatrick 5 and 6) usually require 6 extra months of therapy. For patients who are treated after facial flap surgery, the mean wearing time is about 12–18 months because in general flap skin is more elevated than hypertrophic scars. The time between mask modifications is also dependent on the same parameters. However, in general, the first modification is made 4–6 weeks after start of therapy. Then, once every 2–3 months modifications are done.
Although scanning of the face by means of “computerized surface scanning” and three-dimensional (3D)-printing has gained popularity recently, this technique has not become standard practice in the Netherlands yet. Furthermore, manipulating and steering soft tissue parts manually during the molding process is crucial in fabricating a functional mask, which has not been described earlier. This manual process is not comparable in efficacy yet to computerized surface scanning, as corrections are not included in the manipulation and manufacturing process yet.2,9 The process of tissue steering is able to result in superior pressure distribution of the mask on the face when compared to fabrication of a facemask by means of scanning of the face and 3D printing. However, to reproduce the technique of tissue steering, it is helpful an orthotist/prosthetist who is familiar with the technique to show and teach it. For reproduction of this technique, technicians need to understand the direction the hardening plaster needs to be moved during formation of the negative mold. For example, on areas with skin contractures that cause downward traction on the face, the solidifying plaster and tissue underneath must be shifted in the opposite direction in this specific area. Estimation of the extent of the manipulation is subject to a rather steep learning curve; there will be a quick increment of skill. The described fabrication technique allows manual modifications to take place with submillimeter precision because of the possibility of very precise and minimal removal of plaster on the positive mold. The described technique in this article can deliver very precise molds, is minimally invasive for patients, and can be performed in smaller practices with no advanced 3D-printing machines. Also, pressure mask therapy has proven to be an effective therapy that can replace recurrent surgery of scars or surgical thinning of flaps in some cases.
Key points
Facial pressure masks with added silicones as inner liner are able to reduce protruding hypertrophic scars with long-lasting results.
During the fabrication of the negative mold, steering of the underlying tissue while covering the face with solidifying plaster strips is crucial.
By correcting the irregularities on the positive mold the orthotist creates the areas where additional pressure is desired on the definitive mask.
As a result of remodeling of scars during therapy, routinely modification of the facemask is necessary to assure correct fitting and to keep pressure adequate.
Footnotes
Author contribution
All authors contributed equally in the preparation of this manuscript.
Declaration of conflicting interests
The author(s) declared no potential conflicts of interest with respect to the research, authorship, and/or publication of this article.
Funding
The author(s) received no financial support for the research, authorship, and/or publication of this article.