
Abstract
Sharing data, materials, and analysis scripts with reviewers and readers is valued in psychological science. To facilitate this sharing, files should be stored in a stable location, referenced with unique identifiers, and cited in published work associated with them. This Tutorial provides a step-by-step guide to using OSF to meet the needs for sharing psychological data.
Researchers are increasingly being called upon by journals, funders, and institutions to share the data and materials underlying published articles. Sharing data and materials facilitates reproducibility and replication attempts and allows future researchers to more easily build on past work or reuse old data sets to answer new questions. In order for this to happen efficiently, data and materials must be shared in findable, accessible, interoperable, and reusable forms (i.e., the FAIR principles; Wilkinson et al., 2016). This means that when researchers are deciding where and how to share their data, they should look for repositories with at least a few minimum characteristics: A repository should provide globally unique and persistent identifiers (e.g., DOIs and global unique identifiers, or GUIDs) so data can be cited, should be publicly searchable so data can be found, should allow for licenses that clarify how data can be reused, and should allow for rich metadata descriptions so data are understandable and reusable. Services such as Dropbox or Box, which may be useful for storing files internally during research, are not optimal for data sharing as they do not meet many of these requirements or the FAIR principles generally (Wilkinson et al., 2016). However, there are a number of repositories that are appropriate for sharing psychological data. These include Dataverse, figshare, Zenodo, and OSF. 1
This Tutorial provides a brief step-by-step introduction to using OSF to store and share data. OSF is a free, open-source Web tool designed to help researchers collaboratively manage, store, and share their research process and files related to their research. Unlike the other repositories just mentioned, which were built to simply house and share files once a research project is finished, OSF also allows researchers to store and interact with files during the research process and to preregister their work and upload preprints if they so desire. Though these additional features are outside the scope of this Tutorial, researchers who wish to take advantage of them may also wish to share data on OSF in order to provide a central location where their various research outputs can be connected and found.
Though OSF can be used for storing and sharing any type of file related to research (e.g. analysis scripts, manuscripts, surveys), this Tutorial specifically focuses on data that can ethically be shared (e.g., the researchers have obtained appropriate approval from an institutional review board as well as participants’ consent). The steps for storing and sharing most other types of files are similar to those described here. The steps and screenshots presented in this Tutorial are current as of December 2017. The user interface of OSF is periodically updated, and current screenshots for most OSF features and functionalities can be found in the OSF help guides (http://help.osf.io).
Step 1: Create an Account
OSF accounts are free and open to anyone. To create a new account, go to https://osf.io/ and click the green “Sign Up” button in the upper right-hand corner of the screen. Fill out your name, e-mail address, and password. Once you have created an account, you will receive an e-mail asking you to confirm the account.
Some universities have OSF for Institutions accounts, which allow affiliates to log in to OSF using their institutional user ID and password. 2 If that is true in your case and you have never signed in to the account on OSF, after you click on the “Sign Up” button, click on the “Login through your institution” hyperlink in the bottom left of the window (see Fig. 1), select your university from the drop-down list, and put in your institutional log-in information. This will create an OSF account, and you can proceed to Step 3.
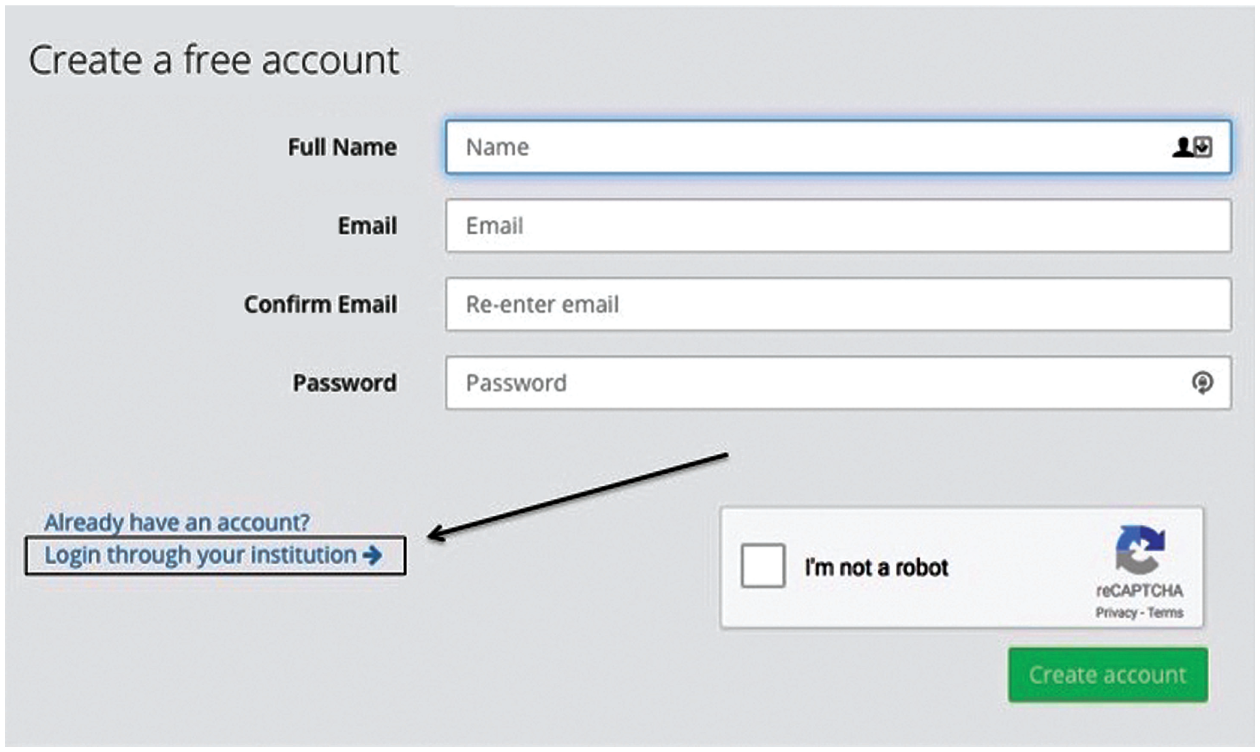
Screenshot of the Web page for creating an account on OSF. Users who wish to log in through an institutional account can do so by clicking on the hyperlink at the lower left, which is highlighted here by the black arrow and outline.
Step 2: Sign In
Once you have an account, navigate to https://osf.io/ and click on the blue “Sign In” button in the top right of the screen. Then, enter your name and password to log in. If you are using an institutional account, you can click on “Login through your institution” at the bottom left of the window, select your institution from the drop-down list, and enter your university credentials.
Step 3: Create a Project
To create a new work space on OSF, click on the green “Create new project” button. A project on OSF can be anything—an individual experiment, a line of research, a manuscript, a lab group, a grant, and so forth. For this example, assume that you simply wish to upload the data files related to an article you are going to publish.
Give your project a descriptive title, then click on “Create” and “Go to new project” to access the project space.
Step 4: Add Collaborators
Projects on OSF are private by default, which means that only the creator of a project can access it when it is first created. You will want to give your collaborators access to this project so that they can use and update the material you upload and also get appropriate credit for contributing to the contents of the project if and when you choose to share it publicly.
To give a collaborator access, click on “Contributors” in the top toolbar and then on the green “+Add” button near the top of the screen. Once inside the Add Contributors module, you can search for a contributor by name and click on the green “+” button next to the appropriate search result (see Fig. 2).
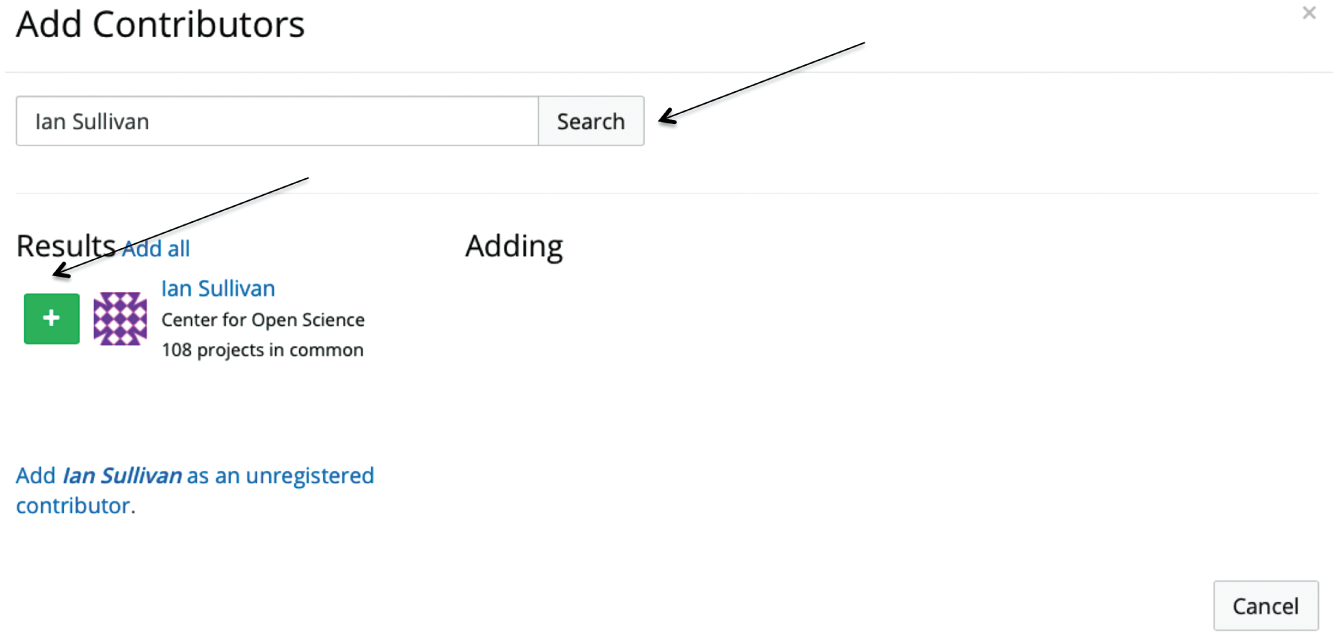
Screenshot of the results of a search for a contributor. The upper arrow points to the search window, and the lower arrow points to the green “+” button used to add the indicated person as a contributor. If a search has no results or comes up with the wrong person, an unregistered contributor can be added using the link under the Results display.
If your collaborator does not come up in the search, you can add him or her to the project by clicking on the “add as an unregistered contributor” link under the Results display. This will allow the collaborator to claim the account associated with the project.
After adding a contributor, indicate if you want him or her included in the citation for the project (the Bibliographic Contributor box) and what level of permissions you want him or her to have on the project. Finally, click on “Add.”
Step 5: Upload Files
OSF can store any type of file; the only restriction is that an individual file cannot be larger than 5 GB. (For files larger than 5 GB, researchers need to use the “Add-ons” feature found on the top toolbar to connect another storage provider, such as Amazon S3, to their OSF project.) To upload files to OSF storage, go to your main project page and click on “OSF Storage” in the Files section in the bottom left of the screen. This will cause a green “Upload” button to appear above the Name section (see Fig. 3). Click on the button and then select the files you wish to upload to the project. When uploading a data file, you should make sure to also upload a codebook (also called a data dictionary), which explains what the variable names mean as well as what any variable codes mean (e.g., 0 = male, 1 = female), so that other users can understand the data file.
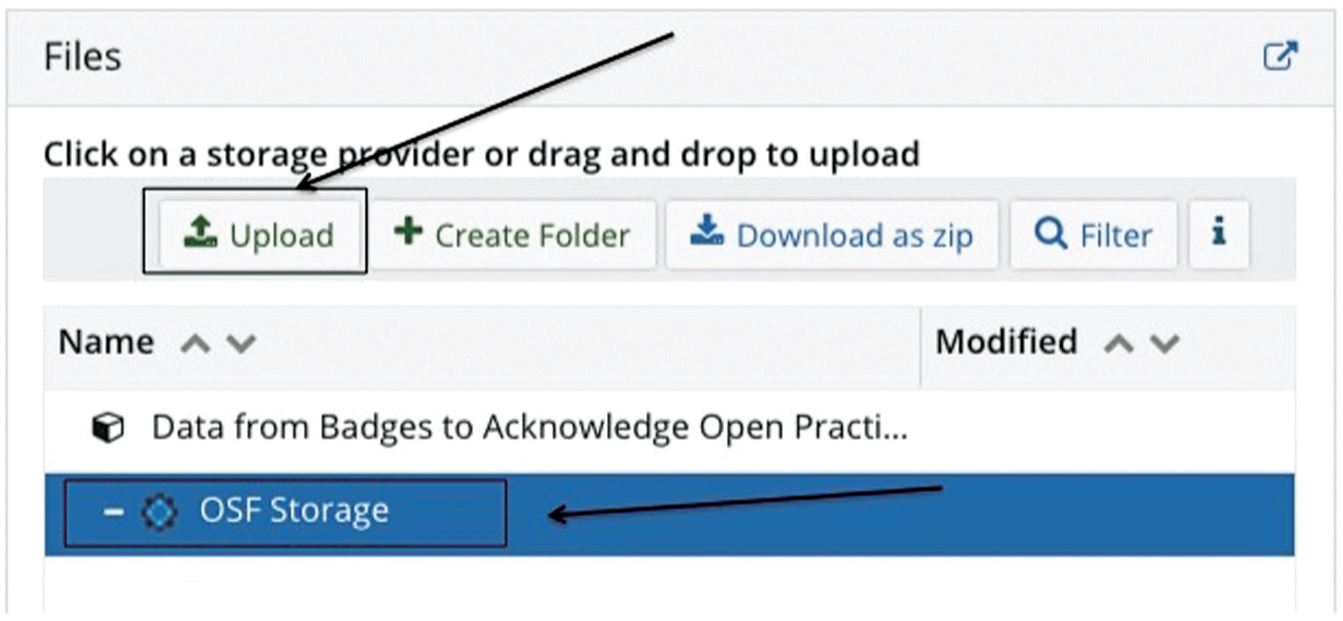
Screenshot illustrating how to upload files. Clicking on the “OSF Storage” label, highlighted by the lower arrow, causes the “Upload” button, highlighted by the upper arrow, to appear. Clicking on the “Upload” button allows you to browse your files and select the ones you want to upload.
Step 6: Add a Description
You will want to add some description of the project, so that you and other users know what the files relate to. The Wiki can be a good place to add this sort of rich description. To open up the Wiki, click on the small blue button at the top right corner of the Wiki section of your project page (see Fig. 4). This will take you to the Wiki editing page, where you can include information about the project, such as an abstract, the citation for the article the files are associated with, or a written description of what the various files are. You can use Markdown or the buttons on the toolbar above the editing panel to add formatting to your Wiki.
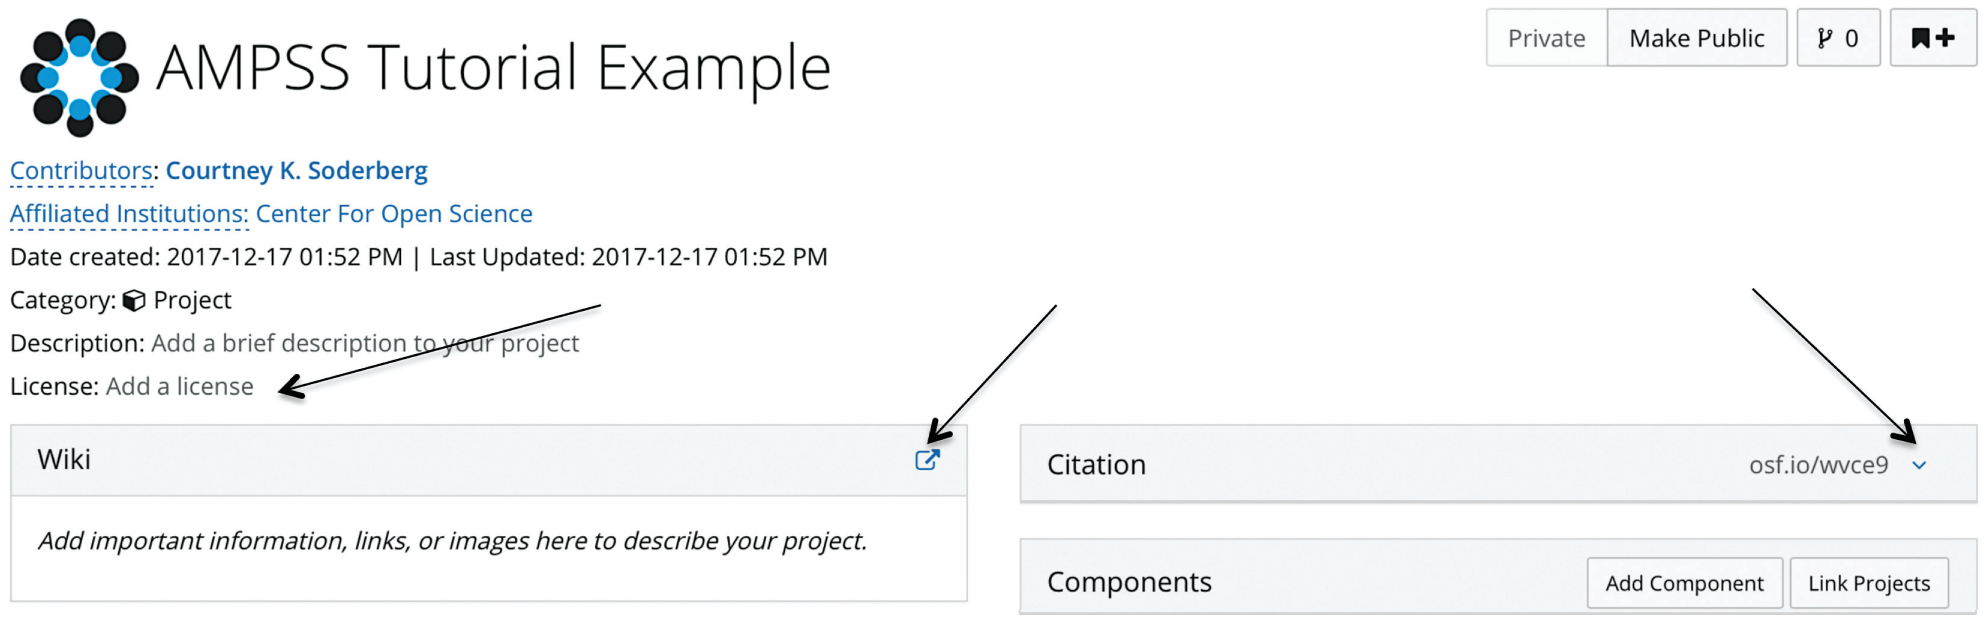
Screenshot of the upper portion of a project home page. From left to right, the three arrows point to the “Add a license” hyperlink, the button for opening the Wiki, and the drop-down arrow used to view the citation widget.
Step 7: Add a License
Because reuse is one of the main purposes of data sharing, it is important that other researchers know how they are allowed to reuse your work. Different countries have different requirements for copyright; in the United States, for example, data typically cannot be copyrighted because they are factual information, but databases can have thin copyright protection, as decisions about organization count as creative work. For data to be efficiently reused, they need to be available under an open license. Although a deep description of possible licenses is outside the scope of this Tutorial, a CC0 (also referred to as CC0 1.0 Universal) license is often recommended for data. It is the most permissive license, dedicating the licensed work to the public domain and placing no restrictions on the reuse of the data.
To add a license to an OSF project, click on “Add a license,” located directly above the Wiki on the project home page (see Fig. 4). The resulting display will allow you to select from a number of suggested open licenses.
Step 8 (Optional): Add Components
Thus far, I have explained how to upload a few files (a data file and a data dictionary), but you may want a project that houses your data, analysis scripts, and study materials. In this case, you may want to add additional structure to your project to make it easier to find the different types of files and to allow other users to cite different parts of your work. To add this structure, you can click on the “Add Component” button in the Components section on the right side of your project page. You can give the new component any title you want (e.g., Data, Analysis Scripts, Stimuli). If you want all the contributors on your main project to have access to the component as well, you will need to click the “Add contributors from ____” checkbox before clicking on the green “Create” button (see Fig. 5). Each component, or subsection, of your project will have its own Wiki, section for files, contributor list, citation, and privacy setting
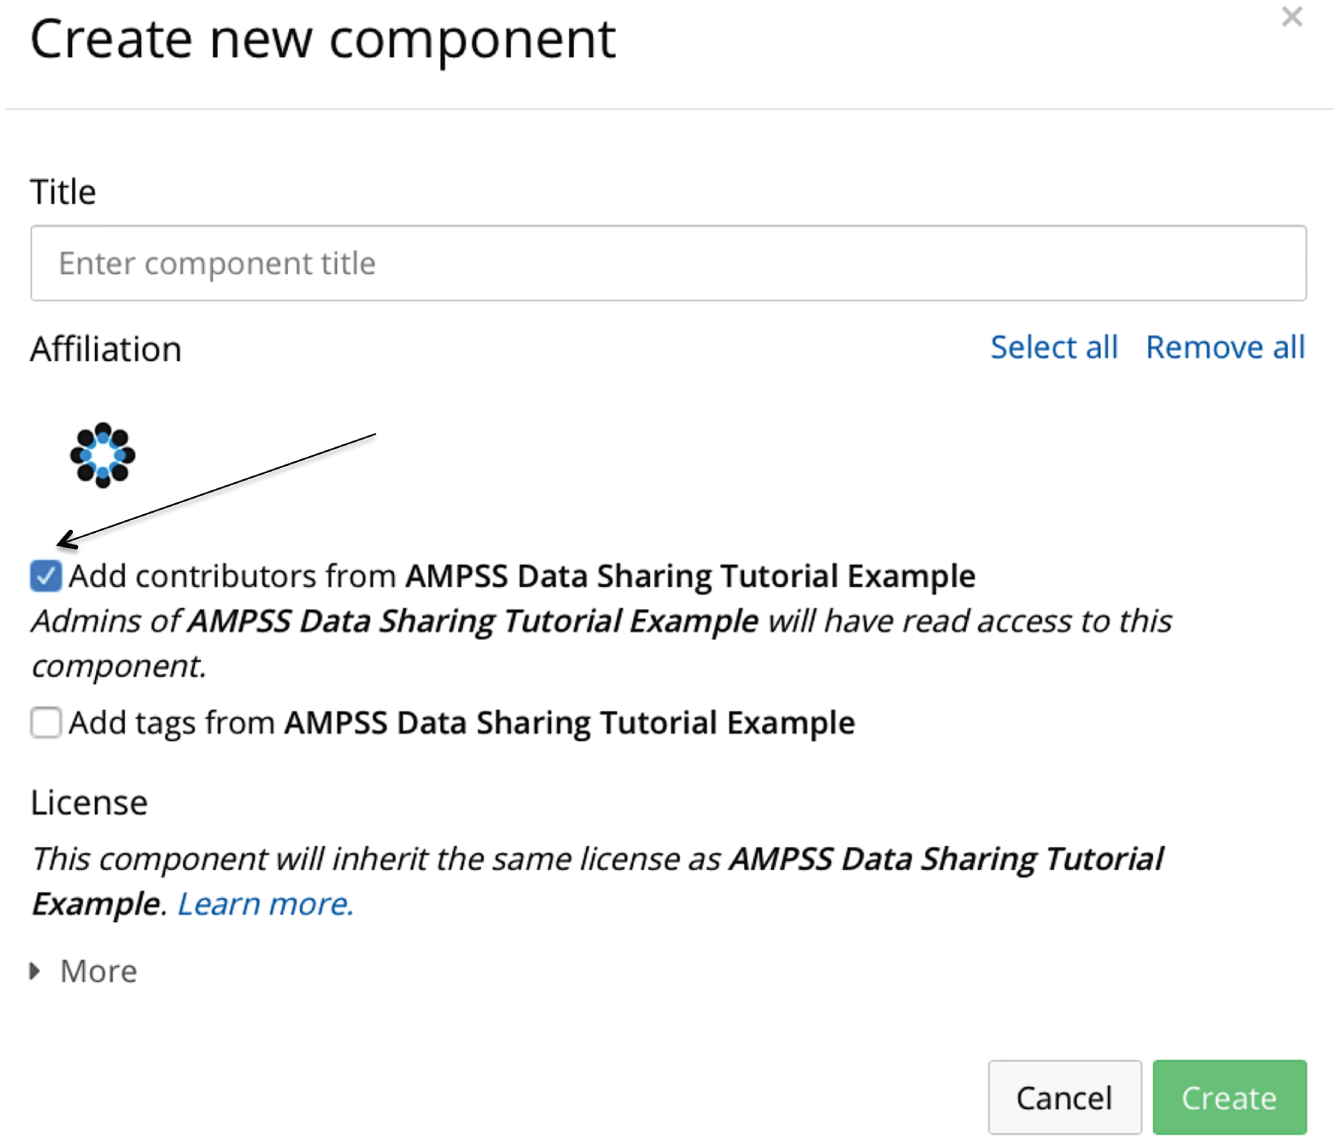
Screenshot showing the pop-up modal used to create a new component. The arrow points to the checkbox used to give contributors access to the new component.
Step 9: Sharing Your Project With Reviewers
Now that your project is set up, you may want or need to give reviewers access to the contents of your project before you make it public. To do this, click on “Contributors” in the toolbar, find the “View-only Links” header at the bottom of the page, and then click on the “+Add” button to the right of the header (see Fig. 6). You can then name your link and click on “Create.” This will create a link that will give anyone who has it view-only access to your project while keeping the project inaccessible to anyone who does not have the link.
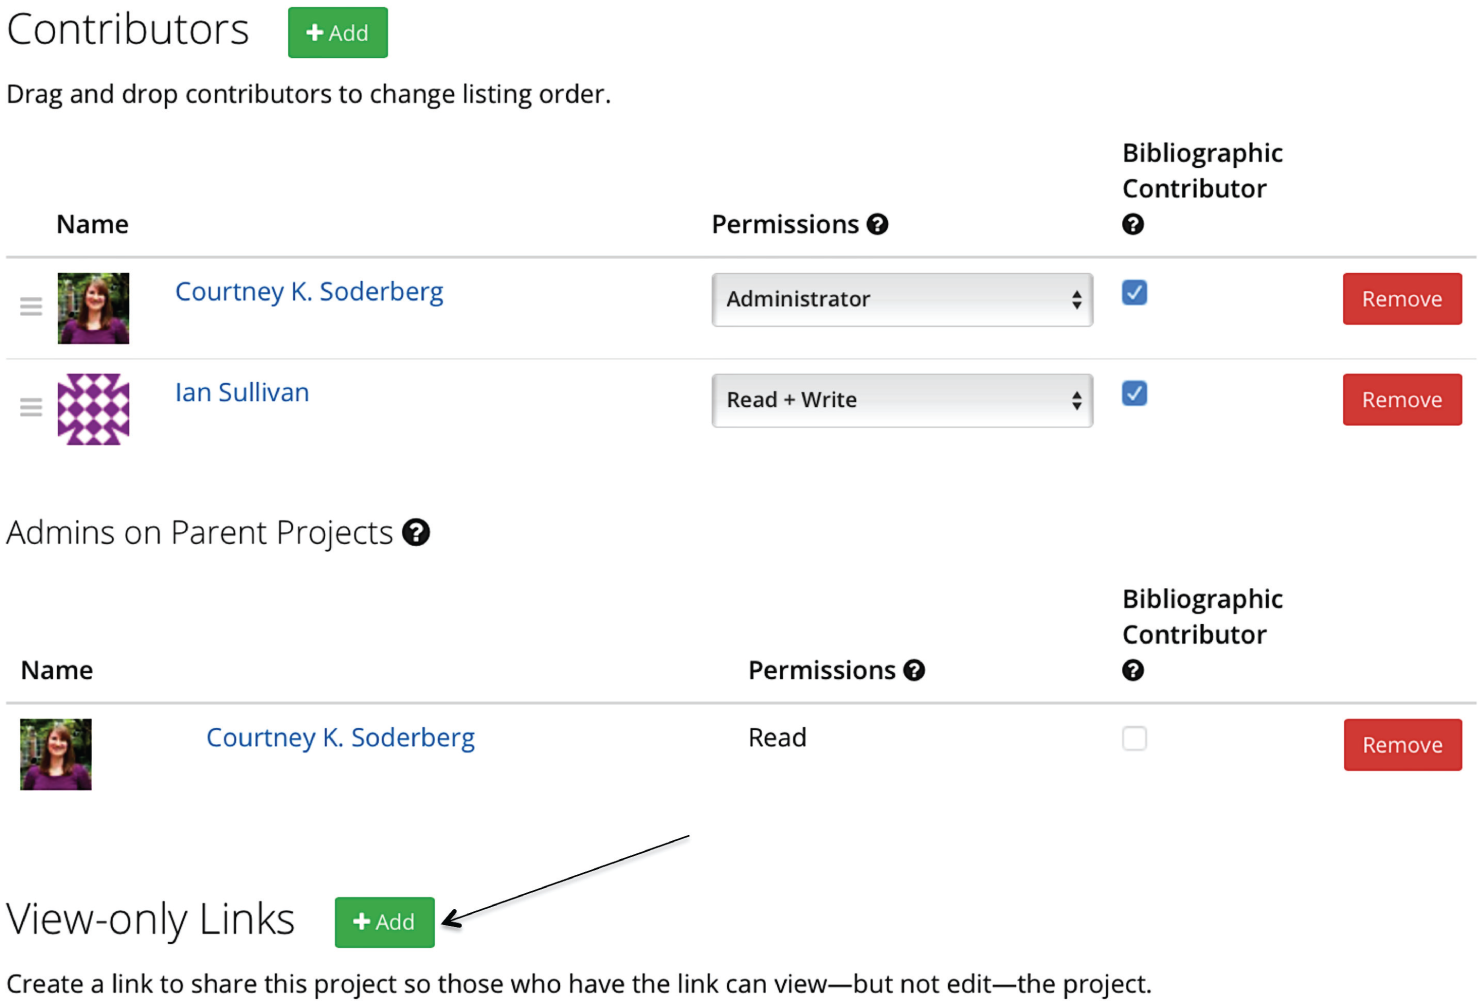
Screenshot of a Contributors page. The arrow shows where view-only links can be created.
If the journal you are submitting your manuscript to uses blind review, click on the “Anonymize” checkbox before creating the link. Doing so will remove contributors’ names from the OSF project when it is viewed through the link. You can then include this view-only link in your submitted manuscript.
Step 10: Making Your Project Public
When you are ready to make your project public, click on the “Make Public” button in the top right corner of the project page. Once you have confirmed your choice, the project will be public, and anyone will be able to view and download all the files.
Step 11: Referencing OSF Files in Your Work
Public files are useful only if they can be found, so how do you direct other researchers to your public files on OSF? The URLs for all projects, components, and files on OSF are GUIDs, which means that the URLs will always point back to those project and files, even if you move the files within your project or rename the files or project. Including these links in your manuscript, in your published article, or on your lab’s Web site is one good way to make sure that readers can find the particular files you reference in your work. Additionally, a citation is automatically generated for each project and component on OSF and can be found in the drop-down Citation widget to the right of the Wiki section on the project page (see Fig. 4). This citation can be included in the reference sections of articles citing the files, so that all contributors who shared data, code, and materials are properly credited when those files are reused.
Summary
This Tutorial has outlined how a researcher can quickly create a project on OSF, upload the pertinent data files, share those files with reviewers and the public, and then reference those files in an article. Although I have used the example of sharing data files, the same general steps can be followed for uploading, sharing, and citing analysis scripts, study materials, and other files related to research projects. Readers who would like further guidance may want to refer to the Center for Open Science’s YouTube channel (https://www.youtube.com/channel/UCGPlVf8FsQ23BehDLFrQa-g), which hosts how-to videos and recordings of previous Webinars, or the OSF help guides (http://help.osf.io). Also, the OSF helpdesk (
Footnotes
Action Editor
Daniel J. Simons served as action editor for this article.
Author Contributions
C. K. Soderberg is the sole author of this article and is responsible for its content.
Declaration of Conflicting Interests
C. K. Soderberg is employed by the Center for Open Science, which builds and maintains OSF. She declared that she had no other potential conflicts of interest with respect to the authorship or the publication of this article.