
Abstract
This paper has been written by the SLAS Sample Management Special Interest Group to serve as a guide to the best practices and methods in establishing and maintaining a high-quality sample management system. The topics covered are applicable to sample types ranging from small molecules to biologics to tissue samples. It has been put together using the collective experience of the authors in start-up companies, small pharma, agricultural research, IT, academia, biorepositories, and large pharma companies. Our hope is that sharing our experience will streamline the process of setting up a new sample management system and help others avoid some of the problems that we have encountered.
Introduction
No one will remember the millions of samples that you have delivered correctly, but they will always remember the one that was not correct.
This simple statement sums up the world of sample management. It is a field where everything has to be tracked: identity, amount, location, solvent, characteristics, number of accesses, and more. It is also a critical part of setting up any new discovery operation, but one that is often ignored or put off until the management of the sample collection becomes such a burden to the scientific staff that it impacts ongoing research or the ability to locate and process samples becomes nearly impossible. The authors of this paper represent more than a century of collective experience in this somewhat eclectic field and have put together this paper to capture their views on best practices.
The management of sample collections is a topic that is usually only discussed among experts in the field until there is a problem. This is partly because the basic concepts of sample management seem like common sense: know what everything is, know where you put everything, and know how much of each you have. However, this becomes quite a bit more complicated when “everything” encompasses millions of samples and the “what” is complicated by chemical structures or biological sequences that can have nearly infinite variability. Fortunately, there are established processes and tools for keeping track of these complex systems that can prevent the crisis resulting from the loss of a company’s most valuable materials. Past expert reviews have discussed many of the details of managing a sample repository.1–11 In particular, Janzen and Popa-Burke’s paper 1 contains a comprehensive review of references prior to 2010; those references will not be repeated here unless they are critical to the point being discussed.
Arguably, the most important rule of sample management is to start at the outset. There are few things more disheartening to an organization than to find out that the compounds, proteins, tissues, or cell lines that showed activity cannot be reproduced because their quality or identity was not properly managed. Similarly, collecting and storing a batch of tissue samples for later analysis is not useful if the identity of each sample cannot be absolutely established and proper collection and storage procedures were not employed. This is particularly critical for biospecimens and biologics as the time from collection to optimum storage temperature to preserve fit for purpose may be minutes. Therefore, it is best to create the process and supporting systems that you will use before you begin making or receiving samples.
There are a few basic premises that one always follows in establishing a new system. First, register all of the samples and create unique identifiers. If possible, globally unique identifiers (GUIDs) should be created as this mitigates future problems in distributing and sharing samples with outside organizations. This process has previously been discussed12–15 and varies by sample type, so it will not be covered in detail in this document. Second, keep an accurate inventory of your samples. It is not possible to stress the importance of accurate inventory enough. This is the most common mistake that new laboratories and companies make. Mislabeled samples such as proteins and cell lines are possibly the largest source of error in research and entirely an avoidable problem. Your initial system does not have to be elaborate, but as with registration, it pays to create a strong system at the outset. The use of automation-compatible barcoded sample containers is highly recommended and will save considerable effort later. Relabeling containers or transferring aliquots to new containers, particularly those that have been stored at subzero temperatures, is very difficult and time-consuming and may, in some cases, be impossible. These topics are covered in more detail later in this document, as are other important topics, such as IT systems, ordering, container selection and management, logistics, and labware.
The complexity of the systems associated with managing a sample collection should match the complexity of the collection and should be able to grow with the collection. If you know that you will be growing your collection to a size that requires a more complex management system, then it pays to plan for it from the beginning. It should be noted that while automation is usually applied at some level in a high-capacity sample management process, it is not a required component. Robotics require a large capital investment that can be burdensome for a start-up organization and may be out of reach for academic organizations, so they should be chosen with care and only to offset pain points or areas where manual intervention is not practical. Sample numbers, access rate, throughput requirements, and retention time should be considered in determining the need for an automated system. It is very possible to initiate a system on paper and migrate it to spreadsheets and eventually to a database-supported electronic system if the process is well thought out initially. For collections of moderate size, a simple system may be sufficient forever. However, remember that a paper system will quickly become unmanageable if your collection grows beyond a few hundred samples and spreadsheets can manage collections up to several thousand, but a well-designed database system can manage tens of thousands to millions of samples.
Another method that is becoming more and more prevalent is to take advantage of contract organizations that offer sample management as a service. If this route is chosen, then it is advisable to perform due diligence visits at the contractor’s site and to carefully consider your requirements for turnaround time and shipping logistics, and be sure that the sample tracking and ordering systems at the contracted facility will meet your requirements. Another common mistake is to assume that a contractor will solve all your tracking problems, including poor sample identification by your other suppliers. Be sure that the samples are clearly identified (as detailed later in this document) before they are shipped to the sample management contractor.
One important decision to be made at the outset is how your sample management team will interact with the larger organization. This is an easy problem to overlook when an organization is small and the sample management group consists of the same people as the requesters and/or the submitters, but if growth is planned, then it is best to plan ahead. A very normal growth curve is the expansion from verbal requests to email to a full sample ordering system. If you plan to grow, then it is best to consider this early to avoid changes that will be confusing for your clients on either end of the process. It should also be noted that almost all commercial inventory management systems incorporate sample ordering. Sample ordering is also dealt with in more detail later in this paper.
Inventory Management Systems
The most basic inventory management system is a box with a numbered grid system and an associated paper or spreadsheet listing of what sample is in each location. This will work just fine as long as you only have enough samples to fill the box. As soon as you need a second box, you will have to expand your tracking sheet to accommodate box 1 and box 2. At this point, it will become difficult to find a specific sample in a paper system, and keeping track of the amount in each sample will become difficult if the samples are accessed even infrequently. When this reaches a larger number of boxes and alternate storage containers are added to the mix, it can become very difficult to manage even with a spreadsheet system.
That being said, the box and grid system forms the basis of most inventory management systems. A group of samples is stored in a container with an addressable system to locate each possible storage location. Containers are numbered and their location is also tracked. Most inventory management systems are built on a hierarchy of locations with increasing specificity (e.g., site, building, freezer, shelf, rack, and grid).
The contents and location of each container are tracked electronically and updated whenever changes are made. This point cannot be stressed enough and is the most common point of failure in inventory management. No inventory system can accurately track samples if a process is not in place to track every change. The process you establish at the outset is the key to building a scalable sample management environment.
The first step in creating this process is registration and assignment of a sample identifier. As was mentioned above, registration is very specific to sample type and will not be covered in detail in this document but is usually accomplished using a commercial system. For more details on registration, refer to Janzen and Popa-Burke. 1 Suffice it to say that each sample should have a unique identifier that needs to be correlated to a unique entity. For example, each compound structure should be checked against everything in the current database to ensure that a new ID is not being assigned to an existing structure. The most common numbering method is the use of alphanumeric codes that can be sequentially assigned. While you do not want to embed too much information into a sample ID, it is a common practice to use a prefix that will identify types or subtypes of samples. For example, a prefix of SM may identity small molecules, while a CL prefix may identify cell lines and TS tissue samples. Alternately, MP may identify mother plates and AP assay plates in a plating hierarchy, or HU may identify human cell lines and MU may be used for murine lines. A suffix or multiple prefixes may also be used to identify batches, salts, passages, and so forth. This will yield a numerical system that looks like XX-00000-YY or XX-YY-00000-ZZ. The number of digits should be large enough to accommodate your anticipated sample collection size. One potentially problematic habit that occurs in every organization is the very human tendency to abbreviate the sample identifier to three or four digits. So XX-123456-AB will inevitably be called 456 at some point. This becomes problematic when sample XX-213456-AB also exists and the wrong sample is ordered for a follow-up test! So it is important to build into your process a full sample identifier check.
Once a sample number has been established, each individual container of that sample must be labeled and tracked. For samples that will be transferred into aliquots or processed into subsequent forms, an important concept is the mother–daughter relationship. The first instance of a sample is the mother and any subsequent immediate transfers are daughter samples. This is not a simple one-to-one relationship; each daughter can also spawn subsamples to a nearly infinite degree. This can apply to tubes, vials, plates, buckets, or virtually any container system. Again, the key to success is that each container is labeled and that any changes to the location or content are recorded. The sample changes that can be tracked are infinite and will depend on your specific needs, but some that are typically tracked are mass, transfers, solvation (and solvent used), volume, storage temperature, time in storage (for expiration and replacement), time out of storage (particularly for samples that require low temperature storage), and user and location changes.
It can be very labor-intensive to record changes to samples if each record requires that you type or look up an alphanumeric string that may be 10–12 digits long. To this end, most inventory management systems utilize barcoding.
Sample Identification
Samples should be identified utilizing human-readable printed labels, linear barcodes, 2D barcodes, radio frequency identification systems (RFIDs), microelectromechanical systems (MEMSs), or other persistent tagging. 16 Selection of the sample identification method should take into consideration the range of temperature and environmental exposures throughout the sample life cycle.
Most people are aware of barcodes from the Universal Product Code (UPC) that is used as the identifier for commercial products. In fact, most of us have scanned them in self-check areas in retail stores. The basics of barcoding are actually quite simple: while there can be significant complexity in the relationship of the data associated with a barcode, reading a barcode simply enters the alphanumeric data encoded in the barcode as if it had been typed in from a keyboard by converting a machine-readable set of symbols to alphanumeric characters. A reader connected using a simple USB cable can be used for data entry. The most common readers are inexpensive and easy to install and can be handheld or have a fixed location. So, there rarely is an excuse for manually entering the sample ID from a label. The use of barcodes greatly simplifies recording information as changes occur. When samples are retrieved or processed in some way, the barcodes are simply read and the associated information can be easily updated.
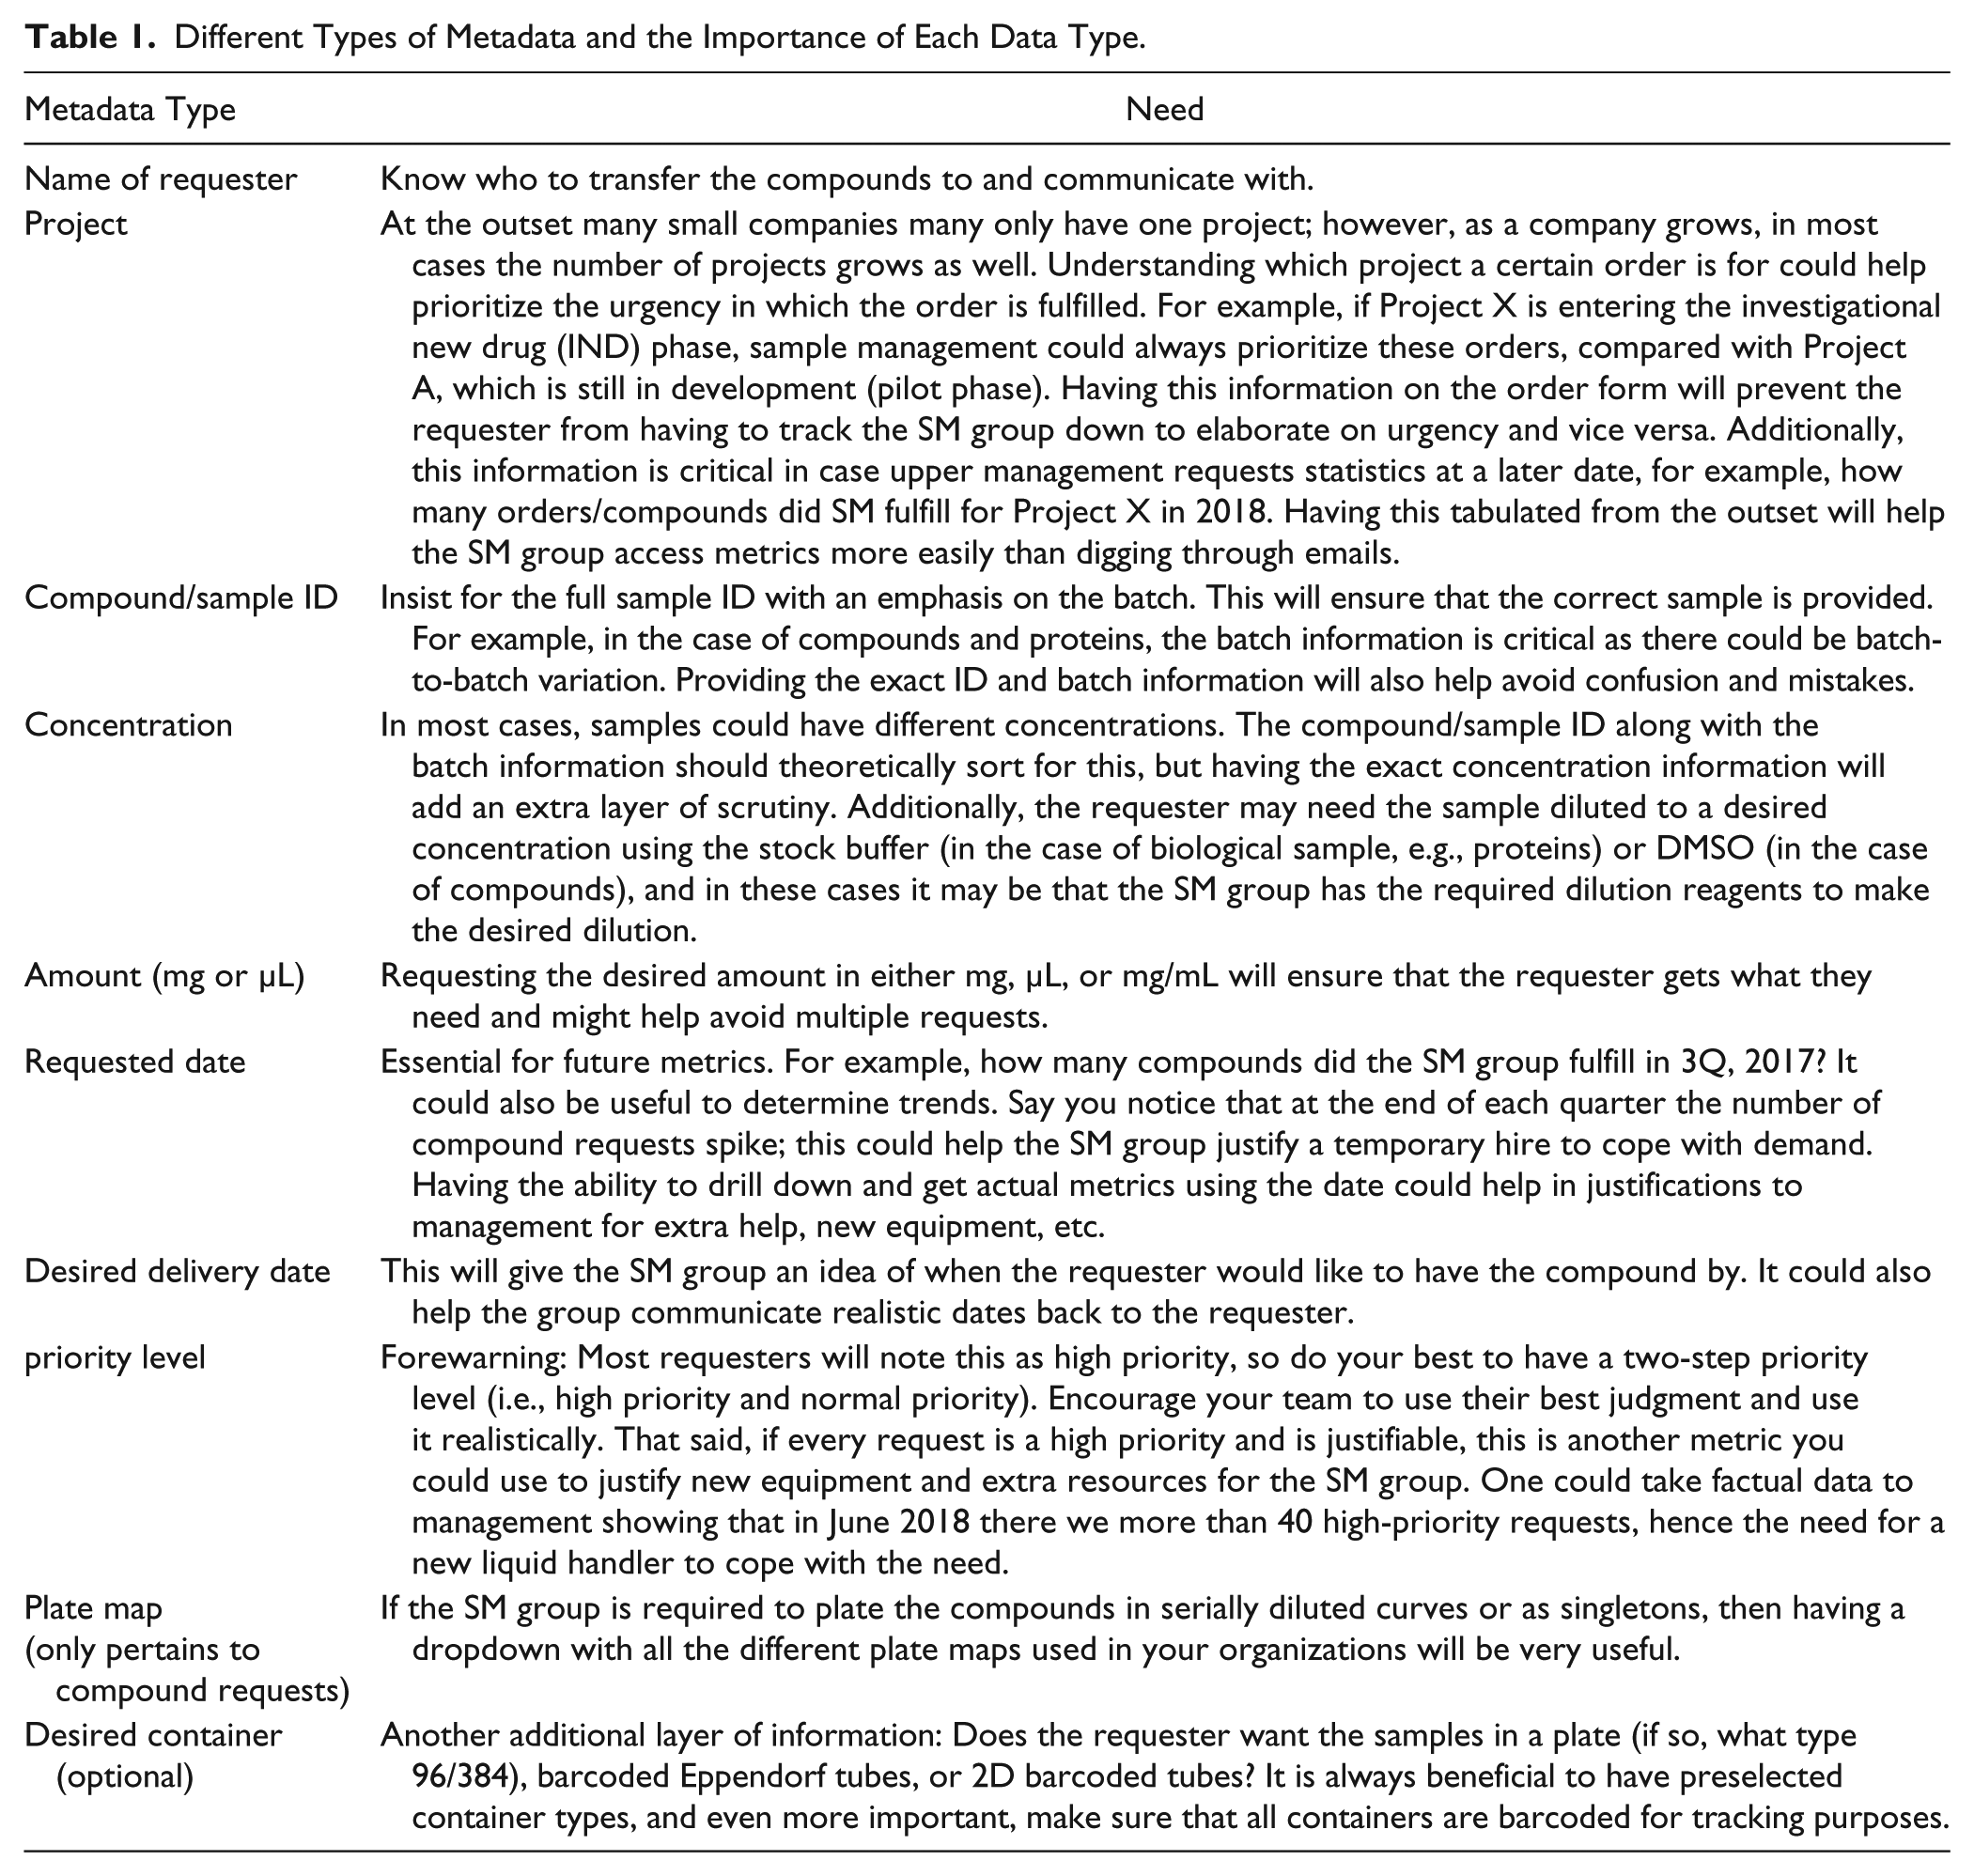
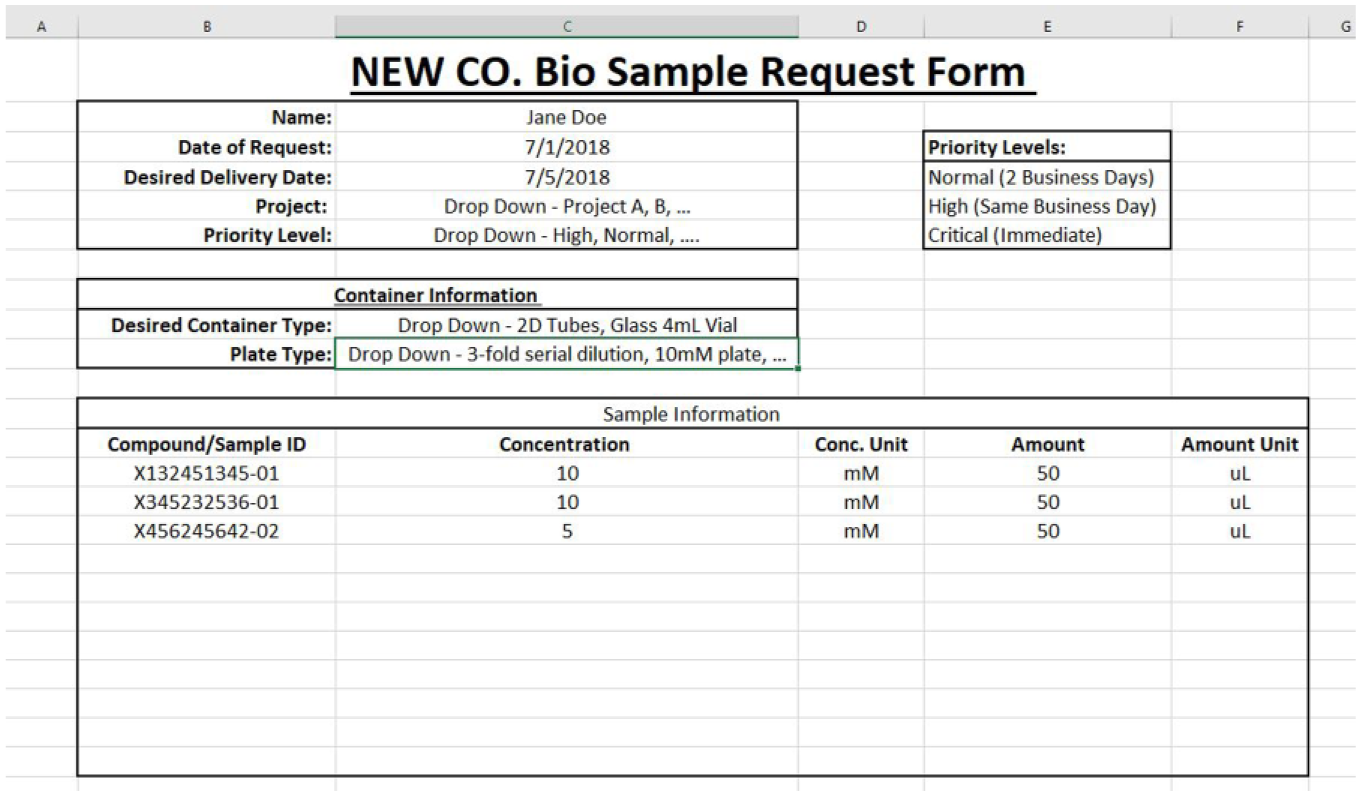
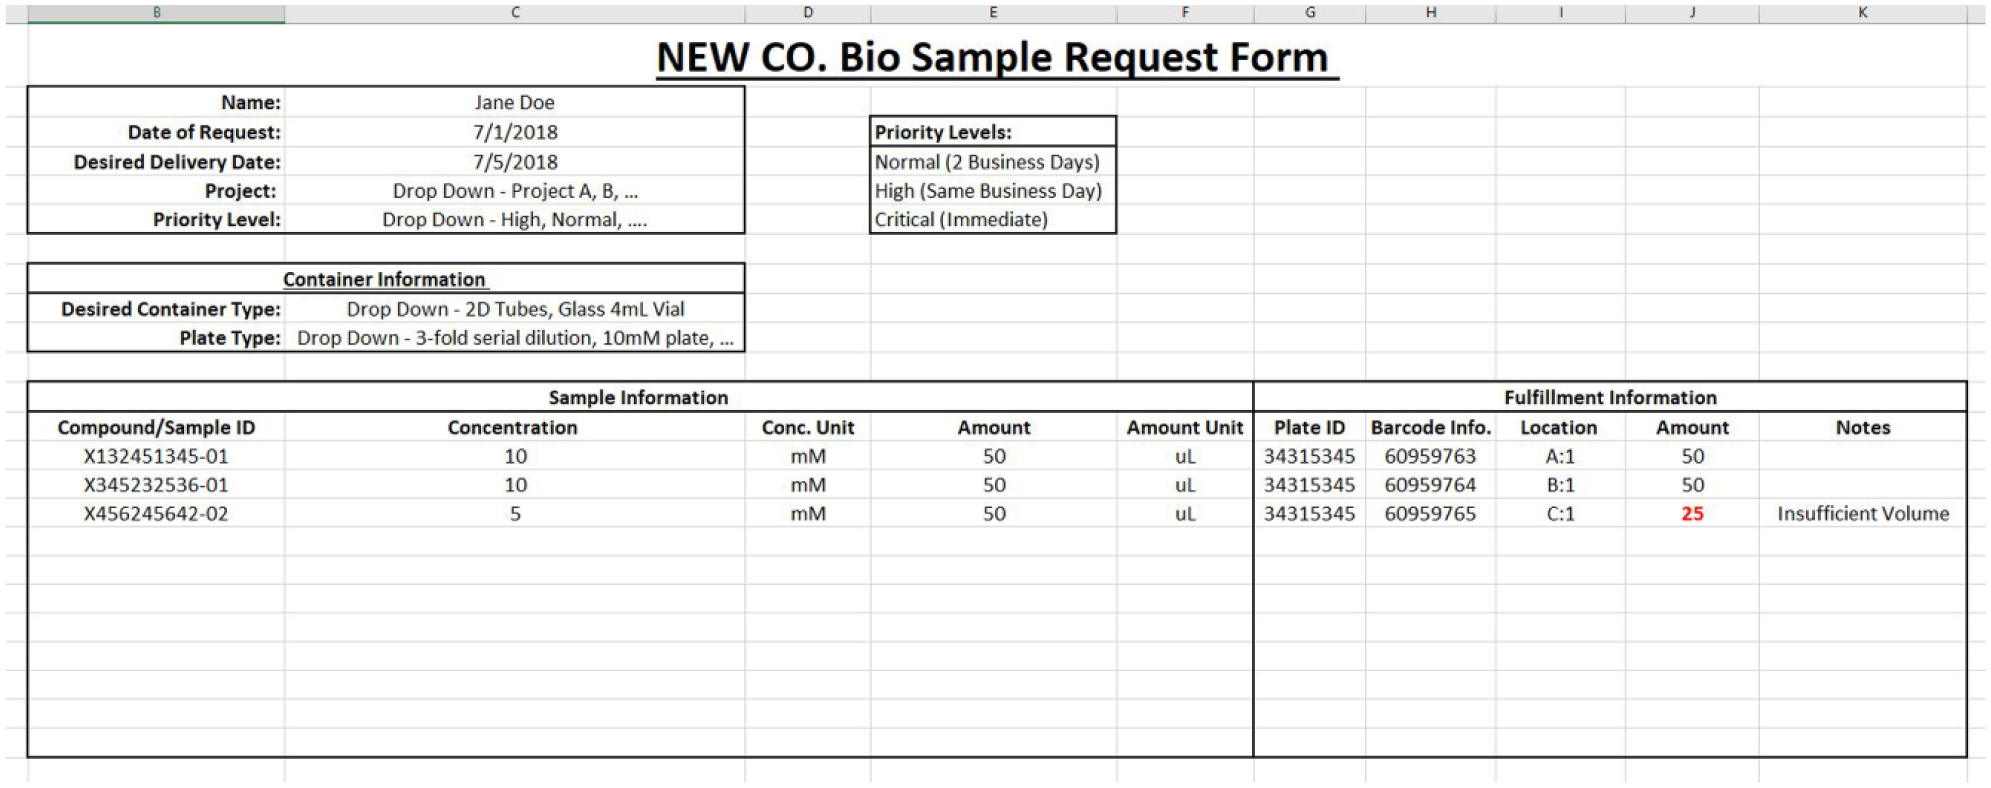
Barcode types are identified by their symbology, which determines the shape of the bars, the thickness and amount of white space between bars, and the characters that can be represented. Fortunately, the field has advanced sufficiently so that this is not a concern that most users have to deal with. Most barcode printers and readers will produce and read (respectively) labels of all types and will automatically scale labels. In fact, most sample containers can be purchased pre-barcoded to avoid this problem altogether. Another technology that has become widely used is 2D barcodes (more commonly known as a QR code), where a matrix of squares is used to represent a code. The use of 2D barcodes allows printing in a much smaller space as well as the storage of larger strings of alphanumeric information. They can also be printed on the base or cap of round vials. Examples are shown in Figure 1 .
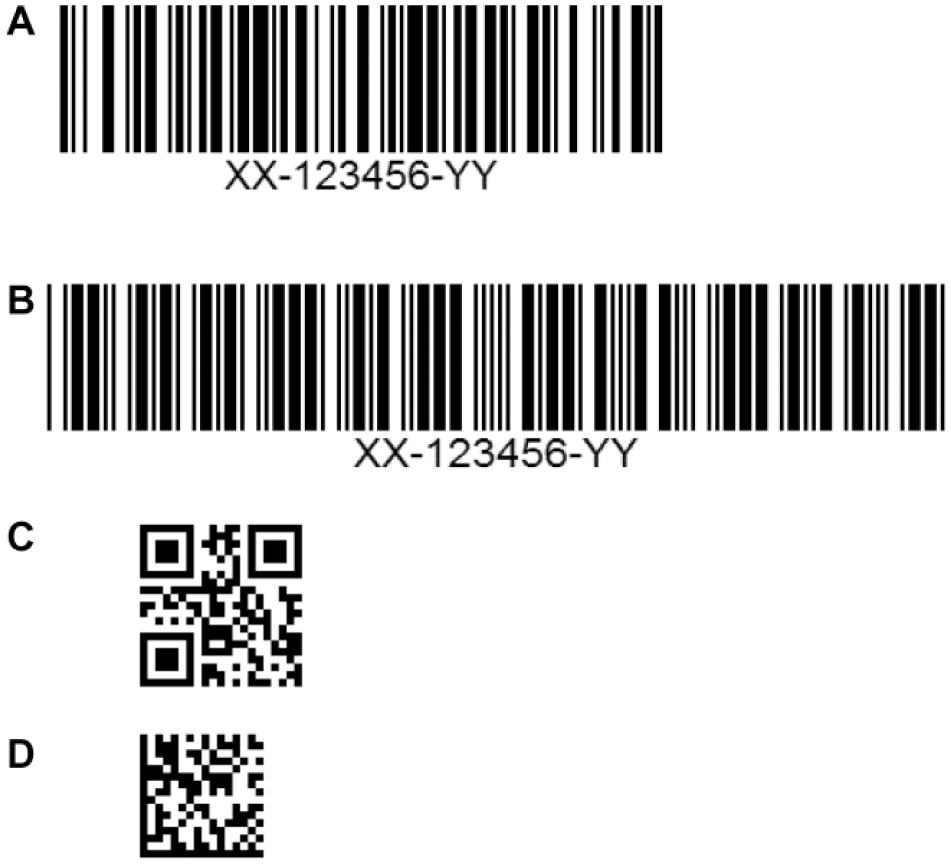
A comparison of barcode symbologies. Four symbologies are shown, each representing the alphanumeric string XX-123456-YY: (
Barcode tracking in sample management differs from the UPC symbol. UPC symbols use a universal code that is specific for each product. Every example of that specific product will have the same barcode, which represents the UPC ID number. For example, every can of a specific type of soda from a brand will have the same UPC symbol. In sample management, we want to track each individual sample, so each sample should have a unique barcode. When a specific chemical is synthesized, you will want to track not only the first and second batches that are made, but also each vial that is weighed, every tube that is solubilized, and every well in a plate where that sample is pipetted. The actual tracking of samples is accomplished by the inventory system by simply reading a source and destination barcode. It is important to note that while barcodes may simply encode the sample identifier, they do not have to be related. A sequential list of numerical barcodes can be produced and then assigned to a sample as needed. It cannot be stressed enough that when this strategy is employed, each barcode in the system must be unique. Various strategies exist for creating unique barcodes, but the simplest is to simply track the highest number produced and restrict the creation of barcodes to individuals who understand the system used for creating barcodes. When barcodes are created externally, then a range of numbers is usually assigned to the group producing the labels, plates, vials, and so forth. The relationship between the semirandom numerical barcodes and the actual sample is then recorded in a database (or spreadsheet) and the inventory program tracks the association. It is common to also have a human-readable label on containers that will allow an operator to identify the sample—most inventory systems will print labels with both a barcode and the related sample identifier.
Sample Stability and Storage Conditions
Establishing appropriate storage conditions for compounds is very important to ensure their structural integrity, a crucial part of maintaining a high-quality sample management system. A variety of storage methods have been utilized by different companies to preserve compound integrity while sustaining process flows. For solid samples, compound degradation is not usually a serious problem and they are commonly stored in neat, dry (desiccated) conditions and are stable for very long periods of time. DMSO has long been the universal solvent for compound libraries. But DMSO presents unique challenges because of its extremely hygroscopic nature and the effects of water content on its physical charactersitics.17–19 Therefore, the storage of liquid samples in this solvent has always been a concern.20,21 Room temperature storage conditions can be utilized for handling liquid inventories only for reasonably short periods. 22 However compounds are stored, methodologies must be incorporated to prevent water absorption in DMSO solutions, during both storage and processing, to preserve accurate concentrations of samples.
The quality of stored compound samples in tubes and plates is affected by many factors, including freeze–thaw cycles and decomposition due to light. Freeze–thaw cycles can reduce solubility and enhance precipitation.23–25 This is caused by uncontrolled water uptake into DMSO stocks during cooling and can lead to compound crystallization. DMSO is very hygroscopic and can rapidly absorb water up to 10% of its original volume 26 and can absorb higher percentages in humid environments. Slow cooling of plates below room temperature is conducive to crystal formation. The precipitated material is in a lower-energy (less soluble) form and is more difficult to re-dissolve than the original amorphous or noncrystalline compound in a high-energy form that dissolves fairly easily in DMSO. 24 In many cases, this explains the biologist’s general observation of freshly prepared solutions being more active than those tested after storage in DMSO.
Flash freezing a compound in DMSO causes less precipitation than slow freezing. Unfortunately, most freezers are designed to be energy-efficient and maintain a low steady temperature instead of quickly freezing a sample. It is important to note that handling practices like wrapping plates in bubble wrap before freezing slow down the cooling process and increase the probability of precipitation. Precipitation is associated with more compound loss compared with decomposition in the first 6 months of plate usage. 27 This is a big challenge with compound libraries as low-solubility libraries (with consequentially reduced compound concentration) have lower high-throughput screening hit rates. 28 In a nutshell, one has to remember that freezing is good for samples that are chemically unstable but can be detrimental when the problem is one of precipitation. Nevertheless, –20 °C storage is recommended for long-term storage of DMSO samples.
The best method of storing individual compound samples is in tubes or plates in a cold, dark, and dry atmosphere for long-term storage. However, defrosting and exposure to the atmosphere is still an area where sample integrity can be compromised. There is an ongoing debate on plate-based versus tube-based liquid compound storage, but this decision is often driven by logistics and how a laboratory is set up. It has been widely accepted that tube storage offers greater flexibility and minimal adverse effect on sample integrity for liquid DMSO stocks. Single-shot (use) and single-freeze–thaw foil-sealed mini-tubes that contain a minimal stored volume of DMSO stock solution should be used whenever possible. On the contrary, while handling samples in a plate the entire plate must be thawed and exposed to gain access to an individual sample. Although it is technically possible to pierce individual wells, it is not a common practice in compound management, and the removal of one sample from a plate typically involves exposing all samples to the operating environment. Assay miniaturization in the hit identification arena has led to the establishment of process flows involving the evaporation and reconstitution of source plates for the long-term storage of premade compound sets. It has been found that the resolubilization process does not have any adverse effect on the biological activity of compounds. 29
Sample Containers
Whatever the sample type stored, it is highly recommended that a standard set of storage containers and formats be chosen. While it may seem easy to accommodate multiple requests in the early stages of setting up an operation, supporting a wide range of formats will quickly become unsustainable. The array of possible storage containers commercially available in today’s market is truly staggering. To help in this decision, it is best to consider a few basic tenets. First, the storage containers you choose will largely be determined by the type of samples you need to store. For biobanking, cellular or tissue archiving application where biological samples must be stored at ultra-low temperature ranging from −80 °C to liquid nitrogen storage, a cryogenic compatible vial is required. Storage of neat (solid) chemical compounds is generally easiest in 4 mL glass vials. These vials can be stored at a range of temperatures, from ambient room temperature down to −80 °C. They are easy to access for weighing into and out of and are safe for most solvents when the compound needs to be solubilized directly in the vial. Long-term storage of neat samples in small plastic tubes can be problematic as it is difficult to manually remove small amounts of compound from the tube. On the other hand, plastic tubes arrayed in 96-well format are often a very good solution for the long-term storage of DMSO samples. These tubes are available pre-barcoded with 2D barcodes in the base from multiple manufacturers, and many automated systems will accommodate storage and accessing single compounds (cherry-picking) in this format. DMSO solution storage in tubes should be at −20 °C for the reasons listed above in the Sample Stability and Storage Conditions section. Storage at −80 °C can create unnecessary problems for nonbiological samples with sealing containers (plates and tubes), ice buildup, condensation on or in the container, and dramatically increased thaw times.
DMSO solutions are also commonly stored in microplates, though only polypropylene plates should be used for long-term storage. Microplate storage has both advantages and disadvantages. On the positive side, it is very easy to replicate samples already stored in plates, but this can be problematic as it will increase water 30 uptake in the DMSO solution, as the entire plate is unsealed even if only one compound from the plate is desired. The impact of water uptake by DMSO is a serious consideration. DMSO can absorb water readily from air and will reach a quite high percentage in humid environments. This can impact shipping considerations when high amounts of water have been absorbed as the freezing point of DMSO can be suppressed to as low as −70 °C with a 30% water content in DMSO. 17
Plate Formats
In screening applications, the compound management team will need to align storage formats with screening and data handling applications. There may be multiple types of screens that will need to be supported: primary screens (single-concentration assays), dose–response screening, combination studies, pooled compounds, and so forth. Each of these could require different plate densities, which range from 24 wells/plate to 1536 wells/plate. The most common densities for smaller organizations are 96-well and 384-well microtiter plates. Here again, standardization will make long-term support much easier. Generally, when planning plate formats, the control well locations should be kept constant across the different screen types (primary vs dose–response). For example, fixed columns are generally left open for control wells. One common format for 384-well plates is to use columns 1, 2, 23, and 24 for controls, while columns 3–22 are used for test compounds ( Fig. 2 ). Typically, a 10-point dose–response curve covers a sufficient concentration range for small molecules when a threefold or fourfold serial dilution scheme is used. Certain assays may require more dose–response points, particularly when paired with a twofold or lower serial dilution scheme. In these cases, the use of the entire row for a 20-point or greater serial dilution curve may be necessary. A key thing to remember is that formats tend to be very long-lived. Whatever format you choose at the outset will probably still be there in 5–10 years because it will be coded into your data system, and once master plates are created, they are replicated repeatedly.

An example of a standard plate layout. Because of the physical requirements of most liquid handling robots, a series of blank columns tend to be used for control compounds and test compounds can be arrayed in the other columns of the plate. This example uses blank columns at the ends of the plate, but controls can be placed in other formats.
Sample Security
Sample security may be of paramount importance, particularly in human biorepositories where the specimen as well as patient information must be protected from unapproved access.16,31,32 Security may be as simple as restricted room access or complex, as with role-based access that is tracked by researcher and time stamp. This is an area where storage automation can provide additional benefit by virtue of its physically closed-system architecture.
Sample Ordering
A comprehensive sample requesting/ordering system is by far one of the most critical infrastructure needs of a sample management group. Getting the correct sample to the right group or individual in a timely manner could make the difference in having that key piece of data in time to make a significant impact. However, a robust sample ordering system is one that many small companies and academic groups overlook.
In most cases, this task is relegated to an email where the requester pastes a list of samples, be they biological samples or a list of compounds, into an email that they send to the sample management team. Initially this may seem an easy and straightforward way to request samples, but as a company grows it becomes more cumbersome, especially if the need arises to retrieve a particular request to check accuracy or verify the requester. This section will outline a more robust and cost-effective model for start-ups and will explore how a company could scale such a system in the years to come.
From the requester’s point of view, sample management is simple. A scientist’s main goal is to get the sample they need as soon as they can with the least amount of effort. This can become particularly problematic in smaller companies that may have added a formal sample management group after email systems had become entrenched in the company culture. Changing that culture and helping requesters understand the reasons behind using a formal system is critical. One should also keep in mind that change management is never simple and plan accordingly. A simple system that tracks the most basic sets of information may be the best way forward in these cases, especially if it can be expanded to add more functionality as the collection and needs grow. In most instances, a sample management group should gather the data listed in Table 1 for a request.
Different Types of Metadata and the Importance of Each Data Type.
Excel and email can be used for the initial development of this system. It is recommended that you do not use personal emails to receive requests and communicate with the requester. Work with your IT group to create a new email address for SM requests (e.g.,
Figure 3 represents a very basic Excel-based request form. As advised earlier, keep the form simple to promote adoption by your team and always promote the benefits of using such a system.
A very basic Excel-based request form.
Once the order is fulfilled, the same Excel form should be used to provide the requester additional information ( Fig. 4 ). Some of the information could potentially include:
Vial or plate ID: Vial or plate type (i.e., if a 96- or 384-well plate is used). If the sample is in a box, the box itself could have a barcode (recommended).
Barcode information of the container (2D barcoded tube, barcoded Eppendorf tube, or any other barcoded vial).
Location within the plate or box.
Amount provided: There may be instances when the requested amount is not available, and hence a different amount maybe provided.
Other information could include molecular weight, salt form, structure, and sequence.
Excel form representing the fulfilled order information.
Tracking and Saving Requests
While gathering all this information is important, it is also important to make sure that the information is archived and easily accessible. This can be achieved by using folder structures within the both the SM email folder and a network folder.
Within the SM email have three folders:
Inbox: To receive all new requests.
In progress: Place all emails that are being processed in this folder.
Completed: Place all emails where the order has been fulfilled in this folder.
Have the same folder structure in the network folder location:
New requests: For all new requests, where the Excel request form is made.
In progress: All Excel forms that are being processed. If Excel is used as a scrap sheet in any way, open a new tab within the file and save all this information. There may be a need to revisit this information at a later date, so it is recommended that all information be stored together. For example, if 10 µL of liquid is transferred from Source Vial 244155 to the new Destination Vial 243455, then this should be saved on the new Excel tab.
Completed: Once completed, move the Excel file into this folder and always date the file.
Note: Windows has a very good search function, and if it becomes necessary to search for a particular vial or compound ID, you could simply go to the completed folder in the network location and enter the vial ID (243455) and it will bring up all files within the subfolder that match the value entered.
Adjusting to Scale
In this global economy, where collaborations and outsourcing are an integral part of both large and small company infrastructure, scaling is critical to keep track of samples that could be dispersed between multiple sites across the entire globe. Hence, forethought is necessary for scaling purposes.
At the onset, an Excel file-based inventory and request system stored on the cloud could suffice. However, the long-term goal should be to replace this with more fit-for-purpose software solutions. This need has been addressed by multiple vendors capable of providing end-to-end support, from managing your sample management inventory to providing a platform to request compounds. Other sections in this paper highlight the different software solutions available in the market to manage inventory, and those same solutions can tackle requesting compounds.
The complexity of these solutions varies greatly, and the best fit should be determined by your individual needs. It is recommended that the SM group have individual customer requirement sessions with each group in the company to determine the needs and then seek out vendors based on those needs.
In summary, having a robust sample request system is critical to the day-to-day operation of companies of all sizes. Getting the correct compound to the correct person as fast and error-free as possible is the main objective, so it is always recommended to have a formal process and initiate it as early as possible. Starting with the basics where a combination of email and Excel is used at the outset with the ultimate goal of upgrading to a best-in-breed platform to cope with scale is by far the best way forward.
Logistics
Logistics play a key role in sample management, especially in this global economy where new start-ups often rely heavily on external contract research organizations (CROs) for countless R&D activities. Many start-ups and established companies cope with fast-tracked timelines by employing CROs with state-of-the-art facilities and subject matter experts rather than building up this infrastructure internally. Services can be sought out immediately via CROs, to a point where a new start-up could potentially receive chemical or biological samples within weeks of starting operations. In these cases, it is imperative to have logistical requirements and proper permitting in place from day 1, especially if your intentions are to ship materials domestically and internationally.
This section aims to cover a short-term logistical support plan for start-up companies. It will also provide detail on the challenges of managing logistics on a global scale. There is no simple formula for how start-ups can address their logistical needs from day 1, given that each company has unique requirements. However, there are many universal activities that can make the transition from internally sponsored activities to a CRO environment smooth and effective.
Since many of the topics in the section will cover the logistics of shipping and receiving samples, lets us first define what we mean when we say “sample.” In this context, we will group samples into two categories, chemical and biological. Chemical samples will loosely refer to active pharmaceutical ingredients (APIs) (heterocyclic hydrocarbons) or intermediate compounds in solid or liquid form. Biological samples will loosely cover plasma, protein, or any human biological samples (HBS) material.
Logistics Staffing
We all know staffing is important. If you plan to move samples in and out of your facility, hiring an individual or a group with experience in shipping and receiving should be a high priority. With so many life science firms working on the same targets and molecules, one unnecessary shipment delay or, even worse, chronic shipping delays can really hurt a company’s chance of getting ahead. The importance of shipping and receiving should not be underestimated!
A staff knowledgeable in classifying sample shipments for couriers, as well as ensuring they are packaged correctly, is fundamental and will decrease the chances of shipping delays. Shipping delays of test samples, as we all know, subsequently lead to testing delays and, oftentimes, loss of materials. In addition to having experience, an effective shipping and receiving staff will be well versed in, and at a bare minimum certified in, U.S. Department of Transportation (DOT) and International Air Transportation Association (IATA) training. Much of this training focuses on how to properly classify materials on shipping documents and packaging requirements. Errors in shipping documentation and packaging can lead to major time delays and expensive fines.
An alternative option for establishing strong in-house shipping and receiving is insourcing. Third-party vendors can provide shipping and receiving support, along with many on-site services, such as product procurement, inventory management, and laboratory support. These types of firms have the ability to make an immediate impact on your company. Third-party staff are all DOT and IATA certified and generally have plenty of on-the-job experience. Insourcing can be costly, but when weighed against the task of establishing a logistics group from scratch, oftentimes it is worth it.
Establishing Couriers
Selecting courier services that fit your needs is imperative. Some of the larger carriers, such as UPS, FedEx, and DHL, are a great option for transporting ambient temperature samples, both domestically and internationally. These companies are cost-effective, and at the same time, they have in-house customs brokers experienced in the import/export field.
The transport of temperature-sensitive samples can often be a little trickier, especially if your company has CROs or third-party collaborations outside of the country. Specialized biosciences couriers are capable of handling biological samples and ensuring that they arrive at their destination intact. They monitor the internal temperatures of packages and replenish materials (dry ice, cold packs, etc.) as needed. These couriers are not the most cost-effective, but when the time and resources it takes to produce samples are factored in, the benefit of using a specialized courier can often be justified. If you think for a minute, when you are shipping precious HBS from the United States to Asia, the transit time (including customs clearance) can take 7 business days or more. If the temperature inside the package is not maintained, your samples are ruined.
One aspect of shipping that cannot be overlooked is the importance of customs brokerage. Countries have different laws and regulations for transferring product over their borders and the regulations are continually evolving. To save time and potentially the integrity of your samples, choose a courier with a proven customs broker. The larger couriers have in-house brokers, while some of the smaller specialized companies use third parties. Just like other industries, some of the smaller companies are understaffed and overpromised, while some of the larger companies are just too big to provide a high level of specialized service. Speaking to colleagues with industry experience may help you fine-tune exactly what you need in a courier.
Permits and Licensing
Securing the proper permitting for your logistical operations can often take several months! Ensure that your permit applications for exporting materials are submitted as soon as possible. When sending biological samples internationally, you will need a permit from each jurisdiction you export materials. As was mentioned earlier, these permits often take significant amounts of time to set up, so it is best to plan ahead and finish this task prior to attempting to ship anything.
Maintaining Your System
Once the sample management system has been established and brought online, the maintenance of that system evolves into troubleshooting and streamlining the day-to-day operations. First, regular quality control and preventative maintenance of the equipment, such as balances and liquid handlers, is necessary to ensure continuing sample accuracy. For example, if the balance for compound weighing is not accurate, then the concentration will be not be accurate, potentially altering the entire compound dilution scheme, and subsequently the potency of the compound. The same thing applies to any instruments that are involved in the sample handling.
Next, once protocols and methods are written for existing processes, it is important to revisit them periodically and understand whether industry standards are still being met and whether new technologies exist that may better serve the end users and assay needs. For instance, more efficient automation and new data may show that a current solid sample storage environment is not ideal and existing storage conditions may need to be revisited.
Documentation of all protocols along with any amendments will supplement the maintenance of the system. Documentation not only aids in training new users but also captures the standardization of processes and, more importantly, allows for transparency to recipients.
Creating redundancy is another important aspect of system maintenance. This redundancy will help mitigate any downtime in daily operations. For instance, if one relies on a liquid handler for daily operations, it will be crucial to have an alternate means of liquid handling in the event that there is a failure. The alternative could either be a duplicate liquid handler or simply another means of performing the same function (e.g., manual pipetting). Additionally, no matter the size of the system, it will prove beneficial to assign primary users of the various instruments as point people, or super-users. These super-users will be able to triage any issues on their assigned instruments or database and determine whether it is necessary to place service calls. This not only saves money on unnecessary service calls but also saves time on troubleshooting some of the more basic errors, minimizing downtime and potentially preventing larger issues from arising.
Sample life management is another facet of maintaining your system. There should be business rules for end of life, retention times, underutilized samples, and samples that are not or are no longer fit for purpose. Along with sample life cycle considerations, the cost of acquiring new samples and maintaining them should be calculated.
Upgrading to a New System
One common theme throughout this paper has been the need to plan for the future and build a process that can grow as your needs expand. Upgrading the system as demands change is challenging, regardless of size and capacity. In this section, we discuss three different key points to successfully execute an upgrade: conceptualizing a plan, decommissioning the old system, and commissioning the new system.
Conceptualizing a Plan for the Upgrade
Some key questions to be considered up front are as follows:
What size is the sample collection that will be processed and/or stored on the system? Do you need more than one system? Will the old system be integrated with the new system? Is the location of the system in the same laboratory?
What capabilities and functionalities should the new system have (i.e., faster processing time, more storage capacity, duplicate instrumentation, etc.)?
Software versus hardware
Software: What will the software interface with: internal software, third-party software, vendor software? What company databases and information can the vendor access to be able to streamline all processes? Will the software work with your operating system at the time of installation, and in the future? Hardware: What instrumentation does the laboratory envision with the system (i.e., a centrifuge, a liquid handling station, de-sealers, sealers) and how many? What types of hardware will work with your current containers? What containers may you look to for the future in order to stay compatible?
Who will this upgrade impact? Changing a system, no matter how big or small, will be an inconvenience at some point. As part of the planning process, identify the individuals or groups who will be affected by these changes and make sure everyone understands the purpose behind why the upgrade is necessary. The more communication that is made ahead of time, the easier it will be when implementing the changes.
Once a plan has been decided, the laboratory will write up a request for proposal (RFP) to hand off to a vendor of their choice. After a vendor has been chosen, the laboratory should assign a specific person to serve as the point of contact. They will be the primary person who communicates with the vendor and should be included in all communication to that vendor. If the project is big and has multiple people involved, a neutral location such as a Google Drive or SharePoint site is necessary to stay on top of deadlines and communications for all parties. Breakout sessions can also contribute to a successful relationship among the laboratory and vendor. The next documentation will be a functional design specification (FDS) that the vendor will propose to the laboratory. A very important piece of advice to the laboratory getting the upgrade: be sure to add every detail you expect to see in this document.
Between the stages of conceptualizing the plan and decommissioning the old system, keeping others apprised of the timeline is of utmost importance. Regardless of the size and impact the system upgrade will have, there will be a period of downtime between the old system coming down and the new system coming up. At the same time, the business needs to keep running effectively, so it is essential to minimize that downtime to limit the disruption to productivity.
In most circumstances, shutting sample management down for 1 or 2 days for an upgrade will not grossly impact the flow of business. However, larger projects may require at least 1 week to set up, so contingency plans need to be made. Larger companies may be able to offset some of this burden by relying on other sites where materials are held. For smaller companies or larger companies where all samples are in one location, it is recommended to track trends in request cycles throughout the annual period and schedule upgrades during the less busy times. This may afford you more time should any unexpected issues arise during the upgrade.
Decommissioning the Old System
Depending on the size of the old system, decommissioning will require some help from your peers. For smaller systems, this may require a few extra colleagues to decontaminate the equipment and contact the proper folks to dispose of the equipment. For larger systems, this may require a larger group, that is, environmental, health, and safety for waste disposal; the IT department for PC disposal; facilities for any construction management; and possibly some contingent staff.
Some other questions to consider: If the system stored samples, will the laboratory be keeping those samples? How will the samples be removed and where will they be stored until the new system is up and running? If the system was used for processing only, are the methods backed up and can they be exported/imported to the new system easily?
Commissioning the New System
As time gets closer for the new system to be installed, the laboratory will write up user acceptance tests (UATs) and send them off to the vendor to view. The factory acceptance test (FAT) is where the UATs will be run, with both the laboratory and vendor present. One recommendation for a UAT is to run a “pressure test.” This is a test to see how much the system can handle and will confirm the cycle times that may have been presented during the planning process. Expect to spend some time on the FAT; this could mean 2 days or 1 week, but schedule enough time to get through many, if not all, UATs.
Depending on the results of the FAT, there could be some time in between the FAT and the site acceptance test (SAT). This is so the vendor can make changes and/or fixes to the system. The SAT will then be performed when the new system has arrived on site. UATs will be run again, and by this time there may be new UATs or modifications to the original UATs. After the SAT is completed, the new system will be ready to go live. A word of advice, if time permits, is to run the system and get comfortable with how it works for a week or two before communicating to everyone that it is readily available.
Disaster Planning and Mitigation
As the sample library grows and a company expands its pipeline, it is important to plan a disaster recovery and mitigation process,33,34 which will restore the ability of critical applications and protect the library in the short and long term. Three key elements to look at can allow for a successful disaster recovery plan. Those areas are redundancy, alarm/notification systems, and backups, which lead to effective business continuity.
Short-term sample protection involves choosing a storage solution that can be monitored and environmentally controlled within the facility. The size of the sample library and what kind of containers they are already stored in may depend on if the laboratory needs multiple units or a room, for example, a cold room. The business rules of the laboratory will decide what type of storage the samples should be held at, for example, cryogenic, vapor phase LN2, –80 °C freezers, –20 °C freezers, +4 °C refrigerators, and room temperature, and what kind of power versus backup power is needed. If there is one not in place already, a fire suppression system should be considered when choosing a storage solution (clean-agent fire system vs a wet pipe system). Once the monitoring systems are put into place within the storage unit(s), this will allow users to regulate and hopefully safeguard against any kind of extreme conditions, such as a freezer failure or environmental deficiency (air handler failure leading to high humidity). Aside from the physical location(s) of the samples, database backups are a fundamental part of a disaster recovery plan. Although your company will have cyber security measures in place, it never hurts to back up your databases from time to time in the event a server goes down.
When thinking about the long-term protection of your samples, a mitigation plan should be enforced in the event of disaster. Disasters can range from local freezer failures and burst pipes to an unfortunate geographical event like a hurricane. The key to a seamless and rapid recovery in these situations is redundancy. The most important redundancy will be the creation of a disaster recovery set (DRS) of the entire sample library. Creation of the set not only adds value to the collection but also shows good sample stewardship. The quantity and type of sample in the DRS should include enough volume/weight for short-term usage until the replacement sample can be generated or synthesized. For example, in the case of chemical compound samples, the business decision might be made to store enough quantity of either solid or solution to perform assays on ten 96-well plates. However, in the instance of a peptide or protein library DRS, one might choose to store a larger quantity of high-value, project-specific proteins and a lesser amount of all the other proteins in the library. In the event a sample cannot be regenerated (last of its kind), that sample should be included in the DRS. Storage location of the DRS is a crucial component for a company’s restoration in the event of a disaster. For example, storing the DRS in a separate freezer within the same space of the actual library will only mitigate any local disasters such as a freezer failure. Ideally, the DRS should be stored at an off-site facility in order to surpass the site-wide outages. When considering an off-site facility for storing samples, the company will want to make sure that the off-site facility mimics the temperature and environmental controls that its laboratory has as well as ensure that any information the site has on the samples is on a secured network and is periodically backed up. A statement of work should be put in place clearly outlining all of the details surrounding the company’s requirements.
After a disaster recovery site is chosen and a plan is in place, a recommendation is to choose a business representative for testing each process. Think of it as a drill: assume that there was a complete power outage and try to recover your sample set and the data attached to it. What information must be preserved? Are there samples that are more important than others? How quickly can we recover from an outage? Whose support do we need, for example, IT or maintenance? Something else that should be done, whether this is quarterly, biannually, or annually, is an audit of the DRS location(s).
Conclusions
The authors of this white paper were asked to create the document they wished they had had before setting up their first sample management laboratory. We hope that the information captured here is helpful to others that are making their first foray into this exciting and ever-changing field. The best piece of advice we can give anyone who is setting up a sample management system is to involve someone who is experienced in the field. It will save you time and money in the long run.
Footnotes
Declaration of Conflicting Interests
The authors declared no potential conflicts of interest with respect to the research, authorship, and/or publication of this article.
Funding
The authors received no financial support for the research, authorship, and/or publication of this article.