
Abstract
Replacing a hopeless molar with a dental implant is one of the most common treatment modalities in implant dentistry. However, immediate implant post-extraction in the posterior region requires managing the bone gap and ensuring primary closure of the socket. To address this anatomical consideration, several authors have proposed using a custom abutment to seal the socket after immediate implant placement, maintain soft tissue contour, and stabilize the surrounding tissues. For example, the “Sealing Socket Abutment” (SSA) enhances the anatomical emergence profile, which facilitates the biological, prosthetic, and aesthetic integration of the future supra-implant prosthesis. A 32-year-old female patient in good general health consulted the Outpatient and Implantology Department of the dental clinic in Monastir, Tunisia, for the extraction of the root tip of the left first mandibular molar (tooth number 36) and subsequent implant rehabilitation. The patient’s medical history was unremarkable, with no known allergies, or chronic conditions. Follow-up appointments were scheduled to monitor the healing process and ensure successful integration of the implant. The aim of this paper is to present, through this clinical case report, the SSA abutment fabrication protocol using the direct technique and to discuss the advantages and limitations of this technique.
Introduction
The loss of a first or second molar is often the first experience of a patient undergoing implant therapy. This is an important reason to introduce new approaches to optimize results and decrease the overall treatment time.
The posterior region poses significant challenges when an immediate approach is planned. In fact, the extraction site is difficult to isolate without pedicle flaps, the alveolar anatomy does not lend itself to standard healing abutments, and high occlusal forces usually limit immediate aesthetics.
The “Sealing Socket Abutment” (SSA) introduced by Finelle et al. in 2017 uses a custom abutment fabricated after tooth extraction to seal the surgical area and protect the bone graft material from exposure in the oral cavity. It is intended to solve many problems inherent in immediate implantation in the posterior region. 1 This paper aims to optimize the immediate placement of the implant in the posterior region and to simplify the closure of the extraction site after filling.
Case presentation
A 32-year-old female patient in good general health consulted the Outpatient and Implantology Department of the dental clinic in Monastir/Tunisie for root tip extraction of the left first mandibular molar “36” and future implant rehabilitation.
The clinical exam showed an intact buccal bone wall, the presence of more than 2 mm of keratinized gingiva, a healthy periodontium, and adequate plaque control (Figure 1).

Intraoral view of the first left mandibular molar “36.”
A CBCT was performed to complete the pre-implant exam. It showed a sufficient bone ridge height and thickness at the molar site and the absence of periapical lesion regarding the 36 with a wide inter-radicular septum (Figure 2).
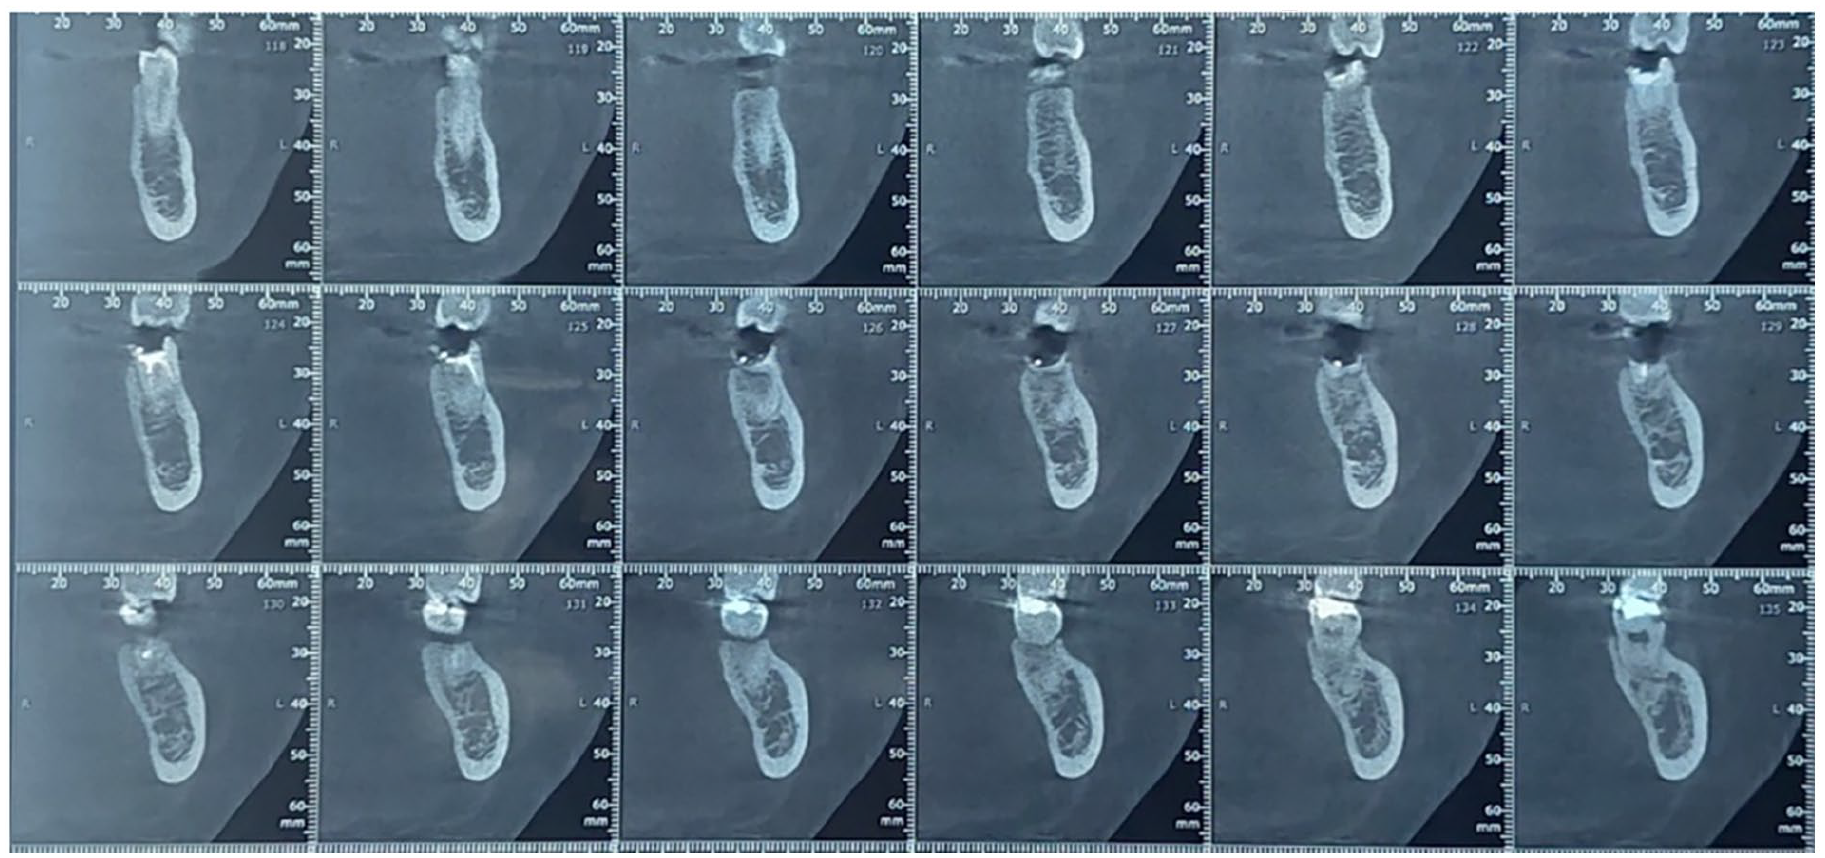
Oblique coronal section showing bone volume and implant type, position, and dimensions.
Surgical protocol
After local anesthesia with mepivacaine 2% containing a vasoconstrictor 1:100,000 (medicine 2%, Médis, Tunisia), an atraumatic extraction of the tooth was performed: the two roots were separated and then dislocated one by one using a periotome to preserve the socket walls as much as possible (Figure 3).

Atraumatic extraction of the 36.
The post-extraction socket was then carefully inspected to ensure the integrity of the alveolar walls and then alveolar revision was performed with an alveolar curette.
Once the avulsion was completed, a 1.5–2 mm diameter round bur was introduced into the alveolus at the level of the septum, and then the implantation site was marked by cutting the cortical bone over 2–3 mm at 800 rpm under irrigation.
Then, using a 2 mm diameter pilot drill, the axis of the implant was determined by drilling over a height of 3–4 mm at 800 rpm under irrigation, then the parallelism guide was inserted to check the correct orientation of the implant (Figure 4).

Placement of the implant direction indicator.
The implant site was then prepared by passing successive drills with increasing diameters to the depth of the final preparation until the final drill was reached whose diameter corresponds to that of the implant.
The implant (Biotech/Kontact®/ø4.2/L:10 mm) was then placed with a rotation speed of 50 rpm and an insertion torque of 35 Ncm (Figure 5)
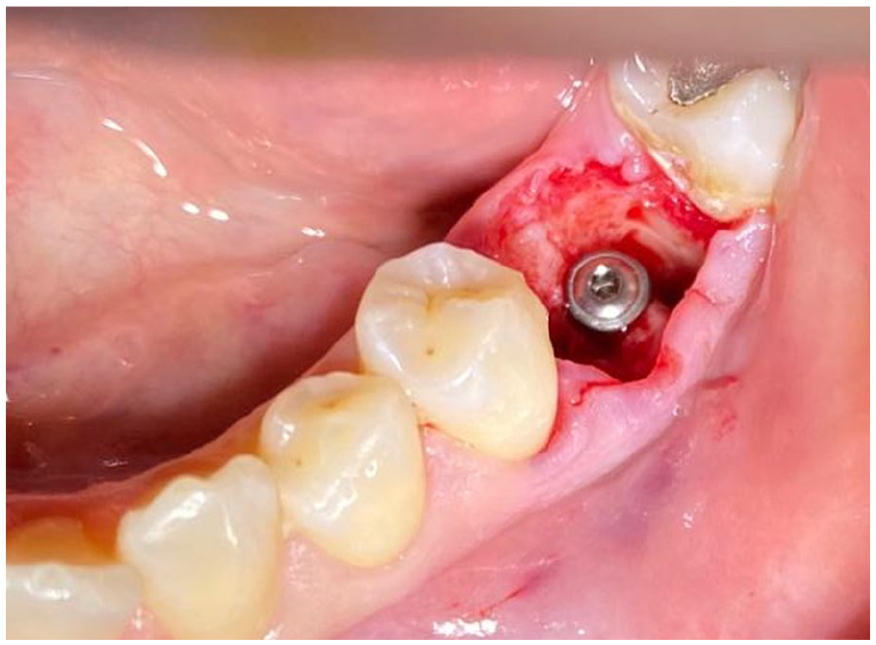
Placement of the implant (Biotech/Kontact®/ø4.2/L:10 mm).
Immediately after implantation, a temporary screw-retained healing abutment was selected. These temporary abutments were made of titanium or polyether-ether-ketone (PEEK) and had the advantage of being micro-textured (Figure 6).

Temporary abutment placement.
The surface of the anatomical healing abutment was prepared: etching then light-curing of the adhesive resin, and then connected to the implant within the socket.
Except for the first few millimeters around the implant platform, this particular surface condition allowed a better retention of the flowable composite resin which was applied and adapted to the keratinized gum to register the morphology of the post-extraction socket (Figure 7).

Modeling fluid resin around the temporary abutment.
After light-curing, the abutment was removed, the flowable composite resin was polished and the edges were rounded (Figure 8).
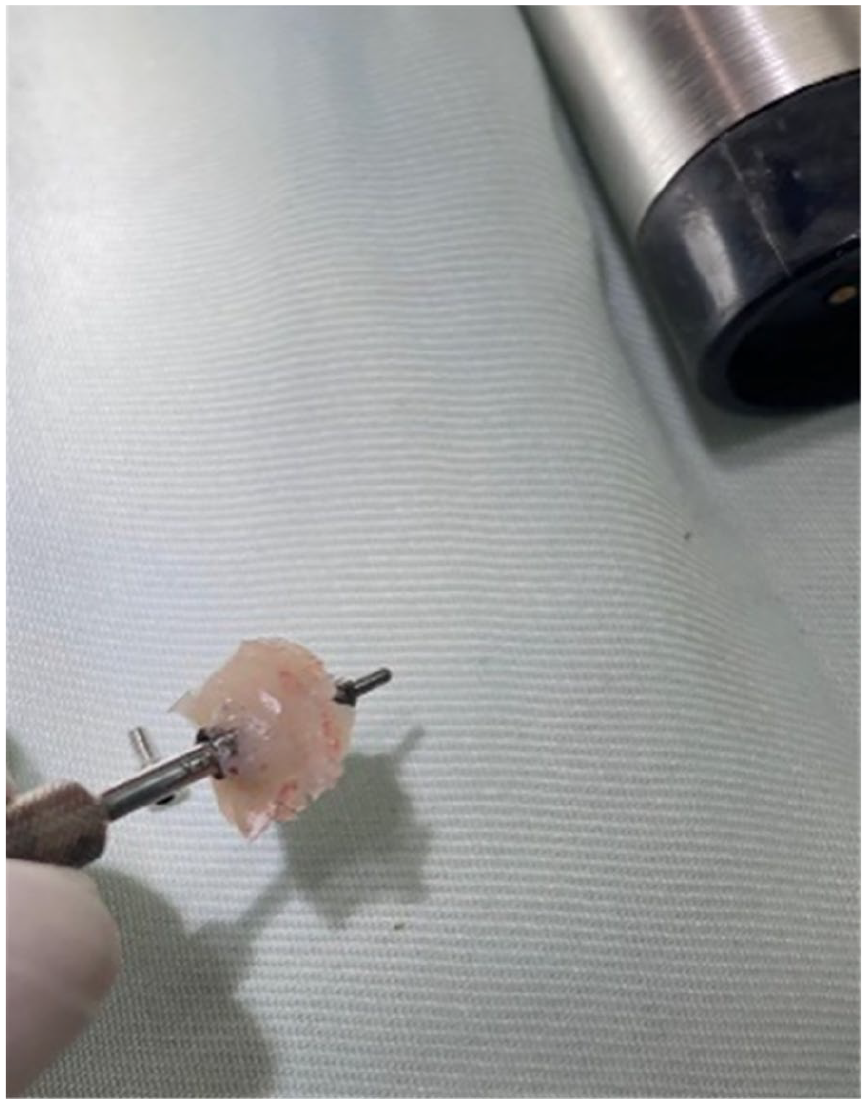
Flowable composite polishing.
Before the final placement of the abutment, the implant cover screw was provisionally placed and bone filling of the socket was performed. In fact, it has been shown that in the case of immediate implantation and in the presence of a space between the alveolar bone and the implant greater than 2 mm, it was necessary to use bone-filling techniques with xenograft particles (Figure 9).

Bone filling of the socket.
After finishing, the abutment was screwed on according to the manufacturer’s recommendations (Figures 10 and 11)

SSA end result.

Fixation of custom healing abutment to implant fixture.
A periapical X-ray was taken on the day of the definitive prosthesis cementation, after 4 months of successful osseointegration, showing good bone healing and integration (Figure 12).

Periapical X-rays after 4 months of follow-up.
Discussion
The “SSA” is derived from the principle of “sealing” the post-extraction implant site. In this case, protection, containment, and preservation of bone biomaterial during the 4–6 month healing period are key factors in maintaining tissue volume. By analogy with the aesthetic sector, this protocol was developed to solve the intrinsic difficulties of immediate posterior implantology by creating a logical and rapid approach to the fabrication of customized healing abutments. 2
Finelle et al. describe the use of individually fabricated healing abutments to seal alveoli following tooth extraction. They are introduced to protect the bone graft material and prevent the material from coming into contact with the oral cavity. This approach achieved 100% implant survival within 2 years with stable soft tissue contours. 3
To achieve these objectives, anatomical healing abutments can be customized by the application of materials or reworked from prefabricated elements. Fully individualized ceramic abutments are obtained only via computer-aided design and manufacture (CAD/CAM), requiring either optical registration of the implant platform with an intraoral scanner, or conventional registration with an intraoral transfer key. Both procedures lead to a real or virtual master model, with the resulting anatomical closure screw adapted to the patient’s alveolus. 4
The healing abutments guide gingival healing and prepare circular emergence profiles. Each implant system offers a range of healing abutments of different heights and diameters, from 3.5 mm to 6 mm. Therefore, the diameter of the healing abutments (including the widest) cannot achieve a perfect primary seal of the extraction site, leading to partial exposure and a risk of filling material escape.
In addition, customized healing abutments for immediate molar placement are essential for many reasons. First, as this protocol allows flapless extraction without bone removal, the underlying anatomy of the socket does not allow the placement of a healing abutment. Second, placement of healing abutments after immediate molar implant placement requires flap elevation to close the abutment and preserve the particulate grafting. 5 Third, the position of the molars is often associated with a mismatch in the emergence shape of the healing abutment, requiring the laboratory to predict (or practitioner sculpting) the gingival emergence contour. It can therefore be difficult to fit a final custom abutment without modeling the gingival tissue, resulting in a poorly designed final abutment. 6
No matter which technique is used, direct or CAD/CAM, the SSA abutment ensures non-invasive closure of the alveolar site, conditions soft tissue positioning during the early stages of healing, and establishes a suitable emergence profile. Both techniques are reliable and reproducible, reduce contamination of bone graft, reduce infection exposures to microbiota in the oral cavity, provide adequate support for gingival tissue, and consequently reduce bone loss. 7
However, injecting flowable composite resins across surgical wounds can contaminate bone graft materials. In addition, it is difficult to control the flow of resin in contact with blood. Moreover, further finishing and polishing are required, which may increase processing time. Additionally, the presence of blood in the surgical field may affect the adhesion of titanium abutments. On the other hand, CAD/CAM manufacturing involves additional steps and costs (Figure 13). 8

CAD/CAM customized healing abutment. 9
The success of immediate implant placement is influenced by various factors, including the surgical technique, choice of implant, type of bone substitute used, and the design, fabrication method, and placement technique of the crown. Each of these elements plays a crucial role in achieving optimal outcomes. 10
The application of bone grafts in combination with socket seal techniques proves to be highly advantageous in preserving the integrity of the socket area following a tooth extraction. By using these methods, the risk of soft tissue or membrane collapsing into the socket is minimized, ensuring a stable environment conducive to healing. Bone grafts act as a scaffold, effectively creating and maintaining the necessary space for the formation of new bone tissue. This scaffold supports not only bone ingrowth but also facilitates the development of new blood vessels, which are essential for sustained bone regeneration and optimal healing outcomes. 11
Prosthetically, the use of an SSA abutment results in more predictable final restorations, as it transmits to the laboratory the clinical situation encountered in the design of the final abutment, thus idealizing the final restoration.
In fact, after the indication of an immediate extraction-implantation protocol, the management of hard and soft tissues conditions the success of the prosthetic phase. Consequently, a “Socket Sealing” technique is used in an SSA protocol to prevent crystal deformations.
Simulating the extracted tooth without its supra-gingival part (molar SSA abutment), also avoids premature function and its repercussions on osseointegration. 12 Similarly, a healthy gingiva at the abutment design stage provides a solid foundation for the clinical prosthetic phases. 13
The benefits of immediate temporization with an SSA abutment for immediate extraction-implantation in the posterior region are numerous.
Regardless of the fabrication technique used (CAD/CAM or direct technique), the SSA stabilizes the gingival architecture immediately after extraction and immediate implantation.
The study by Finelle et al. 14 suggests that the vertical and horizontal dimensions of the soft tissue in most cervical zones are very stable when using the SSA, which could be the result of the SSA’s continued support of the gingival margin and thus prevention of collapse. The relatively limited shrinkage of the underlying soft tissue could be a consequence of bone resorption. Further clinical studies including a control group will be required to assess the potential advantage of SSA over a traditional healing abutment in preserving peri-implant soft tissue dimensions and guiding soft tissue healing, as already suggested by some authors. 15
The SSA provides a customized prosthetic piece that protects and isolates the blood clot and graft particles from the oral environment. 6
To optimize the prosthetic contours of the final restoration, it simulates an emergence profile as on natural teeth (Figure 14).

Post-healing emergence profile. 16
This technique is meant to simplify and reduce the time required for surgical and prosthetic steps (impression taking, easier implant access, faster design of the final abutment).
By documenting the practical application of the SSA in a real-world scenario, this case report contributes valuable insights into its effectiveness and clinical benefits in dental practice. It highlights how the SSA promotes biological integration by maintaining the integrity of the surrounding soft tissue, which is crucial for successful osseointegration.
The report showcases improved aesthetic results achieved through the SSA technique, demonstrating its potential to enhance the final appearance of the supra-implant prosthesis.
Conclusion
The SSA is a successful treatment after immediate implant placement in the mandibular posterior region. The goal of this technique is to support existing alveolar anatomy and preserve it during the osseointegration period.
However, while CAD/CAM SSA design is only suitable for clinicians equipped with a CAD/CAM chain and mastering the digital workflow, the direct technique is a simple and effective protocol that enables clinicians to quickly and manually fabricate an SSA abutment after immediate extraction and implantation.
Footnotes
Acknowledgements
We wish to acknowledge the anonymous reviewers for their valuable feedback, which helped improve this manuscript. There are no specific individuals or organizations whose contributions to this work need to be highlighted.
Author contributions
M.T. drafting article, data collection, concept/design, data analysis/interpretation; G.N. drafting article, data collection, concept/design, data analysis/interpretation; R.S. approval of article, data analysis/interpretation; M.M. approval of article, critical revision of article; M.S.K. approval of article, critical revision of article; F.B.A. approval of article, critical revision of article.
Declaration of conflicting interests
The author(s) declared no potential conflicts of interest with respect to the research, authorship, and/or publication of this article.
Funding
The author(s) received no financial support for the research, authorship, and/or publication of this article.
Ethics approval
Institution does not require ethical approval for reporting individual cases or case series.