
Abstract
Background:
Upper limb, in particular forequarter amputations, require highly customised devices that are often expensive and underutilised.
Objectives:
The objective of this study was to design and develop a comfortable 3D-printed cosmetic forequarter prosthetic device, which was lightweight, cool to wear, had an elbow that could lock, matched the appearance of the contralateral arm and was completely free of metal for a specific user’s needs.
Study Design:
Device design.
Technique:
An iterative user-centred design approach was used for digitising, designing and developing a functional 3D-printed prosthetic arm for an acquired forequarter amputation, while optimising the fit and function after each prototype.
Results:
The cost of the final arm was 20% less expensive than a traditionally-made forequarter prostheses in Singapore. The Quebec User Evaluation of Satisfaction with Assistive Technology (QUEST) 2.0 survey was administered, with results indicating that the 3D-printed arm was preferred due to its overall effectiveness, accurate size, ease of use and suspension. However, durability had a lower score, and the weight of the arm was 100 g heavier than the user’s current prosthesis. The technique described resulted in a precise fitting and shaped forequarter prosthesis for the user. Using the user’s feedback in the iterations of the design resulted in improved QUEST survey results indicating the device was effective, easy to use, perceived as lighter and more secure than the user’s traditionally-made device.
Conclusion:
A fully customised cosmetic forequarter prosthesis was designed and developed using digital scanning, computer-aided design modelling and 3D printing for a specific user. These technologies enable new avenues for highly complex prosthetic design innovations.
Background
The loss of one hand significantly affects the capability of performing activities of daily living, working and social activities. In the United States, it is estimated that major upper limb (UL) amputations account for 3% of all amputations. 1 Among UL amputations, shoulder disarticulation and forequarter amputations are lower in number (5% and 3%, respectively). 2 Tan Tock Seng Hospital, the largest provider of prosthetic services in Singapore, sees 3% of all its patients with amputation for UL prostheses. These cases result from increased numbers of Group A Streptococcus infections and traumatic events.
Worldwide, there is a need for affordable and comfortable prosthetic solutions. Due to the lack of prosthetists and rising number of persons with amputation, there has been an increase in wait times for prosthetic fitting. 3 Prosthetics require a highly individualised and flexible approach and, if possible, low maintenance demands and cost.3,4 A substantial proportion of people with UL loss do not use a device, despite having access to one.5–7 Rates of rejection for both body-powered (26%) and electric (23%) devices have been observed in adults due mostly to cost, maintenance and weight-associated issues.8–10 Evidence suggests that cosmetic prostheses have a higher rate of continuous use in both adult and paediatric populations than other UL options.11,12 The rise of additive manufacturing (AM) capabilities has helped to revolutionise design and manufacturing industry sectors, including healthcare products. AM technologies expand design and manufacturing capabilities significantly in developing products with lighter, multi-material, complex geometrical and multifunctional design features. They offer an alternative avenue for designing patient-specific prosthetic solutions. 9 Still, there remains the issue of quality assurance, standardisation and durability with products designed with AM technologies. Despite these drawbacks, significant developments in using AM for fabricating customised UL prostheses has occurred over the past 5 years, allowing devices with complex geometries to be made more easily in less time.13–15
The purpose of this study was to design a 3D-printed forequarter prosthesis for a pre-selected user to replace his current device by enhancing appearance and function. The new design aimed to be lightweight, capable of dissipating heat, locking at 90° of flexion, comfortable to wear and void of metal components that would be detectable by airport scanners since the user was a frequent traveller.
Technique
Design overview
This study followed a user-centred design approach to reduce time to delivery while optimising fit and function (Figure 1). User-centred design (UCD) is an approach that involves end-users throughout the development process so the designs are easy to operate and are of value to users. 16 The end-user was a 60-year-old male (weight 86 kg, height 1.75 cm) with a right traumatic forequarter amputation that occurred more than 40 years ago. His current cosmetic prosthesis, (570 g) was made from materials including pelite, laminate, silicone and leather coverings with a fishing line passing through the elbow joint to allow free range of motion. Initial consultations with the user and prosthetist, as well as user shadowing yielded the design parameters listed in Table 1. The study was approved by both local healthcare and educational institutional review boards. The subject provided consent to participate in the research and for his case to be published.
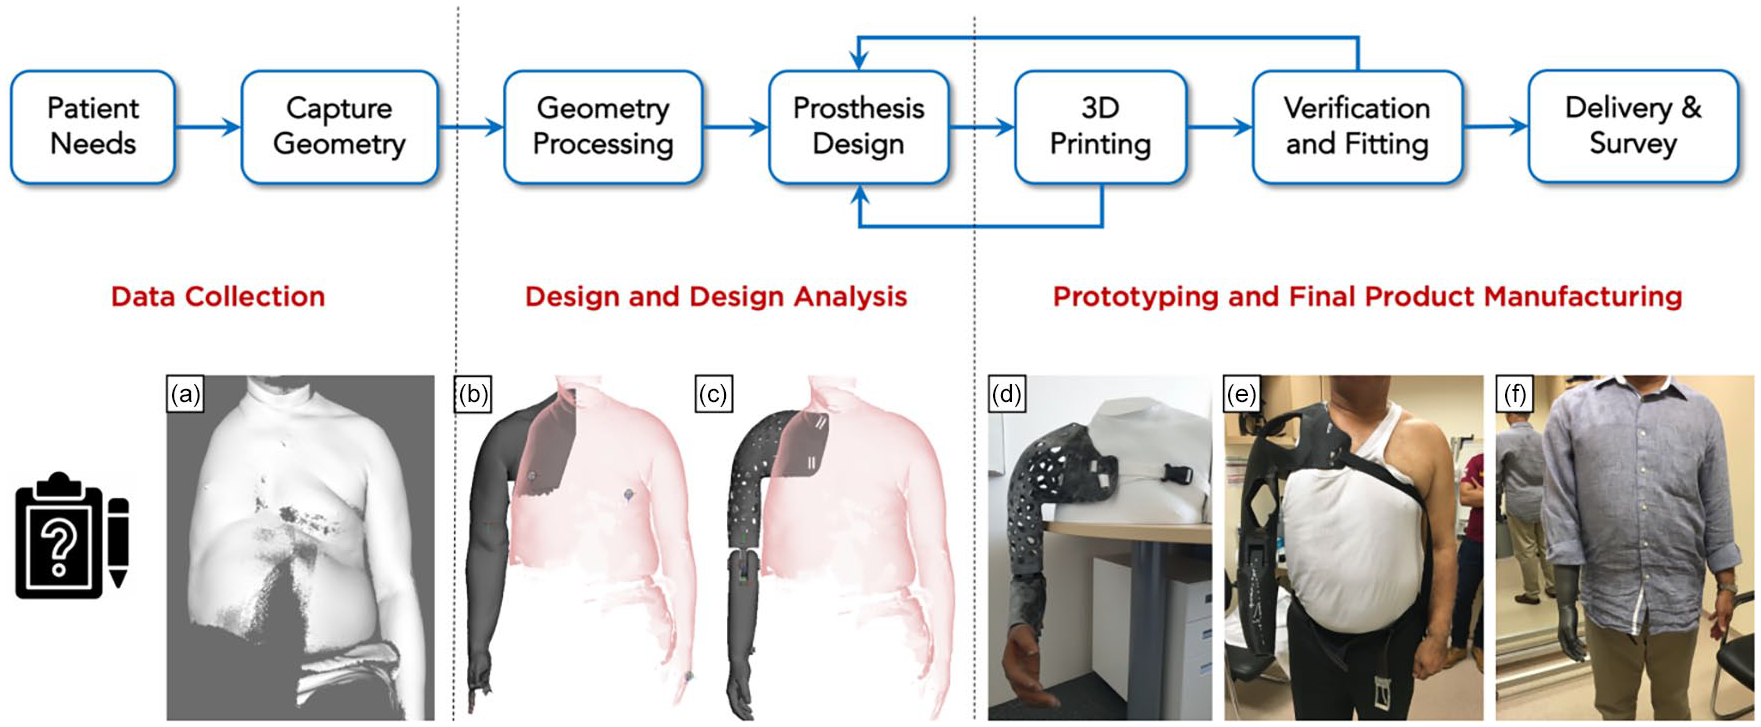
Schematic representation of the stages of the user-centred and iterative process of prosthesis design. (a) 3D reconstruction of the patient’s upper body with residual limb and sound contralateral arm from the cloud points captured via digital scan; (b) basic shape of the prosthesis was obtained using the shape of the residual limb and the contralateral limb; (c) fully designed prosthesis in the extended position to test whether the device would hit the hip and impede walking; (d) 3D-printed prosthesis in 90° flexed position to assess the angle and position of the hand with respect to the contralateral limb on a 3D-printed mannequin of the user; (e) testing and verification of the prototype socket and interface design for design feedback; and (f) final fitting of the prosthesis to the patient and validation of the user’s requirements.
Description of user-defined requirements.
The iterative UCD and development methodology (Figure 1) involves the following:
Capturing residuum and contralateral arm geometry;
Designing different prosthetic elements from the captured geometry;
Manufacturing the prosthetic elements and verifying fit, user comfort and technical requirements;
Capturing and documenting the design and development process to apply to other device design applications,
Administration of the Quebec User Evaluation of Satisfaction with Assistive Technology (QUEST) 2.0 survey 17 to determine user satisfaction.
Part 1: shape capturing and prosthesis design
The portable 3D scanner (Artec Eva, Artec 3D Europe, Luxembourg City, Luxembourg) was used to scan the residuum. The instrument uses laser-free structured light scanning, is quick to use, accommodates minor movement while capturing geometry and texture information, and eliminates the need for reference markers. 18 After a point cloud was created, we repaired the 3D triangular meshes through MeshLab Opensource software (Visual Computing Lab, CNR-ISTI, Italy) before converting it into parametric data to edit and design prosthesis components in the AutoDesk Fusion 360 Computer Aided Design (CAD) modelling software (Autodesk Inc., San Rafael, CA, USA). Design and technical requirements were derived from the user’s and prosthetist’s needs, and revised based on their feedback during the process.
Part 2: manufacturing and delivery
Socket
An early-stage design prototype (Figure 1(e)) was developed to provide a symmetrical, lightweight and cosmetic structure. Unfortunately, the hollows of the socket, while providing heat dissipation, allowed the shirt to sink into them, making the arm more obvious. Based on the user’s feedback, the design was revised (Figure 2(e)) by adding mesh structures over the hollows and shrinking the overall size by 10% of the captured shape. The mesh structures provided a grip to help don the prosthesis with one hand. In addition, the neckline height was lowered for improved comfort, which led to a small loss of shape symmetry when compared to the user’s sound side. The suspension was attached with webbing straps sewn through appropriately located slots to remove the need for the user to feed the strap through the slot before tightening.
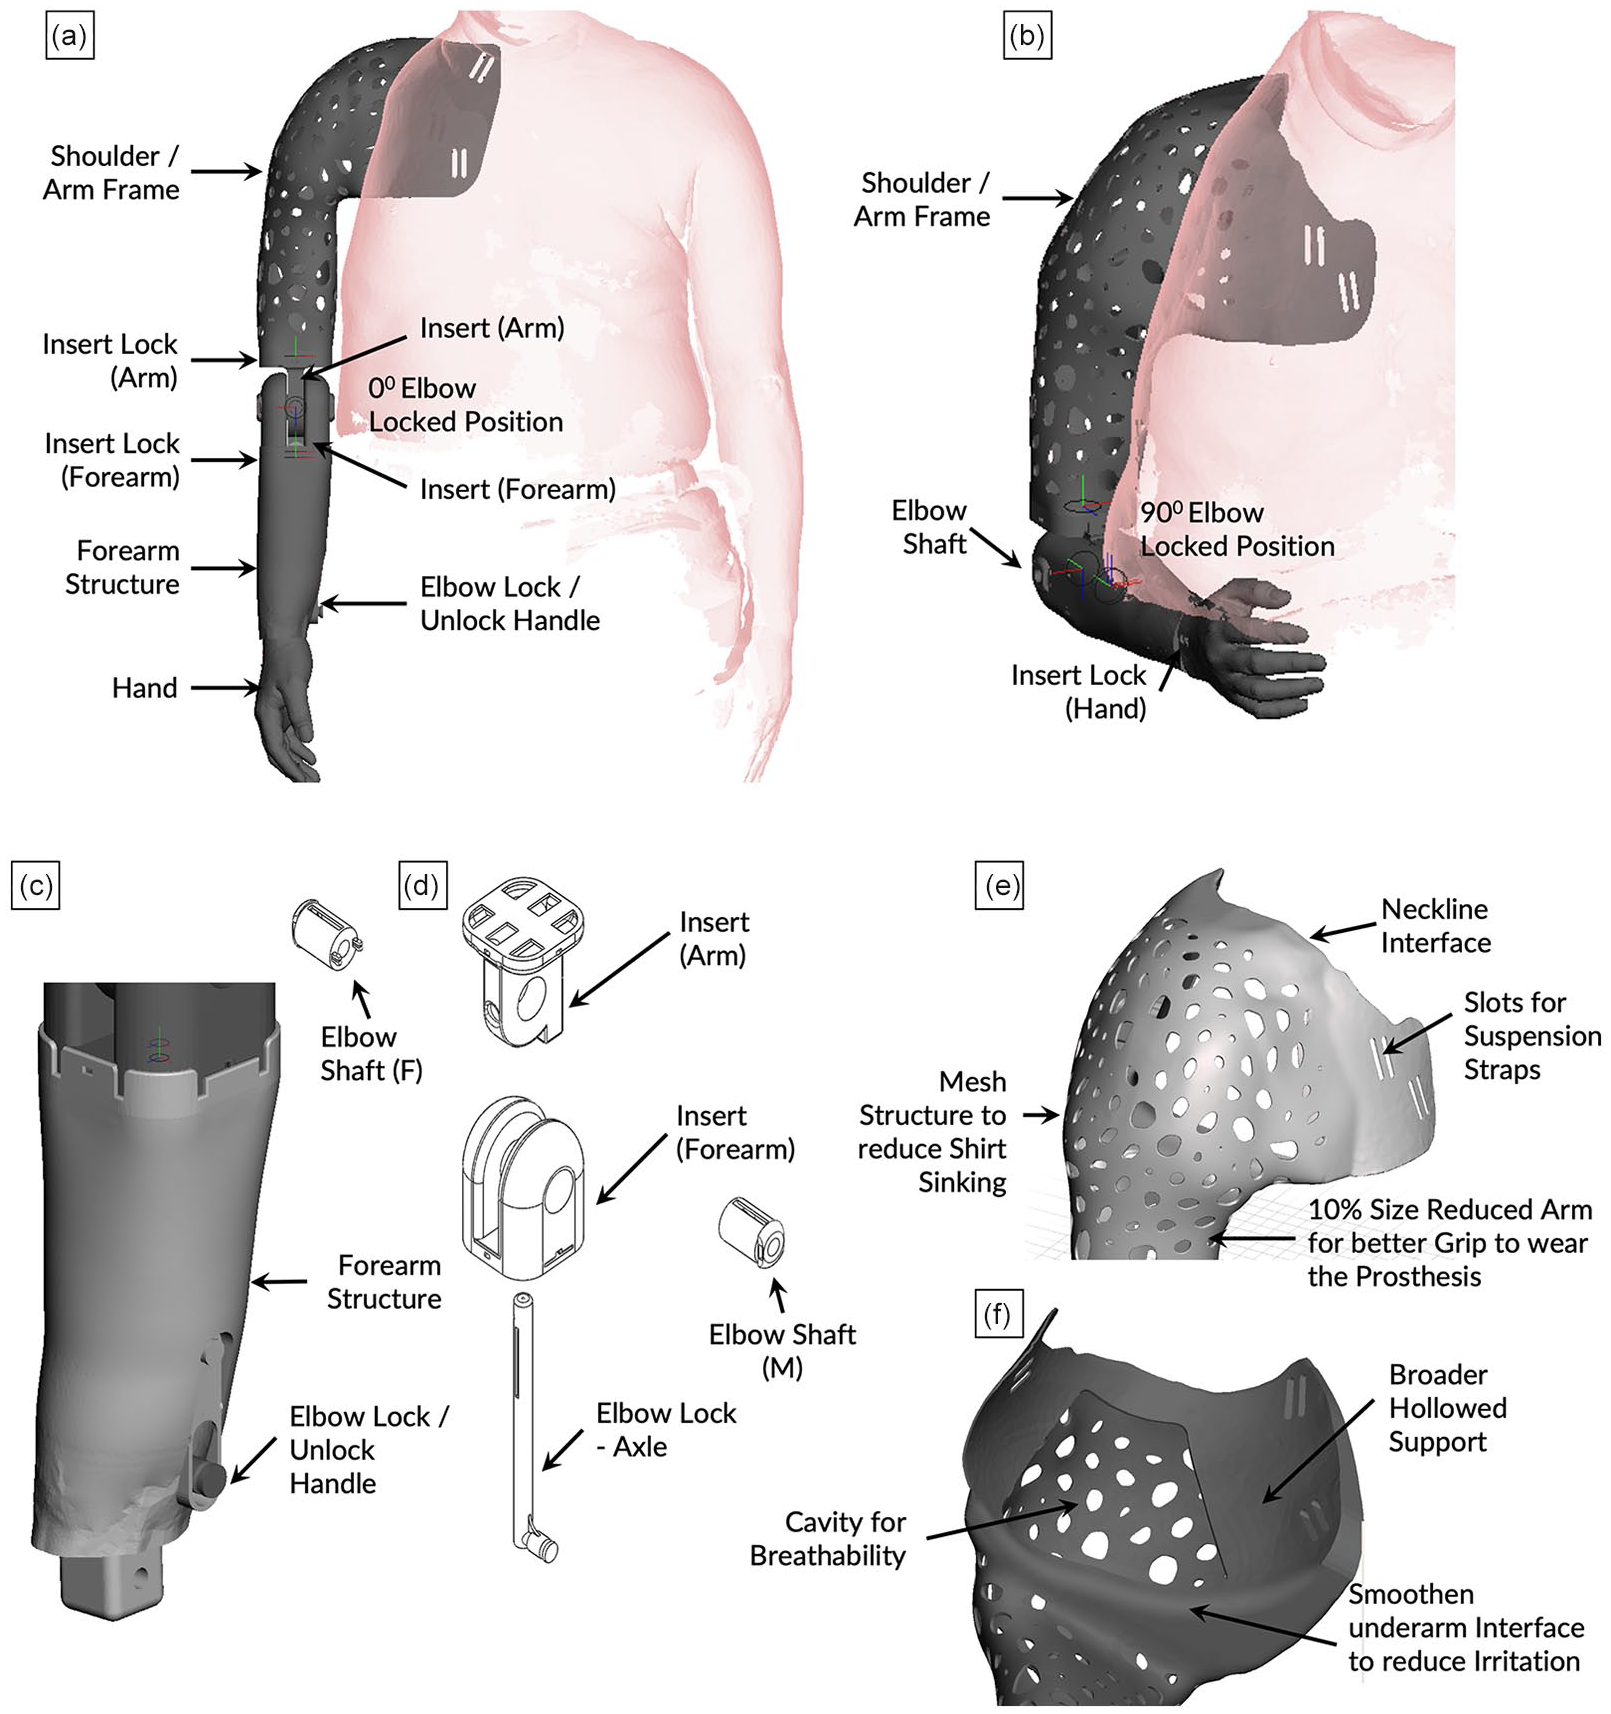
CAD model of the prosthesis with forearm structure in (a) extended and (b) 90° flexed position, (c, d) incorporating the elbow lock mechanism, and (e) the mesh structure of the shoulder frame with (f) a cavity to improve breathability along the amputation site.
Elbow
The user identified that a more distal location near the wrist for a control switch to lock/unlock the elbow would be advantageous as it would require less sound side shoulder adduction. The elbow joint was designed to swing freely in full extension and automatically lock at 90° using an elastic spring at the wrist that holds and pre-loads the mechanism via an integrated shaft. Connecting to the elbow, it features a 90° bend to activate the elastic spring attachment which unlocks the elbow joint. The carrying angles of the elbow were matched to the user’s sound limb (Figure 2).
The locking mechanism was incorporated in the arm structure of the CAD model itself to 3D print the integrated assembly altogether. This design decision enabled a smooth functioning lock mechanism in the internal geometry of the arm structure, thus reducing interference with other structures.
Hand
The final hand structure was created 10% smaller than the scan data, and was printed on an HP multi-jet fusion printer with HP-3D-HR-CB-PA-12 (Nylon) material and an Ottobock silicone glove applied to provide cosmesis. Originally, the hand was printed on a J750 3D Printer (Stratasys Ltd., Eden Prairie, MN, USA), but was rejected by the user for being sticky when wearing his shirt.
Finally, the Multi Jet Fusion (MJF) 3D printing process (commercial PA12 powder, 60 μm particle size, 1.01 g/cm2 print density, 0.08 mm layer thickness, pre-heated by an infrared lamp and 10 s/layer speed) was used. It produces high-quality and strong components by fusing plastic powder material with detailed agent and heat instead of lasers as in the selective laser sintering (SLS) process. Experimental studies19–21 have shown that parts made with nylon via MJF have excellent mechanical and thermal properties, with lower porosity and smoother surfaces than SLS. This makes it more suitable for end-use products, allowing the user’s shirt to slide over the material more naturally (Figure 3). The decision to use MJF printers was based on the time required for pre-processing, printing and post-processing; cost; and accessibility to prosthetists.
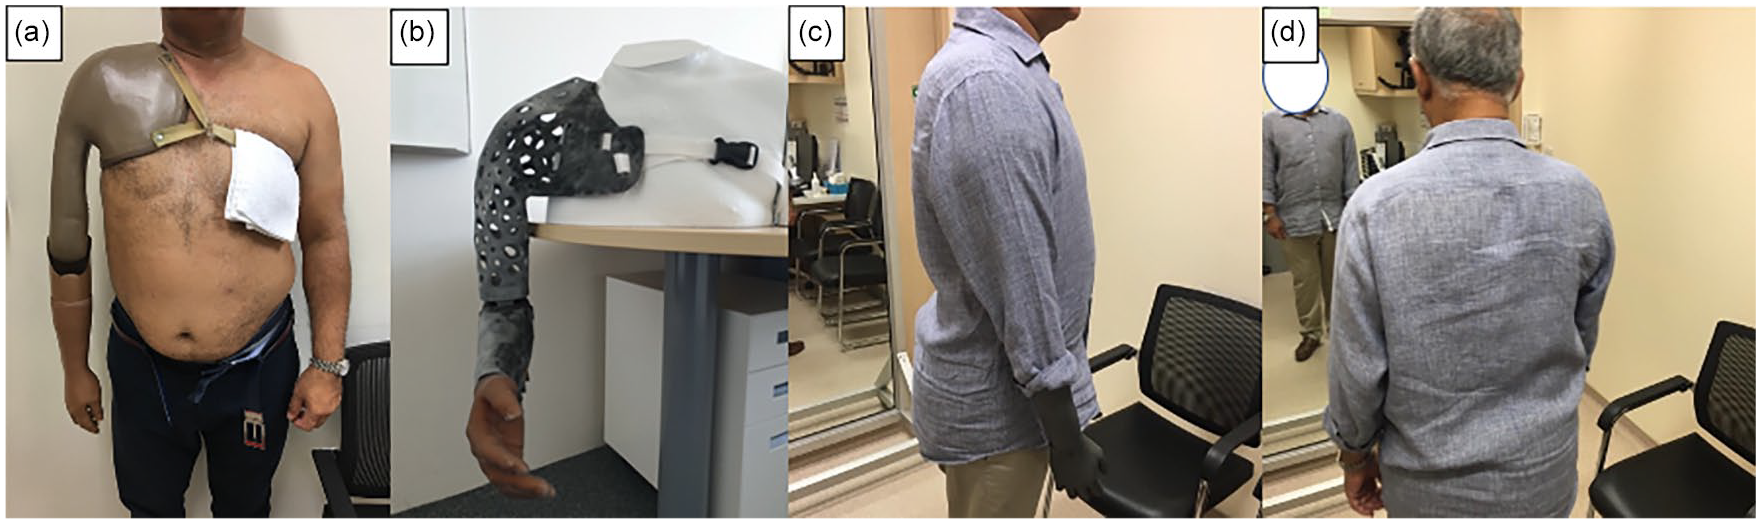
Delivery of the prosthesis to the patient and validation of the user’s requirements: (a) current prosthesis worn by the user; (b) 3D-printed final design of the prosthesis, and (c, d) photographs of the user in Sagittal and Coronal plane views showing the near-perfect aesthetic fitting of the 3-D printed prosthesis.
Results
The cost was calculated after finalising all the design parameters (Supplementary Table 1). The user’s current prosthetic arm cost £2000 GBP and a similar device in Singapore would cost $3000 SGD, making this 3D-printed device about 20% cheaper.
The designed prosthesis was compared with the user’s traditional prosthesis using the QUEST 2.0 satisfaction survey (Table 2). The 3D-printed arm was preferred for its overall effectiveness, accurate size, symmetrical appearance, ease of use and suspension. Even though the new prosthesis weighed 100 g more than the current prosthesis, the user preferred it due to improved suspension contributing to the feel of a lighter arm during use. It was deemed less durable due to the user’s unfamiliarity with 3D printing, his worry of the elbow locking mechanism breaking, and the appearance of the mesh structure relative to his current prosthesis.
QUEST 2.0 survey results comparing the 3D-printed arm to a traditionally fabricated cosmetic prosthesis.
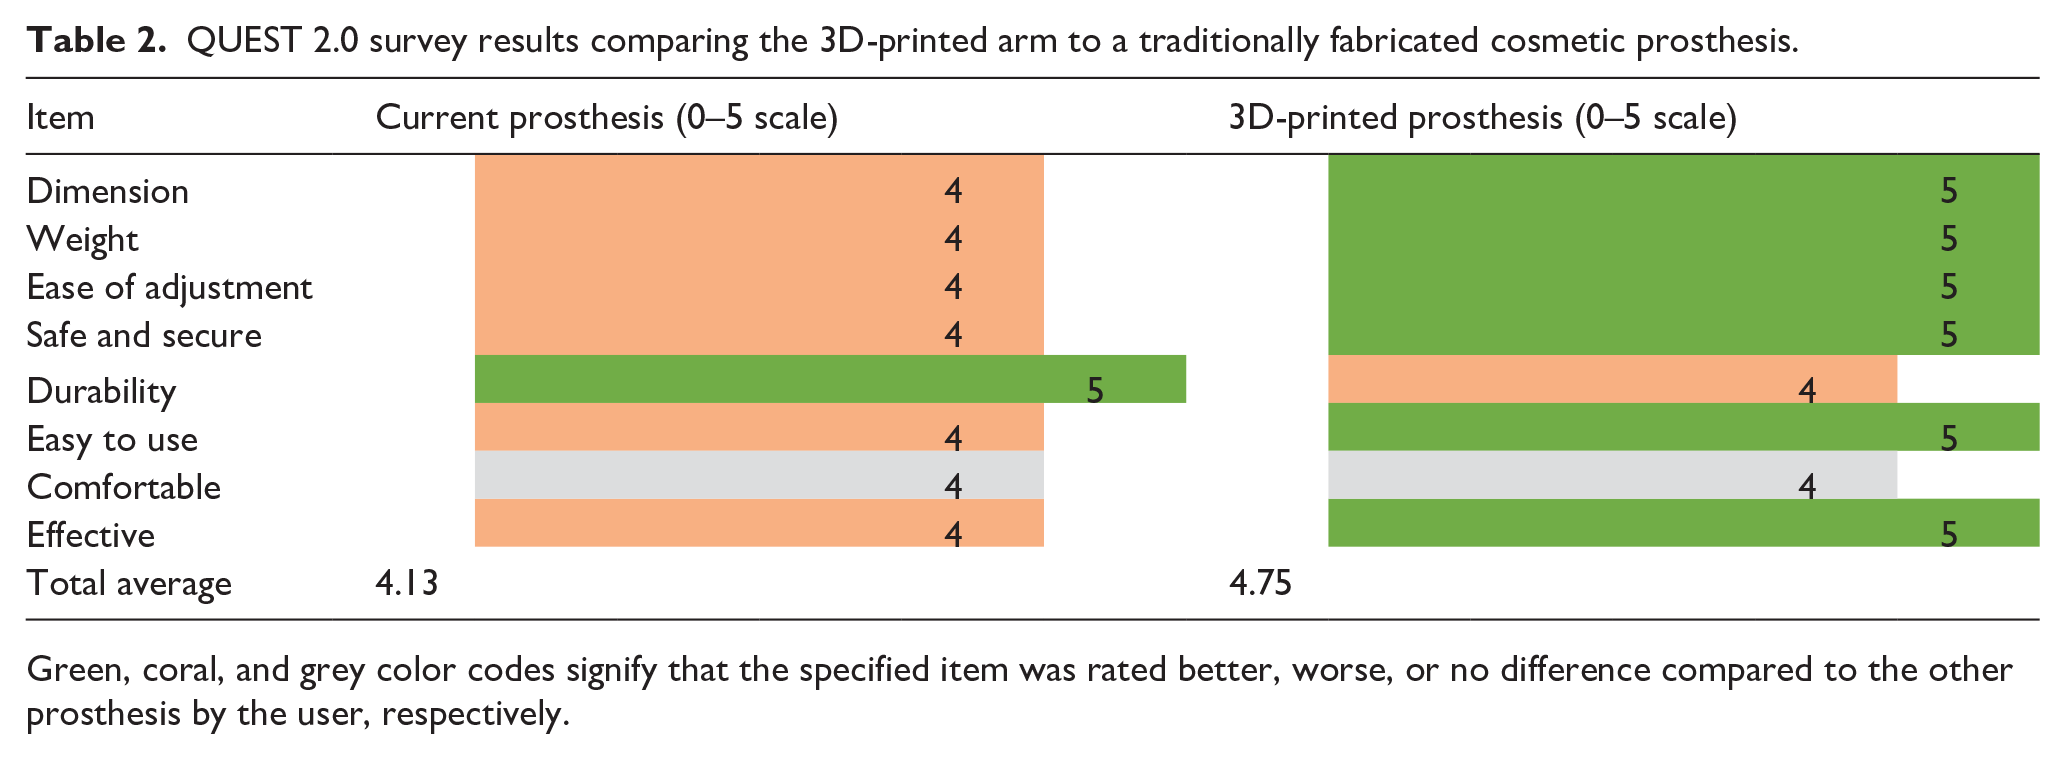
Green, coral, and grey color codes signify that the specified item was rated better, worse, or no difference compared to the other prosthesis by the user, respectively.
Discussion
The prosthetic options for a person with forequarter amputation are limited and expensive. 15 Despite cosmetic arms being worn more frequently than electric or body-powered prostheses, they are still limited in their use.11,12 In this case, the user required a completely non-metal prosthesis that incorporated the functionality of a metal locking elbow used in most cosmetic arms. AM, being metal-free and having the capabilities of the scanner, software and 3D printers to replicate the user’s arm with high precision and geometric complexity, was deemed the most suitable for this prosthesis.
Working with the user at each stage of the design process is necessary to verify and validate user needs. Users may not be fully aware of the capabilities of new technologies when establishing their expectations and opportunities.
Conclusion
A forequarter prosthesis was designed and developed using digital scanning, CAD modelling and 3D printing for and with a specific user. 3D printing technologies are a viable option to reduce labour and operational costs while enabling new avenues for highly complex prosthetic design innovations. Our construction, design and development processes could be applicable in designing “FOR” other levels of arm amputation.
Supplemental Material
10.1177_0309364620948290_Supplementary_material – Supplemental material for Design and development of a novel 3D-printed non-metallic self-locking prosthetic arm for a forequarter amputation
Supplemental material, 10.1177_0309364620948290_Supplementary_material for Design and development of a novel 3D-printed non-metallic self-locking prosthetic arm for a forequarter amputation by Trevor Binedell, Eugene Meng and Karupppasamy Subburaj in Prosthetics and Orthotics International
Footnotes
Author Contributions
T.B and K.S. conceived the idea, devised the project, acquired funding, secured necessary approvals for the project, and in charge of overall direction and planning. E.M. acquired scan data, developed the idea into a product, and fabricated the prosthesis. T.B. and K.S. supervised E.M. and contributed to the design by regularly reviewing and giving feedback during the design iteration phase. T.B. user tested the early version of the prosthesis, fitted the final design, collected user feedback, and took the lead in writing the manuscript. All authors discussed the results, provided critical feedback, and helped shape research, analysis, and manuscript.
Declaration of Conflicting Interests
The author(s) declared no potential conflicts of interest with respect to the research, authorship and/or publication of this article.
Funding
The author(s) disclosed receipt of the following financial support for the research, authorship and/or publication of this article: This project was funded by the National Additive Manufacturing – Innovation Cluster (NAMIC 2017269) with in-kind support from Tan Tock Seng Hospital and Singapore University of Technology Design.
Supplemental material
Supplemental material for this article is available online.
References
Supplementary Material
Please find the following supplemental material available below.
For Open Access articles published under a Creative Commons License, all supplemental material carries the same license as the article it is associated with.
For non-Open Access articles published, all supplemental material carries a non-exclusive license, and permission requests for re-use of supplemental material or any part of supplemental material shall be sent directly to the copyright owner as specified in the copyright notice associated with the article.