
Abstract
Sudden or unexpected deaths in experimental mice can be potential causes of lost data or lost opportunities to diagnose health problems. In small animal units and in particular out of normal working hours there may not be the time or expertise available to attempt a careful dissection on unscheduled mortalities or moribund animals. This paper outlines a robust and easy necropsy technique which can be easily learnt, uses minimal equipment and can be used to implement the 3Rs (replacement, refinement and reduction) by maximizing the amount of information gained from experimental animals.
Keywords
This paper describes a simplified necropsy technique which can be easily learnt and quickly performed in order to preserve diagnostic tissues from a mouse which has died or has had to be killed unexpectedly.
In order to perform the technique a minimum amount of equipment is required, including pots containing at least 250 mL of ready prepared neutral buffered formalin (Surgipath, Leica Biosystems Peterborough Ltd, Peterborough, UK), forceps (blunt tooth, 11.5 cm long), a pair of small sharp dissection scissors (14 cm long curved or straight depending on personal preference) and a pair of strong surgical scissors. Care should be taken to minimize health and safety risks (including exposure to animal allergens and sharps injuries) by following local safety rules. Moribund animals should be euthanized using appropriate techniques, bearing in mind that the method may affect the usefulness of the tissues preserved, e.g. cervical dislocation can cause extensive agonal haemorrhage to thoracic and central nervous system (CNS) tissue. 1
Basic information including the animal number, date and time of necropsy, study number if applicable, and any relevant information, for example the time when last seen alive and the health of cage mates, should be recorded on a standardized form prepared in advance. Throughout the dissection any obvious abnormalities should be noted using an agreed glossary of terms2,3 and, if present, fluids can be sampled for microbiological evaluation using sterile swabs. It is also helpful to take digital images of any suspected abnormalities before fixation when the original colour is maintained. Images of acceptable quality can be obtained using a standard commercially available waterproof digital camera which can be cleaned and disinfected.
The technique for the procedure is as follows:
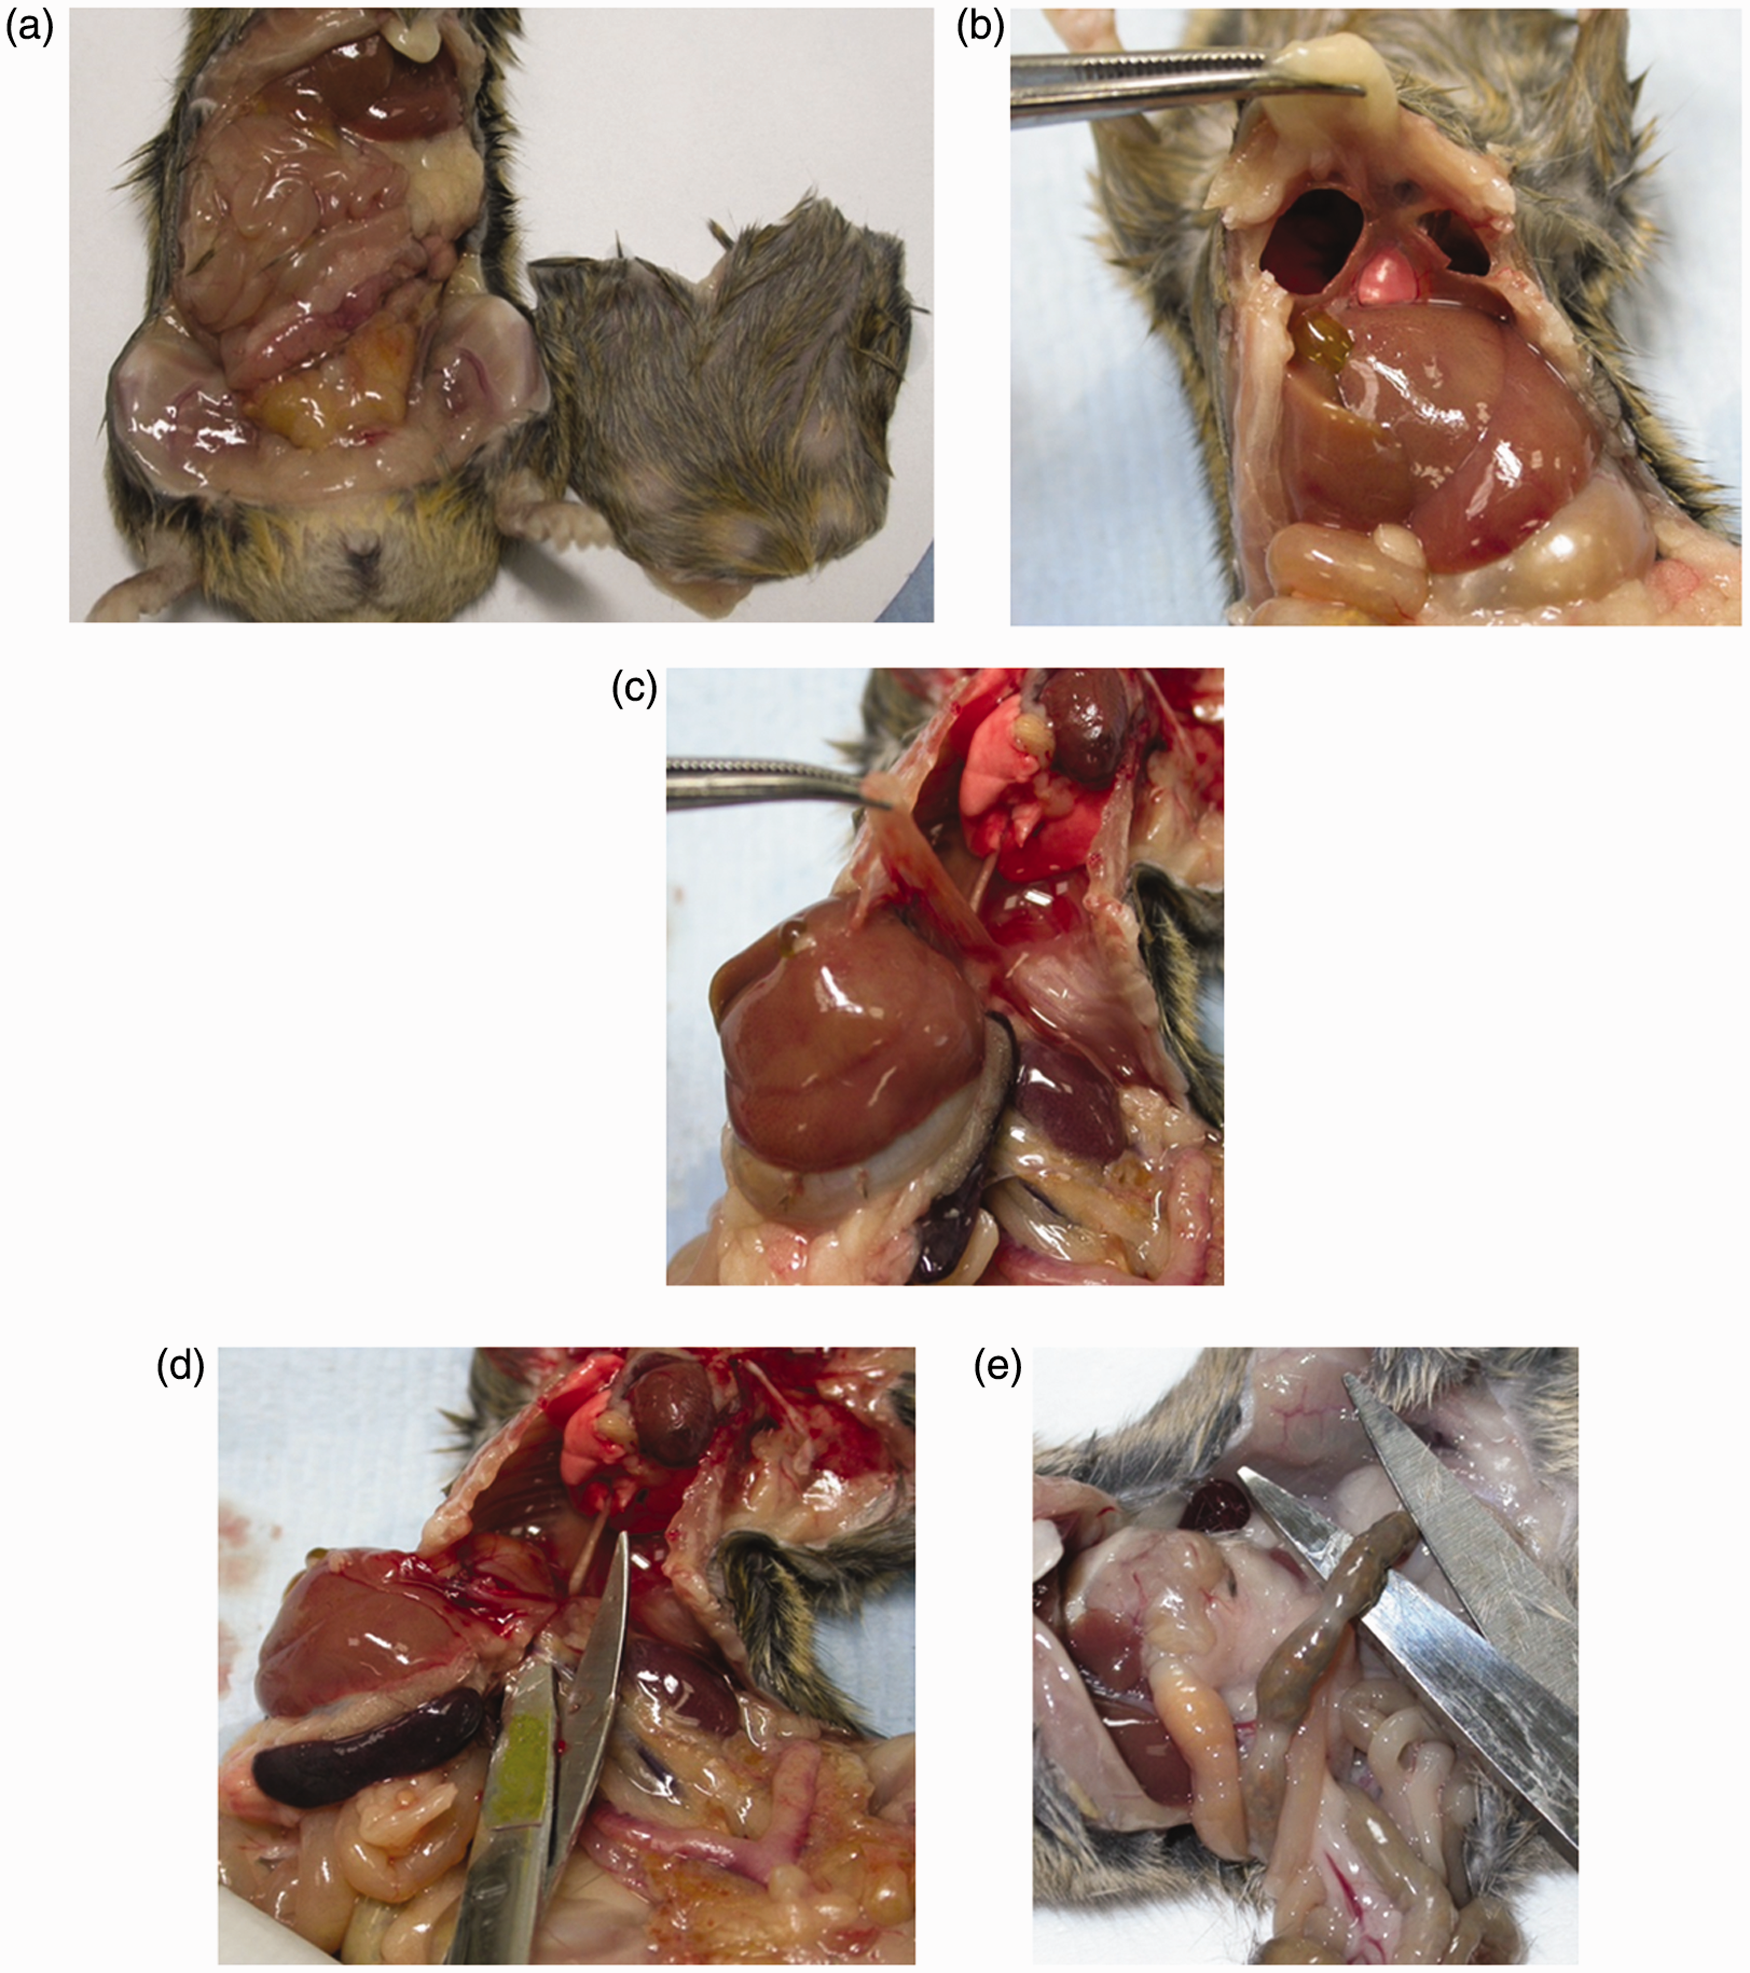
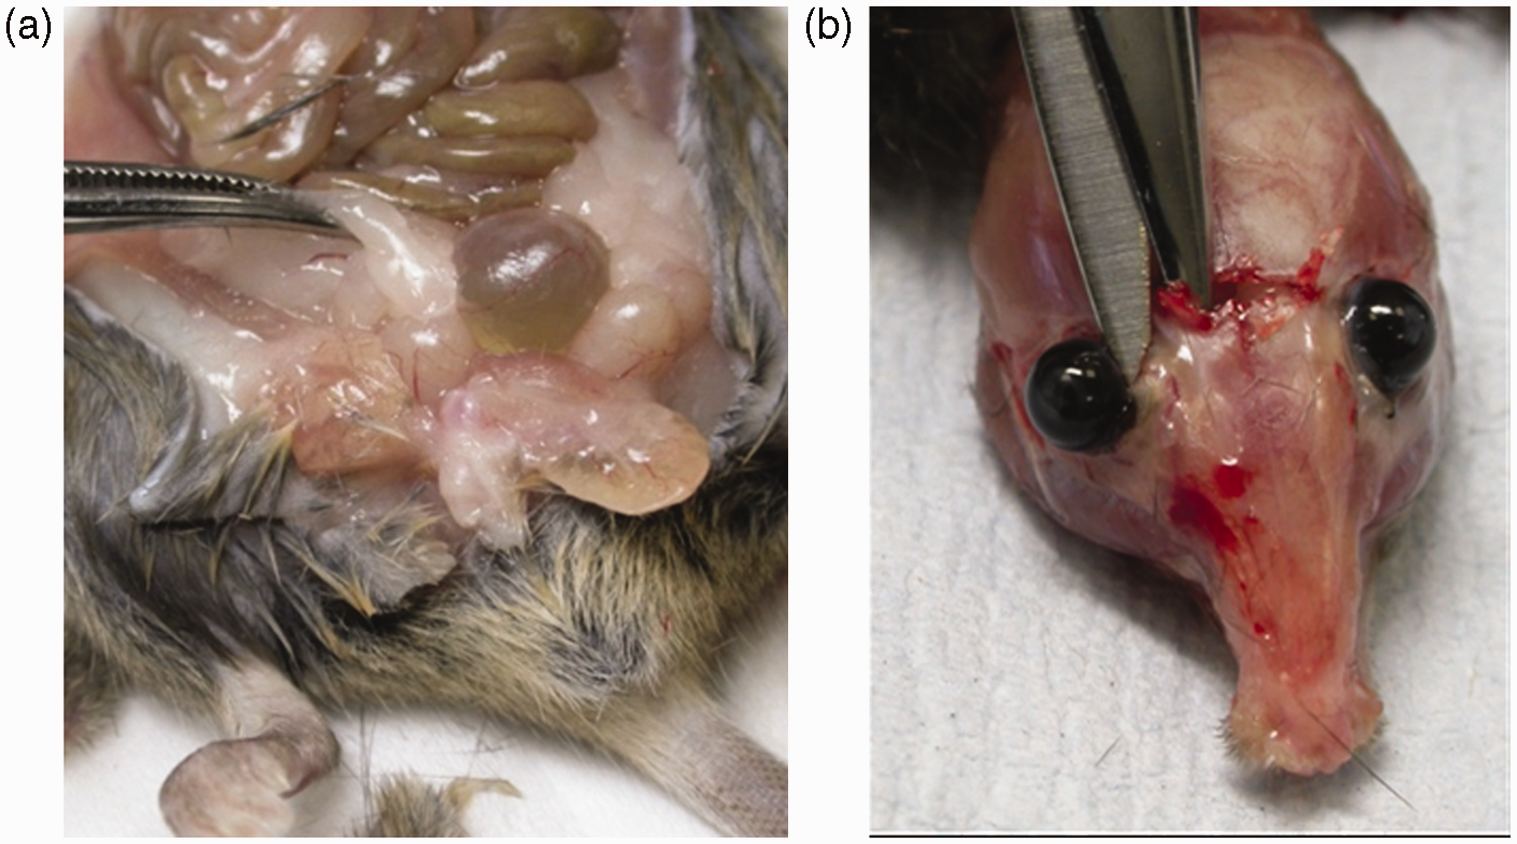
The mouse should first be examined externally and any obvious abnormalities should be noted. Then placing the animal on its back on disposable absorbent paper the skin and abdominal muscles should be picked up using forceps and then carefully cut from the xyphoid cartilage along both flanks, completing the cut in front of the pelvic opening (Figure 1a). The skin and muscle layers can then be placed abdominal side-down on fibre-free blotting paper (Figure 1a), allowed to dry for 2 min and then immersed in formalin. Next a cut should be made either side of the sternum to open up the thoracic cavity and allow formalin penetration. Take care not to damage the heart and any other structures inside the cavity by holding the end of the xiphoid cartilage and cutting the thoracic tissue away close to the underside of the sternum (Figure 1b). Holding onto the diaphragm with forceps, cut it away from the inside surface of the ribcage and cut the oesophagus and associated tissue connections to the thorax, releasing the liver from the diaphragm and thoracic organs (Figure 1d). Once the diaphragm is free from the ribcage, push the abdominal viscera over to one side to access the blood vessels and tissue which secure the liver to the dorsal body wall. Slide the scissors carefully underneath the liver/stomach and spleen and over the top of the kidneys to cut free the upper portion of the viscera (Figure 1d). The intestines and associated organs can be removed from the carcass by cutting the terminal colon (which usually contains faecal pellets) as close to the pelvis as possible (Figure 1e). In male mice the testes can be removed from the scrotal sac to improve fixation by gently pulling on the associated fat pad (Figure 2a). To ensure the brain is fixed, the skin should be removed from the top of the head and strong scissors should be used to snip through the skull between the orbits (Figure 2b). The eyes are retained in the skull at the time of necropsy using this technique. Formalin fixation is adequate for diagnostic purposes. The carcass (with the retained organs) and the intestinal organs should be submerged in an 10:1 excess of formalin in a correctly labelled container. Opening of the major organs at necropsy. (a–b) Illustration of the approach to the abdominal and thoracic cavities. (c–e) Demonstration of the removal of the intestines. (a) Demonstration of the use of gentle traction to expose the testes at necropsy. (b) Illustration of the cut that should be made to enable fixative to enter the cranial cavity.
This technique allows adequate preservation of tissue morphology with a minimum of training and facilities. In our experience, tissues analysed following harvest from freshly killed animals using this technique show minimum degradation compared with fully dissected tissues. Where animals have been found dead, there is always the potential for varying degrees of autolysis which tends to affect the intestines and kidneys first. However, it is often possible to obtain diagnostic information from such animals even if they have been dead overnight. It is worth the small investment of time and consumables (formalin is cheap) to harvest tissues as soon as practical allowing the decision whether or not to invest further time and money to examine them to be made at a later date.
Once tissues are in formalin they need to fix for at least 24 h and will not deteriorate, if fixed, for weeks to months assuming a sufficient volume of formalin so there is adequate time to decide on whether or not to proceed to microscopic examination.
The major disadvantage of the technique is that once the tissues are fixed in this way it takes longer to dissect them in preparation for wax embedding than if the tissues are harvested systematically at the time of necropsy, so the technique should not be used to replace a full dissection 4 on animals scheduled for necropsy at the end of an experiment. This simple technique is recommended as a contribution to the 3Rs (replacement, refinement and reduction) by reducing the potential loss of data from mice which die or have to be killed unexpectedly. The low cost of formalin and training compares well in a cost–benefit analysis against the investment in breeding, housing and ageing of mice, particularly animals with unique genetic modifications.