
Abstract
The main objective of a post mortem is to identify, at a macroscopic level, any anatomical features that characterise mutant or sick mice and to describe lesions contributing to morbidity and mortality. Tissues collected for subsequent examination require appropriate handling and preservation to prevent deterioration. Therefore, efficient routine procedures are essential to facilitate histology and to ensure high-quality samples. In addition, optimised techniques minimise data loss from damaged samples reducing the numbers of animals used and supporting the 3Rs principle of reduction. Here, we describe an optimised method for tissue collection in the mouse. Training tips and points for caution are included.
A necropsy is a post-mortem scientific examination conducted in a systematic manner enabling observation of macroscopic anatomy and tissue harvesting as part of the planned termination of a study or health screen. 1 Necropsies can be technically challenging and differences in techniques between groups may result in poor comparability. Therefore, it is essential to have a standardised protocol and closely monitored training to maintain consistency and tissue quality. A simple glossary of terms helps to ensure consistent descriptions between operators. 2
On average our method can be taught in two 2 h sessions and once competency is achieved the procedure can be carried out in approximately 10 min. Appropriate personal protective equipment (safety glasses, gloves, lab coat, and mask) should always be worn when handling tissues/chemicals.
Caution: training to achieve competence in this technique is essential prior to dissection of experimental animals.
The procedures described were performed on two B6JNM-2019 Harwell bred mice of both sexes, aged 16 weeks, housed in individual ventilated cages with food and water ad libitum in a Home Office accredited facility in compliance with the UK Animals (Scientific Procedures) Act 1986 and Directive 2010/63/EU. All work was approved by MRC Harwell Animal Welfare and Ethical Review Body (AWERB).
Terminal blood sampling (under general anaesthesia) may be performed prior to dissection if a biochemical profile is required to complement macroscopic observations. Once all the necessary samples have been collected the mouse must be exsanguinated or another method of euthanasia must be used. Blood sampling must be performed by a licensed individual (ASPA, 1986).
The authors use the following instruments: Scissors Straight SharpBlunt Serrated 14 cm (Cat. 14007-14; FST), Fine Scissors CeramaCut Straight 11.5 cm (Cat. 14958-11; FST, Heidelberg, Germany), Spring Scissors 14 cm 6 mm Cutting Edge (curved, Cat. 15021-15; FST or straight, Cat. 15020-15; FST), Standard Pattern Forceps (curved, Cat. 11001-13; FST or straight, Cat. 11000-13; FST). Camera, callipers and balances (BAL7000; Sartorius Secura, Goettingen, Germany) should be used to record abnormalities, accompanied by detailed description. 3
All tissues should be placed in 10% neutral buffered formalin (10% NBF; Cat. 3800840; Leica Biosystems, Milton Keynes, UK) unless otherwise specified. Some tissues can be placed on fibre-free blotting paper to avoid folds and to facilitate orientation during embedding and microscopic analysis.
Tip: preprepared 10% NBF provides good fixation for most tissues, the ideal ratio being at least 20:1 of fixative to tissue. Inadequate fixative volume will result in poor fixation.
Animals were euthanised with an overdose of sodium pentobarbital (Euthatal, 100 mg/ml, Larkmead Veterinary, Didcot, UK) administered via intraperitoneal injection. After confirmation of death (i.e. cessation of blood circulation), fur should be dampened with 70% alcohol prior to incision to prevent aerosolisation and minimise risk of allergens. A ventral incision is made through the skin and abdominal muscle across the caudal edge of the rib cage, below the xiphisternum (Figure 1(a) and (b)). The abdomen is then cut either side towards the pubis, and then across the caudal abdomen to remove the entire section of ventral skin. This section should be laid flat on a piece of paper (Figure 1(c)).
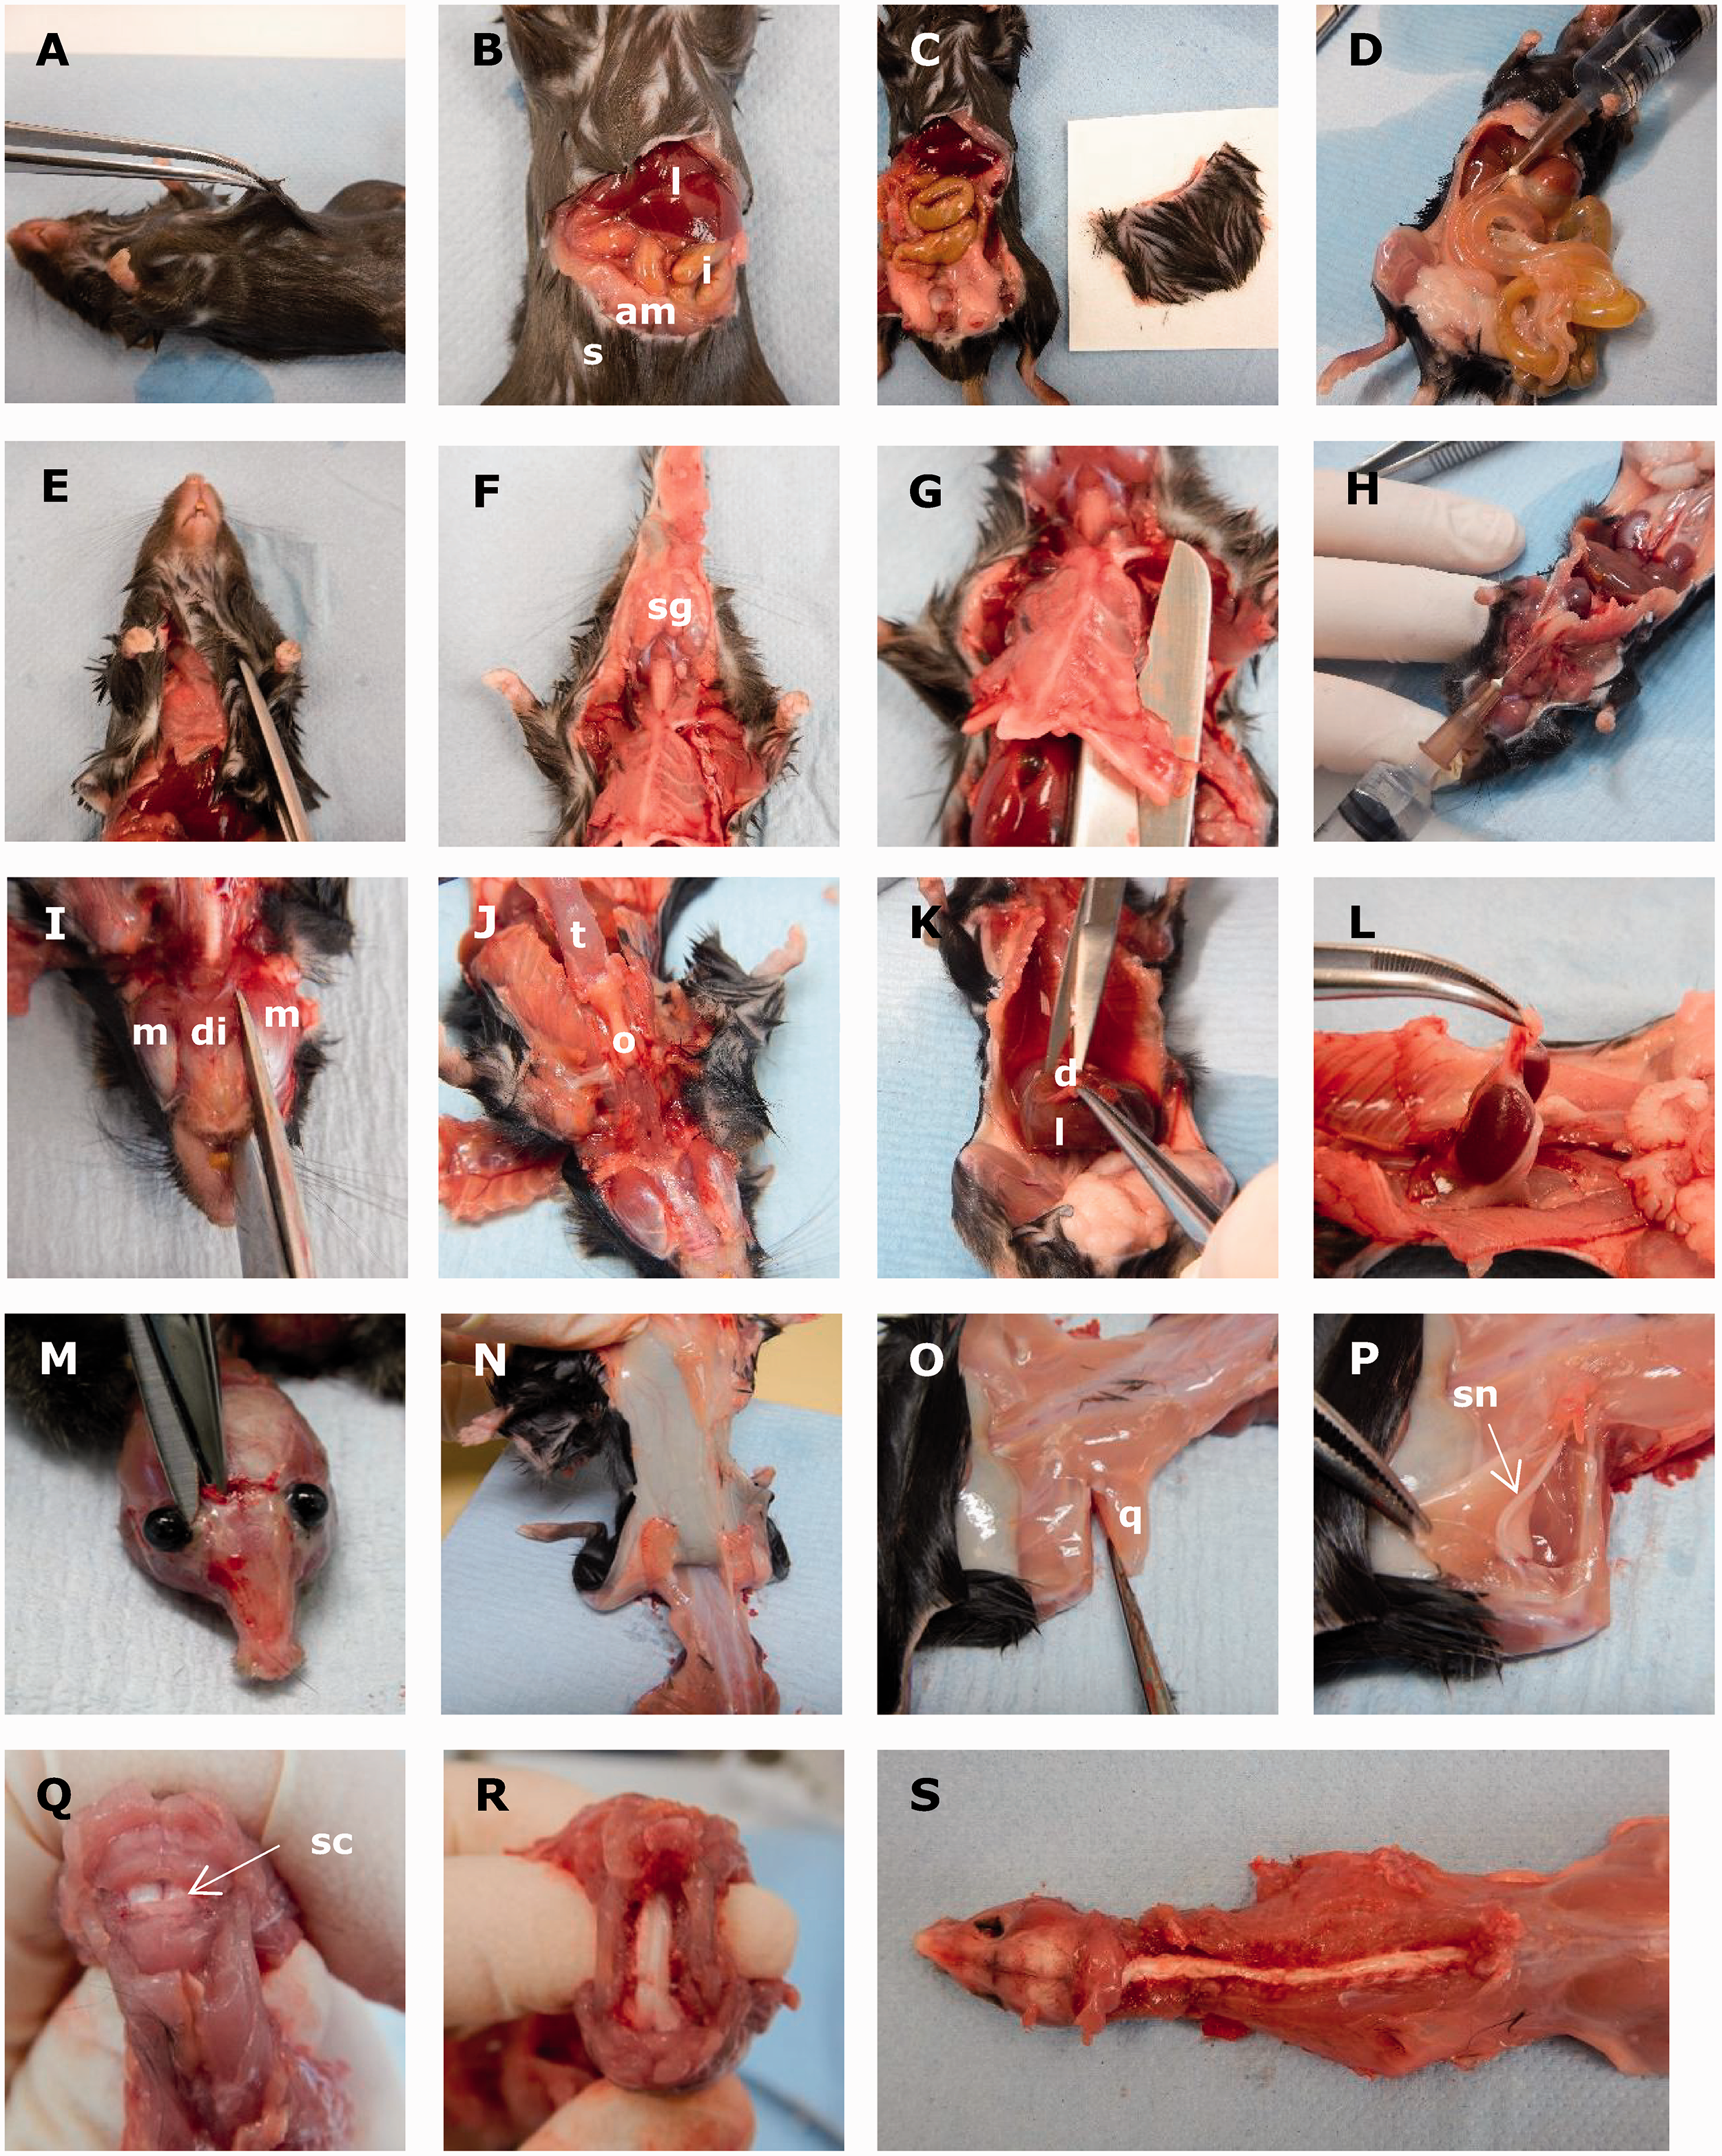
(A–S) Mouse necropsy. Reproductive tract not shown.
Tip: ensure that the ventral skin section is wide enough to accommodate tissue shrinkage and to include mammary tissue.
The intestines and stomach area are then inflated with 10% NBF using a 26G ⅜″ needle and 5ml syringe (Figure 1(d)) to reduce autolysis, which occurs rapidly in the intestines after death.
Caution: over inflation of the intestines may cause rupture or stretch artefact.
The gastrointestinal tract is then removed. Gently hold the stomach, cut the oesophagus and release the intestines. Cut the colon close to the pelvis.
Tip: elevating the body allows the GI tract to fall away from the abdominal cavity, reducing the risk of damage to other tissues when cutting the colon.
The skin from the costal arch to the mandible is removed with care to avoid damage to the salivary glands and trachea (Figure 1(e)). The mandibular salivary glands are left attached to the skin (Figure 1(f)). Next, the sternum and ribs are removed by cutting either side of the thorax, close to the forelimbs, and through both clavicles (Figure 1(g)).
Tip: one scissor blade should go into the suprasternal notch and the other on the outer side of the ribs and clavicle, avoiding damage to the thymus or heart.
Caution: avoid damaging the sternum as this is a useful site to evaluate bone marrow.
NBF is slowly injected via the trachea using a 26G ⅜″ needle to inflate the lungs (Figure 1(h)).
Caution: avoid perforating the trachea multiple times as this will damage the tissue.
Tip: to facilitate lung inflation the needle could be bent on a 90° angle or the body could be held by the head to create a suitable angle for insertion.
The tongue, mandible, thyroid gland, trachea, oesophagus, heart, thymus and lungs are removed together by cutting off the mandible between the digastricus and masseter muscles and gently cutting any remaining tissue attachments (Figure 1(i) and (j)).
Remove the liver and diaphragm together (Figure 1(k)), limiting handling of the liver as it is friable. Both kidneys, with adrenal glands, are removed by holding ureters and cutting the dorsal connections (Figure 1(l)).
If the animal is male, both testes are removed and placed into Hartmann’s fixative. Both epididymides are dissected and placed flat onto paper. The seminal vesicle, prostate and urinary bladder are removed as a whole and placed flat on paper (Figure 2(a) to (d)).
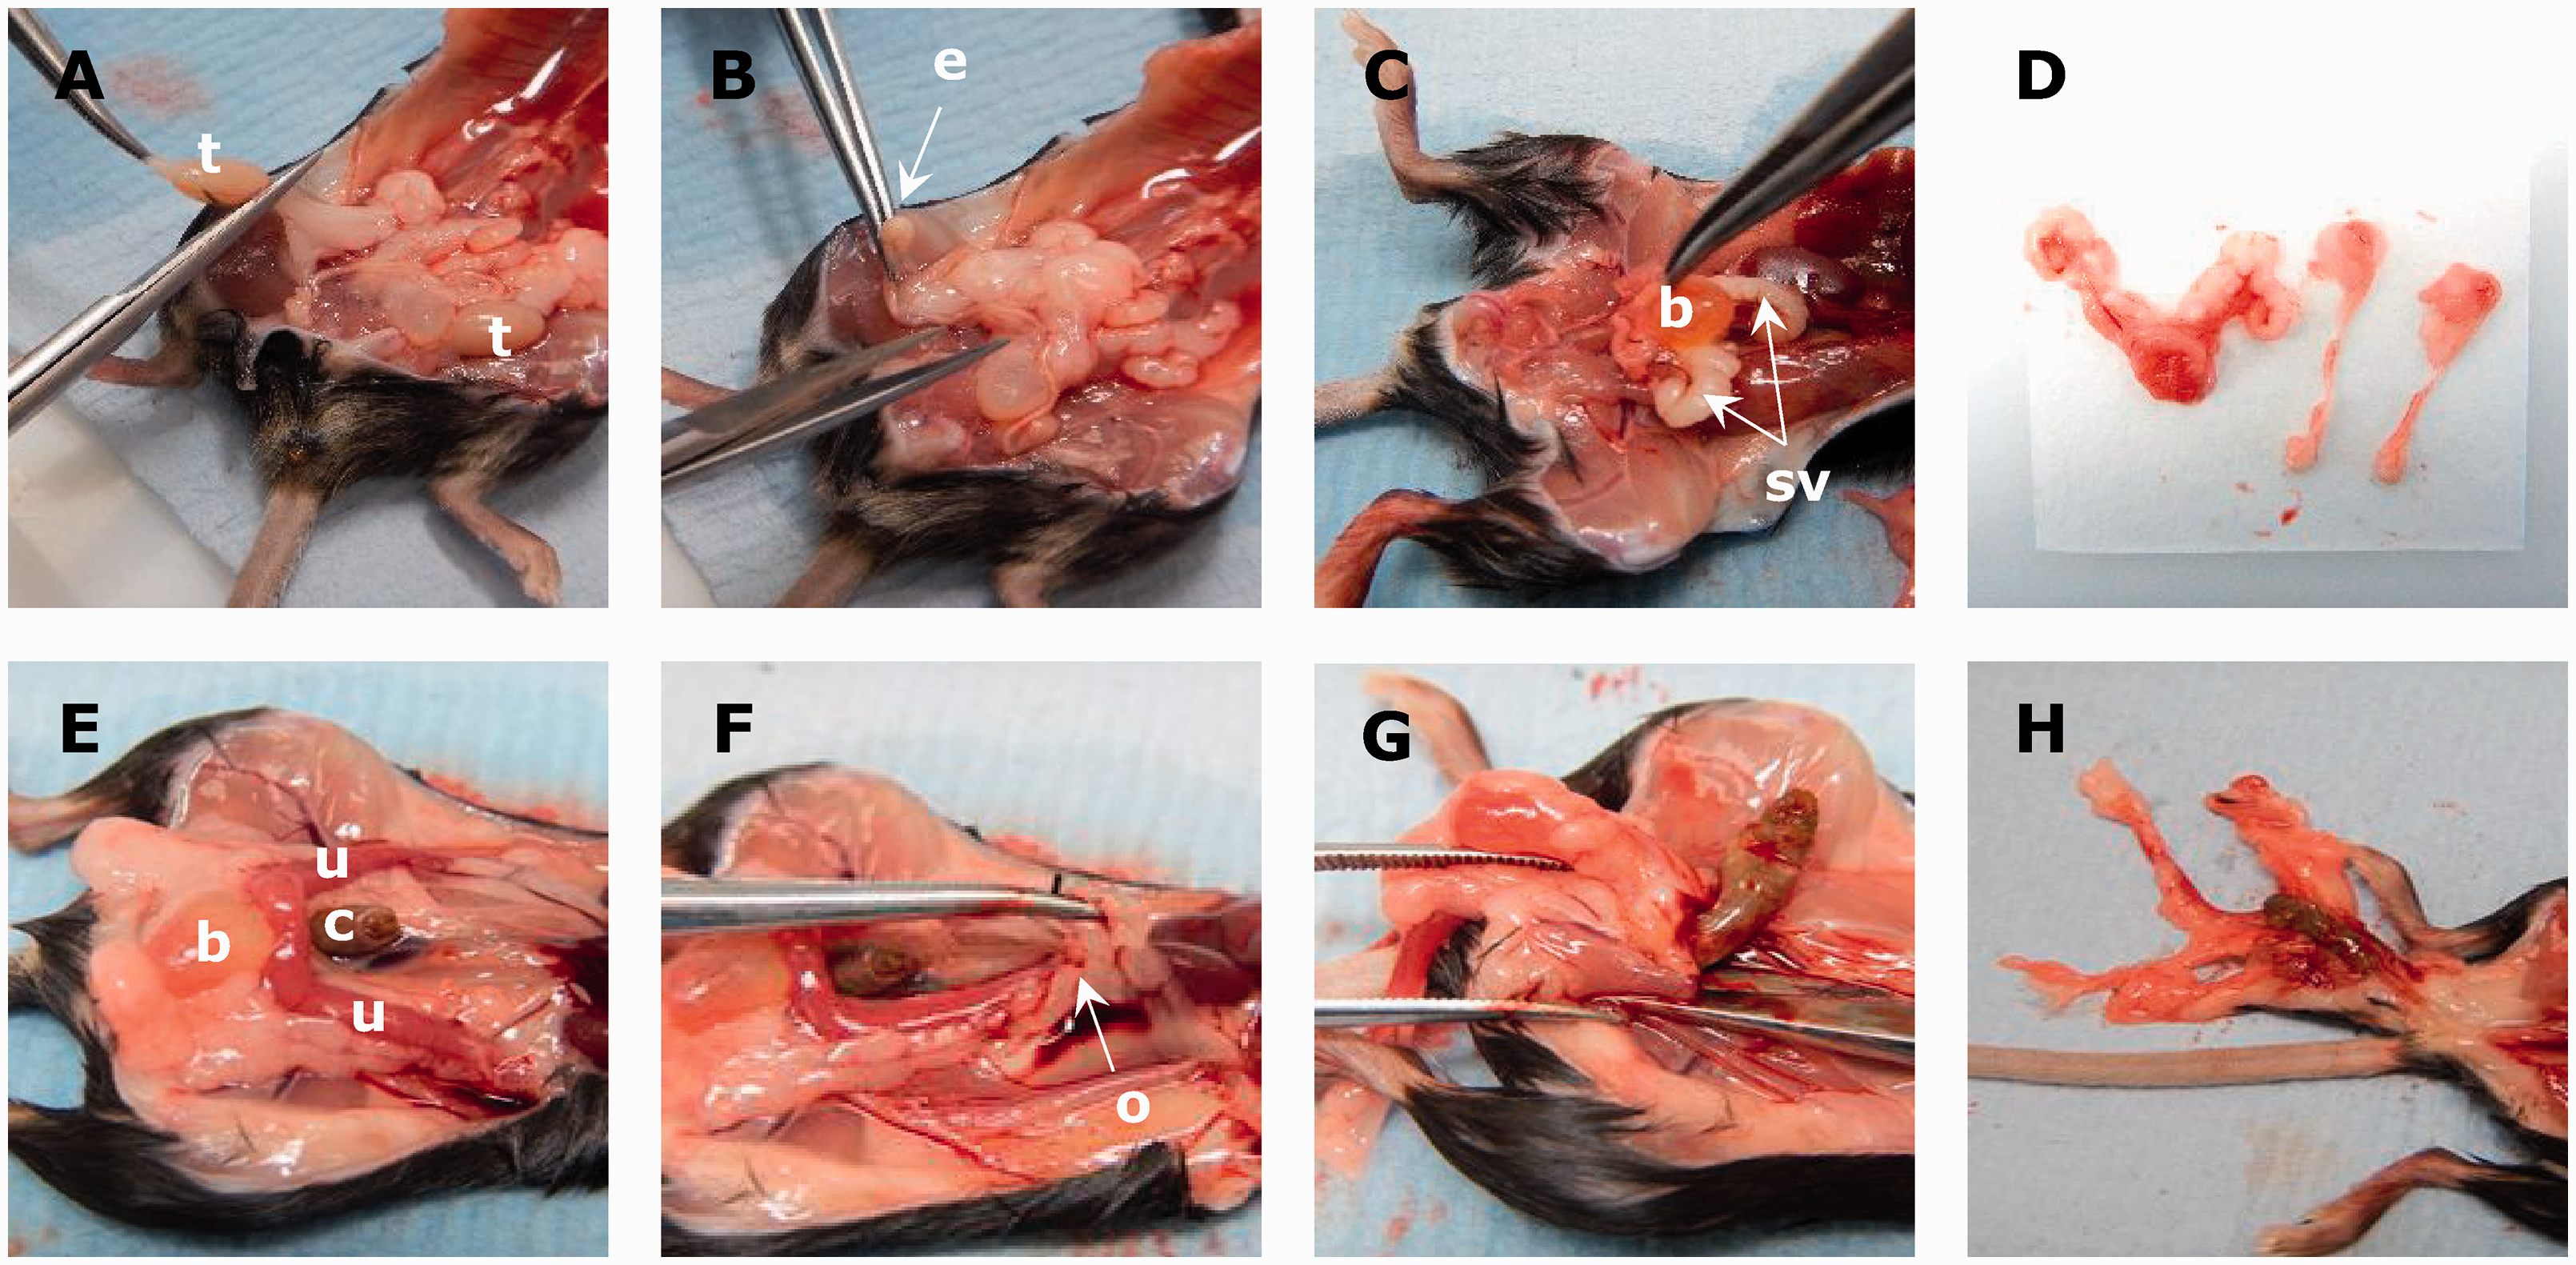
Reproductive tract dissection, male (A–D) and female (E–H).
Tip: for tissues surrounded by a capsule (i.e. eyes and testis) Hartman’s (modified Davidsons) fixative (Cat. H0290-500ML; Merck Life Science) is used to reduce tissue shrinkage and ensure adequate fixation. Samples should be fixed for 24–72 h at room temperature before transferring into 10% NBF.
The female reproductive tract should be removed whole from the ovaries to the vulva, cutting through the pelvic girdle (Figure 2(e) to (h)). The urinary bladder should be left attached but the colon should be removed before placing it on paper.
Skin is removed from the skull and it is opened between the orbits (Figure 1(m)) to allow fixative to access the brain. Both eyes should be removed with the optic nerve attached and placed into Hartmann’s fixative. The skin above the shoulders should be incised, reflected towards the base of the tail, removed (Figure 1(n)) and placed flat on paper.
The quadriceps muscle is removed from one hindlimb by cutting along the femur (Figure 1(o)). The sciatic nerve is exposed by dividing the biceps femoris muscle (Figure 1(p)), removed and placed on paper.
Caution: minimise handling of the sciatic nerve as it is easily damaged.
The remaining hindlimb is removed (at the hip) and the hindpaw is removed. This sample contains the stifle joint and can be decalcified for histological examination.
Starting from the atlanto-occipital space the vertebral arches on both sides are cut and the dorsal processes cut and retracted to expose the spinal cord up to the lumbar region (Figure 1(q) and (r)). The carcass is placed in 10% NBF (Figure 1(s)) and fixed for a minimum of 24 h.
Tip: exposure of the spinal cord is the most technically challenging aspect of the procedure. We advise experimentation with curved and/or straight spring scissors and carcass positioning (flat on the dissection table or curved in the hand) to reduce tension on the tissues.
This quick method for a full mouse necropsy allows for the preservation of all tissues of the mouse and maximises the data that can be obtain from a single specimen. This protocol can easily be replicated with rats, hamsters, rabbits, etc, although differences between species must be taken into account. Different fixatives can also be used to suit specific research needs.
The tissues can be left in formalin or, after the minimum fixation period, they can be trimmed, processed, paraffin embedded, sectioned into slides and stained for histological analysis. Note that any bone samples must be decalcified prior to embedding to make them easier to cut and avoid shattering. 1
Footnotes
Acknowledgements
The authors thank Dr Louise Tinsley and staff of the Mary Lyon Centre.
Data availability statement
Data sharing is not applicable to this report as no datasets were generated or analysed during the current study.
Declaration of conflicting interests
The author(s) declare no conflicts of interest with respect to the research, authorship, and/or publication of this article.
Funding
The author(s) received no financial support for the research, authorship, and/or publication of this article.