
Abstract
Digital smile design (DSD) plays an essential role in the planning of aesthetic treatments. However, most digital smile designing software programmes are expensive and require specialised training and skill for effective implementation. This paper illustrates the use of Adobe Photoshop and Microsoft PowerPoint, which are economical and user friendly for planning aesthetics in a clinical case.
Learning Objectives
To discuss the technique of smile design using common software programs
To familiarise readers with treatment planning using PowerPoint
Introduction
The goal of any aesthetic treatment planning is to understand the patient’s perception of facial aesthetics and smile. Effective communication can be achieved through digital smile design (DSD) (DSD App LLC, Madrid, Spain) for patients who are unsure of the end result. Using DSD, the patient’s smile can be digitally simulated, and a digital mockup can be fabricated as per the patient’s wish. 1 The acceptance rate of the proposed treatment plan is higher as the patient is involved in their own smile design process. 2 Virtual smile designing however requires specialised equipment, expensive software or major investment to implement. This paper presents a technique of smile designing which is solely carried out using generic software programs such as Photoshop (Adobe, San Jose, CA, USA) and PowerPoint (Microsoft, Redmond, WA, USA), which are user friendly and cost effective.
Case report
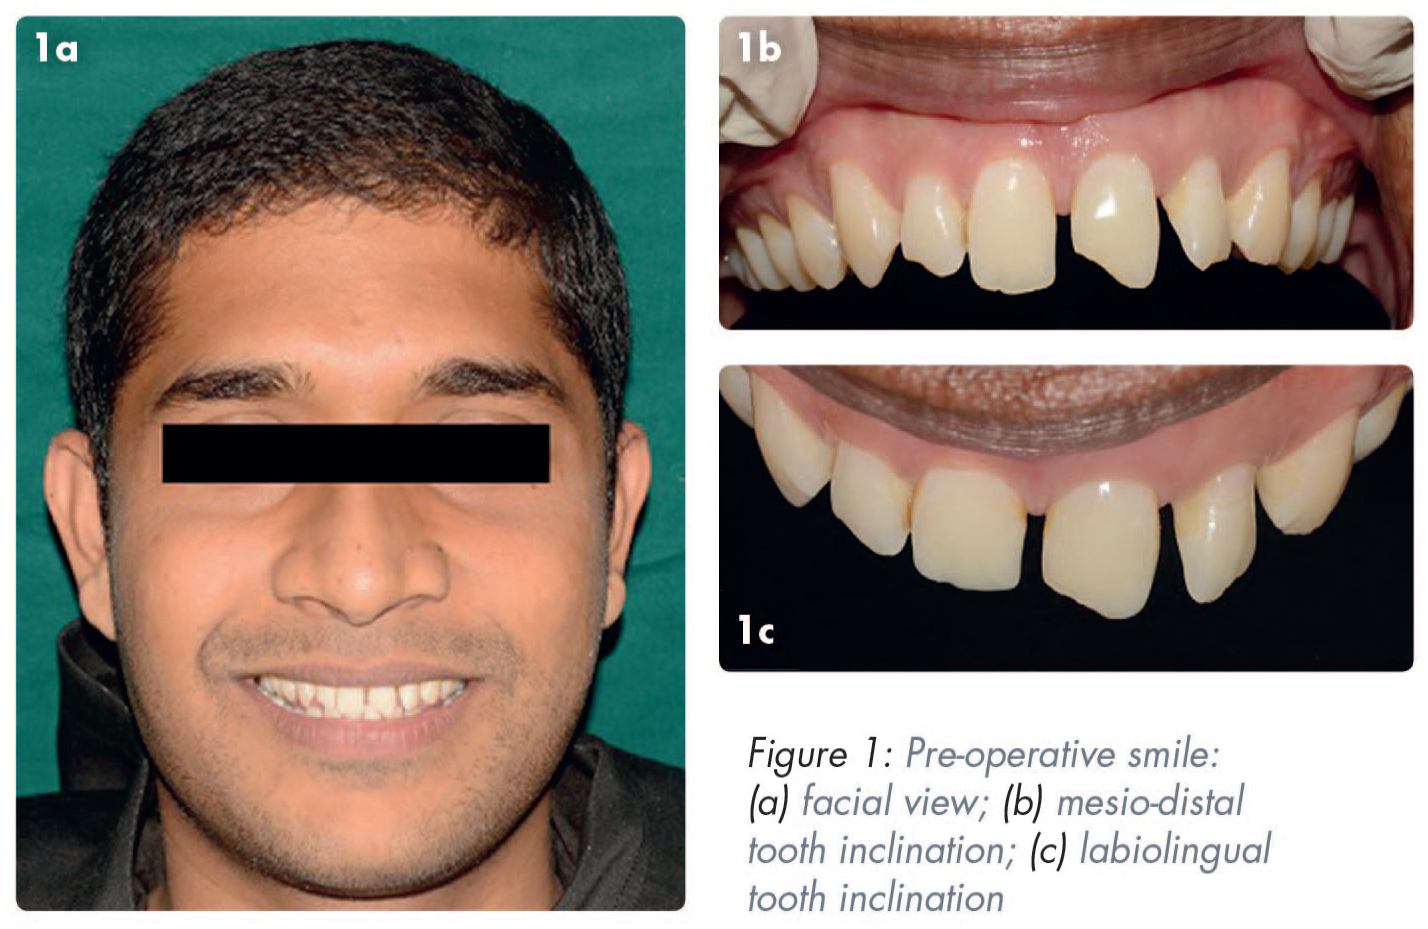
A 27-year-old male patient sought dental treatment with the complaint of an unaesthetic smile. Intraoral clinical examination showed an unequal space distribution between his maxillary anterior teeth and disproportion in tooth shape and size (Figure 1). Ellis class I fracture of upper left central incisor (UL1) and upper right lateral incisor (UR2) was also noted. PowerPoint was used to plan the case digitally and the workflow is described below.
Digital smile design
Three standard photographs and videos were taken using a Nikon D5200 camera (Nikon, Tokyo, Japan) with a Tamron 90mm macro lens (Tamron Co Ltd., Saitama, Japan) and a ring flash to aid in lighting. 3 Photoshop was used to edit the pictures, wherever necessary. The below photographic views were taken:
full face with a wide smile and the teeth apart
full face at rest
retracted view of the maxillary teeth slightly apart
Steps to create a smile design template using PowerPoint (video 1)
Step 1
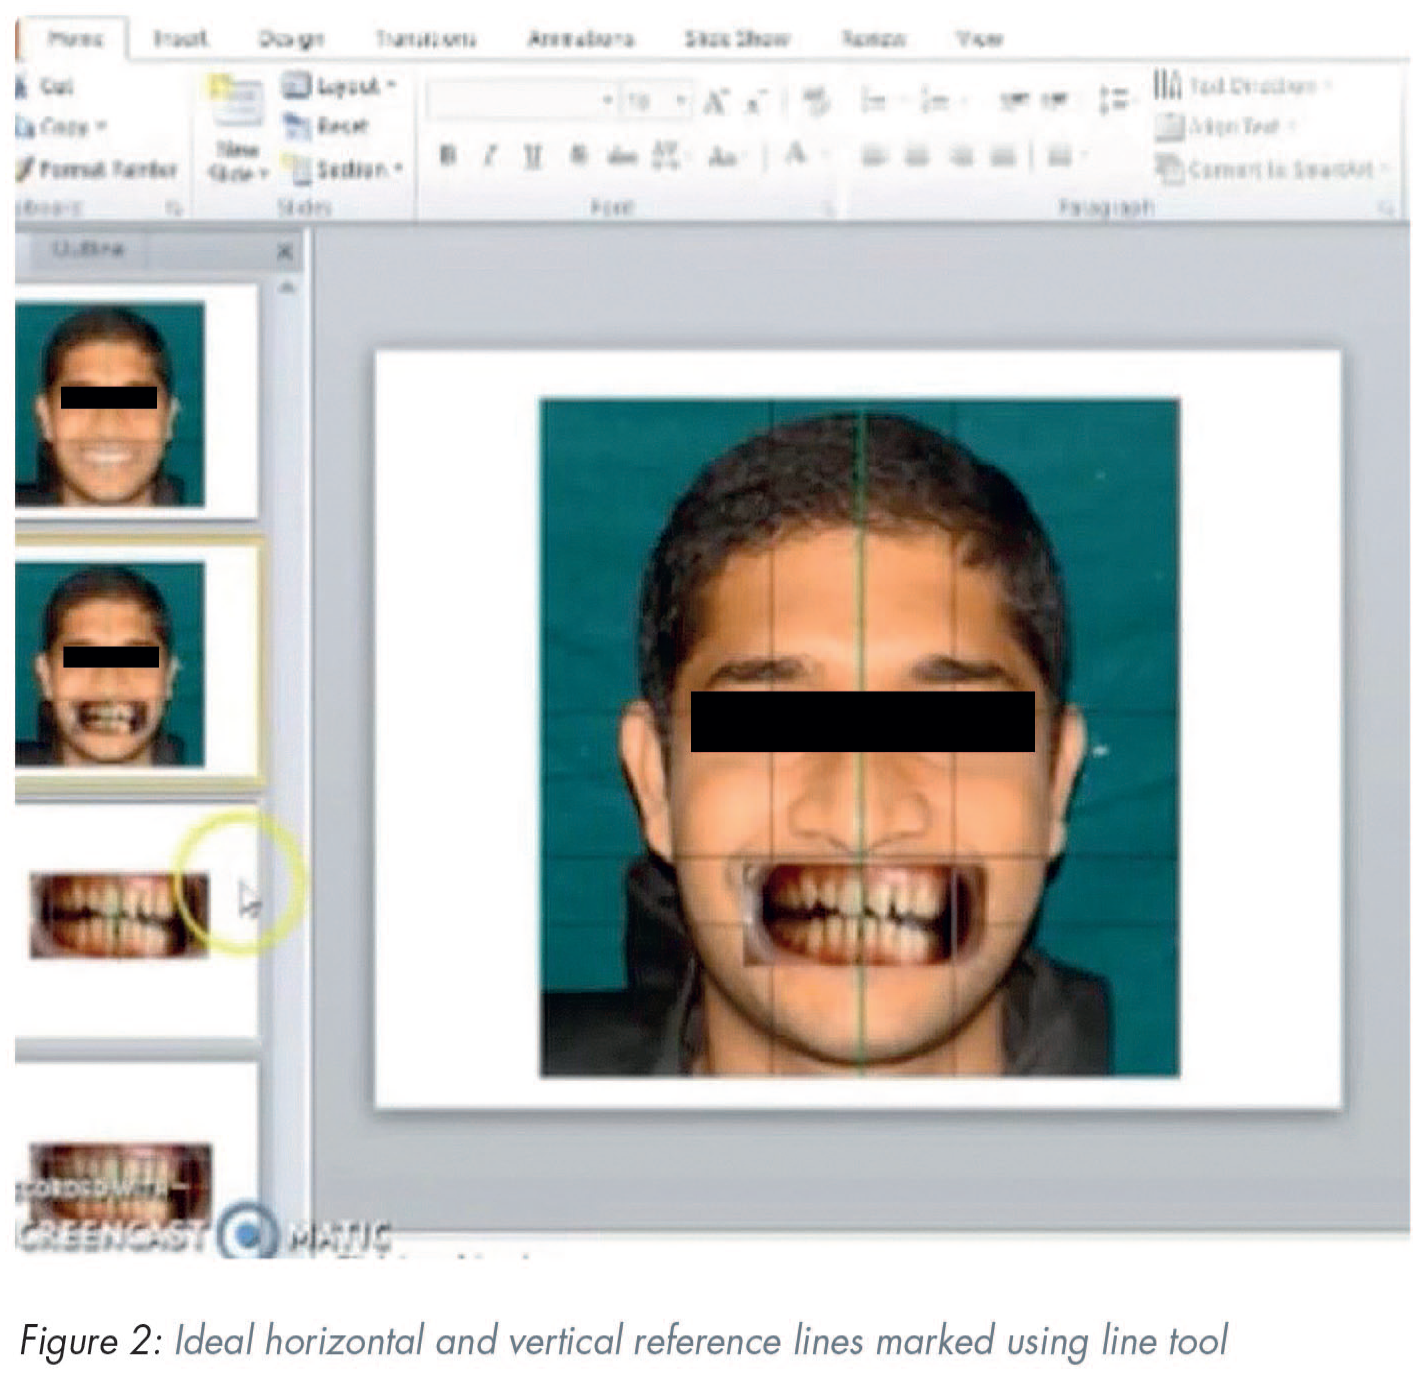
In PowerPoint, a blank slide was created and two lines were placed on the centre of the slide, forming a cross. The photograph of the face at rest was placed behind these lines. A line was drawn between the pupils; the interpupillary line was the first reference line to establish a horizontal reference plane. Then a vertical line was drawn to represent the midline of the face.
Step 2
The facial photograph of a wide smile and the teeth apart was moved behind the cross to determine the ideal horizontal plane and vertical midline of the face (Figure 2). This photograph was then cropped to show only the intraoral view of the teeth which needed corrections.
Step 3
Three intraoral reference lines were marked: one line on the incisal edges of central incisors, a straight line connecting the zeniths of the maxillary canines and another vertical line passing through the dental midline. This assists in duplicating the cross, that is, the reference interpupillary and facial midline in the intraoral view. The current photo was replaced with a new photograph of the retracted smile and was oriented using these reference lines.
Step 4
Next, rectangles were placed over the individual incisors to establish the required length and width of the incisors in accordance with the recurring aesthetic dental (RAD) proportion (Figure 3). 4

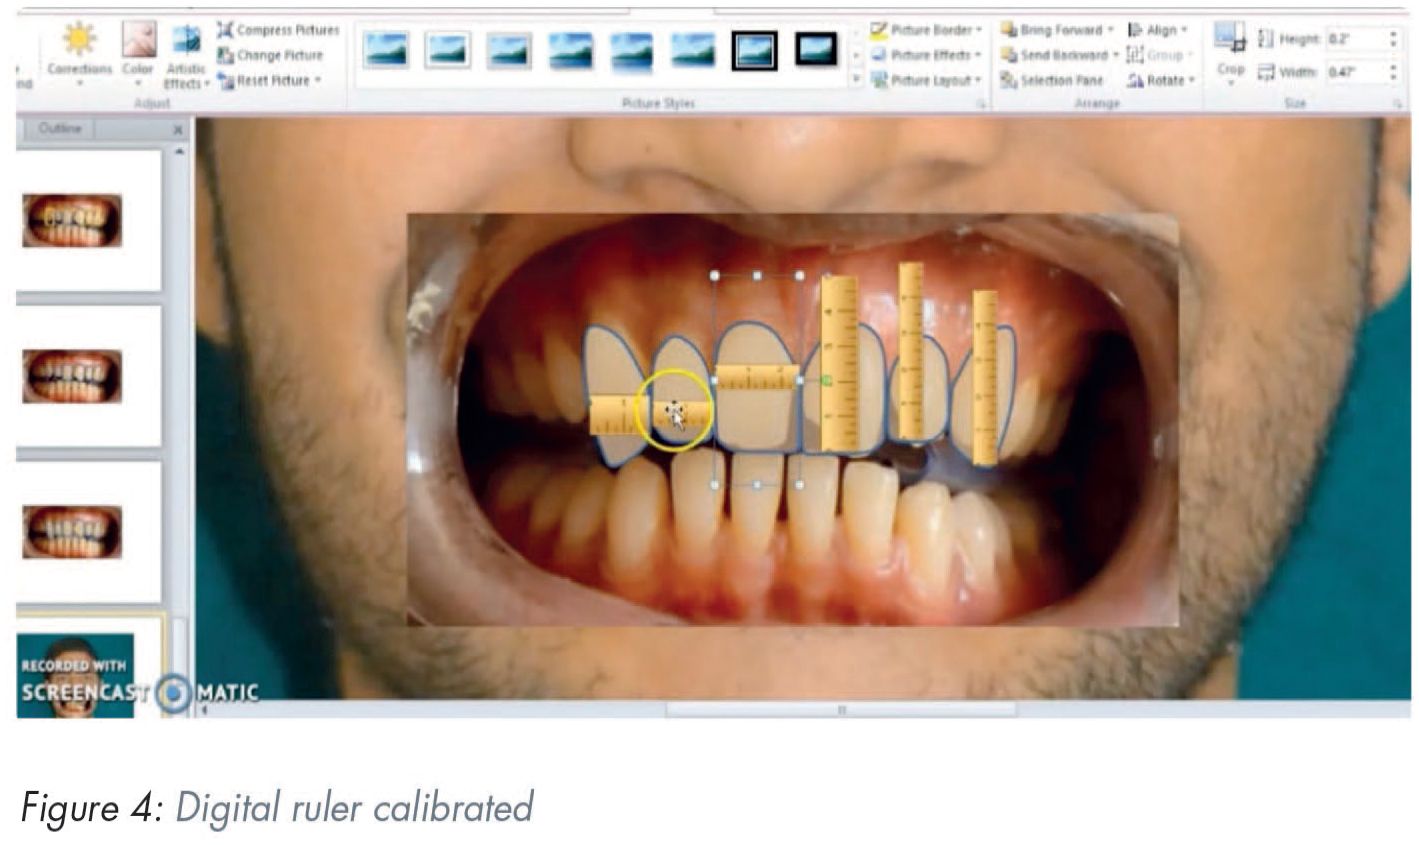
Step 5
The width of the central incisors was 8.5mm when measured on the study model. This measurement was used to calibrate the digital ruler (Figure 4) and the proportions of central incisors were modified to the ideal proportions.
Step 6
Mockup transfer and treatment planning: All the above measurements were then transferred to the cast for a diagnostic wax up. The treatment plan involved intentional root canal therapy (RCT) for upper left central incisor (UL1) and upper left lateral incisors (UL2), followed by full crowns. Veneers were planned for upper right central incisor (UR1), upper right lateral incisor (UR2), upper right canine (UR3), and upper left canine (UL3). RCT was completed and mockup transfer was carried out with the help of a silicone index (Aquasil®, Dentsply Caulk, Milford, DE, USA) and bis-acryl temporary crown and bridge material (Luxatemp, DMG America, Ridgefield Park, NJ, USA). Minor changes were made according to the patient’s desires. Shade matching was carried out. Impressions and final photographs were taken to record these changes.
Step 7
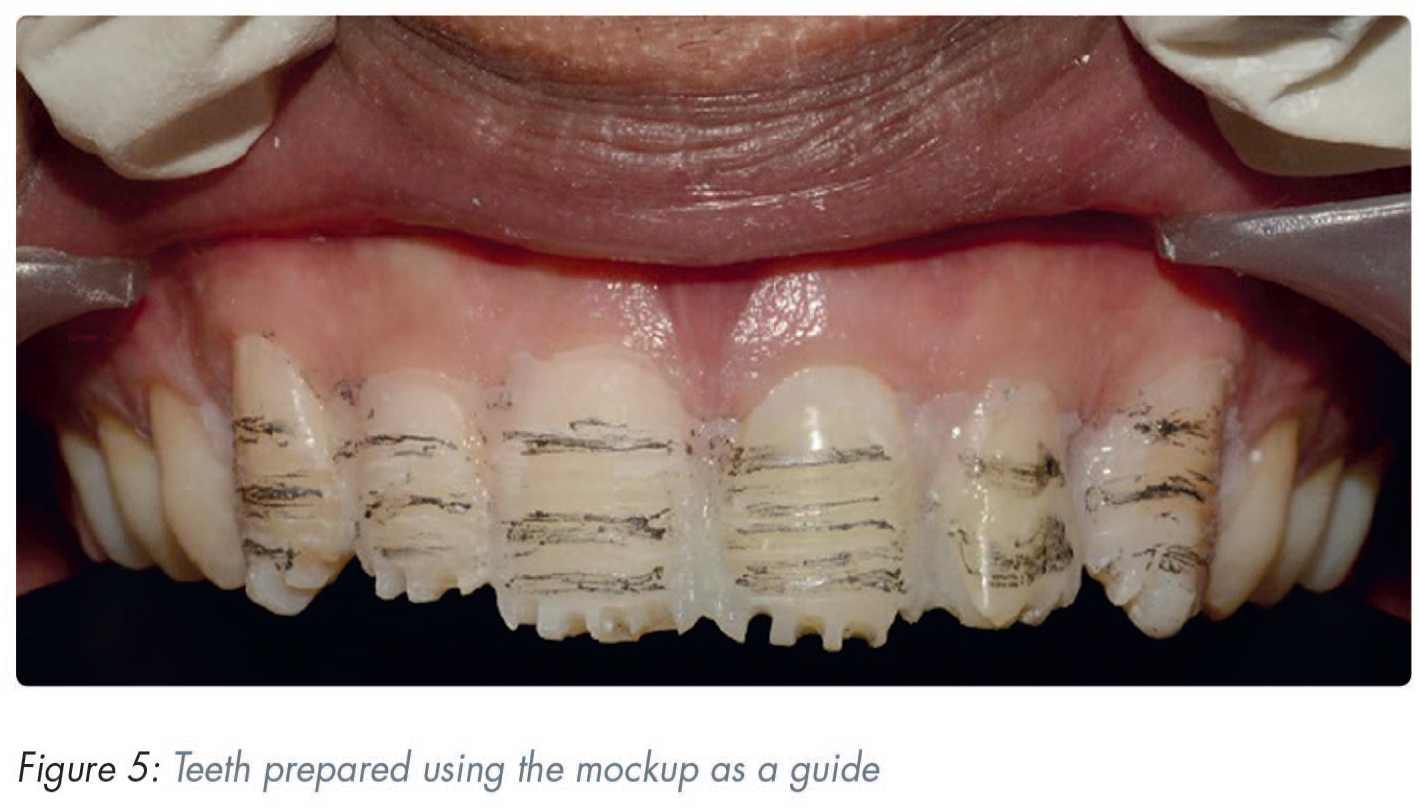
Tooth preparation, impressions, provisionalisation: After two weeks, veneer tooth preparations were carried out in the conventional manner using the mockup as a guide (Figure 5). Gingival retraction (Ultrapack, Ultradent, South Jordan, UT, USA) and final impressions were made conventionally. Provisionals were fabricated using the silicone guide and were bonded to the teeth following spot etching. The final impressions were made using addition silicone (Aquasil, Dentsply Caulk, Milford, DE, USA) and photographs were sent to the dental laboratory for the fabrication of the final restorations.
Step 8
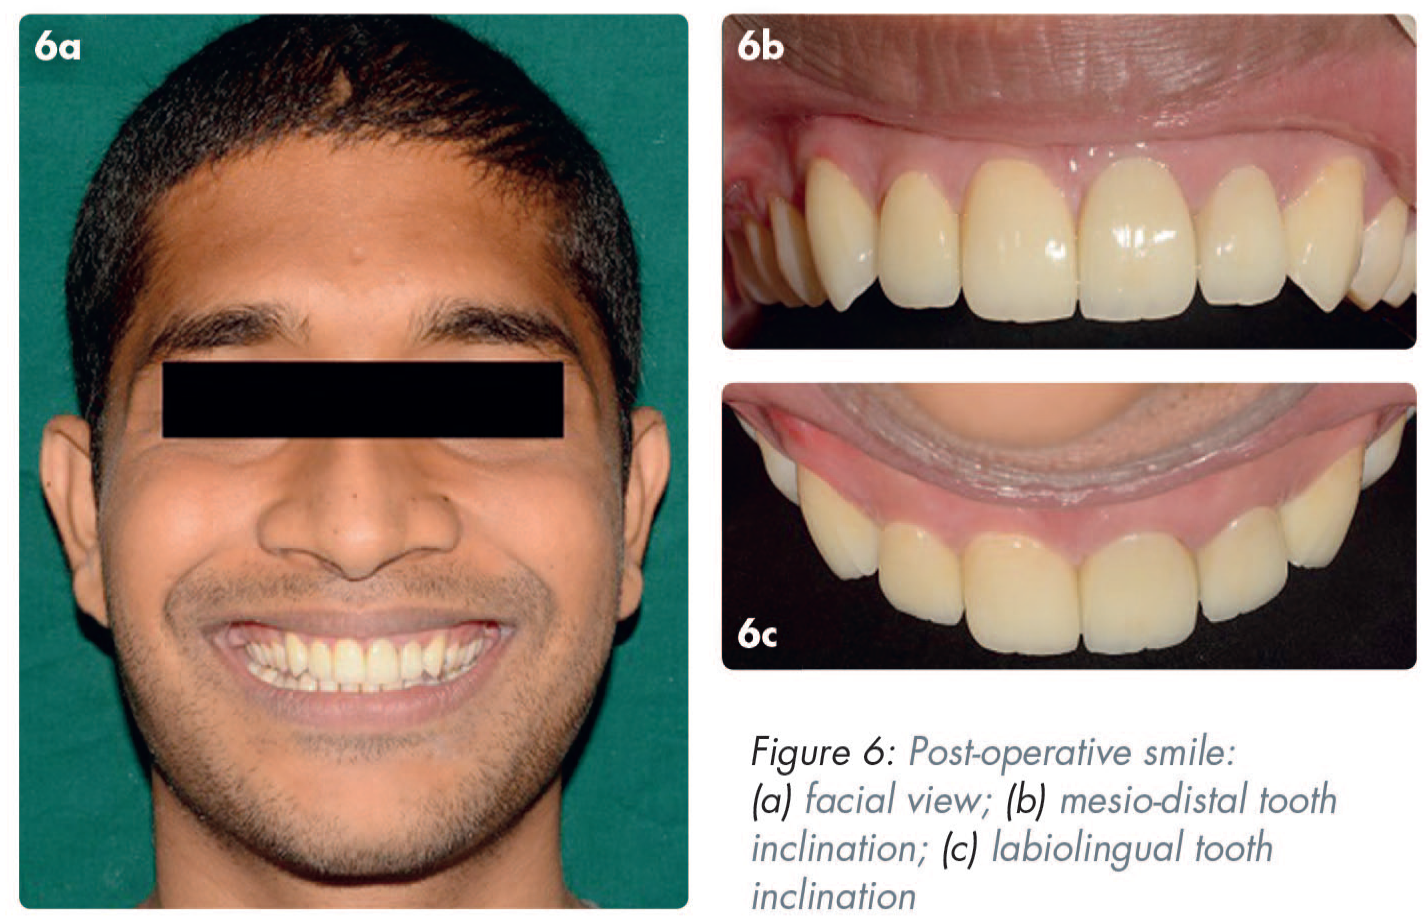
Final restorations and follow up: Lithium disilicate (E-max®, Ivoclar, Zurich, Switzerland) crowns and veneers were bonded in the conventional manner. Follow up was done at two weeks and six months (Figure 6).
Discussion
This technique illustrates a method by which clinicians can objectively overcome some of the obstacles associated with providing predictable aesthetics, in consultation with the patient. Digital imaging and designing can help a patient visualise the expected outcome before treatment begins, thus enhancing the predictability of the treatment by eliminating the communication barrier.5,6 In their study, Cervino et al. 7 concluded that DSD aids the clinician and patient in the treatment planning, as well as the aesthetic and functional rehabilitation of the patient due to the “communicative” nature of the software. However, for digital planning to be precise, the photography protocol followed should be accurate. 3
DSD also plays a crucial role in psychologically improving the patient’s attitude towards treatment as it involves the patient in the designing process. 8 Patients can also compare and evaluate the pre- and post-treatment changes. It also leaves lesser scope for regret post-treatment where the irreversible procedures cannot be undone and can therefore have important medico-legal implications.
Various tooth proportions in relation to the length and breadth (62–80%) of teeth have been documented 9 and these can be used as a template for smile design. The selection of an ideal proportion also depends on arch shape and the alignment of the teeth. In the present case, the patient preferred an alignment according to RAD proportion 4 and hence this was used. Once the final composition of the digital smile was approved by the patient, it was verified by means of a mockup transfer. At this stage a few artistic modifications were made to harmonise the facial form and dental composition. 10 This final approved smile design was then sent to the lab technician to ensure a predictable aesthetic outcome.
This simplified smile designing technique uses generic software programs like Photoshop and PowerPoint. These can be utilised by clinicians who are new to the field of DSD as they do not require specialised clinical training or skill to ensure effective use. They also provide an economical advantage over specialised design software programs.
Conclusion
Generic software programs like Photoshop and PowerPoint can be used to design smiles successfully and economically.
Footnotes
Acknowledgements
The authors would like to thank Mr Shameer Da Costa B.E. (Computer Science) for his immense help with the preparation of the video and figures, and Katara Dental Private Limited (Pune, Maharashtra, India) for dental lab support.
Supplemental material
Supplemental material for this article is available online in the form of a short video showing the PowerPoint design process in action. Scan this QR code to login to your account, then access this paper to view supplemental material under the contents tab.
References
Supplementary Material
Please find the following supplemental material available below.
For Open Access articles published under a Creative Commons License, all supplemental material carries the same license as the article it is associated with.
For non-Open Access articles published, all supplemental material carries a non-exclusive license, and permission requests for re-use of supplemental material or any part of supplemental material shall be sent directly to the copyright owner as specified in the copyright notice associated with the article.