
Abstract
Fabricating a crown for a tooth that serves as an abutment for an existing removable partial denture (RPD) provides a restorative challenge. Typically, the compromised tooth requiring an extra-coronal restoration is initially restored. It is followed by the construction of a new RPD that accurately fits the restored abutment. An increasingly common scenario is that the existing RPD is deemed clinically acceptable and, therefore, does not require replacing. This results in the clinical dilemma of fabricating a crown for an abutment tooth, while also considering how the contours of this restoration will fit with the RPD’s clasps and rests. This can be achieved through the use of various techniques subdivided into indirect, direct and combined indirect-direct. This article describes an indirect-direct technique used in conjunction with the functionally generated path technique to achieve accurately a stable record of the patient’s occlusion in the fabrication of a new crown to an existing RPD.
Learning Objectives
To understand the various techniques available to fabricate a new crown to an existing removable partial denture
To understand how the functionally generated path technique can be used to achieve a stable and accurate record of the dynamic occlusion
Introduction
Demographic studies suggest that although there has been a dramatic decline in the proportion of the UK edentulous population, nearly one in five (19%) adults wear a denture. 1 The data demonstrates that the older population are retaining their dentition for longer, thus increasing the interface between prosthodontic and restorative challenges. 2 An increasingly more frequent clinical dilemma faced by dentists is the construction of an extra-coronal restoration to fit in around an existing removable partial denture (RPD). This is particularly challenging if the tooth requiring the restoration also serves as an abutment for the rest seat and clasp assembly that is supporting and retaining a chrome cobalt denture.
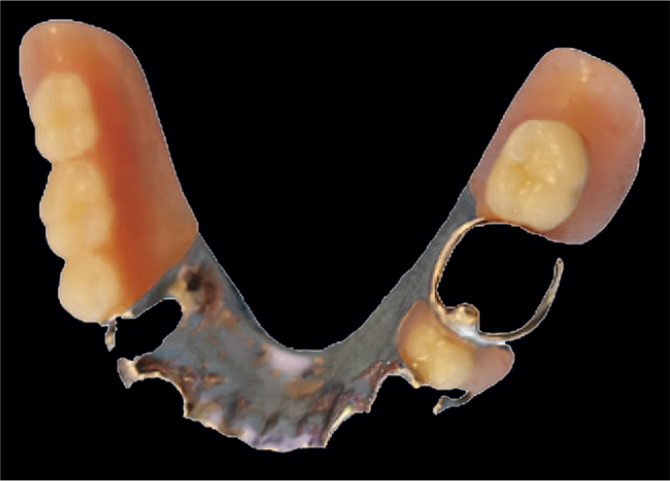
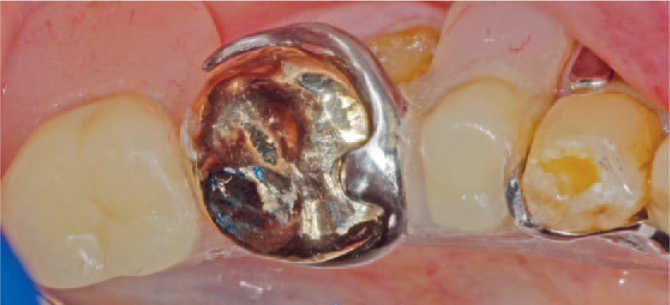
The case in Figure 1 illustrates the complexity of design that exists with some partial chrome dentures. Several direct, indirect and indirect-direct techniques have been described in literature for these types of cases.3-6 Despite innovations of digital impression systems over the last decade, accuracy and results are unpredictable, particularly for recording inter-occlusal contacts.7-9

An example of a chrome cobalt RPD with a complex design
Techniques available to fabricate a new crown to an existing denture
There are a number of techniques available for this clinical situation. These subdivide into direct or indirect.
The indirect technique
This technique involves taking the working impression for the crown with the denture in situ, allowing the technician to fabricate a model and the new crown around the denture. Therefore, this technique is only suitable for patients willing or able to temporarily part with their denture. In addition, there are two potential problems associated with this technique.
Firstly, there is no guarantee that the partial denture does not move intraorally during placement of the impression tray and impression material – the resultant crown fabricated to this false position would not allow the denture to relocate accurately intraorally around the new crown. Secondly, there is a significant risk that on removal of the denture from the model, its relocation is inaccurate – the slightest difference would affect the final result when refitting is undertaken intraorally.
The other option of taking an impression with the denture in situ and then removing the denture from the impression before sending it to the technician is not feasible as it is unlikely that the thin clasps would be reproduced accurately in the new model. Even if they were, being so thin, they would break off on removal of the impression from the fabricated model.
The direct technique
This uses a chairside-adjustable material (such as resin or wax) to form the pattern for the restoration intraorally directly on the tooth preparation. Although this technique circumvents the patient having to be without their denture between appointments, the options of crown material are limited to all metal crowns and to using the pattern obtained for scanning. This entails milling the crown in zirconia. 10
This arduous and technique sensitive option relies on the clinician’s ability and the understanding that the incremental build-up of the crown intraorally is time consuming. The technician is not involved other than in fabricating the final crown from the resin pattern provided to them. The absence of a working model means that further refinements and corrections of the fabricated pattern, particularly at the finishing margins, are not possible, with the subsequent high probability of a compromised final marginal fit.
The indirect-direct technique
The combined approach of following a conventional impression without the denture in place allows the technician to fabricate a working model and to provide an initial well-fitting acrylic resin pattern coping, which is subsequently fitted intraorally onto tooth preparation. The coping is then modified with the acrylic beading technique around the clasp assembly. This blended approach technique combines the advantages of both direct and indirect techniques.
Achieving functional occlusal harmony is paramount when restoring a tooth with a crown. The functionally generated path (FGP) technique involves recording a registration of the various paths of mandibular excursions by the occlusal surfaces of the opposing arch onto the occlusal surface of a prefabricated coping. 11 This coping then acts as a FGP occlusal record for the future crown and is recorded using a plastic acrylic medium, such as Acrylic Pattern Resin LS (GC Corporation, Tokyo, Japan) or Reliance DuraLay Inlay Pattern Resin (Dental Manufacturing Company, Worth, Illinois, USA). The FGP created is classically referred to as a ‘three-dimensional static expression of dynamic tooth movement’. 12
This approach provides a much more accurate alternative to simulating the mandibular movements using either a semi-adjustable or fully-adjustable articulator.
The technique was initially described by Meyer, who stated that occlusal surfaces exhibit certain curved pathways which balance and function harmoniously with the movements of condyles in the glenoid fossa. 13 Since then, the FGP technique has been implemented for use in the fabrication of dentures, complete oral rehabilitation, implants, bridges, and both conventional or CAD/CAM generated restorations.14-17
Shillingburg et al. 18 discussed the following occlusal requirements for this technique to be employed:
As this technique relies on a conformative approach, the existing occlusion prior to treatment must be satisfactory
Ideal anterior guidance must be present
Posterior interferences should not be present as these would also guide the mandibular movements and perpetuate occlusal discrepancy
As the opposing occlusal table serves to mould the occlusal surface of the restoration, the opposing dentition must be in a good status, with the absence of caries, severe rotations, overeruption and unsatisfactory restorations
This clinical case report describes the use of a FGP indirect-direct technique to allow the fabrication of a new crown to fit accurately with an existing partial denture.
Clinical report
An 83-year-old male patient attended the clinic with an endodontically treated lower left first molar (LL6) requiring a cuspal coverage restoration. The patient presented with a well-fitting and functioning, Kennedy Class I modification 1 Chrome Cobalt Removable Partial Denture (RPD), which was constructed two years previously (Figure 2).
Occlusal view of the existing RPD
The lower left first molar served as an abutment for this prosthesis, with a mesial occlusal rest seat and conventional, occlusally-approaching buccal active and lingual reciprocating clasp arms. During discussion with the patient regarding restoration of the molar, he was informed that he would require a conventional crown followed by the fabrication of a new denture around it which, in turn, would require multiple visits. The patient understood, but due to his age and health issues, this was something he wished to avoid.
As the patient was satisfied with his comfortable and well-fitting existing denture, he asked if it would be possible to simply fabricate the new crown around the denture. Therefore, it was decided to use the indirect-direct technique to retrofit a full gold crown around the existing RPD without the need for the patient to surrender his denture temporarily. The patient was unconcerned that the final restoration would be in gold. Furthermore, he understood that this was an unusual technique that could result in failure, but consented for photographs to be taken with a view to publication should the technique provide an excellent clinical outcome.
The general treatment plan for the patient included oral hygiene instruction, direct restorations as necessary, as well as a routine scaling and polish. Following investigation of the previously successfully completed endodontic treatment and removal of all caries and undermined dentine, the decision was taken that the tooth could be viably restored in amalgam with a Nayyar core with a view to the provision of a crown. At a subsequent appointment, a conventional full gold crown preparation was performed, ensuring sufficient clearance between the relevant clasp and rest seat as well as the opposing tooth (Figures 3a and 3b).
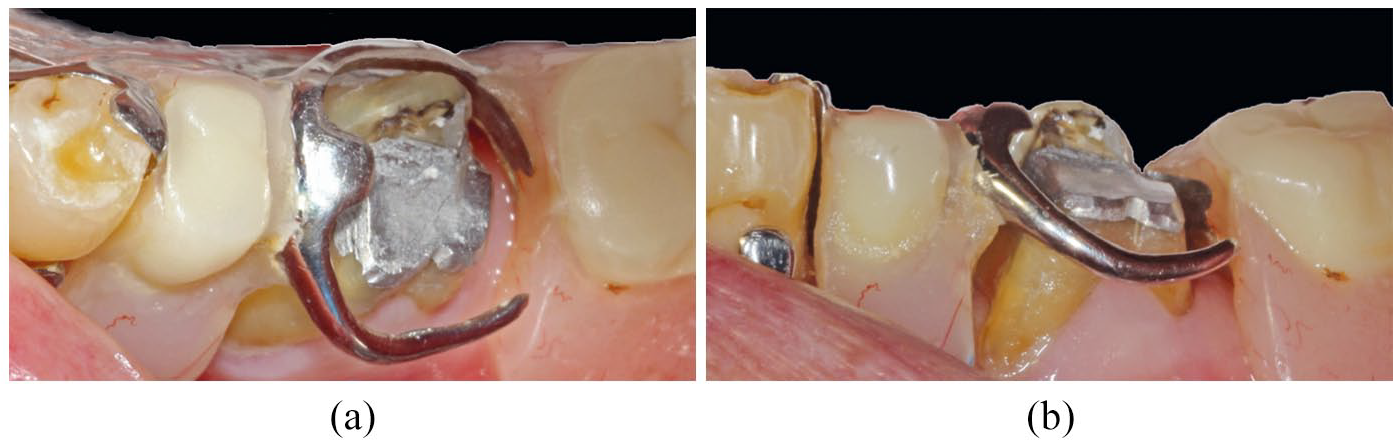
Occlusal and lateral views of the RPD seated to ensure the crown preparation achieves adequate clearance from the clasp and rest
Subsequently, working impressions were taken with the RPD accurately located in polyether material (3M Impregum, St. Paul, Minnesota, USA). Taking care not to tear the impression material, the RPD was removed from the impression. The tooth was temporised with a provisional crown using Integrity (Dentsply Sirona, Konstanz, Germany) and cemented with a temporary cement (Kerr Dental TempBond, Orange, California, USA). Adjustments to the provisional crown were carried out to ensure that the patient could passively seat their RPD around the crown without displacing forces.
The impression was disinfected as per current protocols and sent to the laboratory with instructions to pour a working model and to provide a well-fitting acrylic coping for the next appointment.
On the following visit, after removal of the temporary crown and thorough cleaning of the preparation, the acrylic resin coping fabricated by the laboratory was placed onto the preparation and examined for accuracy of fit and marginal integrity (Figure 4).
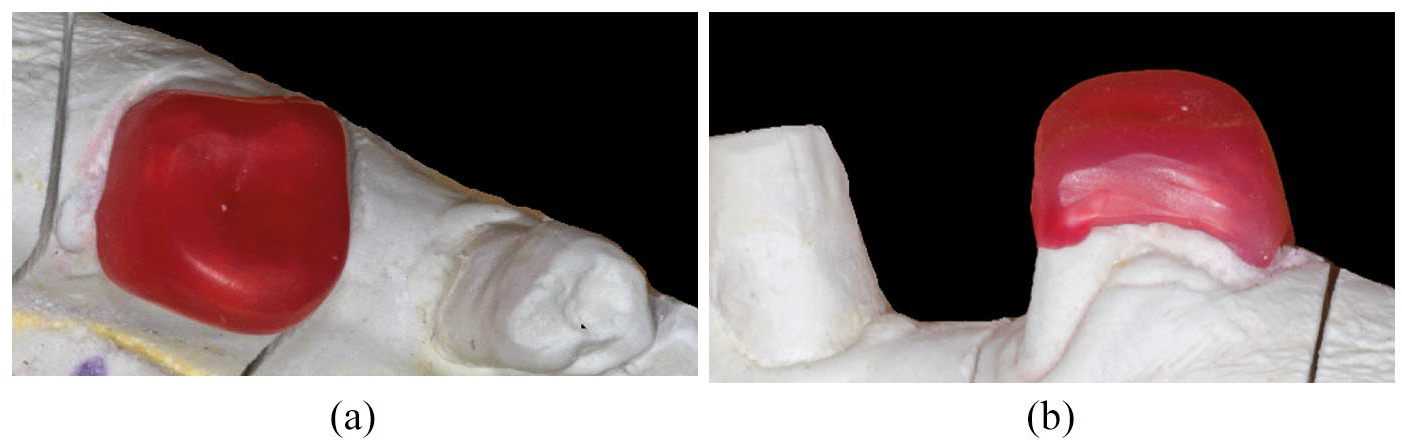
Occlusal and lateral view of coping placed onto the working cast
The coping was adjusted lightly with a super fine diamond bur (FG559 Ultrafine Truncated Cone Diamond Bur, Unodent, Wickham, Essex, UK) to remove any impeding contacts from both clasps and the occlusal rest, as well as ensuring adequate clearance from the opposing teeth, not only in intercuspal, but all the other translatory mandibular excursions. This allowed the RPD to concomitantly seat over the coping without any snagging from the clasps, whilst leaving sufficient occlusal clearance from the opposing dentition (Figures 5a and 5b).
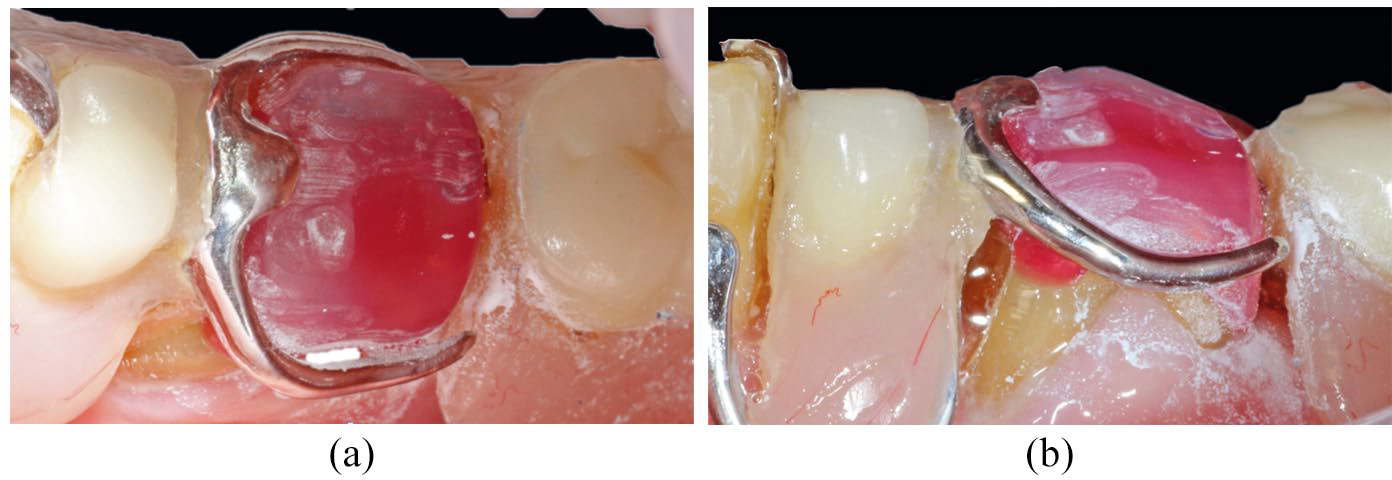
Occlusal and lateral view of adjustments made to the coping to achieve clearance from RPD components and opposing dentition
A thin layer of Vaseline was smeared on the opposing dentition to avoid acrylic resin adhering to the upper arch during the recording of the FGP on the coping. Without the denture in place, Acrylic Pattern Resin LS (GC Corporation, Tokyo, Japan) was mixed to a runny consistency and placed on the occlusal surface of the coping with a flat plastic instrument, ensuring the thickness applied would be sufficient for the FGP recordings to be made without the presence of voids. The denture was immediately positioned into place and stabilised using digital pressure to ensure that all the connectors, rests and clasps were completely seated. The patient was then instructed to close his teeth followed by as many mandibular excursions as possible until the material had set (Figure 6). The coping was then removed and any gross excess trimmed away.
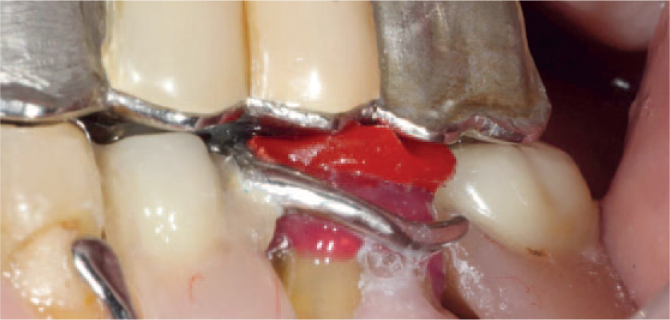
The pattern resin on the occlusal surface of the coping is molded by the occlusal surfaces of the opposing dentition whilst incorporating various mandibular excursions
The coping was then placed back into position to ensure that the record of the functional and harmonious occlusion was correct, as well as allowing an accurate fit of the denture into the newly created rest seat in the resin-coping complex (Figure 7a and 7b).
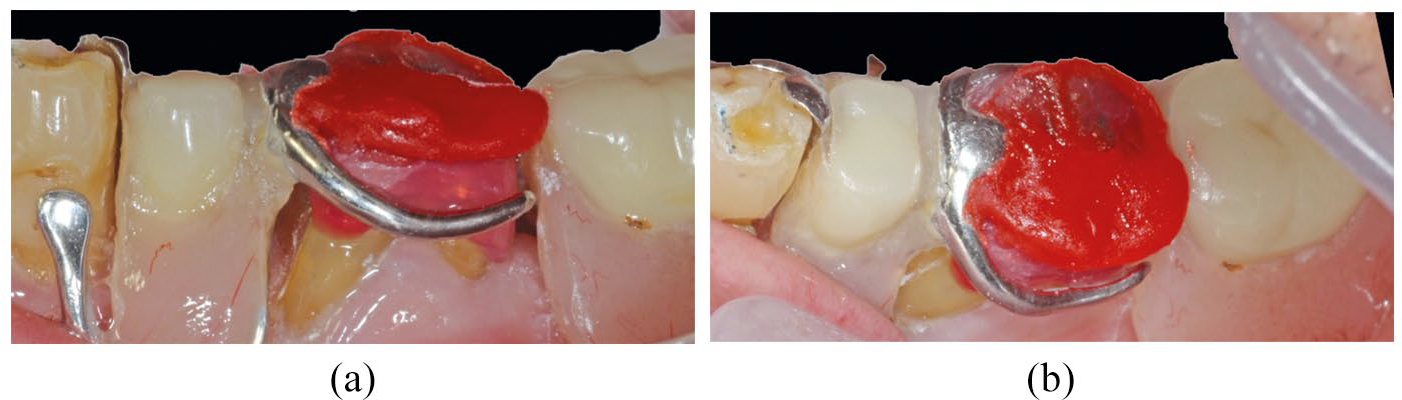
Lateral and occlusal view of the coping with occlusal morphology determined using the FGP. The mesial rest seat has been formed with pattern resin to fit the existing rest of the denture
With the denture in place, the next steps taken were to incrementally build up the buccal and lingual surfaces of the coping around the clasp assembly. Subsequently, the pattern resin was built up on the mesial surface to ensure an intimate contact between the denture and coping as well as on the coping’s distal surface against the existing denture to prevent potential food packing.
Each surface was built up individually by beading the resin with a fine brush, starting with the buccal surface. Once set, the denture was removed with the coping still in place to check the contact between the clasp and coping – any necessary additions were made to improve the future crown contours. The resin-coping complex was then separated from the denture, and any necessary reshaping of the contours undertaken with rubber wheels, with care being taken to ensure that the contact area between the clasp and the future crown remained untouched. These steps were repeated one at a time on the remaining three surfaces (Figure 8).
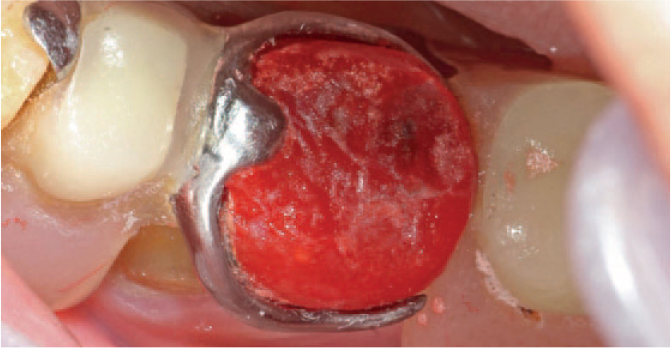
Occlusal view of the resin-coping complex which was built up on all of the surfaces of the coping by beading the resin with a fine brush
The newly created coping was then placed on the model to check the fit at the crown margins to ensure no further additions were required and then finally disinfected (Figure 9). The patient’s temporary crown was recemented and the patient dismissed.
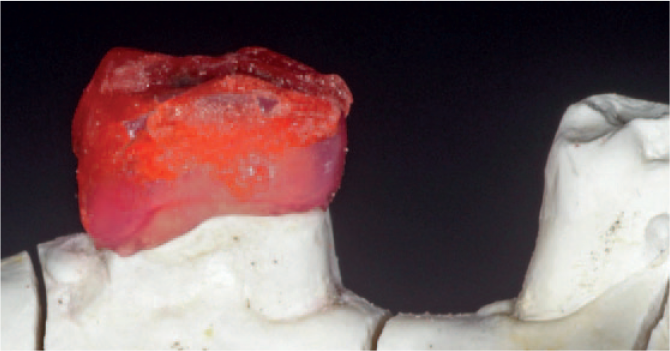
The coping was seated onto the working cast and any final contouring and polishing can be performed extra orally
Should there be any minor ‘air blows’ or deficiencies in the pattern resin, the technician can wax these in as long as the obvious clasp and rest seat areas remain untouched. The excellent pattern adaptation at the crown margin area must also be maintained. Casting and investment followed normal protocols for gold crowns. Should the preferred option be the provision of a milled zirconia crown, the tooth preparation and wax pattern can be scanned ready for milling. The occlusal morphology of the scanned pattern should under no circumstances be digitally altered.
On the subsequent appointment, the first step was to ensure that the new crown fitted into the clasp assembly accurately. The patient handed over his denture, allowing the crown to be placed into the lower left first molar space of the denture, confirming a perfect fit around the clasp and rest (Figures 10a and 10b).

Occlusal and lateral view of the crown and denture assembly prior to cementation. The fit of the gold crown to the denture’s clasps and rests was assessed for accuracy
The patient’s temporary crown, along with any residual temporary cement, was then removed. The crown was trial fitted and very minor necessary adjustments were carried out on the occlusal surface as there were a few ‘high’ spots. The surfaces were re-polished on completion. The denture was then inserted into the mouth to check that it fitted accurately around the new crown. The retention achieved was excellent and no adjustments were required to the clasp assembly, as anticipated with this technique.
The denture and crown were removed and the tooth was isolated and dried. After this, the crown was cemented with Fuji Plus (GC Corporation, Tokyo, Japan). Excess cement was removed and the denture fitted. The crown and clasp assembly are shown on completion (Figure 11). The patient was delighted with the final fit of both the crown and denture and subsequently cancelled his scheduled review appointment as he felt that further adjustments were not required.
Post-operative occlusal view of the gold crown fitting with existing denture’s clasps and rests
Conclusion
The outlined technique provides a predictable, simple and cost-effective solution for fabricating an extra-coronal restoration to fit onto the prepared tooth, as well as allowing an existing denture to fit accurately around it. Many practices would, in all likelihood, have either the GC Pattern Resin or its equivalent, Reliance DuraLay Inlay Pattern Resin (Dental Manufacturing Company, Worth, Illinois, USA) available to use for locating parts of fractured acrylic dentures for repair, the fabrication of direct posts or linking impression copings for implants prior to impression taking. The materials are not expensive to purchase.
Compared to the provision of an indirect crown, only 30 minutes in additional chair time is required. This is in the return appointment following the impression of the crown for the adaptation of the coping to the prefabricated coping. It is preferable to build up the coping in layers and adapt in increments to avoid locking the coping into the arms of the denture and wasting time retracing steps.
The described method allows the patient to retain their denture between appointments whilst demonstrating the success of the technique to fabricate an accurately fitting final restoration, requiring minimal adjustments. The cost to the patient is lower and the surgery time taken to carry out the technique is obviously much less than the provision of a new chrome denture following the fit of the new crown.
Footnotes
Acknowledgements
Special thanks to Brian Braithwaite, Conservation Specialist, and the laboratory staff at King’s College Hospital Dental Institute for all their help with the various steps undertaken.