
Abstract
The Duke-NUS Medical School’s animal biosafety level 3 facility is fitted with 3 types of equipment for waste decontamination: autoclaves, a tissue digester, and an effluent decontamination system (EDS). Validation of the effectiveness of the decontamination systems and process was done through simulated loads of waste. Biological indicators (BIs) were used to test the efficacy of the decontamination process. Geobacillus stearothermophilus log 106 was used for autoclaves and the tissue digester, while Bacillus subtilis and bacteriophages were used for validating the EDS. The loads tested in the autoclave included laundry, solid waste, and animal cages, with BIs placed in locations that were a challenge for steam penetration. The tissue digester was validated with frozen chickens from the supermarket, with BIs placed in the abdominal cavity of the carcass. The optimal weight of sodium hydroxide was that which achieved no growth in the BIs and, on visual inspection, no flesh or marrow on the bony remnants. Liquid waste from the shower, sinks, and downdraft table was routed to the EDS, which was validated with B subtilis and bacteriophage. Bleach was used for decontamination at a concentration >700 ppm of total chlorine. In high-containment facilities, factory and onsite testing and commissioning of waste management systems need to be supplemented by adequate validation processes to ensure the effectiveness of decontamination for the types and amount of waste generated in the facility. This is critical to ensure that no material leaves the facility until it is properly decontaminated.
Keywords
The Duke-NUS Medical School has a strong Emerging Infectious Diseases Program and has constructed an animal biosafety level 3 (ABSL-3) facility to enhance its infectious diseases research capability. The facility is a modular laboratory made up of four 48-ft and one 40-ft containers consisting of 3 laboratories: 1 for molecular work (laboratory 1), 1 for nonhuman primates (NHPs) housed in open cages (laboratory 2), and 1 for rodents housed in isolated cages (laboratory 3).
Laboratory 2 can accommodate a maximum of 6 open cages with 1 NHP in each cage. The laboratory has 2 anterooms, 1 for exit and 1 for entry. The anterooms are equipped with 2 interlocked air pressure–resistant doors, which are lined with a gasket that inflates when the door is shut to minimize air escape. The laboratory also has 2 autoclaves: the large autoclave was built to accommodate 1 NHP cage at a time for decontamination of the cages, and the small autoclave decontaminates smaller loads, including solid waste, mouse cages, and laundry. The purpose of the 2 autoclaves was to ensure that there was redundancy in case 1 broke down. In addition, there is a tissue digester for decontaminating animal carcasses. The 2 autoclaves and the tissue digester can be accessed only from laboratory 2, and items that need to be autoclaved in the other 2 laboratories have to be moved to laboratory 2 via pass-through boxes. The effluent decontamination system (EDS) is located outside the containment areas, and all the water from the showers, laboratory sinks, and downdraft table reaches the EDS through double-barreled pipes that run under the containment laboratories. Figure 1 shows the layout of the facility and the location of waste management systems, and Table 1 shows the specifications of the waste management equipment. The personal protective equipment used in laboratory 2 consists of scrubs, coverall suit, facility shoes with inner and outer boot covers, powered air-purifying respirator, and double gloves.
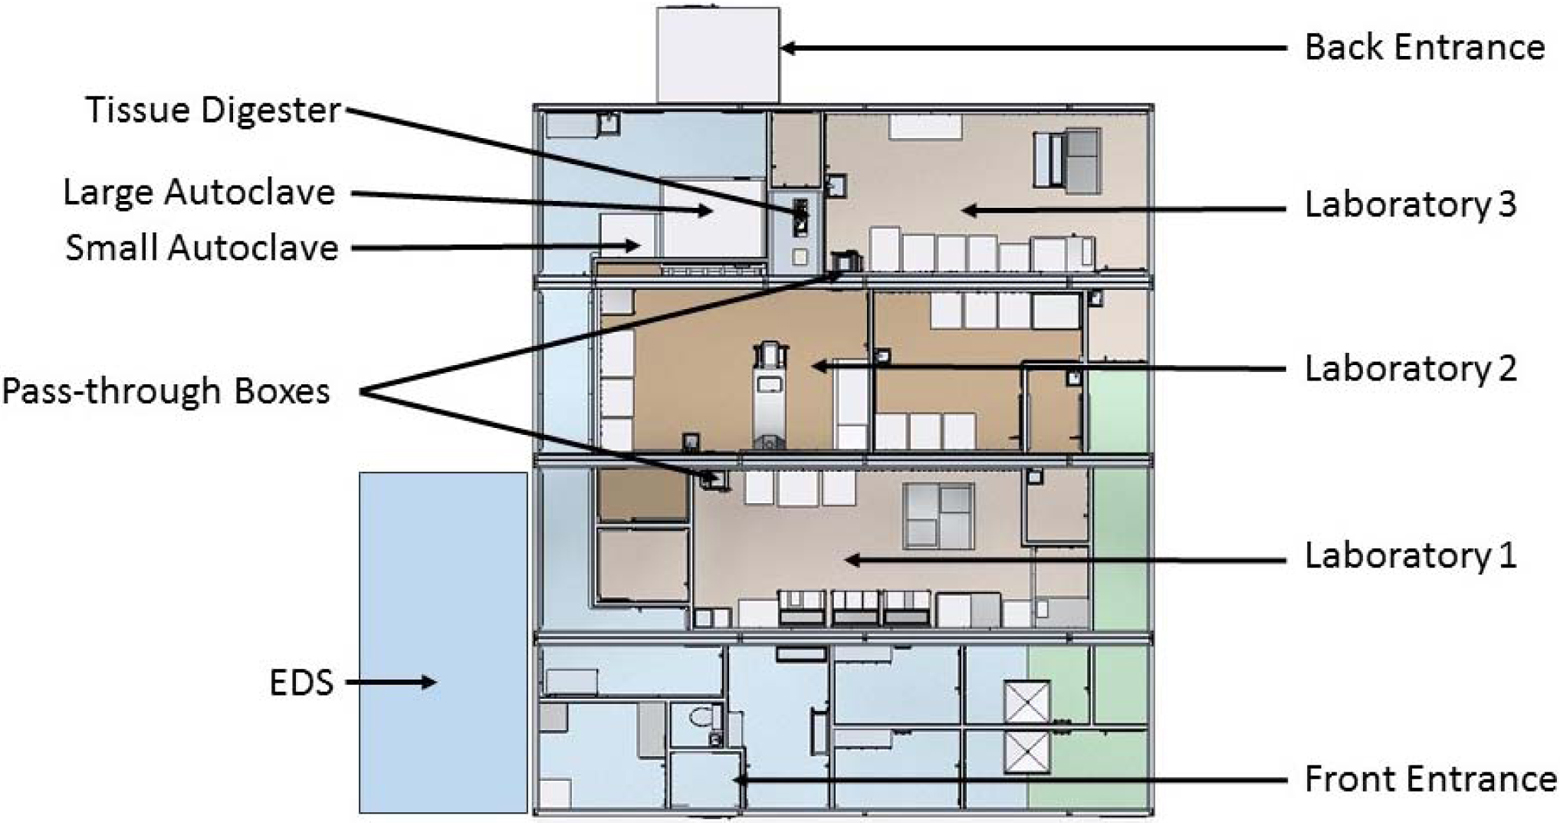
Layout of the facility. The floor plan of the 3 laboratories, showing the location of the autoclaves, tissue digester, effluent decontamination system (EDS), and the pass-through boxes.
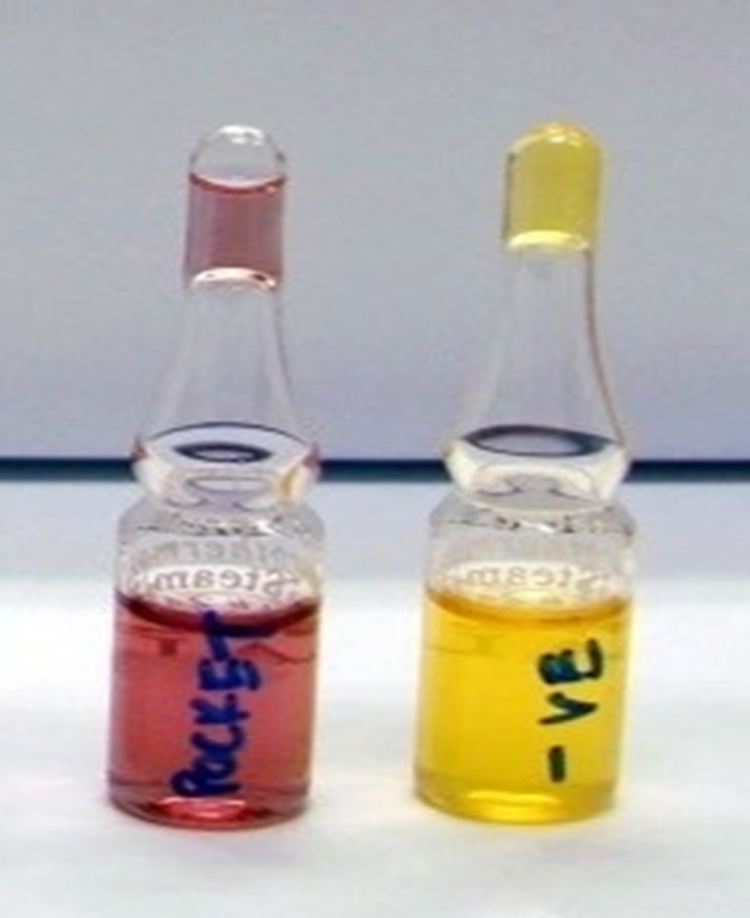
Description of the Waste Management Equipment.
The World Health Organization’s laboratory biosafety manual 1 gives the requirements for different biosafety-level laboratories, and autoclaving or decontaminating waste is required in level 3 facilities before it is brought out of containment. Therefore, ABSL-3 laboratories are required to have a good waste management program and the required equipment to operate the program. Before the facility is operational, these systems have to be validated and a program put in place to validate them at regular intervals. 2
Use of biological indicators (BIs) is an accepted method for testing autoclaves and has been used in many facilities. 3 We used this method to test our autoclaves and tissue digester. The testing of EDS by biological challenge testing also been used in other facilities, 4 and in our facility we used Bacillus subtilis and bacteriophage as surrogates for bacterial and viral agents. The methodology used for the initial validation of the autoclaves, tissue digester, and EDS is described here.
Materials and Methods
Table 1 describes 3 types of waste management systems used in the facility to decontaminate waste.
Biological Indicator
Validation of autoclaves were done through BIs containing Geobacillus stearothermophilus, log 106 (ATCC 7953). The BI is called ProSpore Ampoule and is a hermetically sealed type I borosilicate glass ampoule filled with a modified soybean casein digest broth containing bromocresol purple acid indicator. Each ampoule also contains a population of G stearothermophilus spores that will be killed by the autoclave or digestion cycle, and it acts as a method to test the validation of the cycle. The BI was obtained from Mesa Labs Omaha (http://biologicalindicators.mesalabs.com/prospore-ampoule/).
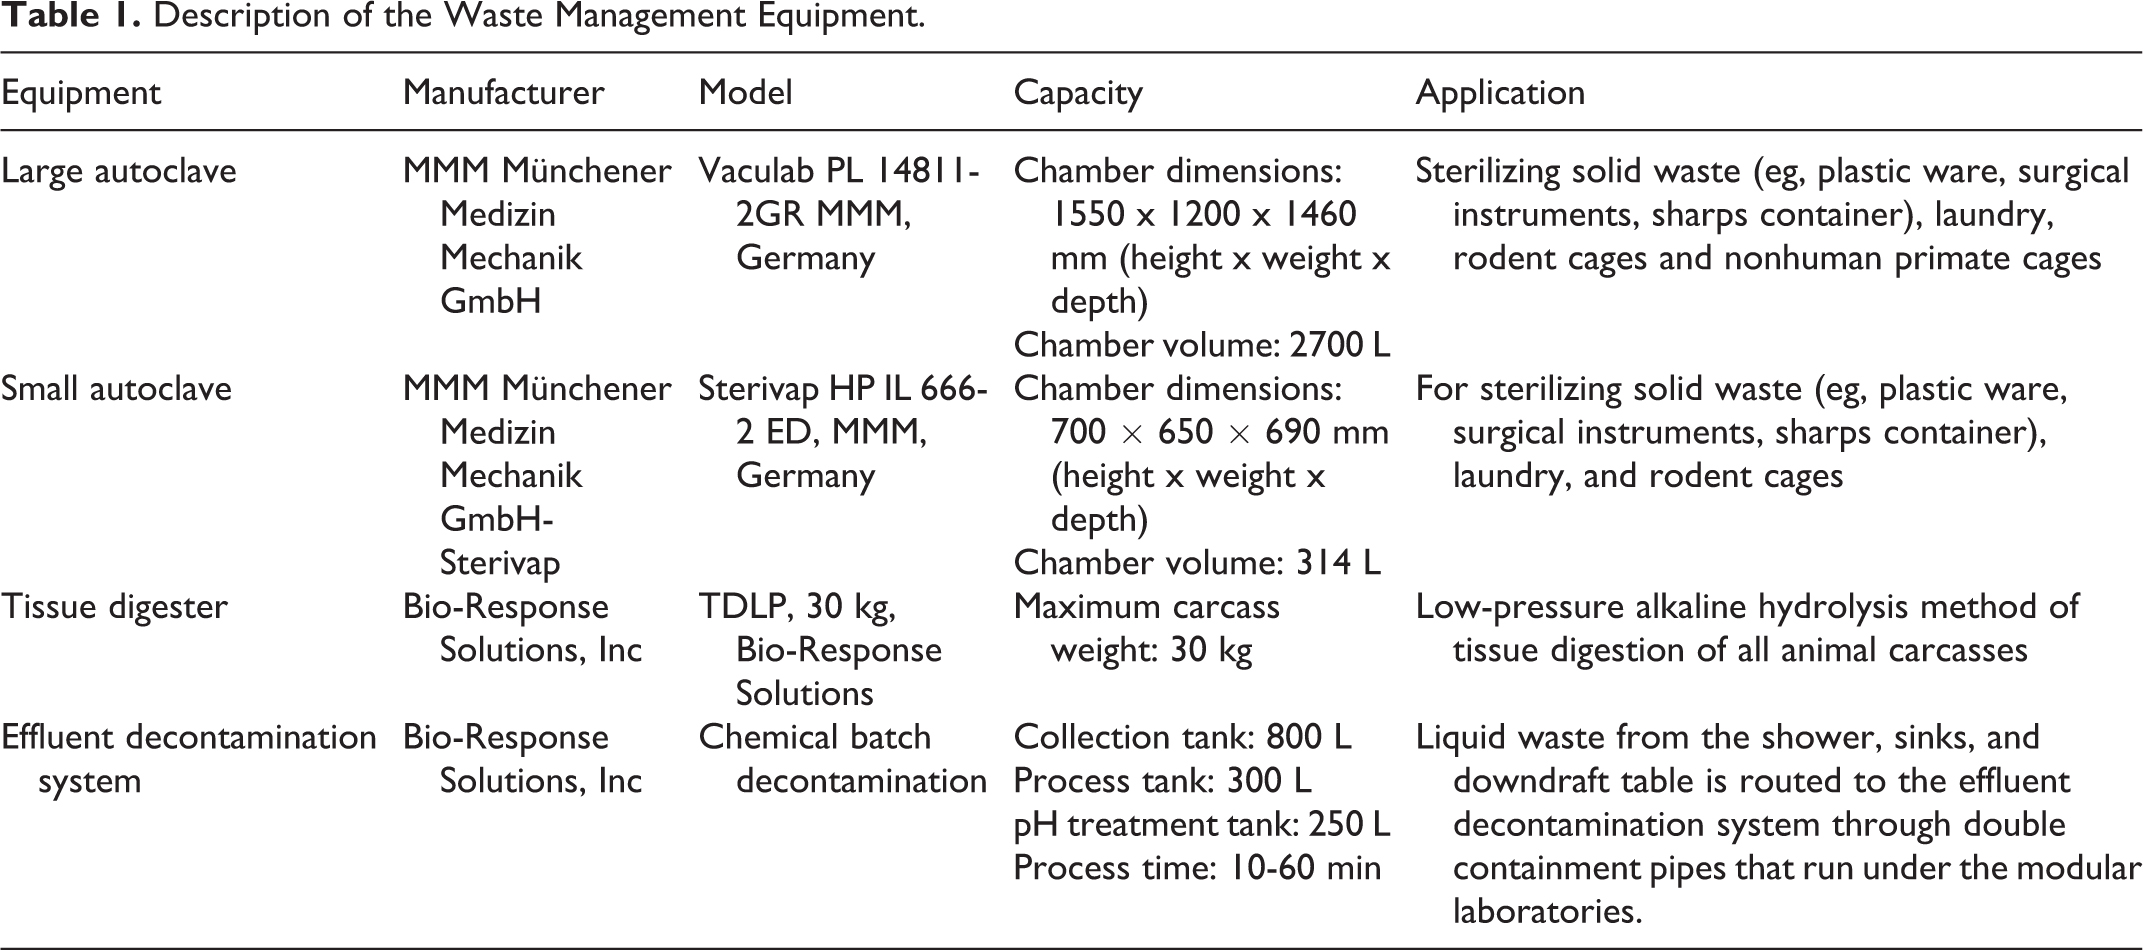
The purpose of the BI is to ensure that steam penetration was adequate for full decontamination. A tie was attached to the BIs for easy retrieval, and they were placed in areas that would be hardest for the steam to penetrate, to ensure that the decontamination process reached all the waste material. A BI that was not subjected to an autoclave or tissue digester cycle was used as positive control and included in all validation cycles. After the completion of the decontamination cycle, the BIs were retrieved and incubated at 55ºC for 48 hours in an aerobic dry incubator to observe the results. A sterilized BI remained purple to indicate adequate sterilization, whereas a BI from a failed sterilization cycle or control exhibited a color change toward turbid yellow (Figure 2).
Biological indicators (BIs). Shows the color change in a BI after it has been through an autoclave cycle. Successful sterilization is indicated by the BI remaining purple (left) while a failed sterilization is indicated by the BI turning turbid yellow (right).
Autoclave Validation Methodology
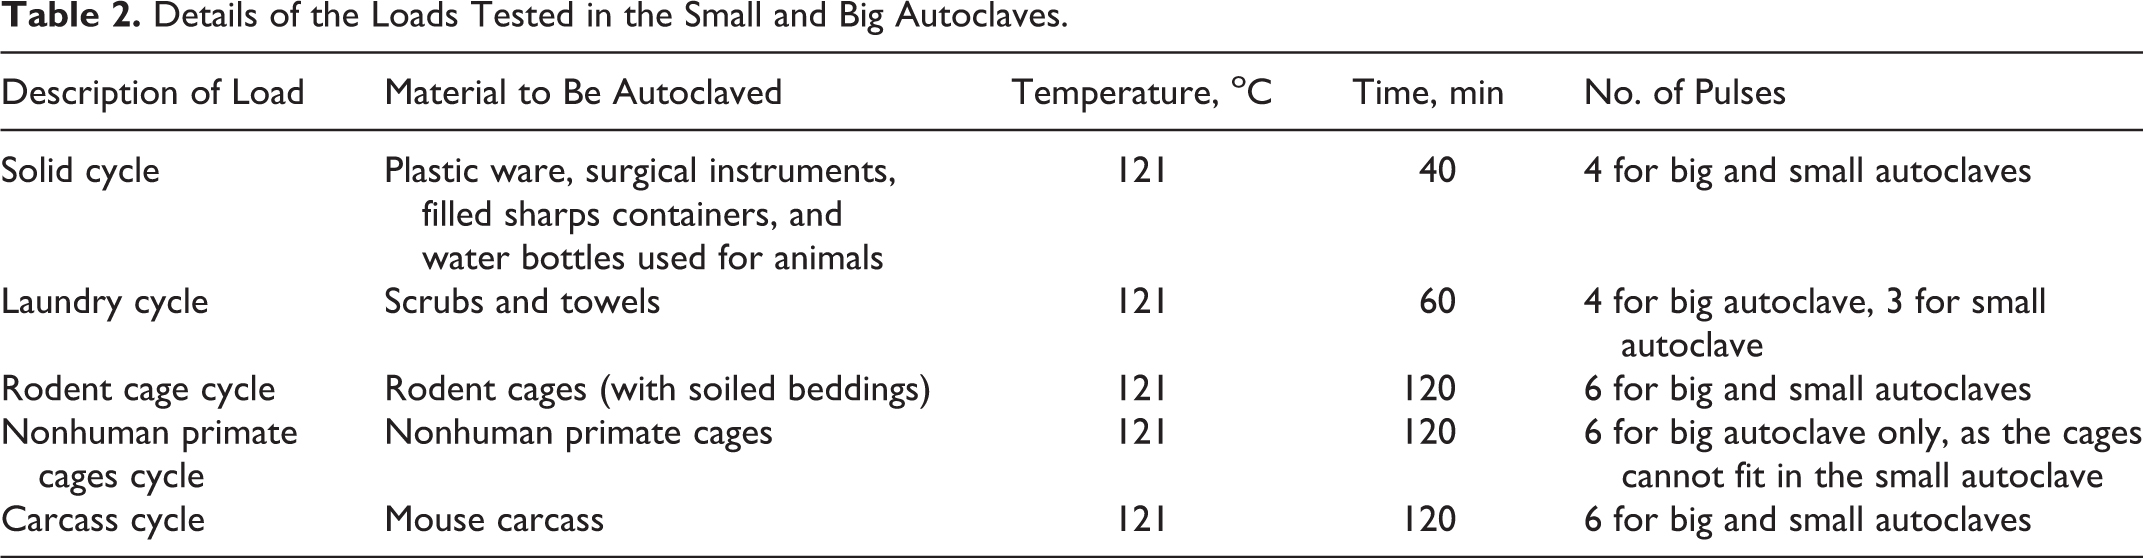
The autoclave operates on a prevacuum cycle, which is designed to provide injections of steam pressure alternating with vacuum suctions (pulses) to remove air from the autoclave chamber. Given the loads that are expected in our facility, we validated 5 types (Table 2).
Details of the Loads Tested in the Small and Big Autoclaves.
Preparation and Validation of Solid Cycle
Visual assessment of the autoclave chamber was performed to determine the number of bags that would fit comfortably within the chamber. Based on this, the maximum number of biohazard bags that would comfortably fit in the large and small autoclaves were determined to be 6 and 1, respectively. For validation purposes, the bags were filled with pipette tips, animal water bottles, a filled sharps container, surgical instruments, and towel wipes that were not contaminated but mimicked a real load that would be expected in the facility. These were arranged in the configuration shown in Figure 3 so that steam would penetrate into all the bags for good sterilization. All items for autoclaving were double-bagged in autoclavable polypropylene biohazard bags, which were obtained from a local manufacturer. Lauer et al describe the different types of bags and containers that can be used for autoclaving, and these have to be validated before use. 5
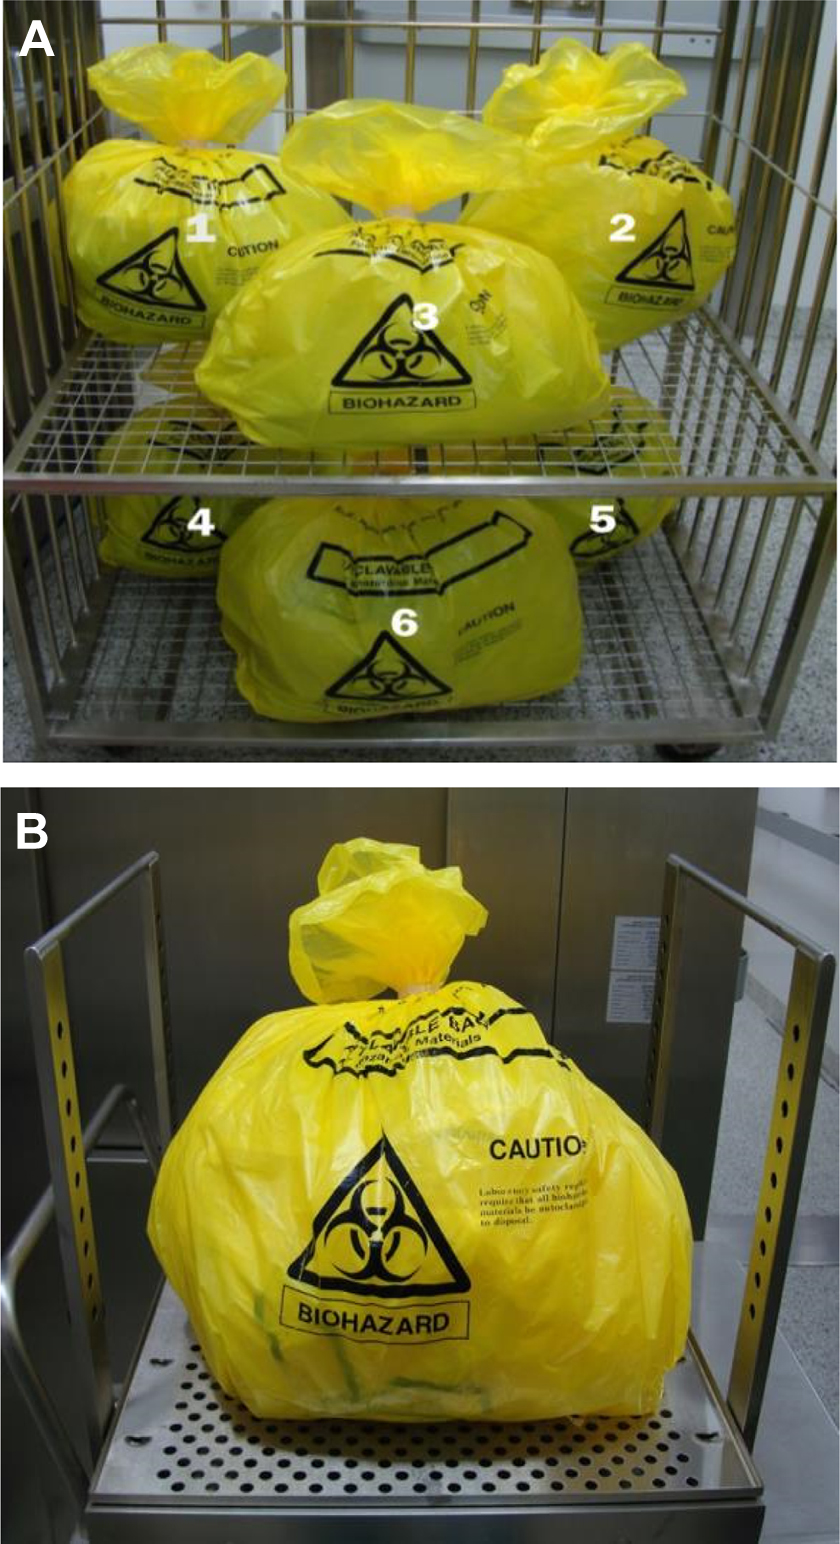
Configuration of biohazard bag placement in the autoclaves. Based on visual assessment, the configuration was determined to be 6 biohazard bags in the large autoclave (A) and 1 bag (B) in the small autoclave.
The mouth of the inner bag was folded twice to close the bag loosely to allow steam to penetrate, and the mouth of the outer bag was taped loosely with autoclave tape. A BI was placed in the center of each biohazard bag, and 2 additional BIs were placed at diagonally opposite corners of the autoclave trolley. The placement of BIs was done in this way to test if steam penetrated inside the biohazard bag and the corners of the autoclave chamber. Steam penetration is critical in autoclaving, 6 and our validation process is designed to ensure that steam reaches all the surfaces that are to be sterilized.
All validation cycles were run in triplicate to ensure that the results were reproducible, for 2 reasons: (1) because autoclaving is the critical step for decontamination before any material is brought out of the containment facility; and (2) because failure to validate accurately will result in contaminated material being brought out, resulting in serious consequences.
Validation of Laundry Cycle
Ten sets of scrub suits (top and bottom) were placed into double-lined biohazard bags, and the autoclaves were loaded with 1 bag in the small autoclave and 6 bags in the large autoclave.
A BI with a tie attached for easy retrieval was placed inside the pocket of a scrub suit top, and this was placed nestled within the other scrub suits (Figure 4). In testing the effectiveness of the validation cycle, the load has to be placed and packed in such a way that good steam penetration is achieved, and the tested method has to be followed strictly in the facility. If the users choose to pack the bags more tightly into the autoclave, the validation has to be repeated to ensure that steam penetration is adequate and the autoclave cycle is successful. Additional BIs were placed on top of the scrub suit load within the double-lined biohazard bag and in diagonally opposite corners of the trolley, again to ensure good distribution of the steam throughout the autoclave chamber.
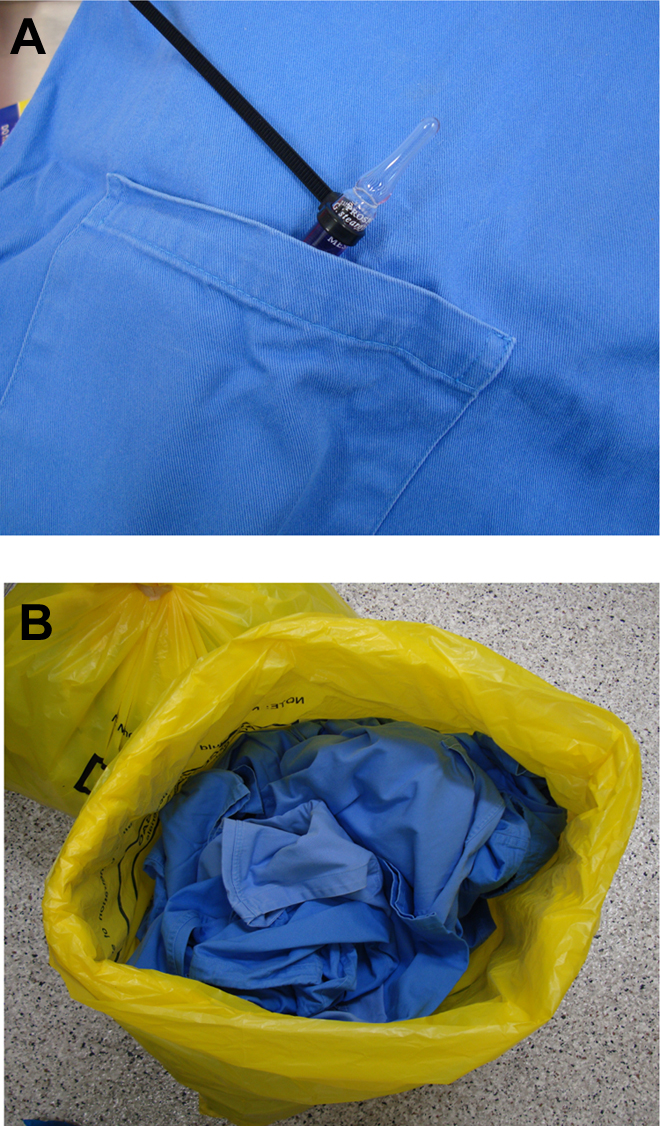
Placement of biological indicator for a laundry load. (A) A tie was attached to the biological indicator, and it was placed in the pocket of as scrub suit top. (B) The 10 scrub suits in a biohazard bag within which the scrub suit top was nestled.
Validation of Cage Cycle
Large biohazard bags were double-lined, and the bottoms of 3 individually ventilated cages (ISOcage N-Biocontainment System) were stacked and packed into the biohazard bags (Figure 5). In normal operations, the cages will contain bedding, however, this validation was performed with empty cages because the primary aim of this validation was to determine if steam can penetrate when cages are stacked in this way. A BI was placed in the bottommost cage; the inner bag was folded twice; and the outer bag was taped with autoclave tape. The location of the BI at the bottommost cage was chosen because in previous cycles we found that the 3 stacked cage bottoms tended to sit firmly and make an airtight seal preventing penetration of steam to the bottommost cage (results not shown). The small autoclave was loaded with 3 bags and the big autoclave with 10 bags. Two BIs were also placed at diagonally opposite corners of the trolley, again to ensure good distribution of the steam throughout the autoclave chamber.
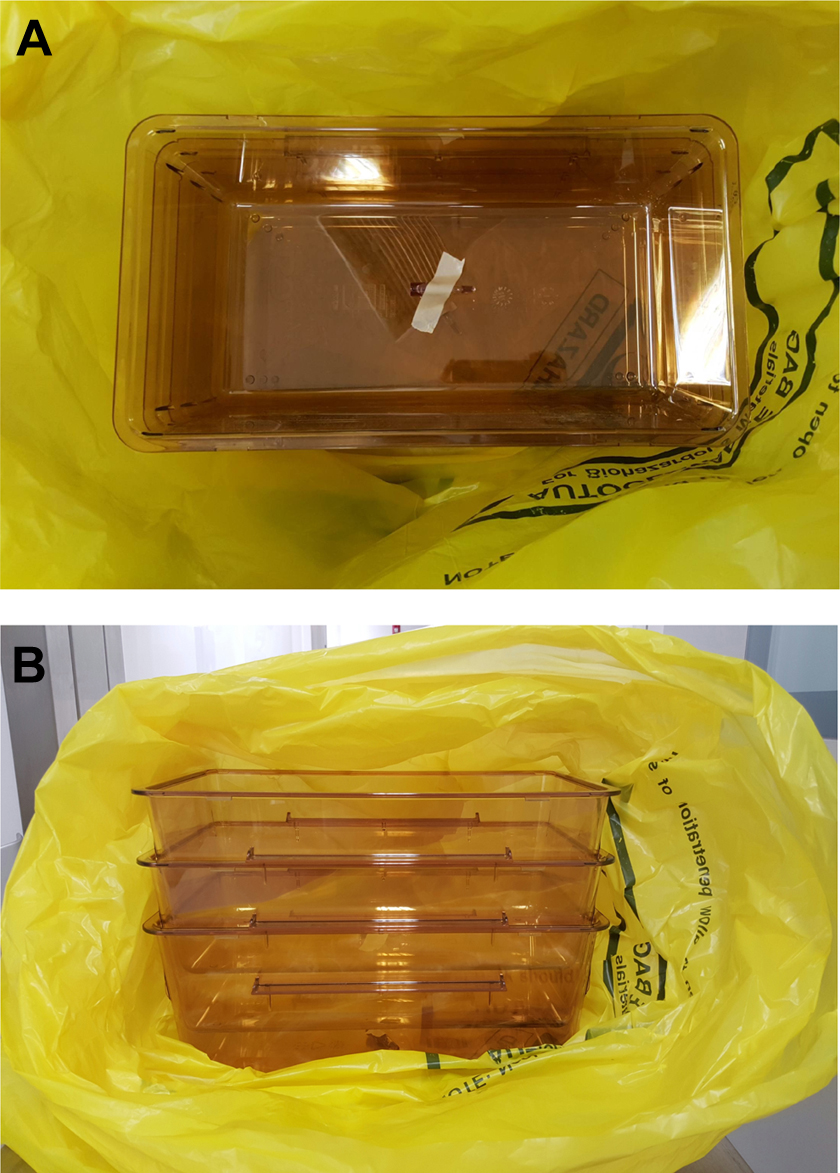
Load preparation of rodent cages. (A) A biological indicator stuck to the bottom of the lowest cage. (B) Three cage bottoms stacked and ready to be placed in the biohazard bag.
Nonhuman primate cages were autoclaved 1 at a time due to their large size; this did not need specific preparation but for placing BIs at 4 corners of the cage.
Validation of Carcass (Mouse) Cycle
Twelve adult frozen mouse carcasses were placed into a small biohazard bag. One was a white mouse carcass for easy identification, which was implanted with a BI sutured into the abdominal cavity with a string for retrieval, and the rest were black mice (Figure 6). The small biohazard bag was then loosely sealed with autoclave tape. Five small autoclave bags (each filled with carcasses) were further bagged into big double-lined biohazard bags. The inner bag was folded twice, and the outer bag was taped with autoclave tape. The small autoclave was loaded with 1 big bag and the big autoclave with 6 big bags, and again 2 BIs were placed at the alternate corners of the big trolley.
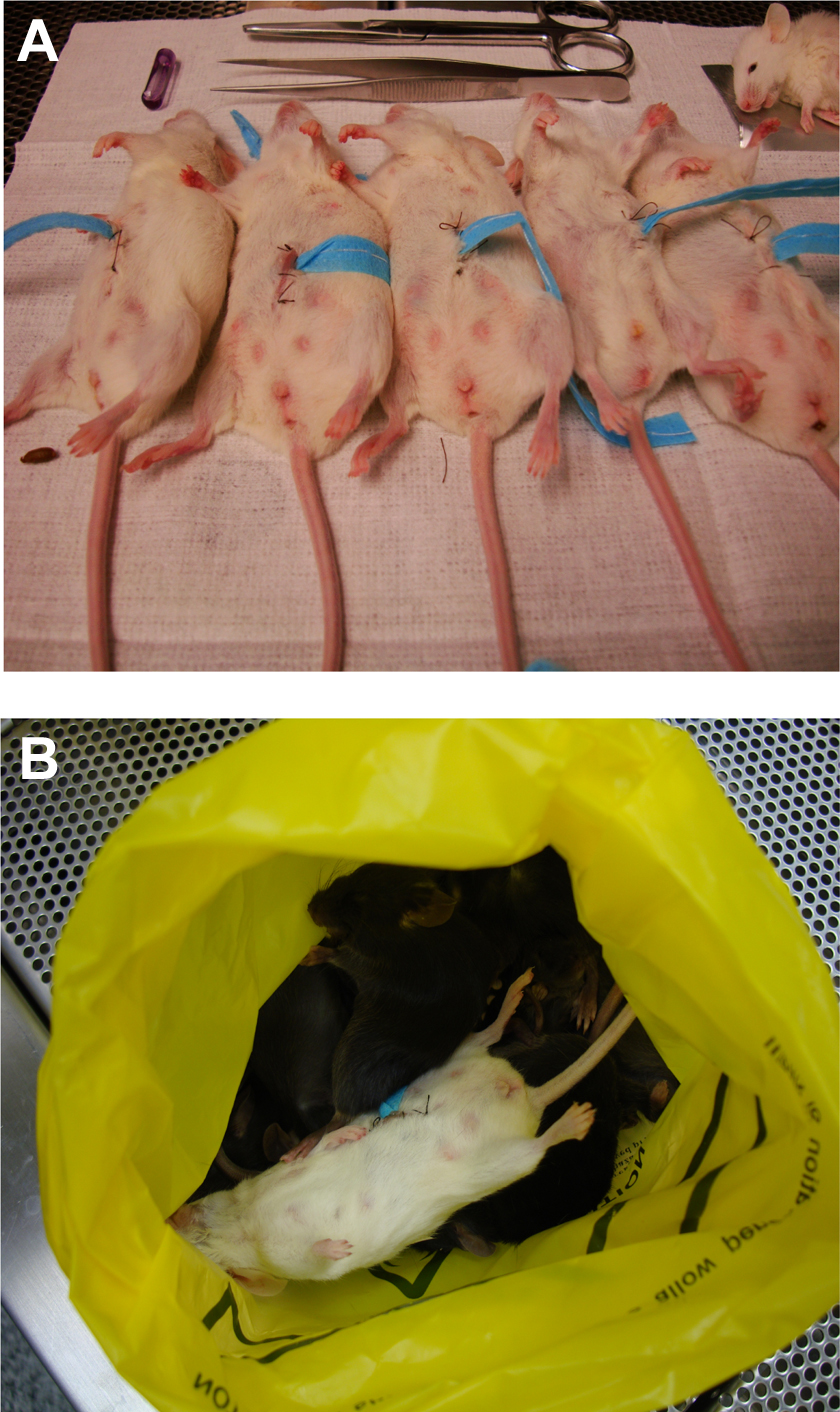
Load preparation and placement of biological indicators (BIs) for mouse carcass load. (A) The carcasses prepared with BIs implanted into the abdominal cavities. (B) The white mice with the BIs placed among the black ones for easy identification and retrieval.
Validation of Tissue Digester
The tissue digester is a low-temperature alkaline digester that can digest a maximum of 30 kg of animal carcass. The alkaline hydrolysis process converts organic material into a sterile aqueous solution suitable for disposal to a sanitary sewer. The process reduces the carcass volume and weight by up to 95% and destroys pathogens. The validation method helped to determine if the amount of sodium hydroxide (NaOH) required for digesting the carcass load in the tissue digester is effective based on the visual inspection of bone remains and BI growth. NaOH is very hazardous if it comes in contact with skin or mucous membrane or is ingested. As such, since the digester is accessed only from laboratory 2, personnel will be wearing the full personal protective equipment described above.
The weight of NaOH required to achieve full digestion is proportional to the weight of the carcass to be digested. Therefore, to have an initial idea of the weight of NaOH required for different carcass weights, frozen chickens from the supermarket were used. NaOH in dry powder flake was used in the alkaline hydrolysis process, and only alkaline-digestible (or biodegradable) bags were used in the tissue digestion process. Chicken carcasses weighing approximately 1 kg were used to validate loads of 1 to 12 kg, and a BI strip was placed into the abdominal cavity of the carcass and sutured (Figure 7). A BI was also placed at the base of the tissue digester’s basket; NaOH was added per the recommendation of the manufacturer; and the tissue digestion cycle was run for 8 hours at 96ºC. After the process, the leftover remains are the mineral constituents of the bones and teeth of the carcass. These sterile remains are brittle, and they were disposed in biohazard bags and autoclaved out of the ABSL-3 facility as solid waste. The frozen chicken carcasses (carcass were still frozen at the time of digestion) formed a good surrogate to reach an accurate estimate of the weight of NaOH required. 7 This estimate was then used to fine-tune the amount required for nonhuman primate and rodent carcasses (Table 3).
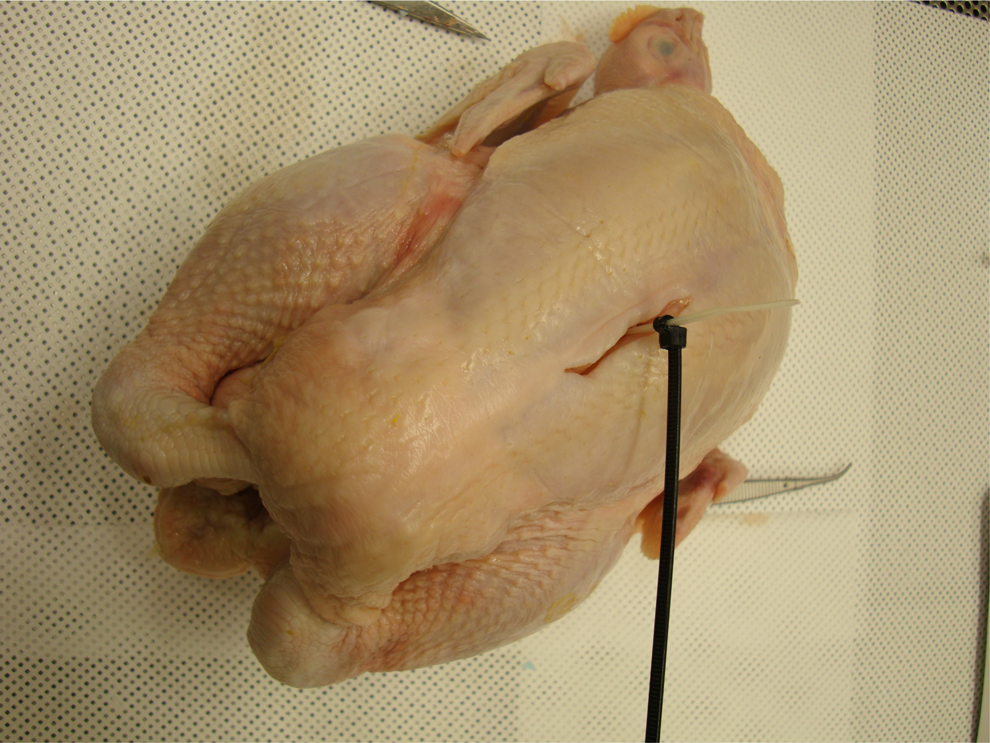
Chicken carcass with biological indicator placed in the abdominal cavity to validate the tissue digester.
Weight of NaOH Required to Achieve Complete Digestion for Different Weights of Chicken Carcasses.a
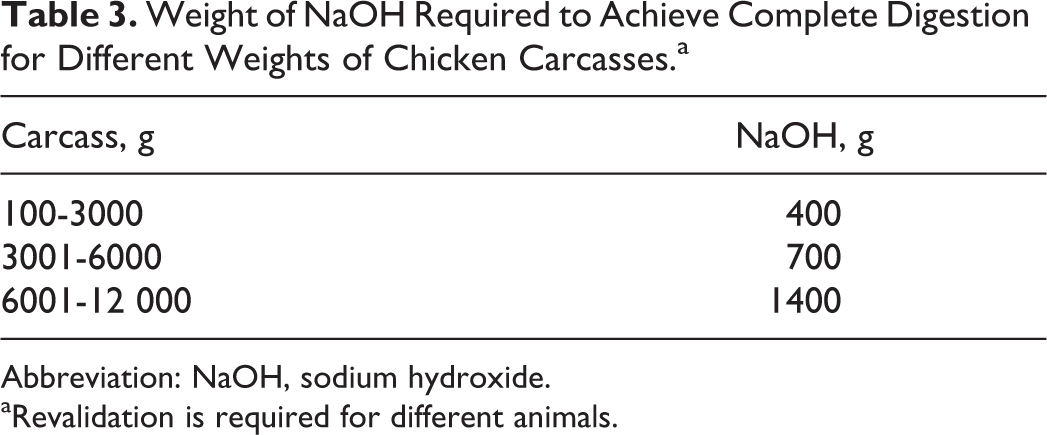
Abbreviation: NaOH, sodium hydroxide.
Revalidation is required for different animals.
Validation of EDS
Liquid waste from the shower, sinks, and downdraft table is routed to the EDS through double-barreled pipes that run under the modular laboratories and are equipped with a sensor to detect and warn if there are leaks in the inner pipe. The EDS is constructed in a slightly sunken sump so that if there is a leak, it will be contained. The EDS consists of an 800-L collection tank; when the tank is two-thirds full, level sensors pump the liquid into a 300-L process tank. In the tank, 2.5 L of 12% bleach is automatically added to achieve a final concentration >700 ppm based on the manufacturer’s guide and agitated for 30 minutes. After 30 minutes, the mixture is transferred to a pH treatment tank where the pH is neutralized to achieve a range of 6 to 9 per the local sewerage requirements, and the liquid is discharged into the sewer system. Figure 8 gives a schematic diagram of the EDS.
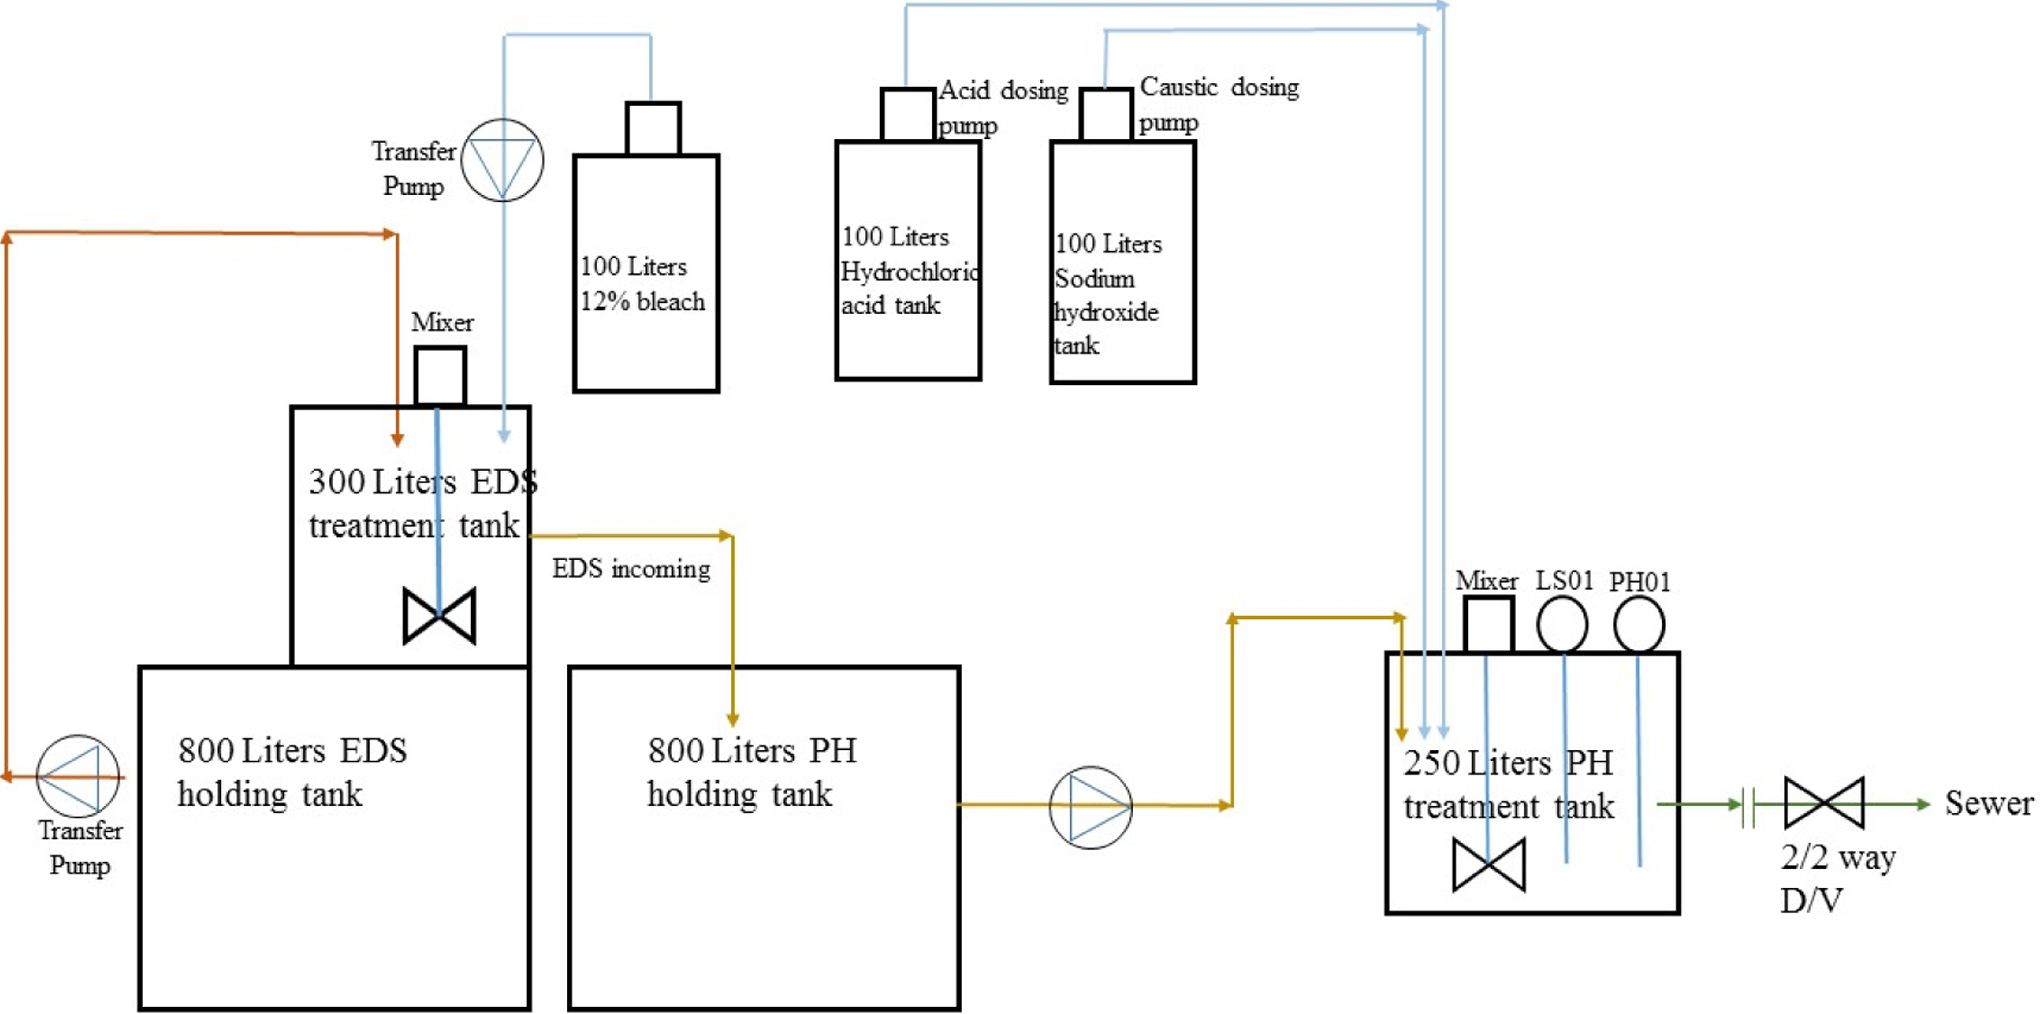
Schematic drawing of the effluent decontamination system.
Two agents were used to challenge the EDS and test its ability to effectively decontaminate waste water: B subtilis and bacteriophage.
B subtilis (ATCC 6633) was used for bacterial challenge, and stock solutions were stored at –80ºC. The stock was grown overnight in 10 mL of tryptic soy broth at 36.5ºC, and 1 mL of the overnight culture was further added to 1.5 L of tryptic soy broth and incubated at 36.5ºC for 48 hours with stirring at low speed. The bacterial broth was then centrifuged at 3.5 K × g for 20 minutes, and the supernatant was decanted. The bacterial pellet was suspended in 500 mL of phosphate buffered saline (PBS) and centrifuged again at 3 K × g for another 15 minutes, and the pellet was resuspended in 500 mL of PBS supplemented with 0.5% bovine serum. Ten-fold dilutions were made of the washed bacterial stock concentrate. The number of viable microorganisms was enumerated by dilution plating onto tryptic soy agar and incubated at 36.5ºC for 24 to 48 hours. Bacterial stock concentrate was stored at 4ºC until use.
Bacteriophage (ATCC 15597-B1; 30 nm of RNA specific for Escherichia coli C3000 ATCC 15597) was used as surrogate for human viral pathogens for the challenge experiment. The virus was grown up to 1010 to 1011 plaque-forming units per milliliter prior to the challenge. The stock was filtered through a 0.22-µm filter and supplemented with 0.01% Tween-20. Ten-fold dilutions of bacteriophage stock were made in sterile PBS and enumerated by a single agar layer overlay procedure using the respective hosts per EPA 1602 (Environmental Protection Agency male-specific [F+] and somatic coliphage in water by single layer agar procedure; Washington DC, 2001). All samples were stored at 4ºC until use.
Initially, several trial runs of tank filling and flushing were performed to ensure that the delivered volume of 12% sodium hypochlorite solution (2.5 L) resulted in a treatment tank concentration ≥700 ppm of total chlorine. All tank water samples were collected from an unused tank port via a sterile 50-mL polypropylene centrifuge tube containing 2% sodium thiosulfate solution. The 800-L holding tank was filled, and sodium thiosulfate was added to neutralize any existing chlorine residue. The absence of chlorine residue was verified with a chlorine meter. The tank was then flushed and filled several times; then, it was rinsed thoroughly to remove any sodium thiosulfate residue and filled with fresh water to the 800-L mark.
All solutions, media, and plastic ware were sterilized prior to use, and aseptic techniques were practiced to ensure that there was no cross contamination. A total of 1800 mL of bacteriophage and 3600 mL of B subtilis were added slowly to the filled decontamination tank through a separate top-side port. Samples were drawn from a separate port to prevent any cross contamination. Ports were decontaminated with 70% isopropyl alcohol and gloves changed to prevent cross contamination. Following the addition of microbial challenge, the water was allowed to circulate for 3 minutes. Samples (25 mL) were then drawn aseptically and collected in 50-mL sterile centrifuge tubes containing 2% sodium thiosulfate solution. This sample was T0 and represented the sample taken before the sodium hypochlorite was added to the tank for decontamination. The tank control system was manually initiated to add the predetermined volume (2.5 L) of sodium hypochlorite to the decontamination tank, and the water was agitated. Samples were drawn in triplicate every 10 minutes for the next 30 minutes and collected in 50-mL centrifuge tubes containing 2% sodium thiosulfate. The total chlorine was measured throughout the procedure.
When all the samples were collected, they were analyzed for viable B subtilis by dilution plating aliquots of each sample onto tryptic soy agar and incubating at 36.5ºC for 48 hours. Colonies were counted and verified to be B subtilis by macroscopic observation. Bacteriophages were enumerated by the single agar layer overlay procedure with hosts per EPA 1602.
Results
Autoclave Validation
Positive-control BIs that were not subject to the autoclave cycle showed turbid yellow color change after incubation, which meant that there was growth of the organism. All the test BIs remained purple without any change in color after autoclave sterilization for all the different loads tested. The autoclave loads and cycles tested were therefore successful in decontaminating the waste.
Tissue Digester Validation
Positive-control BIs that were not subject to the digester cycle showed turbid yellow color change after incubation. All the test BIs remained purple without any change in color after they were subjected to tissue digestion. It was noted that even if the BI passed, a visual check of the bony remnants showed that undigested flesh and marrow were still stuck to the bones. The NaOH amount was adjusted and the cycles run repeatedly until a completed digestion of the carcass was achieved, as evidenced by the complete lack of any undigested tissue or marrow stuck to the bones (Figure 9). The amount of NaOH required to achieve this, based on kilogram weight of carcass, is tabulated in Table 3.
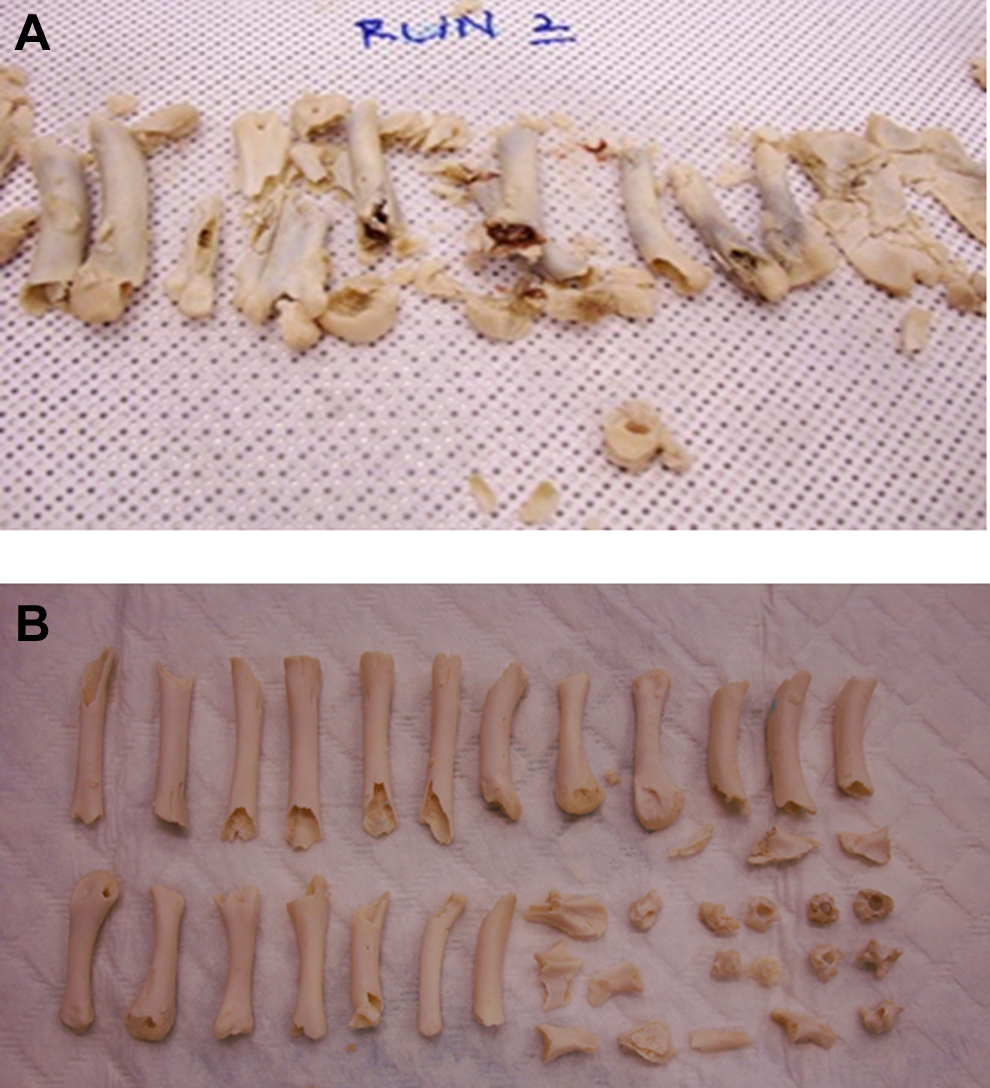
Bone remnants after an incomplete digestion (A) and a complete digestion (B).
EDS Validation
No growth was observed in any of the samples collected 10 minutes after addition of sodium hypochlorite, while the positive control samples collected before addition of sodium hypochlorite showed growth (Table 4). Within the EDS treatment tank, total chlorine was detected at 700 ppm initially and declined to 624 ppm in 1 hour.
Results of the Effluent Decontamination System Validation.
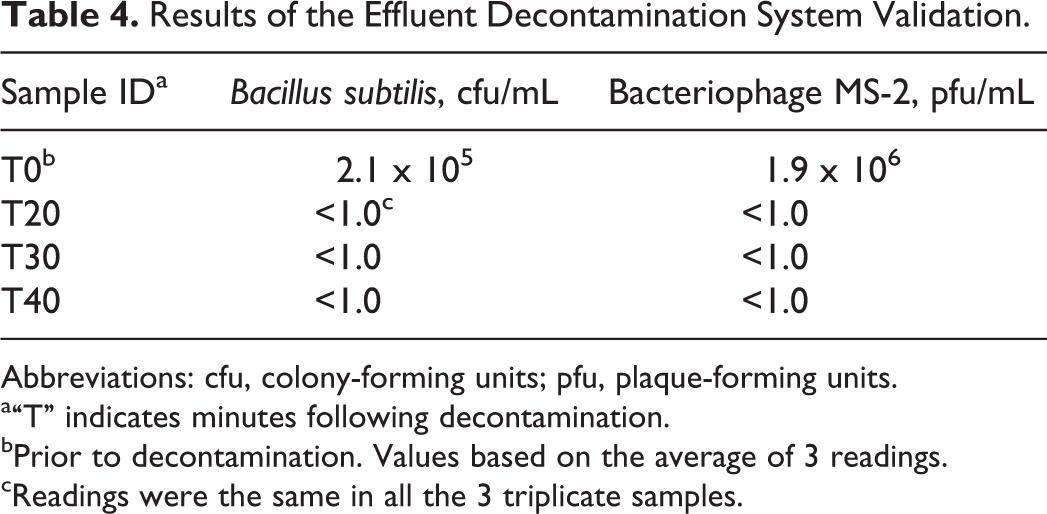
Abbreviations: cfu, colony-forming units; pfu, plaque-forming units.
“T” indicates minutes following decontamination.
Prior to decontamination. Values based on the average of 3 readings.
Readings were the same in all the 3 triplicate samples.
Discussion
Waste decontamination is a critical process in a high-containment laboratory and has to be critically evaluated before starting operation. The equipment would have undergone factory and site testing and commissioning processes that are by themselves not sufficient. It is critical that the staff who would operate the equipment perform adequate validation based on established best practices and on the type and amount of waste that the facility would generate. 8 Staff should ensure that any new types or quantities of waste are validated again, and they should not assume that the validation for one quantity and type of waste will be adequate for others.
Suitable methods should be selected for the validation processes and performed by the staff, to serve as good training and to be reliable in the hands of those who operate the facility on a daily basis. With organisms that are especially resistant to decontamination, it is critical that a suitable surrogate be utilized in the validation so that it can be applied to the organism being used in the facility. 8
In conclusion, the validation processes described here provide a good method to successfully validate the 3 waste management systems in the facility—namely, the autoclaves, tissue digester, and EDS.
Footnotes
Declaration of Conflicting Interests
The author(s) declared no potential conflicts of interest with respect to the research, authorship, and/or publication of this article.
Funding
The author(s) received no financial support for the research, authorship, and/or publication of this article.