
Abstract
Background:
Hemorrhage is the leading cause of death in trauma settings. Non-compressible torso hemorrhage, which is caused by abdominopelvic and thoracic injuries, is an important cause of subsequent organ dysfunction and poor outcomes in multiple trauma patients. The management of hemodynamically unstable patients with non-compressible torso hemorrhage has changed, and the concept of damage control resuscitation has been developed in the last decades. Currently, resuscitative endovascular balloon occlusion of the aorta (REBOA) as a method of temporary stabilization is the modern evolution of bleeding control, and it is in the middle of a paradigm shift as a treatment for non-compressible torso hemorrhage. Despite its effectiveness in patients with hemorrhagic shock, the application of REBOA remains limited because of lack of experience and troubleshooting guidelines.
Objectives:
The aim of study was to provide useful tips for the implementing a step-by-step procedure for REBOA in various hospital settings and capabilities.
Methods:
We introduced REBOA procedures using a REBOA-customized 7 Fr balloon catheter through the animation models or radiography from preparation to access, catheter management, and device removal after procedure completed.
Results:
We have described REBOA procedures as follows: identification of the common femoral artery, arterial access for placement of a guidewire, precautions during a sheath insertion, guidewire and balloon positioning in the aorta, occlusion zones and adjustment of balloon location, REBOA strategy for extending the occlusion time, balloon deflation and removal, sheath removal, and medical records.
Conclusion:
We believe that the practical tips mentioned in this article will help in performing the REBOA procedure systematically and developing an effective REBOA framework.
Introduction
Torso hemorrhage is the leading cause of potentially preventable death in trauma settings.1–8 Damage control resuscitation (DCR) has been developed to increase the chances of survival for patients with severe trauma, and the use of endovascular management for bleeding control has dramatically increased in the last decade.1–9 Resuscitative Endovascular Balloon Occlusion of the Aorta (REBOA) has been used to manage non-compressible torso hemorrhage (NCTH) as a method of temporary stabilization; however, it is challenging to perform because of lack of experience and troubleshooting guidelines.7,8,10–13 Therefore, the techniques and success rates of REBOA should be assessed and improved through sharing of experiences and learning from errors. The aim of study is to describe useful tips to help physicians perform REBOA systematically, and it is based on REBOA procedure using the 7-French (Fr; 1 Fr = 0.333 mm) RESCUE balloon™ catheter (Tokai Medical Products, Aichi, Japan).
Identification of the common femoral artery
According to the Advanced Trauma Life Support (ATLS) guideline, 14 the “ABCDE” bundle has been emphasized during the primary survey. Moreover, life-threatening conditions must be identified and treated simultaneously; therefore, immediate intravenous vascular access must be available for resuscitation.14,15 Recently, vascular arterial access has also been considered as a modification of the traditional “ABCDE” bundle because it could provide the diagnostic and therapeutic modalities for trauma care.9,15
To place the REBOA catheter, the first step is identification of the common femoral artery (CFA). Because the superficial femoral artery (SFA) is small, the CFA is preferred to avoid complications from vascular access.1,7,16,17 To access the CFA, most doctors try palpating the CFA in inguinal area. However, palpation of the arterial pulse is difficult in patients with hemorrhagic shock, especially obese patients. In such cases, ultrasound-guided puncture has been valuable in identifying the division of the CFA into the SFA and the deep femoral artery (DFA) branches, which are crucial landmarks.13,17–22 Usually, the ideal puncture site is recommended 2 or 3 cm above the bifurcation.7,16,17 Even if a sterile cover for the probe is not available, identification of the bifurcation site should be confirmed for ideal puncture sites to avoid complications associated with a greater risk of leg ischemia, especially in patients with profound shock. In such condition, the transparent dressing film such as Tegaderm™ (3M Health Care, Loughborough, UK) could be a substitute for a commercial sterile cover to keep the sterility of the probe. If ultrasound is not available, the ideal puncture site is recommended to be approximately 2 fingerbreadths or 2–3 cm below the ligament to avoid the bifurcation of the CFA.1,7
Arterial access for placement of a guidewire
The puncture site should be sterilized and covered with routine draping, and if needed, the patient should be appropriately sedated to tolerate the procedure.16,17 A superficial skin incision should be made using a number-11 blade scalpel, and the subcutaneous tissues must be dissected adequately to facilitate subsequent passage of the catheter. If a small skin incision at the puncture site is not made using a surgical knife, the tip of sheath may be damaged. The damaged tip may then result in vascular injury or difficulty in removing the balloon catheter at the end of the procedure.
To complete arterial access, different wall puncture techniques, such as single-wall puncture and double-wall (through-and-through) puncture have been used, which are all acceptable.9,16,17,22–24 The single-wall puncture involves only the anterior wall of the artery; hence, it is a simple and useful femoral approach. However, it is difficult to introduce a guidewire into a collapsed artery with a small diameter caused by hemorrhagic shock. 16 In contrast, the double-wall puncture technique is a more complex procedure. In the double-wall puncture, a needle with plastic cannula crosses both the anterior and posterior walls of the artery. After the inner metallic needle is removed, the plastic cannula is withdrawn back into the lumen. When a pulsatile backflow is seen, the cannula is carefully advanced into the artery. It is easier for patients with small-diameter arteries such as the radial artery. 17 Therefore, the metallic needle without plastic cannula is used in the single-wall puncture technique while the metallic needle with plastic cannula is used in double-wall puncture technique. There should also be no resistance during the placement of the guidewire.
In patients with small-diameter arteries due to hemorrhagic shock, double-wall puncture technique using a metallic needle with plastic cannula may be useful for arterial access.16,17 If micropuncture set (e.g. Micropuncture® Access Set, Cook Medical, Bloomington, IN, USA; outer catheter: 4 Fr, guidewire diameter: 0.018 inch, and needle gauge: 21) is available, the small artery can be easily approached by the single-wall puncture technique. However, if the metallic needle with plastic cannula in sheath set or micropuncture set is not available, 18-gauze angiocatheter can be used instead to place the guidewire. Because the diameter of mini guidewire for placement of 7-Fr catheter is 0.035 inch, it can be advanced into the artery through the 18-gauze angiocatheter.
To perform REBOA, a proper kit is necessary, and it might be prepared differently depending on the conditions of each hospital.7,10,12 To place the RESCUE balloon™, sheath size should be larger than 7 Fr based on internal diameter. Most physicians are aware of the need for the 7-Fr sheath such as 7-Fr Radifocus® Introducer II (Terumo, Tokyo, Japan); however, more importantly, there are two different sizes of entry needles with the same product name. One is composed of only metallic needle, and the other is an inner metallic needle and a plastic cannula. When using the metallic needle, the mini guidewire (diameter: 0.035 inch) can be introduced into the artery directly through the puncture needle. However, where the inner metallic needle and plastic cannula are used, the metallic needle should be removed after arterial puncture. Thereafter, the guidewire is introduced into the artery through the plastic cannula, so that the metallic needle is not used as an entry point for insertion of the guidewire.
Precautions during a sheath insertion
While inserting the sheath, it is recommended that the dilator and sheath be primed with heparinized saline.7,10,16,17 If heparinized saline is not available, normal saline should be sufficient. After being primed, the dilator should be inserted into the sheath until it fits in and is fully incorporated (Figure 1(a)). If the dilator becomes unlocked in the sheath, it may withdraw during insertion and result in the failure of the procedure (Figure 1(b)). In addition, the tip of sheath may become damaged, and this can lead to vascular injury or problems while removing the balloon catheter. Therefore, the dilator and sheath should be used as a single unit during preparation and insertion.
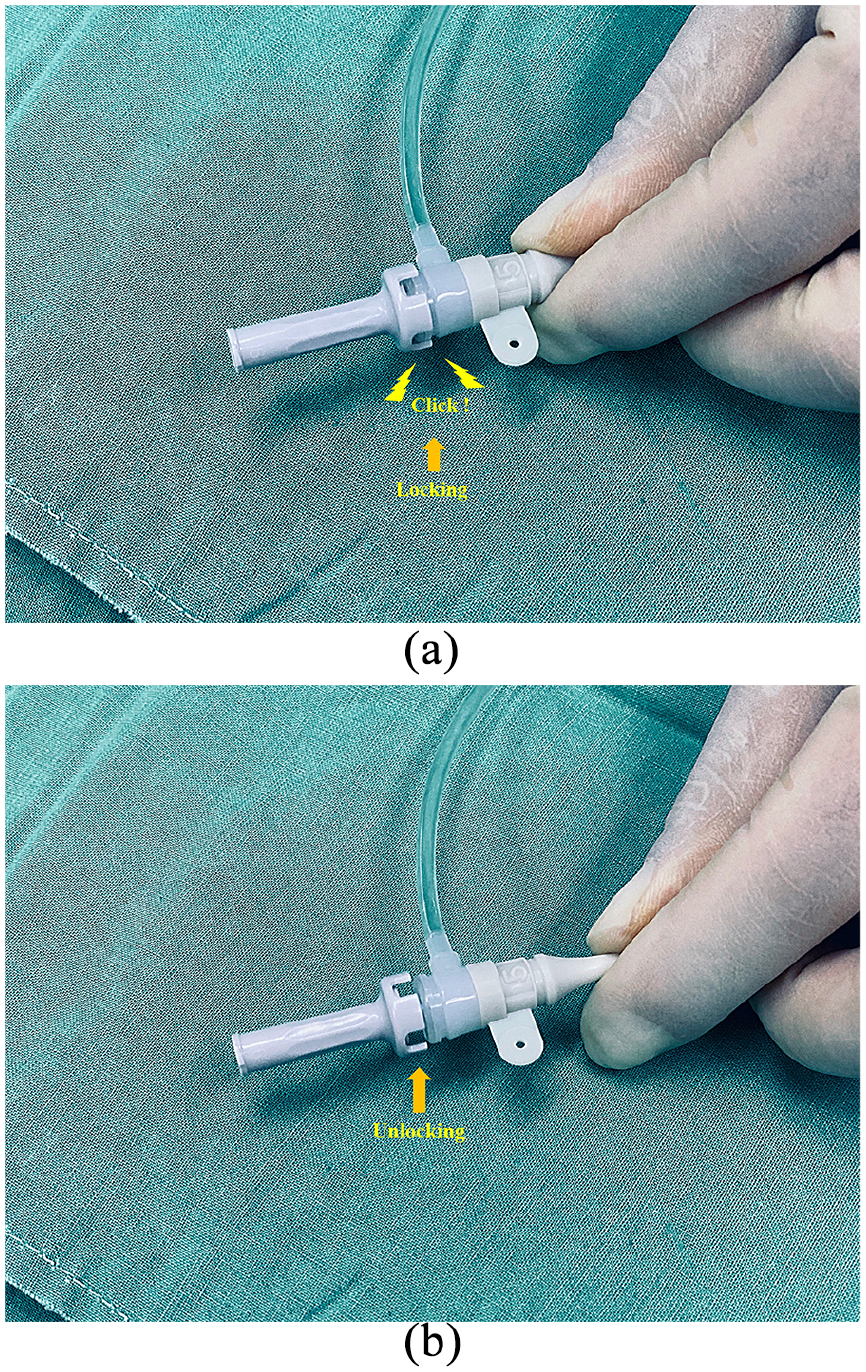
Sheath and dilator: (a) the dilator is inserted into the sheath until it fits with a click sound and (b) the dilator is unlocked in the sheath, which may result in failure of the procedure.
Even if arterial access using the guidewire is achieved, it may be difficult to advance the sheath where the entry route is too vertical or subcutaneous tissues are not dissected adequately. In such cases, the artery could become damaged, so a sheath should never be advanced into an artery forcefully. To leave the outer sheath in the artery, the most important precaution is that a sheath with dilator should be introduced into the artery through a mini guidewire, and then, the dilator and guidewire should be removed slowly without any resistance. If the sheath is unintentionally retracted during the removal of the dilator, it must be advanced carefully into the artery since the artery may be damaged by inserting the sheath without a dilator.16,17 If there is any resistance in this case, the sheath must be removed, and all procedures restarted from the beginning.
Guidewire and balloon positioning in the aorta
Except for ER-REBOA™ catheter (Prytime Medical Devices, Boerne, TX, USA), a long guidewire must be placed in the aorta to position the balloon at the aortic zone of occlusion. 7 When using the 7-Fr RESCUE balloon™ kit, it should be primed with solution.7,10 Sterile heparinized saline or normal saline solution should be flushed to activate the hydrophilic coating in the guidewire and the central lumen of the balloon catheter after removing the stylet. When the coating does not function properly to maintain lubrication due to an inappropriate flushing, there is a high probability that the balloon catheter would not be introduced into the blood vessel along the guidewire.
It is recommended to introduce the balloon catheter in the targeted aortic zone along the guidewire after checking the position of guidewire in the aorta.7,8,11,12,20,25,26 If real-time fluoroscopic guidance under angiography or C-arm is available in the emergency setting, it can be very useful and safe for identifying the cause of the resistance when there is any during such procedure.20,26 However, real-time imaging equipment may be not available in most emergency medical centers, so serial X-ray or ultrasound can be used instead.7,27 Transperitoneal sonograms may be poor in patients with pneumoperitoneum, subcutaneous emphysema, obesity, or fatty liver. Therefore, serial X-ray is usually a practical option to confirm positioning.
The aortic zone is classified into three zones.1,3 Balloon catheter is mainly positioned in aortic zone I for patients with intra-abdominal hemorrhage and in aortic zone III for patients with unstable pelvic fracture. To place the balloon in the exact occlusion zone level, real-time imaging equipment is necessary. However, if it is not available, an X-ray is substantially useful. When using X-ray, the bottom of the balloon catheter with radiopaque steel marker can be a guide to position the balloon in the targeted zone. Zone I REBOA is recommended for the diaphragm while zone III REBOA is recommended for the skeletal landmarks of the lower margin of the third lumbar vertebral body (Figure 2(a) and (b)).28–31 Unfortunately, if imaging equipment is not immediately available, simulation with the conventional landmark or an optimal fixed insertion length can help in placing the balloon catheter in an emergency or prehospital setting.21,29 For example, the landmark of the catheter for zone I level should be above the xiphoid process and for zone III, near the umbilicus (Figure 3(a) and (b)). However, the estimated length from an external landmark may be shorter than the actual length especially in elderly patients, and the inflated balloon also may migrate to the caudal direction due to elevated blood pressure after the ballooning. 32 Therefore, the position of the balloon catheter should be placed slightly higher (experientially, 3–5 cm in our institute) than measured. If a 7-Fr RESCUE balloon™ catheter is being used, the guidewire should be changed to a stiff stylet to prevent caudal migration of the balloon catheter before balloon inflation. 7 If the stylet is not placed in the 7-Fr RESCUE balloon™ catheter, the inflated balloon catheter may severely damage the aorta or itself due to balloon migration (supplementary video; a video showing that the inflated balloon catheter without the stylet can move to the caudal direction due to an elevated blood pressure, and the migrated balloon catheter may cause damage to the aorta or itself (yellow circle)).
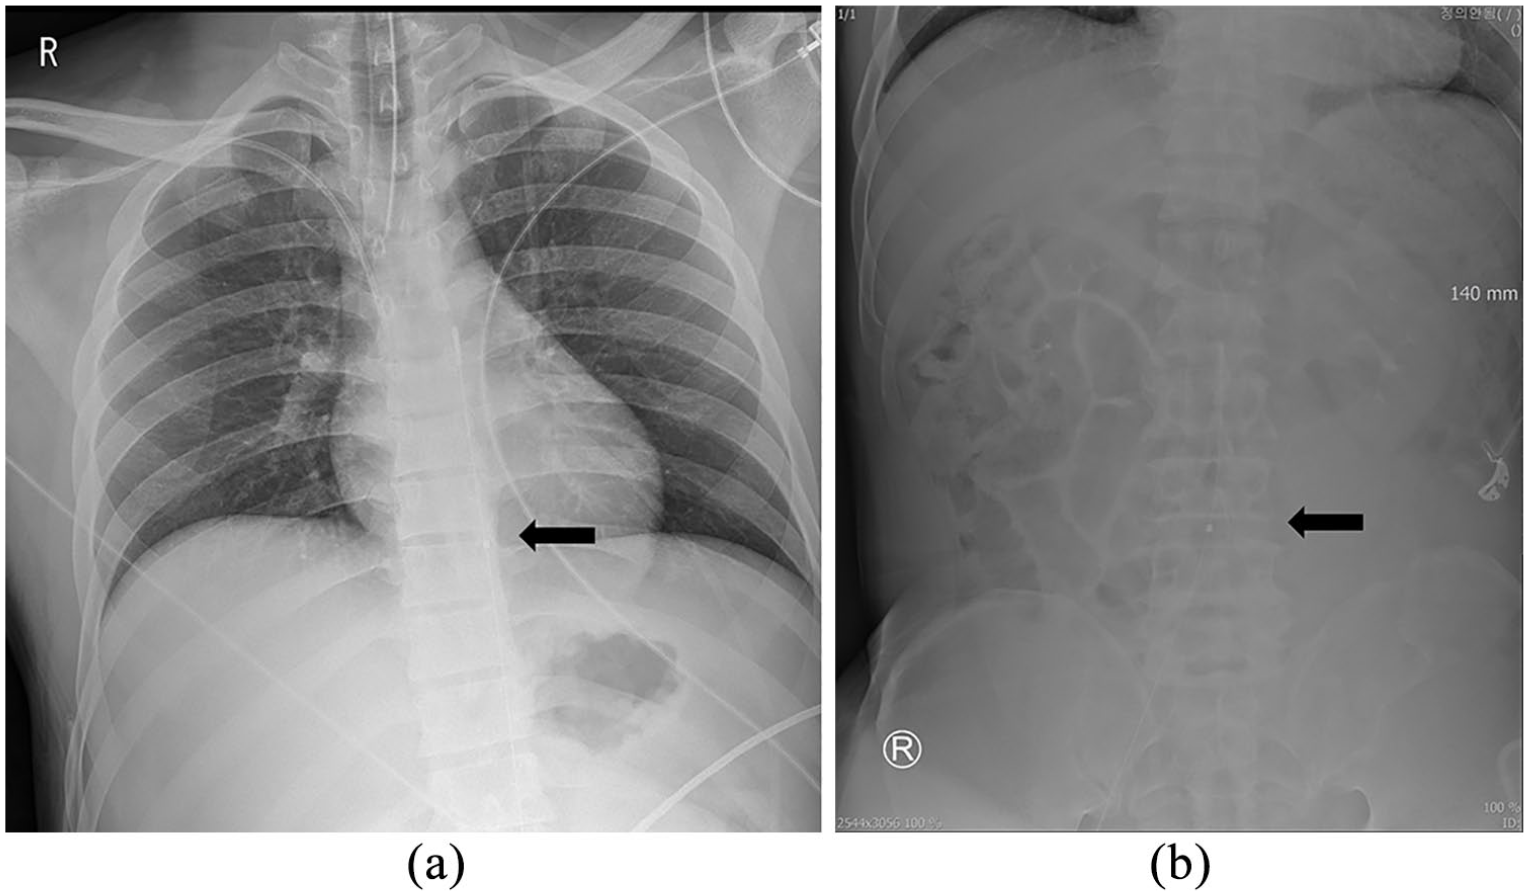
Radiograph showing the bottom of the balloon catheter with radiopaque steel marker (black arrow): (a) zone I REBOA is recommended for the diaphragm and (b) zone III REBOA is recommended for the skeletal landmarks of third lumbar vertebra.
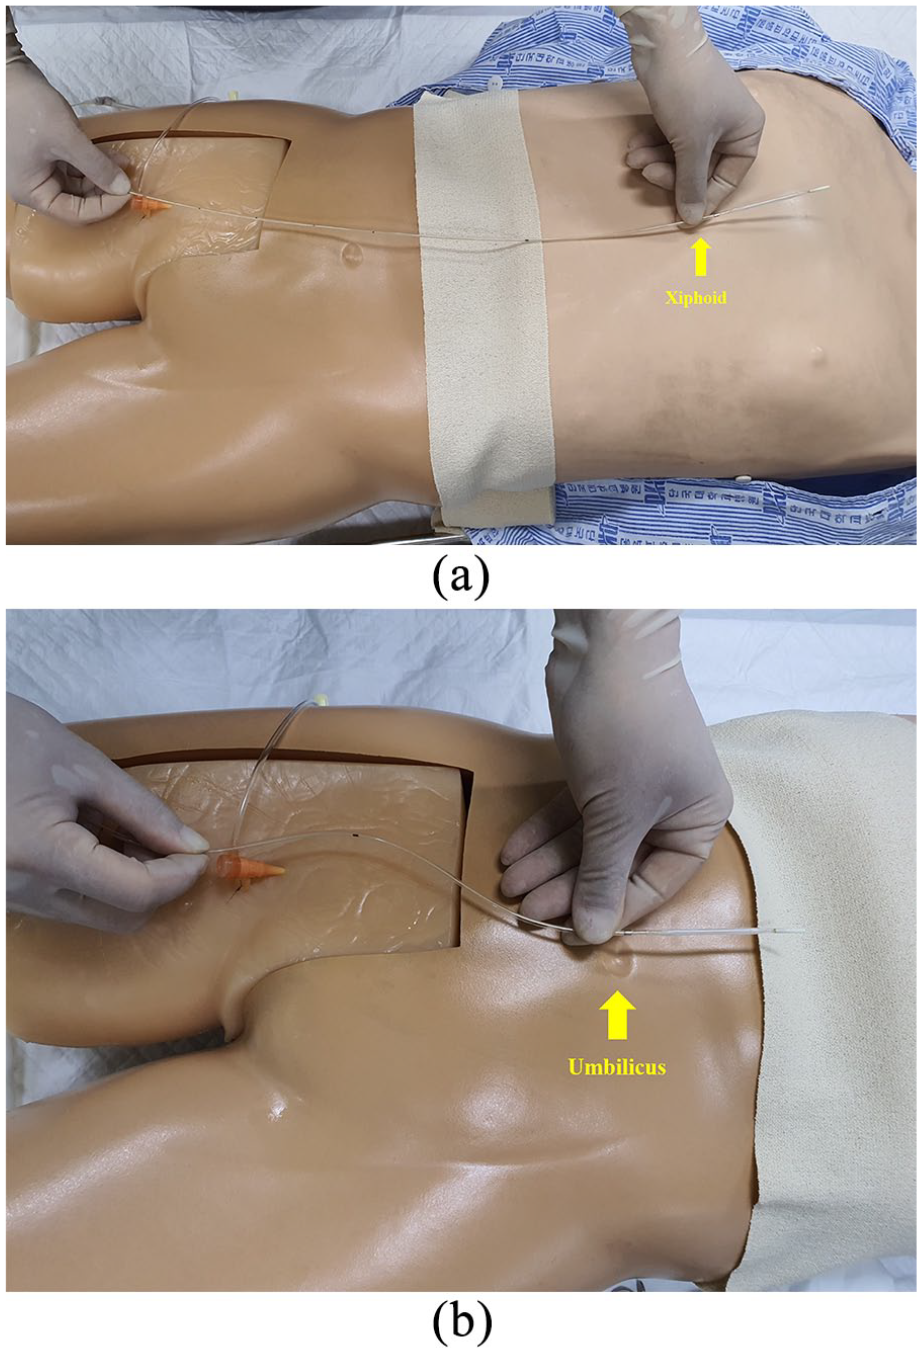
Simulation with the external landmark for placing the balloon catheter: (a) zone I level is recommended above the xiphoid process and (b) zone III level is recommended near the umbilicus.
Occlusion zones and adjustment of balloon location
Balloon position should be considered through various information and strategies in hypotensive trauma patients to mitigate the degree of distal ischemia.8,11,21,25,30,33 In general, imaging by a focused assessment with sonography for trauma and a pelvic radiograph can provide clues for possible causes of hemorrhage shock in trauma patients and be a determinant for the level of occlusion. However, they may not demonstrate all types of hemorrhage in the abdominopelvic cavity such as retroperitoneal hemorrhage.19,34,35 Beyer et al. reported that the zone of aortic occlusion based on the injury site is recommended, but zone III REBOA may not optimally elevate proximal blood pressure to support perfusion of the heart and brain in patients with severe hemorrhagic shock. 33 In addition, Tibbits et al. suggested zone I REBOA should be considered for patients at risk for hemodynamic collapse regardless of the injury site. 30 Zone I REBOA may lead to an additional ischemic burden compared to zone III REBOA since organ ischemia below the occlusion is inevitable. Therefore, zone I REBOA may be preferentially performed in patients with profound hemorrhagic shock except in patients with obviously isolated and unstable pelvic fractures.
The balloon position inappropriately placed at the target zone may be problematic.8,18,30,33,36 If the location of inflated balloon is lower than the target zone, the balloon catheter should be advanced to the cranial direction. However, the balloon catheter with the stiff stylet may damage to the aorta directly while advancing the catheter, especially in elderly patients with tortuous aorta. For balloon advancement, the stylet should be withdrawn about 3 cm to make the tip of balloon catheter soft, and then the balloon catheter can be advanced into the aorta slowly after deflation. This tip can be useful and applicable especially in patients with straight aorta. However, if there is any resistance during the adjustment of balloon location, the procedure must be resumed from the soft guidewire insertion. Moreover, it should be noted that the deflation and removal of balloon catheter may lead to catastrophic hemodynamic collapse and procedure time delay in patients with profound shock. Therefore, it is recommended that the initial balloon location may be better at a higher level than the target because it is more anatomically feasible and safe to move the balloon catheter to the caudal direction than to the cranial direction in patients at risk of hemodynamic collapse regardless of injury site.18,36
Intermittent versus partial REBOA for extending the occlusion time
The deployment of REBOA in the aorta increases the risk of developing ischemic injury below the occlusion level. In addition, prolonged inflation has the potential to contribute to fatal pulmonary and cerebral edema and heart failure.5,37,38 To prevent possible complications, as an alternative to complete occlusion, current reports have focused on the occlusion methods to mitigate ischemic complication, including the use of intermittent and partial aortic occlusion techniques.9,13,25,35,39–42
Intermittent resuscitative endovascular balloon occlusion of the aorta (iREBOA) means that the balloon is fully inflated and deflated intermittently over various schedules, including a time- or pressure-based schedule. Kuckelman et al. reported that an iREBOA is superior to full REBOA techniques for extending the occlusion time for zone I. 40 In iREBOA, a pressure-based technique (mean arterial pressure (MAP) <40 during deflation/10-min inflation) may be superior to a time-based technique (3-min deflation regardless of MAP/10-min inflation).
Partial resuscitative endovascular balloon occlusion of the aorta (pREBOA) means the balloon is partially deflated with the goal of maintaining a target blood pressure, for example, maintaining proximal systolic blood pressure over 90 mm Hg, to allow distal perfusion, so practitioners usually do not feel any resistance between the aorta and balloon during inflation.25,35,38,39,42 It can provide adequate hemorrhage control and decrease ischemic injury. Compared with iREBOA, pREBOA may be superior in preventing a profound shock episode and providing distal perfusion, but there are no differences in the duration of an optimal MAP and survival benefit statistically. 35 Therefore, iREBOA might be preferred in the military or prehospital setting because of its simplicity since there is no need to check MAP during the procedure, while pREBOA might be suitable in hospital setting. Unfortunately, the absolute limit of occlusion time, optimal time balance between inflation and deflation in iREBOA, and the practice guideline of pREBOA to support hemodynamics for survival and to mitigate distal ischemia have not been established.11–13,35,41
Balloon deflation and removal
During surgery or intervention, the operator as the balloon holder has to communicate with the surgeon, anesthesiologist, and interventional radiologists about the balloon inflation or deflation.7,11–13,37,43,44 Following control of major hemorrhage, the balloon can be deflated slowly and cautiously if the patient is hemodynamically stable. Additional bleeders below the occlusion level might be seen, which were masked due to low blood perfusion; hence, slow deflation can facilitate surgical control for additional bleeding. However, when developing unstable hemodynamics owing to rebleeding from deflation, reinflation might be needed to decrease hemorrhage during bleeding control. Moreover, an abrupt deflation may result in profound hypotension and a catastrophic event. At our institution, the balloon is sequentially deflated slowly at 1–2 mL per 2–3 min while maintaining target blood pressure.
Before removing the balloon catheter, full deflation is mandatory. After completely deflating the balloon, the plug of the three-way stopcock should be closed (Figure 4(a) and (b)), and then, slowly, the balloon can be removed using the clockwise rotating method while the sheath is held. If the three-way stopcock is not closed, a small volume of inflated solution may reinflate the balloon, and the balloon base may not be totally collapsed. The balloon base may result in some resistance when arriving at the sheath; therefore, the balloon catheter may not be pulled through the sheath. In addition, with the 7-Fr sheath, subtle resistance may usually be felt during the removal of the balloon catheter due to its internal diameter. Compared to the 7-Fr sheath, which demands more attention, 8-Fr or 9-Fr sheath can be less problematic. In particular, if the contrast medium was used for the identification of the balloon location and for the inflation, the removal resistance may increase due to its sticky nature which makes complete deflation difficult. 7 However, if the sheath is larger than 8-Fr or 9-Fr, it may not pose any problems. According to the manufacturer’s instructions, the balloon catheter and sheath can be removed as a unit. However, it should be noted that an incompletely deflated balloon catheter and sheath as a unit may cause vascular injury during the pulling of the catheter.
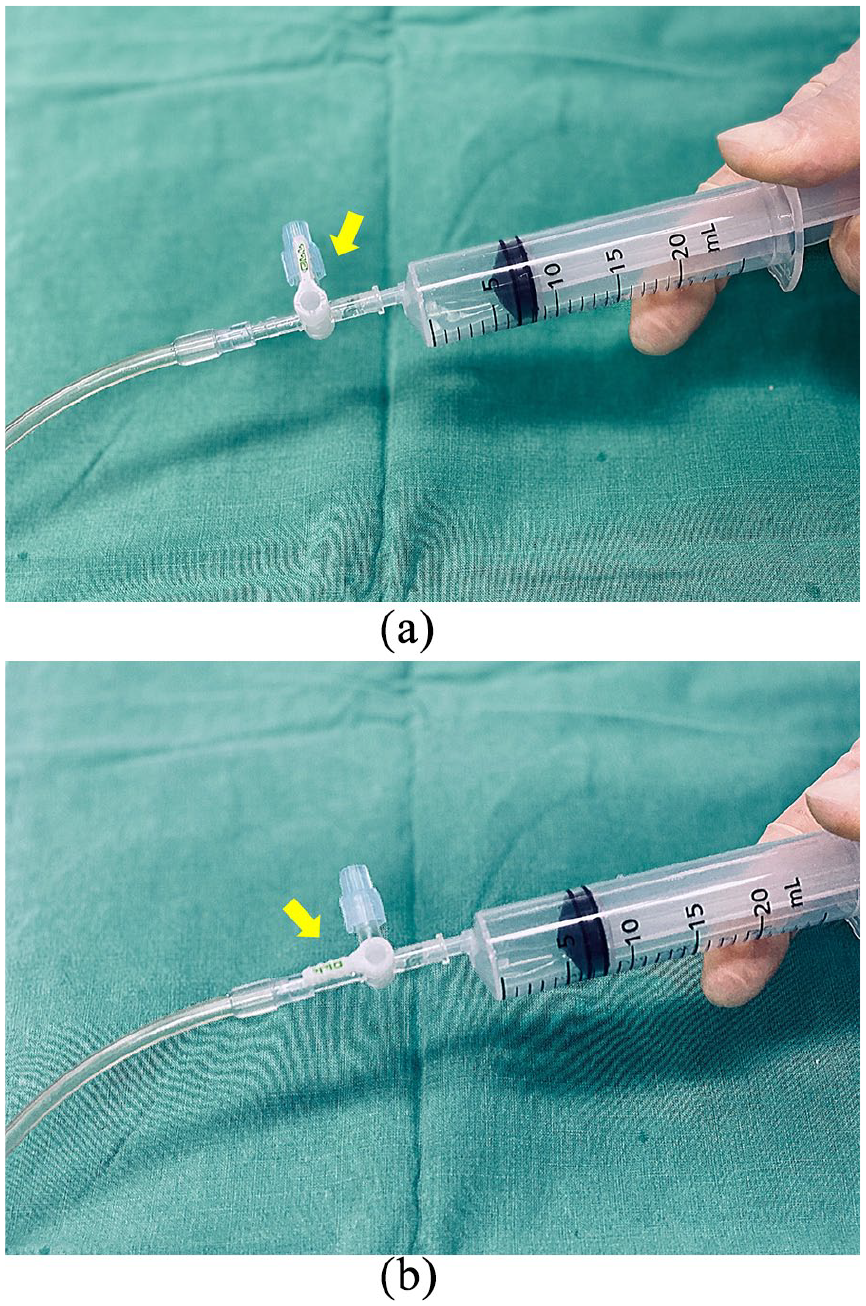
The plug of the three-way stopcock on the 7-Fr RESCUE balloon™ catheter (Tokai Medical Products, Aichi, Japan): (a) the syringe is fully pulled to maintain the negative pressure for complete deflation and (b) after the balloon is completely deflated, the plug of the three-way stopcock is closed to prevent reinflating the balloon catheter.
Sheath removal
For any reason, such as the possibility of reinsertion of the balloon catheter or angioembolization, the sheath can be left in place while assessing the peripheral circulation.16,17 However, if the patient is hemodynamically stable with a normal coagulation profile, the arterial sheath should be removed to avoid ischemia and thrombus complication immediately.6–8,11,45 In addition, it may be helpful to aspirate blood through the sheath to forestall the thrombus formation just before removing the sheath. If a clot is seen on aspiration, surgical exploration may be required.
Several methods for sheath removal are available, such as external compression, direct surgical repair, and vascular closure device (VCD).7,17,22–24,46–48 External compression is suitable for small-sized sheaths, such as 7-Fr or 8-Fr. However, if the patient is at risk of coagulopathy or thrombus formation, direct surgical repair is the recommended method. Similarly, surgical repair should be performed if the sheath was placed into the artery through a cut-down maneuver.16,17,23,24 VCDs are being increasingly used for effective hemostasis instead of external compression.46–48 Currently available VCDs include FemoSeal™ (St. Jude Medical, St. Paul, MN, USA), Mynx® (Cordis, Milpitas, CA, USA), Perclose ProGlide™, StarClose SE™ (Abbott Vascular, Redwood City, CA, USA), etc. Each VCD has a different mechanism of vascular closure, and they can potentially reduce the time required for the removal procedure and bed rest.24,47 Although VCDs have lower rates of vascular complication compared to hemostasis with external compression, complications secondary to VCD failure may occur. For example, if subcutaneous tissues are not adequately dissected before sheath insertion, the arterial closure device will not easily advance to the arteriotomy site. As a result, complications secondary to VCD failure may occur such as bleeding, pseudoaneurysm, and vascular obstruction. Therefore, adequate dissection using curved mosquito forceps would be required, which would facilitate the subcutaneous passage of the device into the arteriotomy site. After sheath removal, distal circulation must be monitored. If leg ischemia is suspected by manual palpation, vascular examination such as the Doppler ultrasound should be performed immediately, and surgical exploration or embolectomy may be necessary to treat it.16,17
Medical records
All REBOA procedures should be monitored and evaluated to ensure performance improvement and patient safety. In addition, treatment algorithms or medical records would be needed to share relevant information since resources for REBOA performance vary depending on each hospital’s settings and capabilities. There are several treatment algorithms for REBOA use, but standard medical records on REBOA performance are rarely documented.1,3,5,10,13 In our institute, medical records on REBOA procedure are being documented to ensure timely and reliable data retrieval and usage (Figure 5). We believe that sharing skills, experiences, and errors based on medical records with other specialists can provide a high quality of REBOA performance.
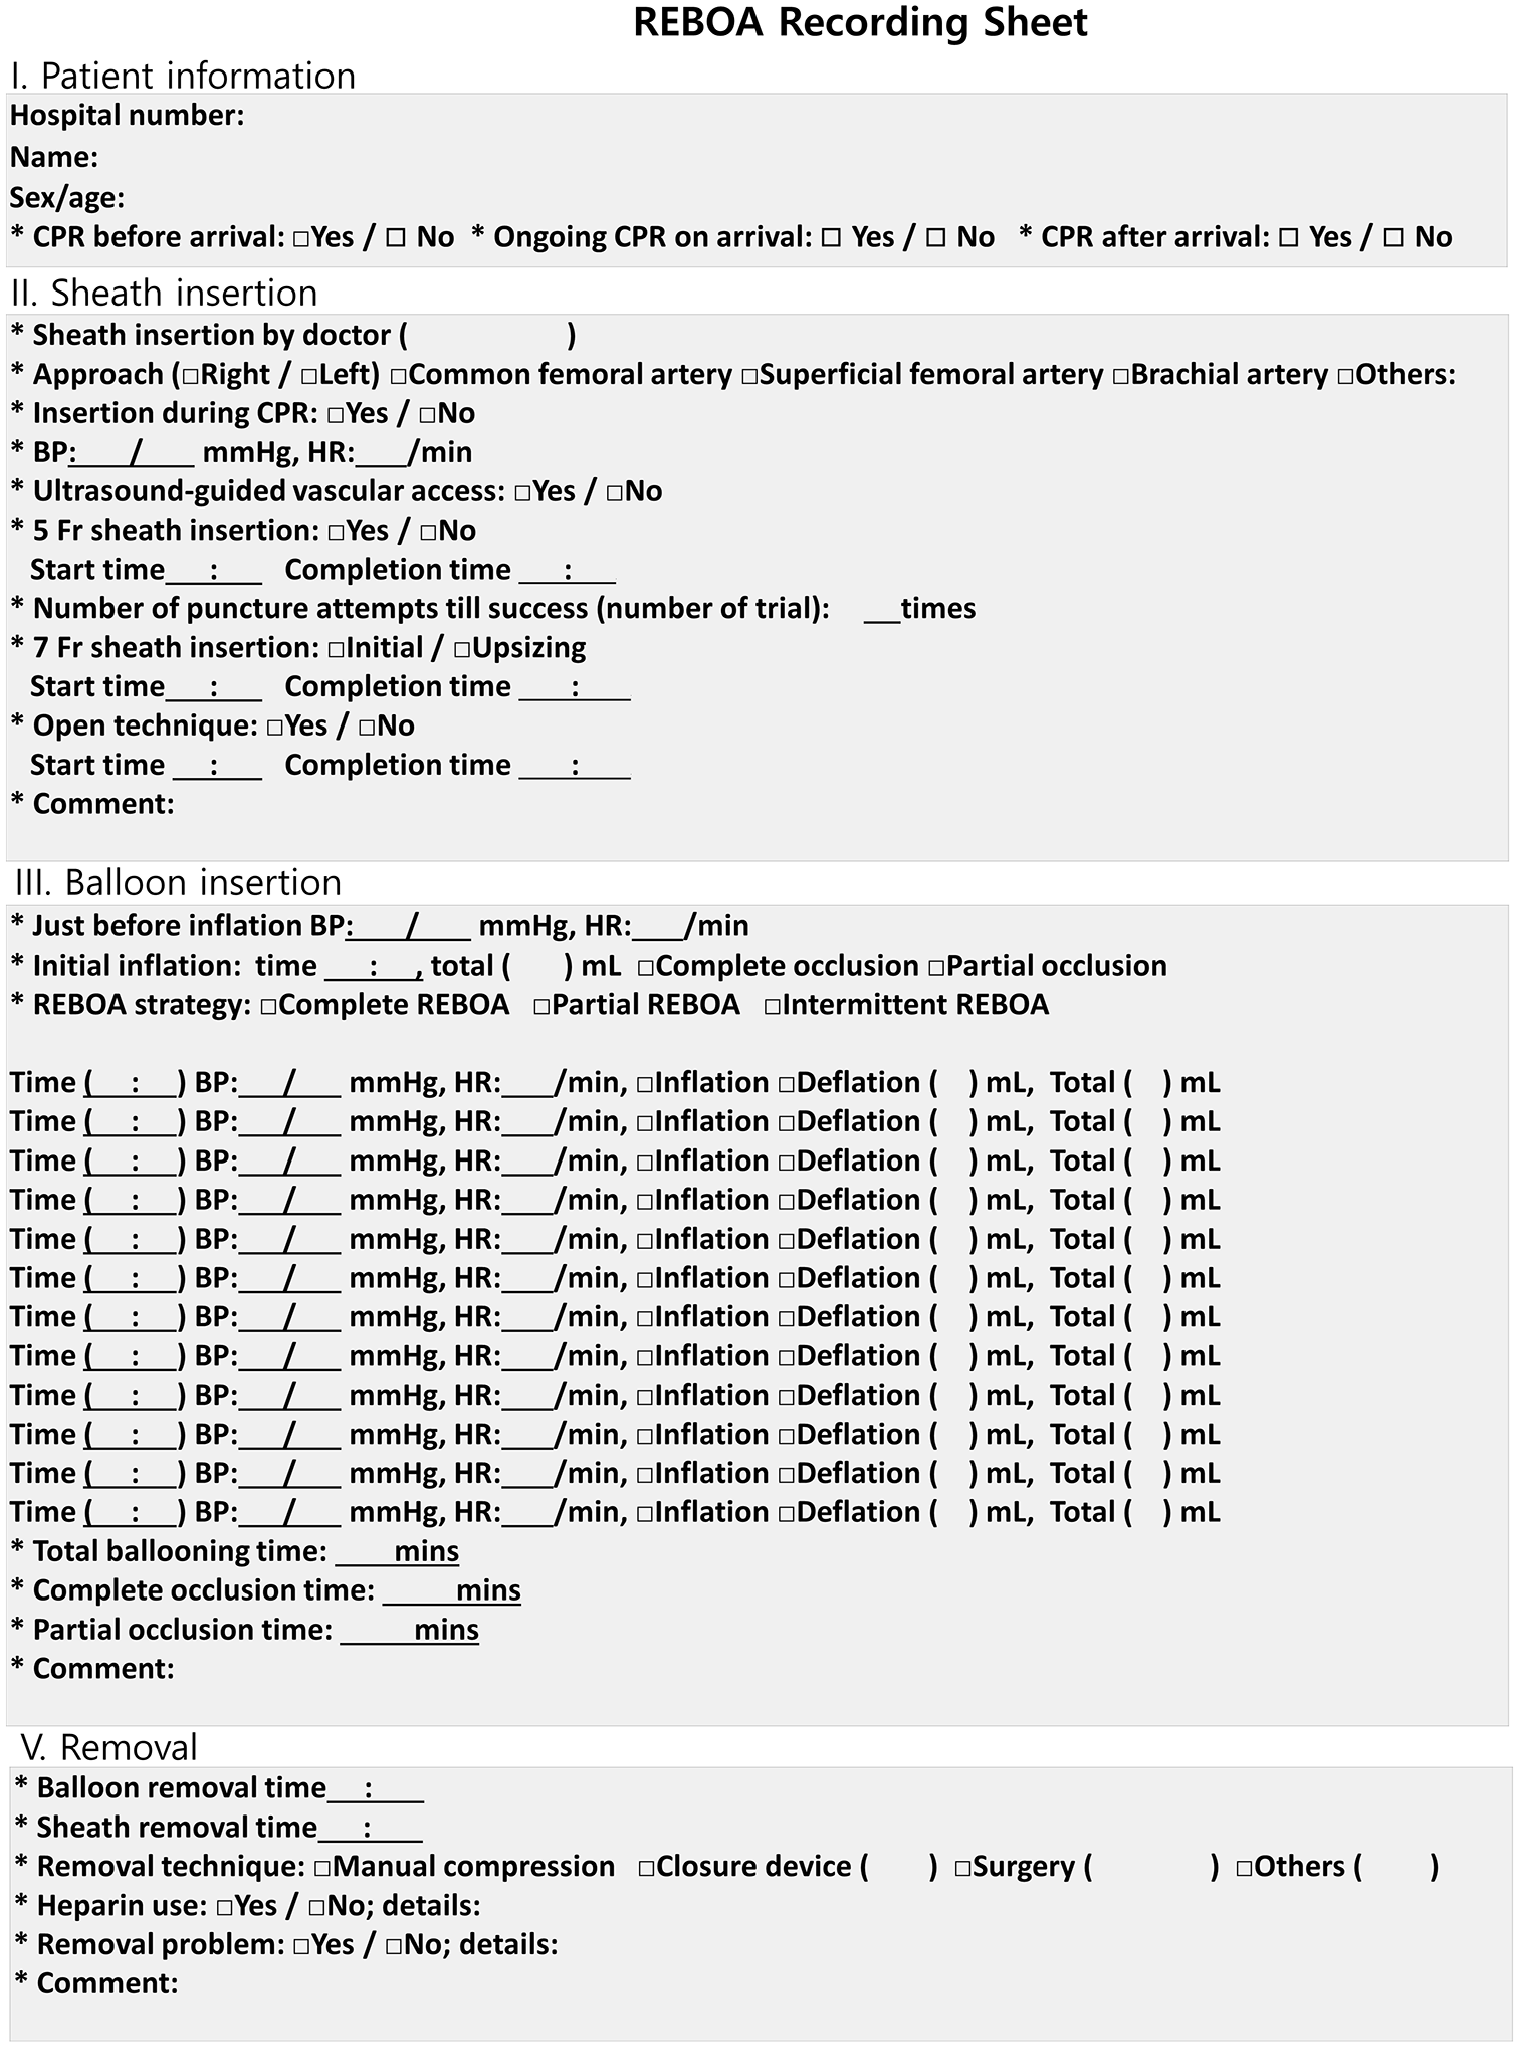
Medical records for REBOA procedure. The step-by-step procedure for REBOA was recorded by trauma bay nurses.
Conclusion
The management strategy for patients with hemorrhagic shock has been changing, and REBOA is being increasingly utilized as a bridging therapy for NCTH in the middle of a paradigm shift. Nevertheless, the application of REBOA remains limited because of inadequate facilities, and lack of training and experience. We believe that the tips mentioned in this article will help in performing the REBOA procedure systematically and developing an effective REBOA framework according to various hospital settings and capabilities.
Footnotes
Author contributions
S.W.C. made study concept and design. D.H.K. provided study materials. Y.R.C., D.S.M., D.H.K., and S.W.C. wrote and approved the manuscript. All three authors contributed to all the phases of this research.
Declaration of conflicting interests
The author(s) declared no potential conflicts of interest with respect to the research, authorship, and/or publication of this article.
Funding
The author(s) received no financial support for the research, authorship, and/or publication of this article.
Availability of data and materials
Data and materials can be made available to the public through direct requests to the corresponding author.
Informed consent
This article did not use patient data, and thus, no consent was required.
Informed consent for publication
All authors have provided consent for publication of this article.
Human rights
No human subjects were included in the study.
Supplemental material
Supplemental material for this article is available online.
References
Supplementary Material
Please find the following supplemental material available below.
For Open Access articles published under a Creative Commons License, all supplemental material carries the same license as the article it is associated with.
For non-Open Access articles published, all supplemental material carries a non-exclusive license, and permission requests for re-use of supplemental material or any part of supplemental material shall be sent directly to the copyright owner as specified in the copyright notice associated with the article.