
Abstract
Background:
Tibial tubercle osteotomy is an effective technique that has been well-described to treat patellofemoral overload and/or instability.
Indications:
A tibial tubercle osteotomy may be indicated in patients with patellofemoral instability and/or pathologic stress reactions at the patellofemoral joint, along with excessive lateral position of the tuberosity or patellar height abnormality.
Technique Description:
This video shows 2 types of osteotomies: anteromedialization alone and distalization with anteromedialization.
Results:
Two techniques were performed for tibial tubercle osteotomies on cadaveric models. Biomechanical studies have shown that anteromedialization, distalization, or a combination of the 2 can decrease patellofemoral joint forces when compared with lateralized and native tubercle positions.
Discussion/Conclusion:
We present an anteromedializing and a distalizing tibial tubercle osteotomy. This is a reproducible procedure that is an essential tool in the patellofemoral surgeon's toolbox. The customizable nature of the cut allows optimization of patellofemoral alignment and contact forces. Medialization, anteromedialization, distalization, or a combination of these procedures can be completed with careful attention to preoperative planning and intraoperative technique.
Patient Consent Disclosure Statement:
The author(s) attests that consent has been obtained from any patient(s) appearing in this publication. If the individual may be identifiable, the author(s) has included a statement of release or other written form of approval from the patient(s) with this submission for publication.
This is a visual representation of the abstract.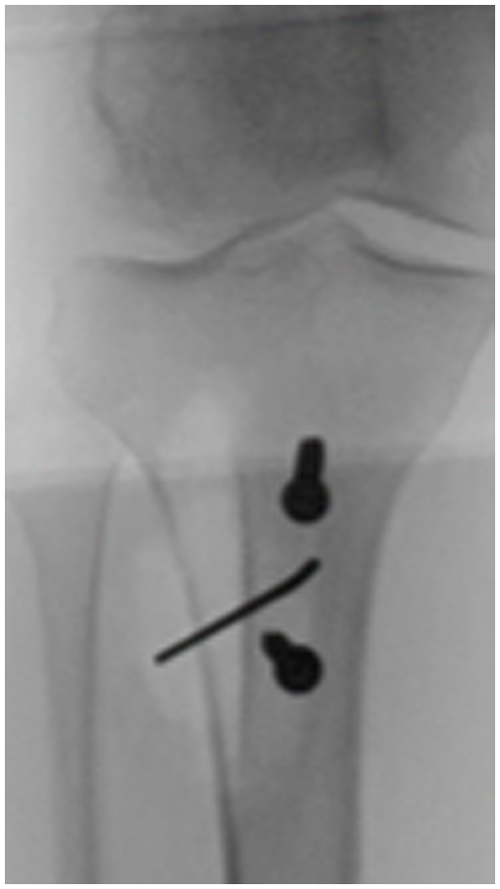
Video Transcript Background
This is Jackie Brady from Oregon Health & Science University, presenting the technique for tibial tubercle osteotomy.
Indications
First, we will discuss medialization or anteromedialization. 1 I am going to show you on the right knee.
Technique Description
I generally take an extra centimeter of skin relative to the size of the shingle I am going for. In a large soft tissue envelope, you might go a little bigger. In a very lean patient, you might have a little bit more leeway to go smaller.
First, you are going to expose the patellar tendon. You can make your incision just medial to the tubercle or just lateral to the tubercle. In my case, I tend to prefer a lateral approach, but you can see that if you want to harvest a hamstring, being just medial works a little bit better. You are going to get a retractor across that patellar tendon to make sure you protect it, and the first cut is a proximal one across the top of the tubercle. You can see me with an osteotome here, coming from lateral to medial across the top of the tubercle anteriorly. This is a really important cut, and it is critical not to forget this. You can see me using a poor man's caliper there to make sure I am deep enough, and I have zoomed in a little bit there to show you where that cut is. So, you are just going from lateral to medial across the whole tubercle, and it is really important to include this because this is what can happen if you do not. This attempted tibial tubercle osteotomy propagated into the tibial plateau. This was a patient I saw in early practice, and this is a really tough problem to undo.
So, once you have got that cut, you are going to carry your incision down along the anterior compartment, trying to stay out of the muscle as best you can to avoid bleeding. You can use a bovie or a knife, and then, once you're through that fascia, you can use an elevator—here I have a Cobb elevator removing the anterior compartment fascia from the bone. Proximally, there, you can see I am stopping where the Gerdy tubercle connects to the tibial tubercle, and so we have to deal with that bony cut here in a minute.
And then medially, you need to get to the bone, which helps you determine the start point for your pins—I will show you here in a minute. Here, I am headed toward, but not all the way to, a point, anticipating that I will leave a periosteal hinge for rotating the fragment, right? We are not distalizing; we do not need to remove that hinge. It helps with healing; leave that soft tissue intact.
Once you have got that, you are going to place 2 pins: the proximal one is a little deeper, and the distal one is very superficial, anticipating that you are going to come to that point. However, they are parallel to each other, and I have got my backstop of my elevator on that lateral side. Then, I have got a saw blade coming between those 2 pins as my template for my cut. You want one cut, medial to lateral: kind of score the near cortex in its entirety before proceeding. Then, pins come out, and you are going to complete this with an osteotome, first heading proximally, and then cracking the bone distally. You can see me just working my way from distal to proximal: first, finding the line of the saw cut, because the osteotome is a little thicker than the saw blade, and then working my way proximally toward that top cut. You want to be almost all the way across from medial to lateral because the lateral cut is not the same angle—I will show you in a minute—but make sure you have got good mobility of that fragment at this stage, and you will save yourself some time.
So, once you are happy with that, you are going to come around to the lateral side of the table and separate the tubercle from the Gerdy's. You can see me identifying where the saw blade exited and then moving proximally to where the top cut was started. I will get out of my own way here in a minute and show you that angle from top to bottom, from superficial to deep, headed from top cut to where the saw blade exited laterally.
Once that is completed, you are going to mobilize your fragment. So, proximally, you are going to ensure it has a slight wiggle: you have removed all bony attachments (see how it is moving). We slowed this video down a little bit: I am going to move my osteotome gradually distally here—right there—so, I am right up against that distal bone. Here, you can see that it cracks, and you have got your periosteal hinge intact, but your shingle is nice and mobile.
Then, you are going to get a good, sturdy thumb and give it a shove in the direction you want, which is medial or anteromedial, depending on the angle of your cut. You can see that the read on your correction is going to be lateral, off the shoulder of the Gerdy tubercle. I am using my ruler here to measure the amount of correction I have imparted. This is another talk entirely—whether you want to use your tibial tubercle–trochlear groove, your patellar tendon–lateral trochlear ridge, or just a Gestalt, but you use your ruler to get an idea of how much correction you have made. 3
Once you have it where you want it, you are going to fix the tubercle in its new position. You want to keep 2 points of fixation at all times, because all osteotomies want to go home. I use 2, and sometimes 3, screws, depending on how much I like the bite. There are many options for these screws—here, I am showing a cannulated system in a laboratory setting. Clinically, I tend to use a large frag system and lag by technique. You want to think about compression and make sure you have a good bite. That proximal screw is going to have a cancellous bite, so just be prepared for that. If you do not like the bite, you can go to a cancellous pitch of a screw, you can add a third screw, you can do both, et cetera. 5
This is what it looks like clinically—this is our radiograph from the operating room. You can see that I have moved the tubercle medially there. I have got a pin provisionally holding it; I have got 2 screws in place. I am honestly not dedicated to having the screws parallel: do not split the wood—it is actually a little bit better if they are not colinear, but make sure you have got a good bite wherever you put them.
What if you want to add distalization? You are going to go about a centimeter longer on your shingle. I do not tend to undertake distalization unless I anticipate removing about a centimeter of the bone. I am going to show you on a contralateral knee, and I will try to label this appropriately. This time, it is the left knee, and the goal is to get it to a high normal level; you do not want to overcorrect.
So, the same thing here: I have got 2 pins in place and a saw coming between them. The distal pin is deeper here, though. You could do your typical anteromedialization or medialization and just feather it to an end and remove that end of bone. I find that to be a little bit less precise, and that end of the bone is very dense. So, I tend to like a step cut, and I will show you that technique, but both techniques are very viable.
I have got my saw cut here, and my pins have come out. Now, I am going to take the saw transversely at the distal end. This creates that dreaded black line, and you have to be cognizant of this when you are rehabbing the patient, but I like the precision of this. I feel like I can really dial in my correction here. So, I have got my saw blade across, my fragment is nice and mobile here, and then I will decide how much bone to remove. Here is a ruler in the center of the shingle, and you have to decide: are you purely distalizing (in which case you'd make a parallel line), or are you anticipating medialization or anteromedialization in conjunction with your distalization? Here, I am doing just that, so you have got an obliquity here, anticipating that I am going to rotate this shingle as I distalize it. I am going to take that piece of bone away; you can see that sort of angular cut, scoring the anterior cortex, and then once you are complete, you remove it (you want to stabilize this as you're doing it with a towel clip). Then, once you have removed your piece, you want to mobilize your shingle. A lot of people think you need to do a lateral release with this procedure, and you do not: the extensor mechanism is quite forgiving, as anybody who does extensor mechanism repair will attest. 4
You might remove your bump or your triangle as you mobilize these soft tissue attachments and get your shingle mobile. And now you are going to place it where you want it, as minimal a gap as possible distally (make sure that's good and secure). Then, you are going to check your medialization and make sure you like it, zooming in there. Then, you are going to fix it in position. I have got 2 screws in place; I have got that piece that I removed distally, and I am just going to translate that proximally to maybe keep the correction, but at least fill the gap. I have got, again, 2 cannulated screws, but there is not a lot of dogma about which system you use. I tend to use just the large frag system, and I do not hesitate to put a third screw if I have got a distalization because I have disrupted that periosteal hinge. You want to ensure you have a good, solid fixation. 5
Here is what that looks like on a radiograph: you have the distalization, the gap proximally, and I have a star next to that dreaded black line that I created.
Results
You want to watch that heal, especially in your athletic patients who want to return to pounding on it.
Discussion/Conclusion
Make sure it does not become a stress reaction as they start to load it. 2
Footnotes
Submitted March 18, 2025; accepted September 1, 2025.
One or more of the authors has declared the following potential conflict of interest or source of funding: J.M.B. is a paid consultant and speaker for Miach Orthopaedics. AOSSM checks author disclosures against the Open Payments Database (OPD). AOSSM has not conducted an independent investigation on the OPD and disclaims any liability or responsibility relating thereto.