
Abstract
Recent calls for improving reproducibility have increased attention to the ways in which researchers curate, share, and collaborate on their research assets. In this Tutorial, we explain how version control systems, such as the popular Git program, support these functions and then show how to use Git with a graphical interface in the RStudio program. This Tutorial is written for researchers with no previous experience using version control systems and covers both single-user and collaborative workflows. The online Supplemental Material provides information on advanced Git command-line functions. Git presents an elegant solution to specific challenges to curating, sharing, and collaborating on research assets and can be implemented in common workflows with little extra effort.
Lack of reproducibility is increasingly being recognized as a problem across scientific disciplines, and journals in a wide range of research areas, including biology (Markowetz, 2015), ecology (Ihle, Winney, Krystalli, & Croucher, 2017), neuroscience (Eglen et al., 2017), and psychology (Munafò et al., 2017), have published calls for changing the scientific workflow to enhance reproducibility. Studies suggest that one specific challenge to reproducibility is the ways in which researchers organize, curate, share, and collaborate on their research assets (Vanpaemel, Vermorgen, Deriemaecker, & Storms, 2015; Wicherts, Borsboom, Kats, & Molenaar, 2006). By assets, we mean, for example, stimuli, data, and code used to support a research article’s conclusions.
Fortunately for the empirical sciences, challenges related to curating materials across time, space, and collaborators have been solved to a high standard by software referred to as version control systems (VCSs). In this Tutorial, we introduce a popular VCS called Git and illustrate its use in the scientific workflow with a hypothetical example project. We show how to use Git with a graphical user interface (GUI) in the RStudio program (RStudio Team, 2016). We also show how to use Git with the online service GitHub for collaborative workflows. Using Git (and GitHub) will streamline workflows and help researchers stay better organized, and thereby facilitate reproducibility.
Version Control Systems
Consider a scenario in which several researchers are collaborating on a manuscript that reports results from an analysis of a data set. In a typical workflow, one person might format the raw data in a specific way to fit a particular statistical model and then write a draft of the manuscript, in the process creating three files: a spreadsheet with the data, a file with the computer code for the analysis, and the manuscript. If a collaborator then decided to use another statistical model, which required the data in a different format, and then edited the manuscript, he or she would create three more files: new data spreadsheet, new file with the code for the analysis, and revised manuscript. This cycle would then be repeated as many times as required; each time more files would be created, and it would become increasingly difficult for the authors to remember which data were paired with which analysis, and which analyses were reported in which version of the manuscript.
With a VCS, the project would contain three files only (one each for the data, analysis, and manuscript). The VCS would keep track of changes to the files and their different versions, therefore removing the need for new files for every new idea or edit. This lack of duplication, in turn, would likely reduce errors in remembering which data file was linked with which analysis, which manuscript version had the correct numerical results, and so forth. Box 1 shows additional examples of how VCSs can improve the scientific workflow. In the Discussion section, we compare Git, as a representative VCS, with other common workflow tools.
How Git Facilitates the Scientific Workflow
• Collaborators can share work easily, safely, and in an organized manner.
Git enforces a common organizational scheme among collaborators, making it easier to keep everyone “on the same page” with what goes where and how to contribute to specific parts of the project. Git projects are shared as a whole, so complex projects with multiple files linking to each other are easy to share. Sharing projects with other researchers is built into Git and can be facilitated with online services such as GitHub. A project that uses Git can be easily copied to GitHub, and other researchers can download the entire project from GitHub onto their local computers.
• Users can try different ways of visualizing data while keeping track of the variants.
Git saves a file’s current version whenever that is requested, so new features can be tested without losing previous versions or increasing the number of files in a project’s directories. Any past version can be retrieved from Git’s history.
• Multiple collaborators can work on the same files at the same time.
Collaborators work on the project locally, sending material to and receiving material from a central copy of the project.
Git keeps track of who has done what, when, and why (if users add a commit message). Git never loses information or overwrites work unless asked to do so, but allows for collaborators to work on the same ideas simultaneously.
VCSs were initially developed for writing code collaboratively, 1 but are increasingly being adopted to enhance workflows outside computer science. To understand why, it is helpful to think of code more broadly as any text written on a computer: Manuscripts, statistical analysis scripts, source code of computerized experiments, and even data files are code, or have source code. Code is just plain text written on a computer, and when we use the word code in this Tutorial, we mean it in this broad sense (e.g., this manuscript’s source code was written on a computer and was version controlled). Furthermore, metadata, stimuli, study notes, and other research documents often go through multiple revisions and could therefore benefit from being version controlled.
For example, a computerized experiment’s source code (text written by humans but interpreted by computers to, e.g., display stimuli to participants) may have multiple authors and go through multiple versions. The problems inherent to keeping track of these versions and changes, and allowing many authors to contribute (without introducing errors to the experimental program’s code), are problems that VCSs were specifically designed to handle. Writing manuscripts collaboratively is quite similar, at least as far as the computer is concerned: Multiple authors write multiple versions of a text document, sometimes needing to inspect previous versions, and the text needs to be merged across these authors. Even data sets can be considered as plain-text code: In most computerized experiments, the output data are numbers and text written into a text file. Researchers would usually not want to see that their raw data files were changed after they were created, and VCSs make it possible to verify that they have not changed because their history is preserved.
The core concept of version control is that contributors to a project keep track of the changes they make to the source code by saving the files they have made changes to and then saving those revised files to the VCS’s history. (This process is analogous to saving an intermediate version of a file on a computer’s hard disk. Indeed, in order to submit a file to a VCS’s history, one must first save it on disk.) The VCS maintains a history of changes to the code between the various versions of the files that were saved to its history and therefore allows users to return to any earlier version by browsing the history. Figure 1 illustrates these concepts by outlining the typical Git workflow. Git and GitHub terminology is explained in more detail in Box 2.
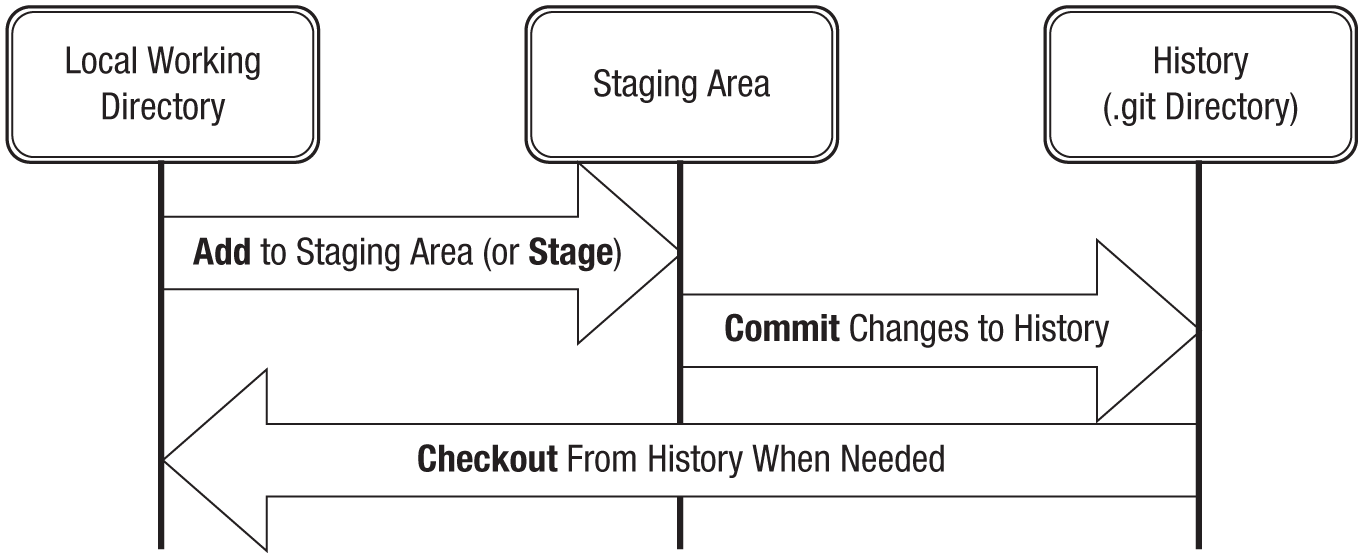
A diagram illustrating the typical Git workflow. Verbs in boldface are Git operations. In brief, this workflow begins with working in a local directory to make changes to a file in a project (e.g., editing a manuscript) and then adding the changed file to the staging area. Many files can be added to the staging area, if desired. The user can then commit the changes to Git’s history. A commit can be accompanied by a short commit message that describes the changes made. When required, files’ older versions can be retrieved by checking them out from Git’s history. These terms and operations are explained in more detail in the main text. This figure was adapted from Figure 6 at https://git-scm.com/book/en/v2/Getting-Started-Git-Basics.
Main Git and GitHub Operations and Terms
The Git Version Control System
Version control software has a long history in software engineering, and there are many VCS programs. Some popular ones are Apache Subversion (https://subversion.apache.org/), Mercurial (https://www.mercurial-scm.org/), and Git (https://git-scm.com/ 2 ). In this Tutorial, we focus on Git because it is increasing in popularity within the scientific community and is especially good for scientific collaboration because of its online tools that allow seamless collaboration even for very large research teams. Further, Git is free and open source, and it works on Windows, Mac, and Linux operating systems (among others).
Most computer users are already familiar with creating, copying, and deleting files and folders on their computers using the operating system’s default file viewer (Mac’s Finder, Windows’ File Explorer). Git adds functionality to the computer’s file system by making available a set of commands—executed either from a point-and-click GUI or from the computer’s command line—that allow users to keep track of files and their history and to distribute files across multiple computers and users. Git does not move or change the files or folders in any way: Users interact with their files as they would without Git, but instead of creating a new file each time they make important changes, they can use Git to save the file’s current state to Git’s history; subsequently, they can retrieve each of these versions of the file as needed.
Installing Git
Even if you already have Git installed on your computer, it is good practice to install the latest version (as of the writing of this article, Version 2.16.2), which can be downloaded from https://git-scm.com/download. Because Git is a stand-alone program, it is easy to install by simply downloading the installer and following the on-screen instructions. If you are a Mac user, the easiest way to install or update Git is to download the installer from http://git-scm.com/download/mac and install Git as you would any other program. Similarly, if you are a Windows user, you can download the Git software installer from http://git-scm.com/download/win and install Git as you would any other application. If you are a Linux (or other) user, you should look at the instructions on the Git Web site (https://git-scm.com/book/en/v2/Getting-Started-Installing-Git).
After the Git software has been installed, its functions are available to the computer’s users through various Git clients. In this Tutorial, we show how to use Git with RStudio. We present instructions for using Git from the command line in the Supplemental Material available online.
Disclosures
The Git repository for this manuscript, which includes its source code, can be accessed at https://github.com/mvuorre/reproguide-curate. The materials are also stored on the Open Science Framework, at https://osf.io/txgn8/. A Git repository for this Tutorial’s hypothetical example project can be found at https://github.com/mvuorre/git-example. The Supplemental Material discusses using Git (and GitHub) from the command line and can be accessed at https://github.com/mvuorre/reproguide-curate/blob/master/manuscript/supplement.pdf or http://journals.sagepub.com/doi/suppl/10.1177/2515245918754826.
Fundamentals of Git
The first operating principle of Git is that your work is organized into independent projects, which Git calls repositories. 3 A repository is a folder on your computer that is version controlled by Git, 4 and it can itself contain subfolders. Everything that happens inside a repository is tracked by Git, but you have full control of what is committed to Git’s history and when. Because you have this full control, there is a small set of operations you need to know. As a new user of Git, you will find it helpful to tape a Git-command cheat sheet (https://services.github.com/on-demand/resources/cheatsheets/) on your wall, but note that this sheet contains many more commands than are needed for the basic use of Git in standard psychology studies.
Briefly, when you work in a Git repository (i.e., make changes to files within it), Git monitors the state of all the files, and when they change, Git knows that they differ from their previously logged state. If you are happy with the current changes, you add the changed files to Git’s staging area (i.e., you stage them). If you then are certain that the changes in the staging area are desirable, you commit the changes. These two operations are the backbone of using Git to store the state of the project whenever meaningful changes are made (Fig. 1). Each commit in the repository’s history contains information to recover the full state of the project at that point in time. Users can always go back to an earlier version by checking out a previous state from Git’s history.
To explain the Git workflow in practice, we now turn to a practical example of working on a hypothetical project using RStudio. Git can be added to a project at any stage of the project’s life cycle, but to most clearly show its use, we begin with an empty project.
RStudio
RStudio (RStudio Team, 2016) is an integrated development environment (IDE) for the R programming language (R Core Team, 2017). 5 It is free and open source; works on Windows, Mac, and Linux operating systems; and can be downloaded from the project’s Web site (https://www.rstudio.com/products/rstudio/download/). RStudio incorporates tools that are useful throughout the scientific research cycle, including tools for organizing projects, analyzing data, and writing manuscripts. To these ends, RStudio also includes a graphical interface for using Git.
Creating the example project
Implementing reproducibility into the scientific workflow is less time-consuming and effortful if it is planned from the onset of a project, rather than added to the project after all the work has been completed. One of the early steps that can be taken to facilitate reproducibility is to organize and label files and folders as clearly as possible (here, we loosely follow guidelines such as the Project TIER, n.d., recommendations). For example, files and folders should have easy-to-understand names (i.e., idiosyncratic naming schemes should be avoided), and the names should indicate the purposes of the files and folders. Following these practices will help potential collaborators (and yourself) find files you need quickly and reliably. We illustrate some additional good and not-so-good practices in Figure 2.
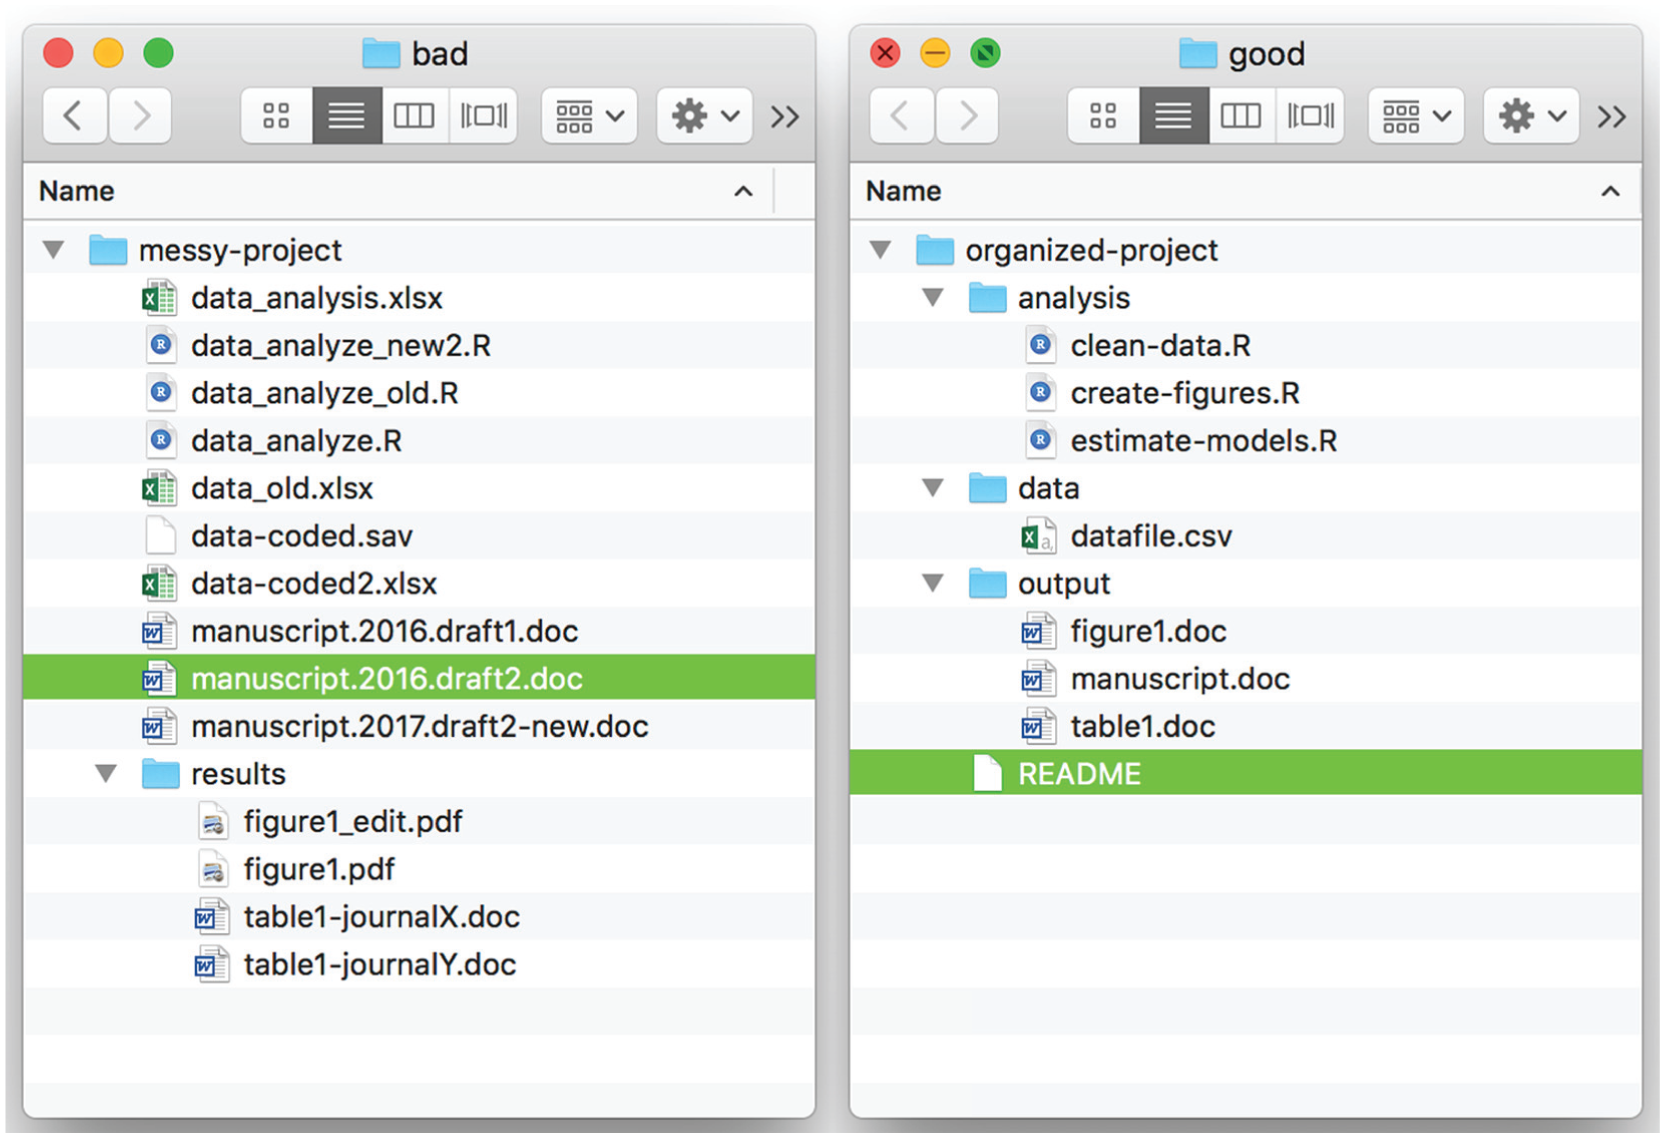
Examples of good and bad practices in organizing files and folders. Bad practices (left panel) include having multiple versions of a given file. When there are multiple versions, collaborators may, for example, accidentally use the wrong data for analysis or forget which version they used. It is better to organize a project in subfolders with meaningful names and to have only one file per purpose (right panel).
A project’s folder should have an immediately recognizable name and should be placed somewhere on the computer where it can be easily found. We call the example project (and therefore its home folder) “git-example.” Because the folder structure on a computer is easy to think of as a tree, a project’s home folder—or any folder that has subfolders—is also known as the root directory. To start the new project with RStudio, open the RStudio application, and click on “File” and then “New Project.” 6 This brings up a dialogue (left panel in Fig. 3) asking whether you want to create a project in a new directory, create a project in an existing directory, or retrieve (checkout) an existing project from a version control repository. We want to create our example project in a new directory, so after clicking on “New Directory,” we choose “New Project” (middle panel in Fig. 3; old RStudio versions may instead call this “Empty Project”). In the screen that follows (right panel in Fig. 3), we give a name to the project’s home folder (“git-example”) and choose where to save it on the computer. We also check the “Create a git repository” box, which will automatically set up a new repository for the project. Clicking “Create Project” then creates the project’s main folder in the specified location, as well as two files inside that folder. One of these files is .gitignore, which we discuss in more detail later. The other file is git-example.Rproj; the extension indicates that the folder is the home folder for an R (RStudio) project. Users will not interact with this file directly, but it is a plain-text file containing the project’s settings (these can be modified by clicking on “Tools” and then “Project Options” in RStudio).

Creating a project in RStudio. To create a new project in a new directory, click on “New Directory” (left panel) and then “New Project” (middle panel). The final step is to name the directory and indicate where it should be saved on the computer (right panel). There is also an option to create a Git repository for the project.
Now that the R project has been created, RStudio has a Git panel in the top right portion of the GUI (Fig. 4). This panel shows the two new files in the repository and buttons for the main Git commands. Because the project’s main folder has been initialized as a Git repository, Git will monitor any changes within the folder and allow you to add and commit these changes.
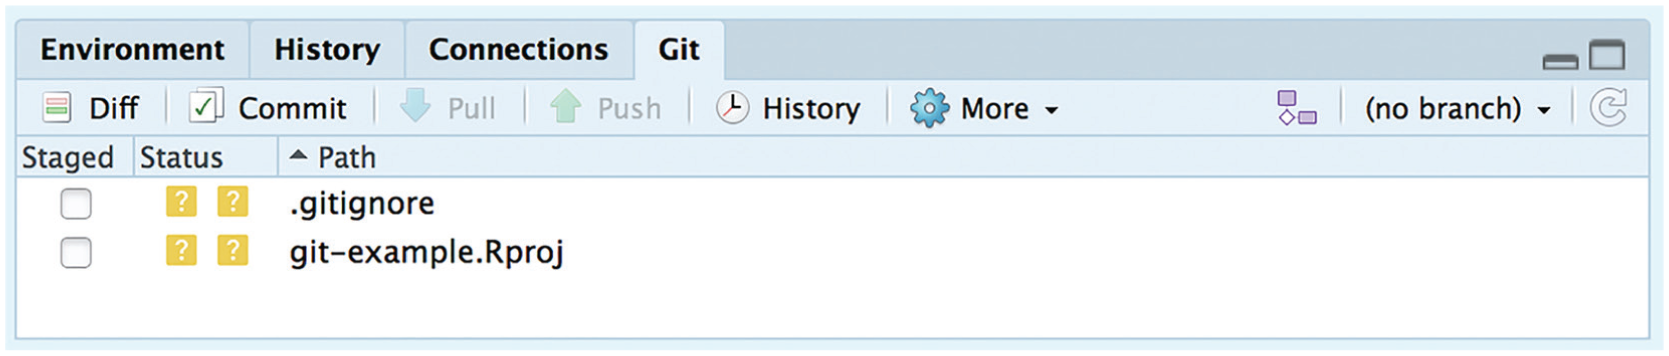
Screenshot of RStudio’s Git panel for the newly created example project. This panel shows the two files that were created when the project was started and the buttons for the “Commit” and “Diff” commands (“Diff” is used to identify the differences between two versions of a file).
Adding files to Git
To mark this milestone in creating the project, you can commit all the changes so far to Git. To do this, click on “Commit” in the Git panel. This will bring up another window (Fig. 5), where you can select files to add to the staging area. The two new files in the repository are initially flagged by yellow question marks in the Status column. To add these new files to Git’s staging area, select the radio buttons in that column. This files’ status is now shown as an “A” on a green background (see Fig. 5). The screenshot in Figure 5 shows how this window looks if you then select the .gitignore file. The text in the pale-green section at the bottom of this window indicates the lines of text that were changed in the selected file. All the lines of text in this file show up in this section because the file is new to Git and therefore each line is an addition (change) to the file (we discuss the contents of this file in more detail later).
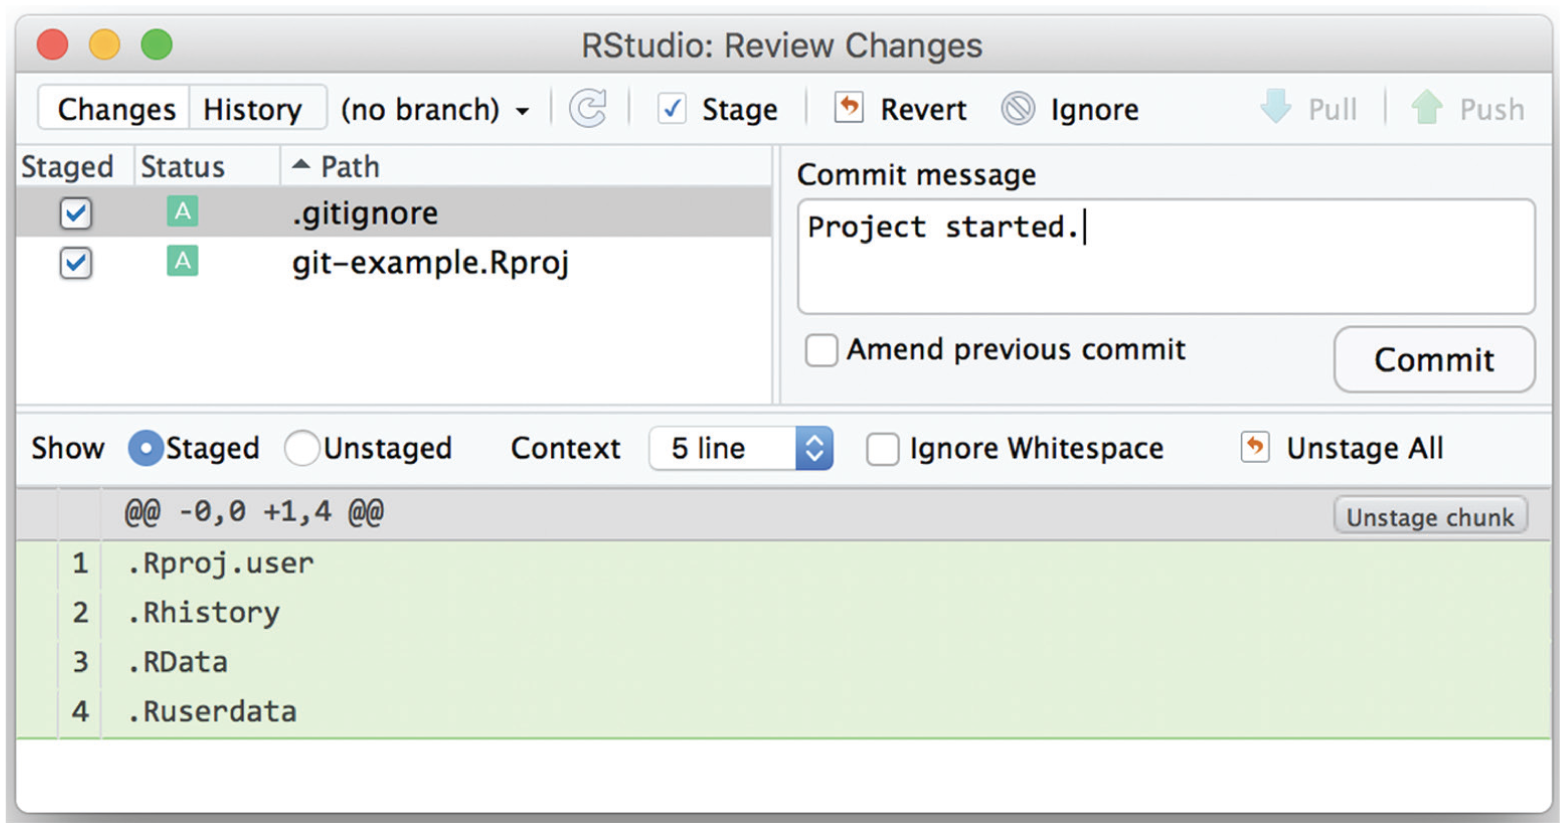
Screenshot showing RStudio’s Git panel for the example project after the first two files have been added to the staging area. Note that the bottom section of the window displays the changes in the .gitignore file, because it has been selected. An explanatory message has been typed in the “Commit message” box, in preparation for committing the files.
You have now added the files to Git’s staging area and can commit the files to Git’s history. Before clicking on “Commit,” write a short message in the “Commit message” box, describing what changed and why. These messages will be important when you later browse the history of your repository. After you click on the “Commit” button, a window summarizing the commit’s changes will pop up (Fig. 6).
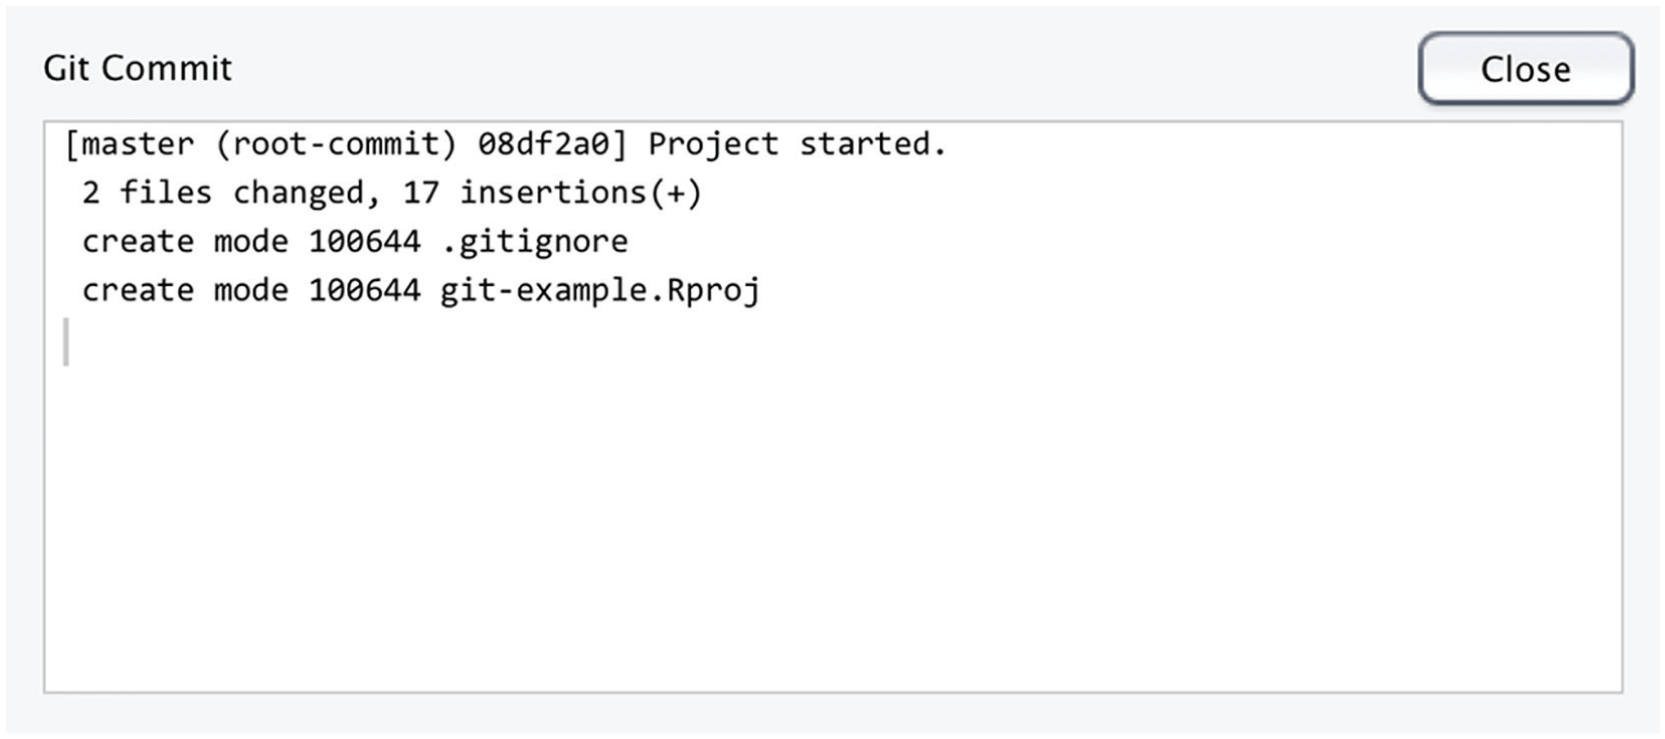
Illustration of Git’s description of changes within a commit. This commit (from Fig. 5) changed two files and inserted a total of 17 lines of text. The rest of the information can be safely ignored for the purposes of this example. Click on “Close” to proceed.
Every project (repository) should contain a brief note explaining what the project is about and whom to contact for more information. This note is usually called a readme file, and therefore your first proper contribution to this project will be a README file. 7 Although it might seem odd to document such trivia when working solo on a project, it will be easier for you and other people (e.g., someone else continuing your project later on) to recall what the project was about if this information is available.
The README file should be a plain-text (.txt) file (i.e., not created with Microsoft Word or similar software) that can be read with a simple text editor. 8 Create this file with RStudio’s text editor (click on “File,” then “New File,” then “Text File”), and save it to the project’s root folder. Once you have saved the file in that folder, it will be visible in RStudio’s Git panel (with yellow question marks indicating that it is a new file). Once you are happy with the README file’s contents, stage the file by checking the radio button, write a commit message, and click on “Commit.” This initial version of the README file is now saved in Git’s history and can be retrieved later. Notice also that after the commit, the Git panel in RStudio is empty; there are no changes to the repository since the last commit.
Keeping track of changes with Git
Git now will keep track of all and any changes to the README file and the two other files in the git-example project. For example, if you change the text in the README file with RStudio’s text editor and save the file, RStudio’s Git panel will show the README file with a blue “M” (for “modified”) flag: Git knows that the README file has been modified since the last commit. It is often useful to know exactly how a file has changed before committing it. To view differences to a file not yet committed, click on “Commit” in the Git panel and select the appropriate file. The bottom section of the panel will then display the new lines of text on a green background and the old lines of text on a red background. That is, if you make changes to a given line, the old version of that line will be shown on the red background, and the new version will be shown on the green background. Once you are happy with the changes, you can repeat the add and commit steps to permanently record the current state of the project to Git’s history.
The real importance of these somewhat abstract steps becomes apparent when we consider Git’s history for a project. The history contains the exact state of the project at each commit and allows retrieval of previous versions of files. To view a project’s Git history in RStudio, click the “History” button in the Git panel. For this example, suppose we have added some information to the README file. The top section of the following screen (Fig. 7) shows each commit’s message, author, date and SHA key (a hash code that uniquely identifies the commit). The bottom section of the screen shows more details about the selected commit, including the actual changes made to files in that commit. In the current example, the README file received three new lines, shown in the green background in Figure 7.
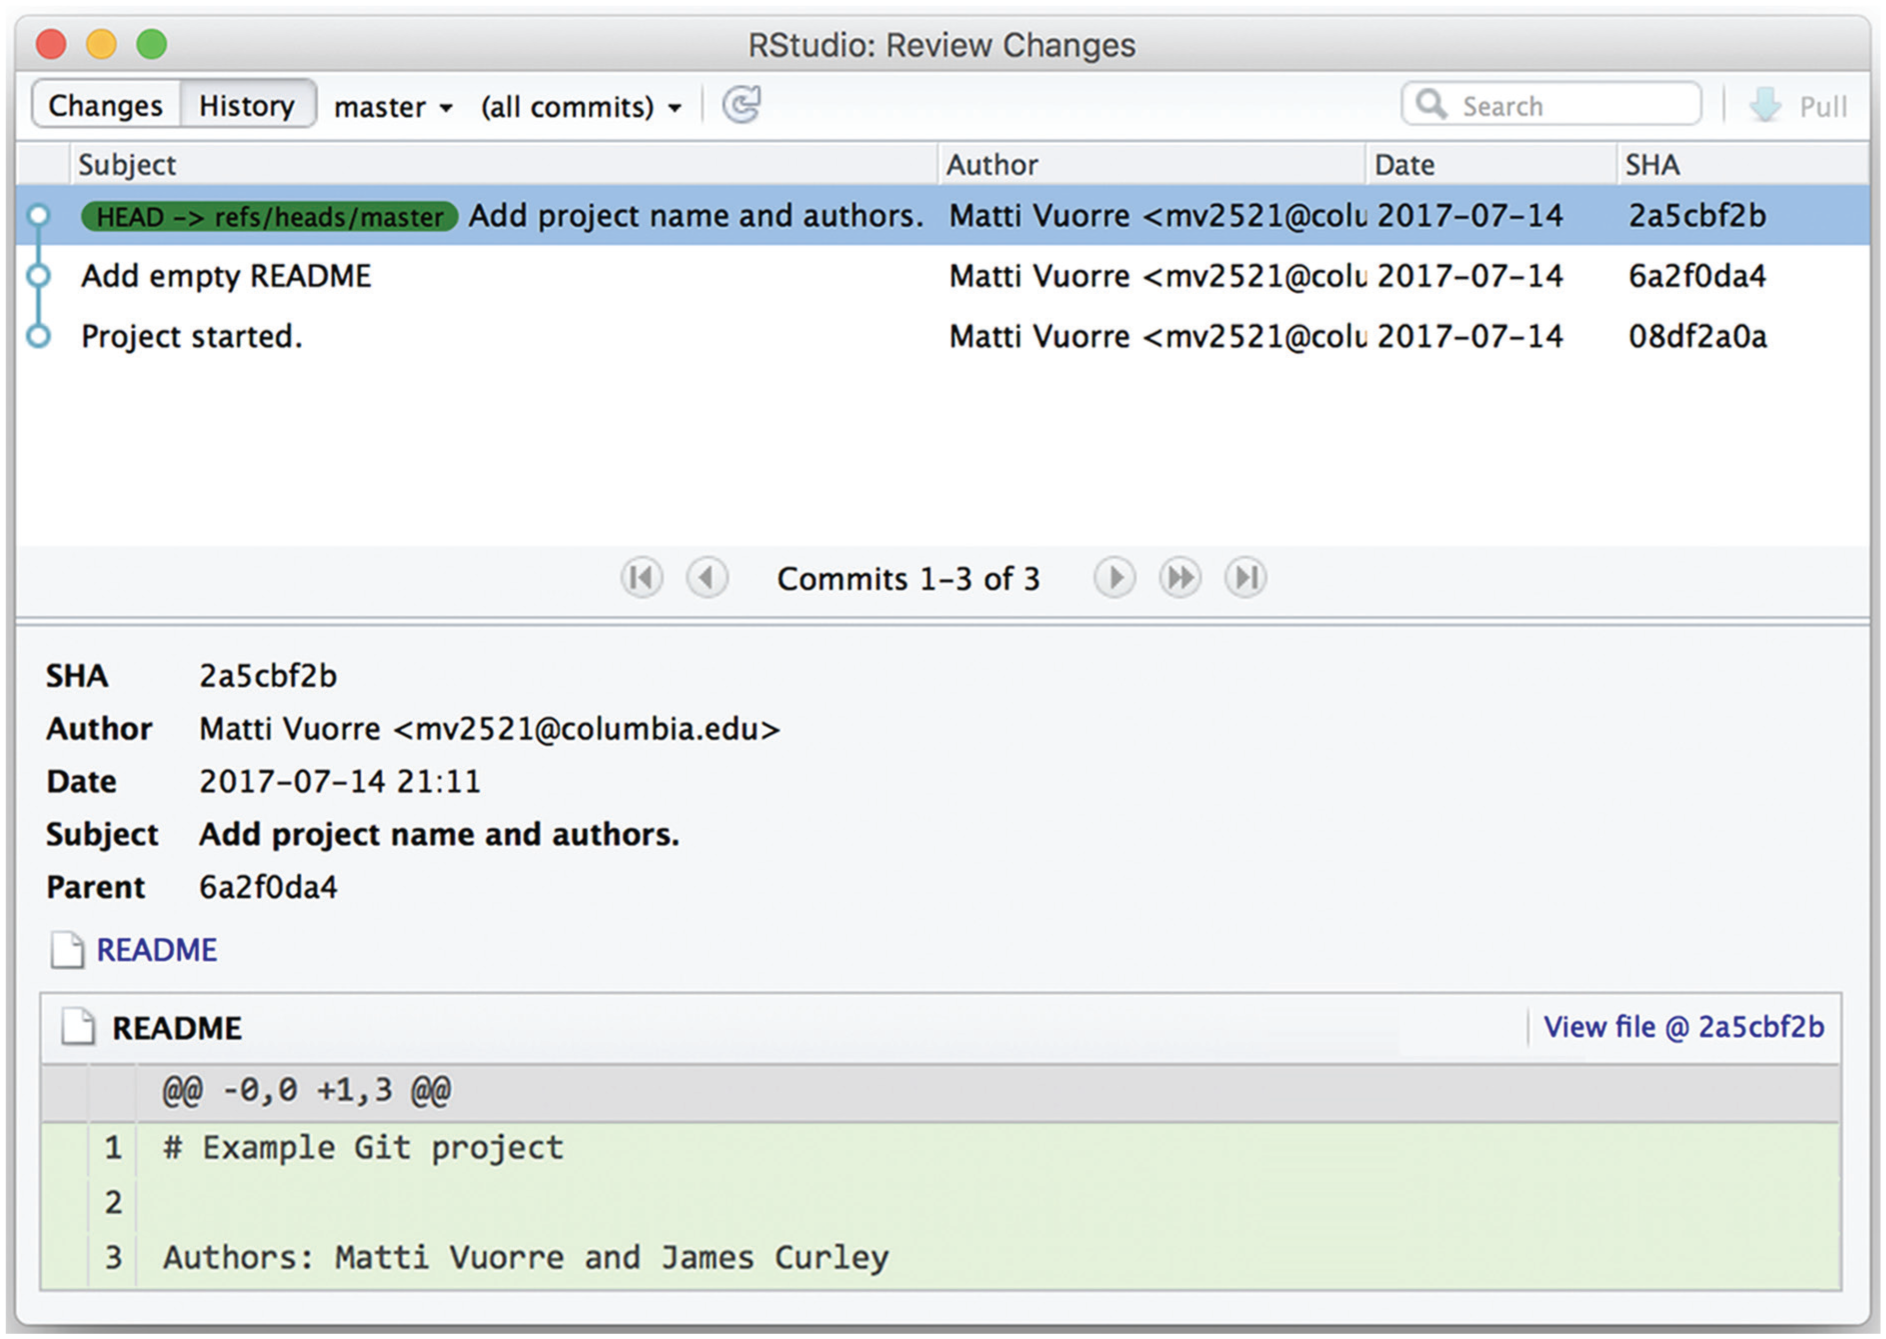
RStudio display showing the Git history for the example project after changes to the README file have been committed. The top section of the display summarizes the history, and the bottom section details the changes in the selected commit.
Although you have now seen the fundamentals of using Git to track the states of (and therefore changes to) a repository, this overly simplistic example does not allow full appreciation of the benefits of using Git for version control. To better illustrate Git’s functioning, we now fast-forward the hypothetical example project to a stage at which more files and materials have been created.
(Slightly More) Advanced Git
Suppose that after working for a while on the project, you have added two files to it, and the project’s home folder looks like Figure 8. Viewing the Git panel in RStudio would reveal that there are two new files (possible empty folders are ignored): One is a .pdf file with some administrative information (ethics-info.pdf), and the other is an R script file for a prospective power analysis (plan_n.R). Suppose further that you would like to track any changes to this script, but do not need to keep track of the ethics file. Git has an elegant solution to specifying which files to keep track of. Because by default all files are monitored, a special file tells Git which files are to be ignored.
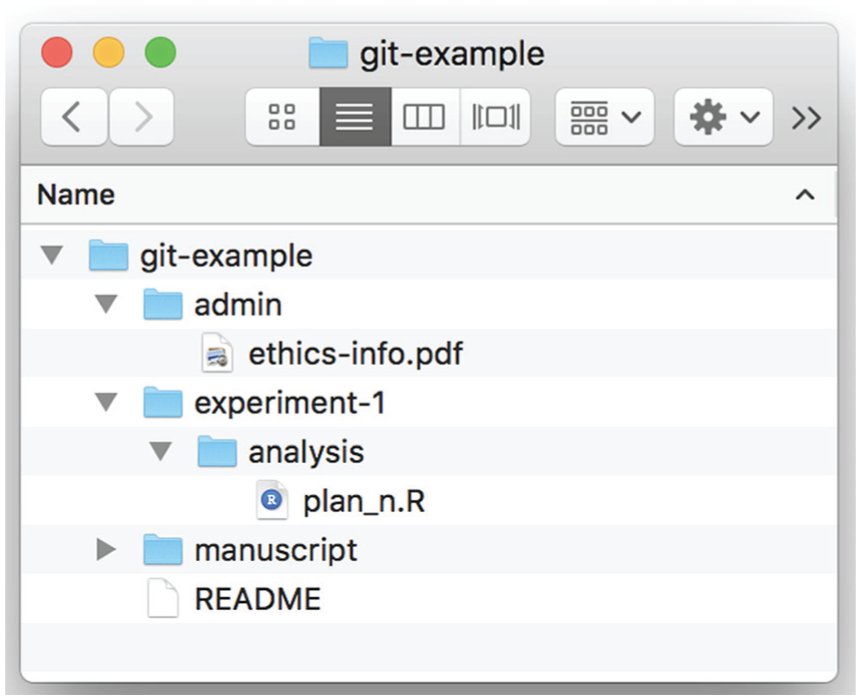
Screenshot of the root folder of the example project after an ethics file and script for a power analysis have been added. Note that the .gitignore and .Rproj files are not shown here.
Telling Git to ignore files
Git uses a special plain-text file in the home folder of the repository to control which files are to be ignored by Git. RStudio creates this file, which is called .gitignore, automatically when you create a new project with Git enabled, and you can use a text editor to edit it (i.e., add or remove components to be ignored).
9
Note that the file is hidden (by default, not visible in the operating system’s file viewer), but can be seen in RStudio’s Files panel. Each row of text in this file specifies a file or a folder (or a pattern of characters, referred to as a regular expression) that Git should ignore. In the current example, suppose you want Git to ignore the admin folder entirely and also to ignore any file with the .pdf extension inside the manuscript folder. The example file would look like this:
.Rproj.user .Rhistory .RData .Ruserdata admin/ manuscript/*.pdf
The first four lines are automatically written by RStudio when the project is created, and the fifth and sixth lines specify the files you want to ignore.
After you save these changes to the .gitignore file, RStudio’s Git panel shows that the .gitignore file has changed and that there are changes in the experiment-1 folder. To find out which files have changed in that folder, click on the “Staged” radio button next to that folder (see the example of the Git panel in Fig. 4), and the display will show that the only changed file is plan_n.R. Because there are now two files that are not specified to be ignored in .gitignore (i.e., .gitignore and plan_n.R), and because you usually should aim to maintain a clean commit history for a project, 10 you should now create two separate commits: one for the .gitignore file and one for the power-analysis file.
After committing the plan_n.R file to Git’s history, you can at any time use Git’s history to return to this file and see what was inside at an earlier time. For instance, if new information suggests that you should change the assumed effect size in the power analysis, you can simply edit and save the file, and then add and commit the changes to Git with a helpful message that logs this important event in Git’s history. Afterward, you can inspect the file as it was before those changes were made, if required.
Accessing files’ past versions
This possibility of “rewinding history” is especially useful for files that might undergo multiple revisions (e.g., manuscripts, analysis files), or if you are interested in when the files were created, the order in which they were created, and who created or changed them. To see an earlier version of a file, click the “History” button in the Git panel 11 and select the commit that contains the version of the file that you would like to see. Then, in the lower section of the screen, click “View file @ [the commit’s SHA code].” This will reveal the file exactly as it was at that point in history.
Currently, RStudio’s Git panel offers limited functionality in rewinding history, and to our knowledge, the best tools for accessing old versions of a project are Git’s command line functions. In the Supplemental Material, we discuss in detail how to retrieve old versions of files, and even old versions of an entire project, using these functions.
Collaborating
The true advantages of using Git become apparent when one considers projects with more than one contributor. For example, consider a project in which data are collected at multiple sites, and the data files are then saved onto a central server, or shared through a service that automatically merges files from multiple sources (e.g., the popular Dropbox service). If two or more sites accidentally save a data file with the same name to the server (or service), and these changes are then automatically merged, whichever file was later will simply overwrite the earlier file. Disaster! Alternatively, consider a data analysis involving two or more people who work simultaneously on some complicated analysis script and share their work using a central server or a system such as Dropbox. If user A and user B are making changes to the same file and user B saves the file, user A’s version of the file will be overwritten. Disaster!
Git and other VCSs, on the other hand, were specifically designed to allow (and facilitate) multisite collaboration on complex projects. For example, Microsoft Windows is developed collaboratively on a Git platform by about 4,000 engineers (Harry, 2017). We believe that Git can be especially helpful in scientific collaboration.
There are many ways in which a team could collaborate on a Git project; here we focus on a common one, called centralized workflow. In this workflow, a central (also called remote) repository is created on an online platform. Individual users work in their local Git repositories as we have already described, but can also send and receive changes from the central repository (see Fig. 9).
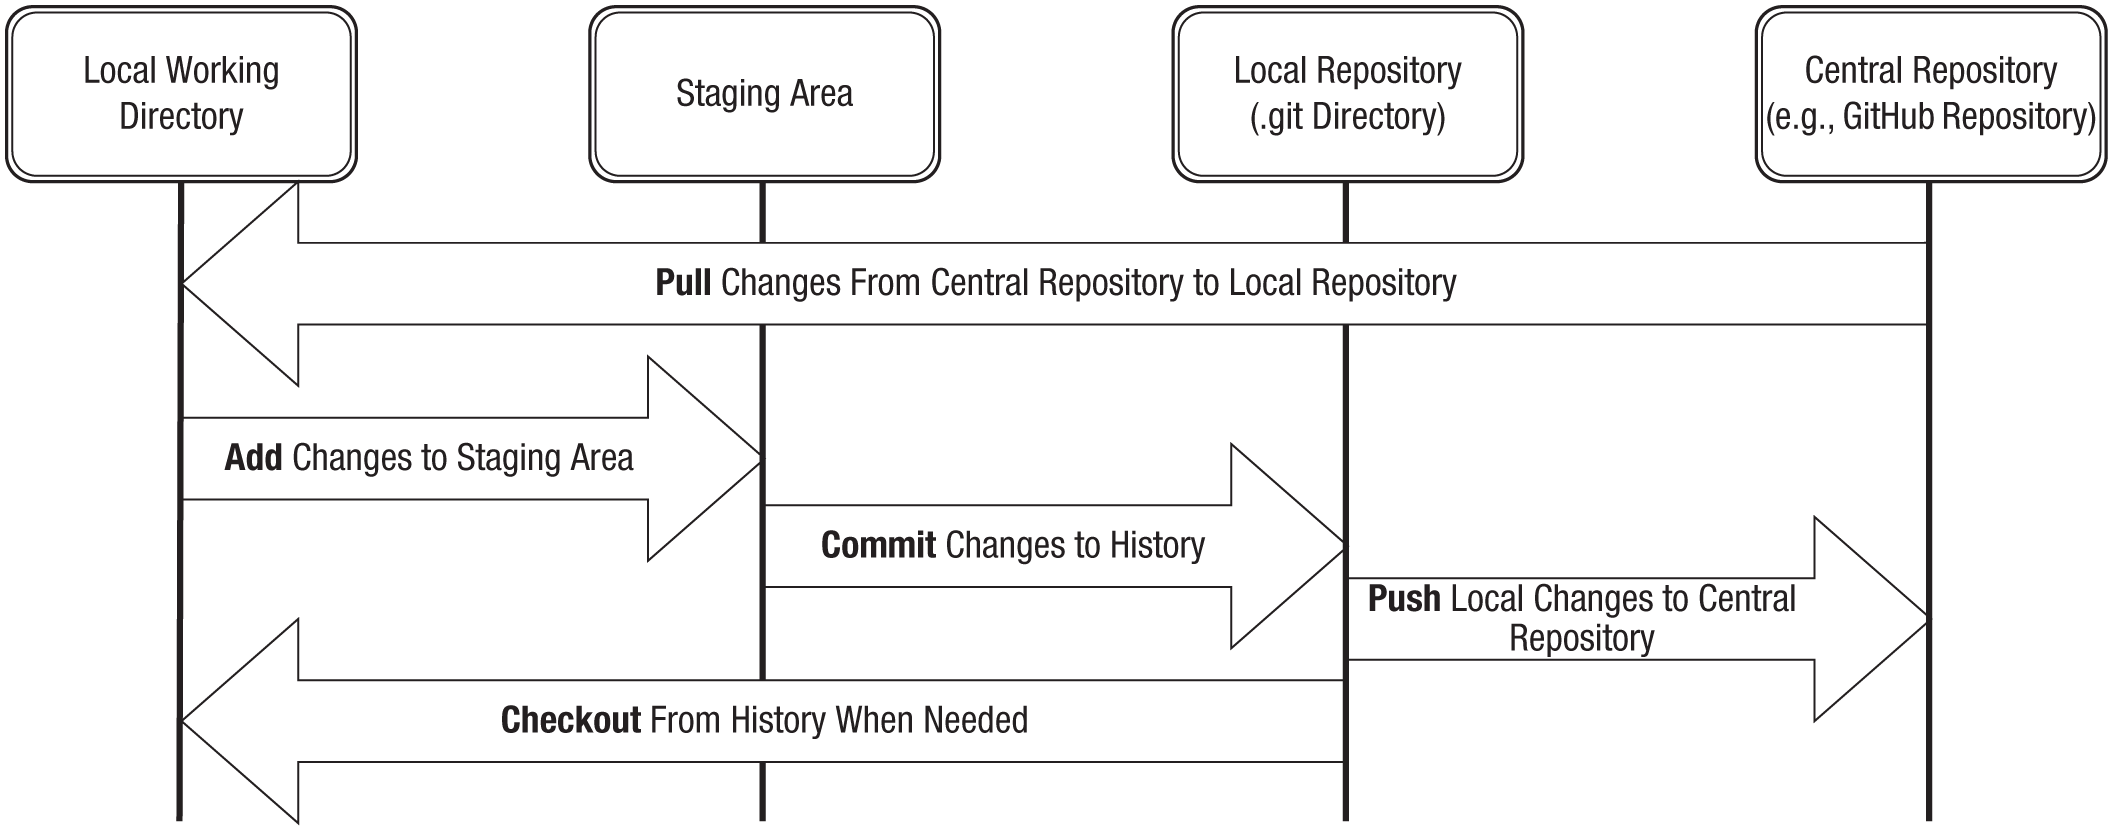
A diagram illustrating the typical collaborative Git workflow with a central repository (e.g., GitHub). As when a central repository is not involved, users work in their local repositories, making changes to files and viewing prior versions as needed. In addition, they push changes from their local repositories to the central repository, so that collaborators have access to them, and pull changes from the central repository to their local repositories, to see their collaborators’ work. Verbs in boldface are Git operations and explained in the main text.
In brief, once a user wishes to collaborate on a project, the user creates a central repository, and connects his or her local repository to it. Other users can then clone their own local repositories from the central repository. The central repository exists on an online platform (e.g., GitHub) or, for example, on a private server, and the local repositories are on the collaborators’ own computers. Contributors, including the one who created the central repository, continue to work on their local repositories. After committing changes in their local repositories, they push their changes to the central repository, to make the changes available to other users. To get changes from the central repository, contributors pull changes from it to their local repositories.
Central Git repositories can be set up relatively easily on research teams’ private servers, but because the details vary from team to team, here we illustrate the centralized workflow using GitHub.
Collaborating With GitHub
GitHub is one of the 100 most popular Web sites worldwide. As of February 2018, it hosted more than 79 million software projects with a total of more than 28 million users. For this Tutorial, we chose to focus on GitHub for collaboration because it is already popular among scientists who use VCSs, it offers free private repositories to some users, 12 and repositories from GitHub can easily be connected to projects hosted on the Open Science Framework (OSF; https://osf.io). There are many alternatives to GitHub, such as Bitbucket (https://bitbucket.org/) and GitLab (https://gitlab.com), both of which provide free private repositories and function very similarly to GitHub. Thus, although we focus here on GitHub as an example, switching to another service would be relatively straightforward.
If you are a new GitHub user, you must first create a free user account at https://github.com. You must create the GitHub account with the same e-mail address that you used when configuring your local Git (or reconfigure your local Git to use the e-mail address that you used to register for GitHub). GitHub will use your e-mail address for authorization purposes and will use your username to identify you as the source of your commits. The Supplemental Material shows how to use the command line for configuring Git.
Creating a new GitHub repository and linking it with a local Git repository
To start collaborating on a project, you first need to create a repository on GitHub. After you have created a GitHub account, log into your account and click the green “New repository” button on GitHub’s main page. GitHub will first ask for a name for your GitHub repository. The name can be anything, but to continue with our example project, call the GitHub repository git-example. After indicating the repository’s name, you can choose whether the repository should be public or private; we discuss this choice in more detail later, but for now, choose “Public.” At this point, you can allow GitHub to automatically create README, .gitignore, and license files for your repository, but for this example, skip this step because these files have already been created in the local repository.
After you click on “Create repository,” the next step is to link the new GitHub remote repository to a local Git repository, by either creating a new local repository from the remote repository (this is called cloning) or connecting an existing local repository to the newly created remote repository. Currently, RStudio allows you to link a local Git repository to a remote repository only when you are creating a new project in RStudio; you cannot connect existing local Git repositories to GitHub with RStudio. (You can connect an existing local repository to a GitHub remote repository with two short lines of code in the computer’s command line, and we show how in the Supplemental Material.) Therefore, we show here how to use RStudio to create a new project that connects to the GitHub remote repository you just created (Fig. 10). You need the remote repository’s URL to set up the new project in RStudio. This URL is visible on GitHub on the page that appeared after you created the new repository. Copy the repository’s URL from the address box on GitHub (the URL will end with .git, e.g., https://github.com/username/reponame.git). Then, in RStudio, click on “File” and then “New Project,” and select “Version Control” (Fig. 10, left panel). This option allows you to create a new local repository by cloning the GitHub remote repository. Click on “Git” (Fig. 10, middle panel), then paste the GitHub URL in the “Repository URL” box, and choose an appropriate location on your computer for the project (Fig. 10, right panel). Note that the full address, including “https://,” should be pasted in the box for the repository’s URL.
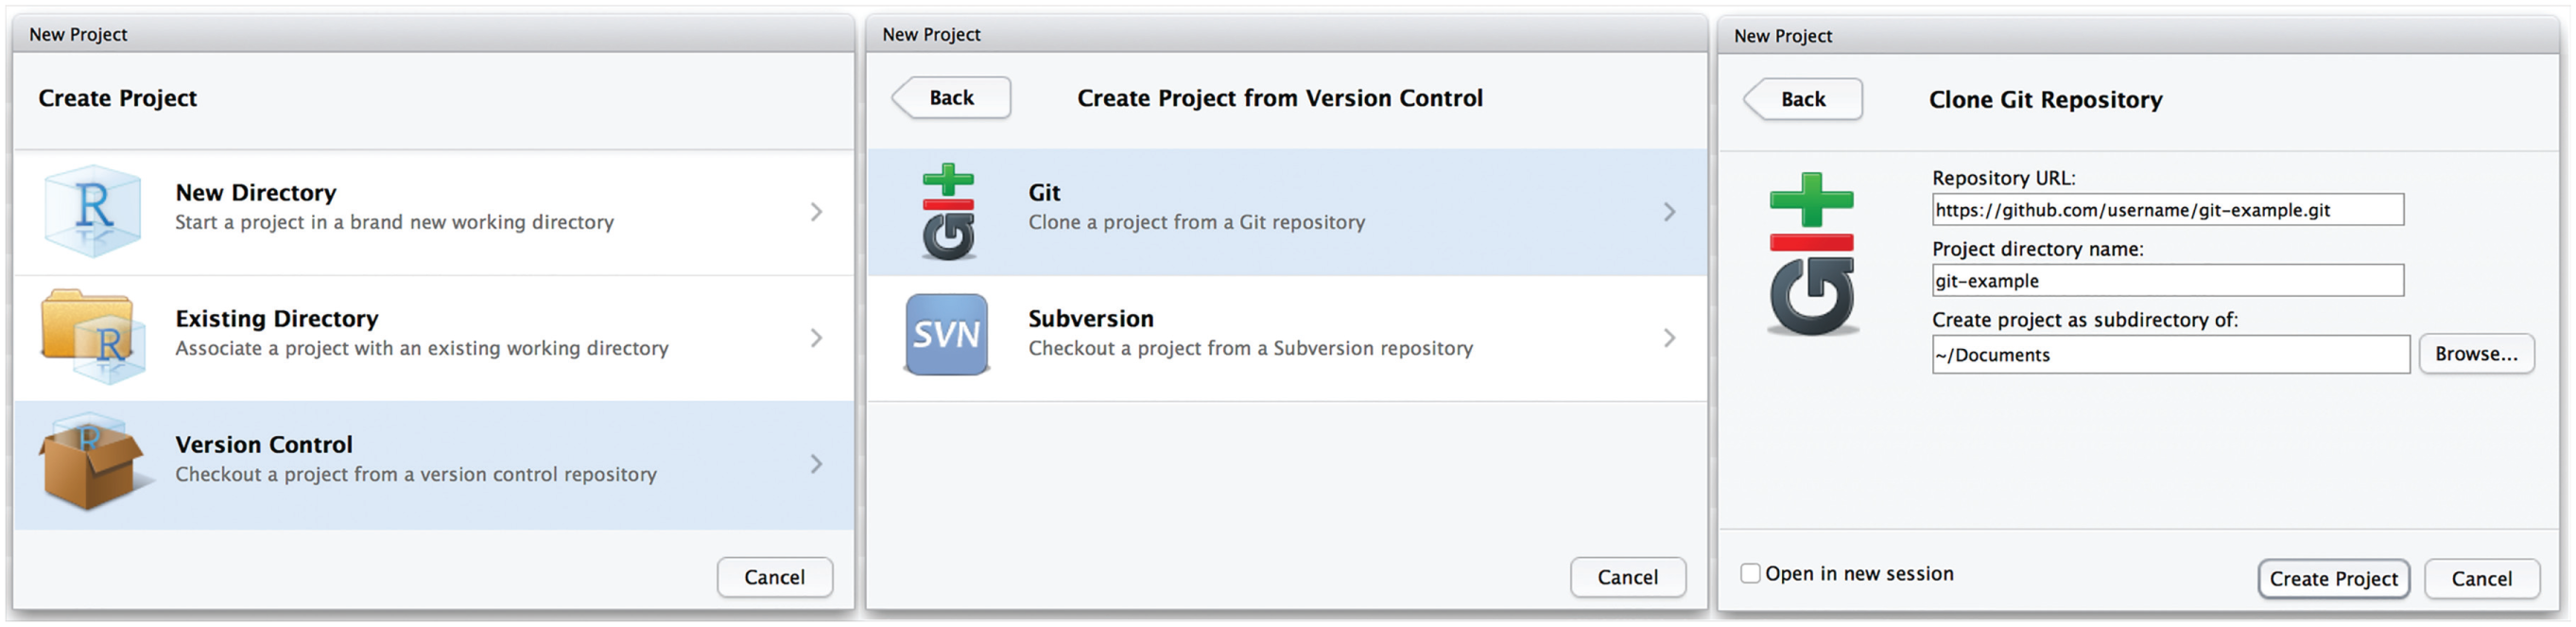
Creating a new local repository by checking out a project from a GitHub repository. Click on “Version Control” (left panel) and then “Git” (middle panel). The final step is to paste the URL for the GitHub repository in the appropriate box and indicate where the project should be saved on the local computer (right panel).
You have now associated the empty remote (GitHub) repository with a local folder on your computer. Usually, you would connect the local and remote repositories as soon as a project is started. However, in this example, you created an empty GitHub repository but had a local repository for a project that was already started on your local computer, so you need to copy the contents of the old folders and paste them in the new local repository, so that you can continue with the same materials.
Next, make sure that the contents of the old .gitignore file have been copied to the new file. Otherwise you will be committing files that you would rather ignore into Git’s history. You can then commit all the files to the new local Git repository using the steps detailed earlier in this Tutorial. After adding and committing some files locally, you will have two new buttons in RStudio’s Git panel: The local repository can now send (push) changes to and receive (pull) changes from the remote repository. Click on “Push” and use a Web browser to navigate to the repository’s GitHub page and refresh the page. You will then see all the committed files and folders on GitHub. You can browse and view the project’s files, and even make changes to them, on the GitHub page.
Contributing to a central (GitHub) repository
Now that you have created a GitHub repository, other team members need only set up Git on their own computers and sign up for GitHub in order to clone the remote repository onto their local computers, just as you did. These users can find out the repository’s URL by navigating their Web browsers to the repository’s GitHub address (e.g., https://github.com/mvuorre/reproguide-curate for this Tutorial’s repository; the repository’s URL is the GitHub address with a .git extension) and clicking on the big green “Clone or download” button; the complete address will then appear in the text box, shown in Figure 11. Again, the full address, including “https://,” must be pasted in the box for the repository’s URL. After creating clones on their own computers, new contributors can work on their local copies of the project as detailed in earlier parts of this Tutorial. After committing their changes, they can update the status of the central repository by pushing their changes to it. To push changes, they simply press the “Push” button in RStudio’s Git panel.
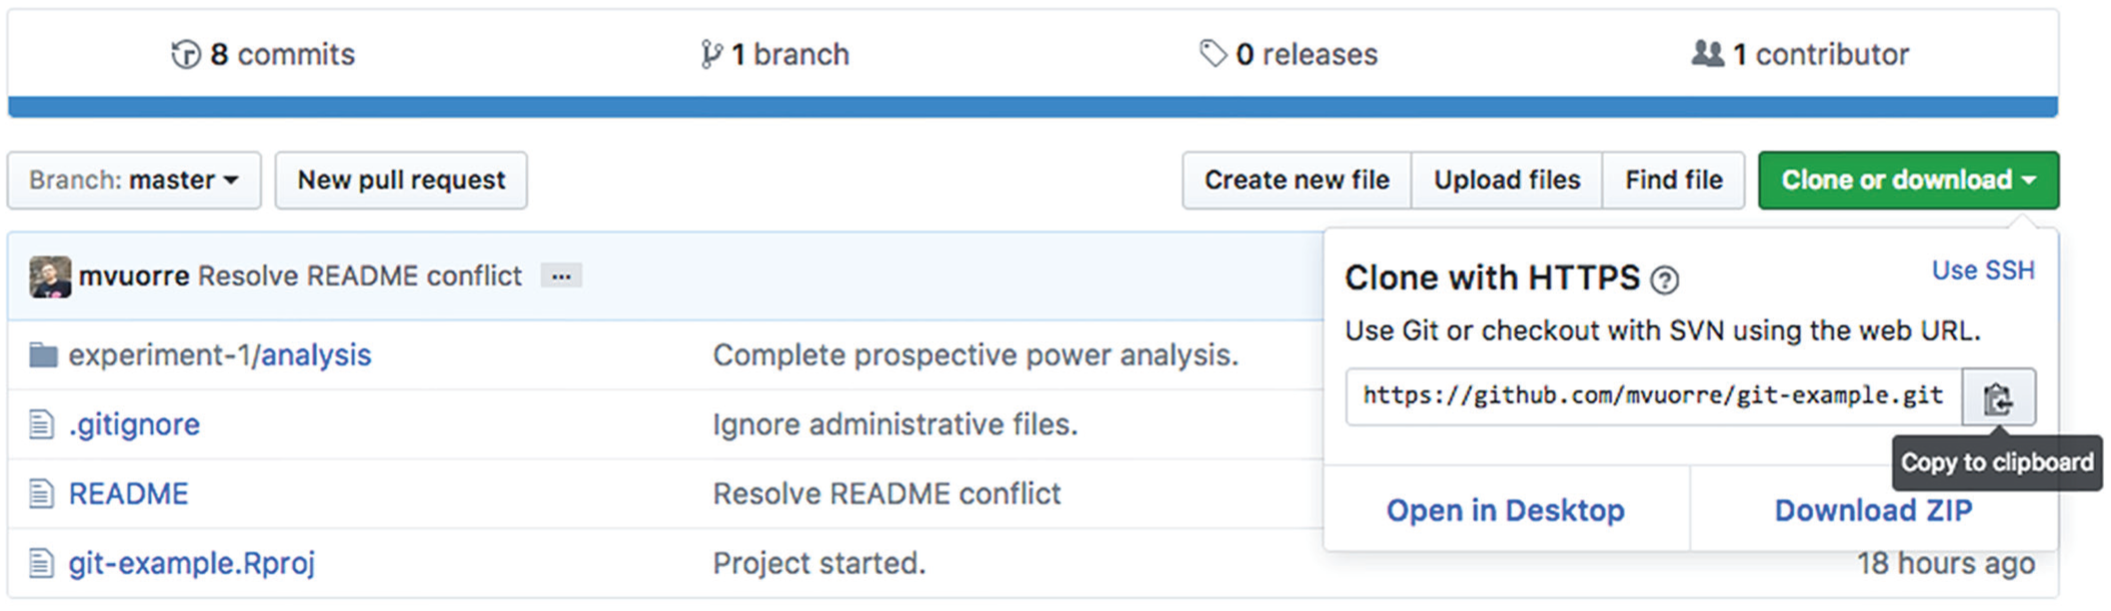
Screenshot illustrating how to find a remote repository’s URL on a project’s main GitHub page. When users navigate their Web browser to a repository’s GitHub address and click on the big green “Clone or download” button, the complete URL appears in the text box.
Note that you can also clone GitHub repositories if you are not aiming to contribute to a project. Hosting projects on GitHub is useful because other people can easily clone (download) your work to build on it.
Obtaining other people’s changes from the central repository
Just as you must manually push your own local changes to the remote repository, you must also obtain other contributors’ changes by pulling them from the central repository. Pulling is indicated in the collaborative workflow in Figure 9 because it is important that you start working on the most up-to-date version of the project (e.g., you do not want to redo work that has been completed successfully or make unnecessary conflicting changes). Before starting to work on potential changes, always pull the remote changes by pressing the “Pull” button in RStudio’s Git panel.
Resolving conflicts in GitHub
The way in which users and their local repositories interact with the central repository by pushing and pulling is the cornerstone of collaboration on GitHub, and thoughtful use of these operations allows for complex workflows without any important code (data, ideas in a manuscript, analysis code) ever being overwritten. One possible concern is that two or more users may have worked on the same code and then attempted to push conflicting changes. There is no automatic way for a computer to tell what changes to prioritize, but if a conflict occurs, there is no need to worry; you simply need to know how to resolve it.
Many different types of conflicts may appear in collaborative work. For example, multiple users may create files with the same name but different content, or multiple users working on the same code may create changes that conflict with each other. Typically, this latter type of conflict occurs when the users have made edits to the same line of text in the same document. We use this situation as an example to explain how to resolve conflicts in collaborative work.
Consider the following scenario. Two collaborators, user A and user B, are working on the same project (they collaborate on a repository on GitHub and work in local repositories). At some point, they might be working on the same file (e.g., they might be writing a manuscript together) and find that they have made changes that conflict with each other. More specifically, let us assume that both users are making changes to a file, and user B happens to add and commit his changes locally and push them to the central repository before user A does. When user A then attempts to push her incompatible changes to the central repository, a conflict occurs. That is just a natural consequence of two individuals working simultaneously on the same idea and then writing different code in the same location in the file. When this happens, user A needs to first integrate the latest version of the project from the central repository to her local project, so that it reflects both collaborators’ edits, and then push the new merged version to the central repository. Let us look at what this workflow entails in a little more detail.
For this scenario, assume that user B has made changes to the README file in the git-example project and pushed the changes to the central repository. When user A attempts to push conflicting changes to that repository, RStudio will display a Git error message indicating that the push would create a conflict (Fig. 12). User A sees that she needs to pull the most current state of the remote repository by clicking on “Pull.”
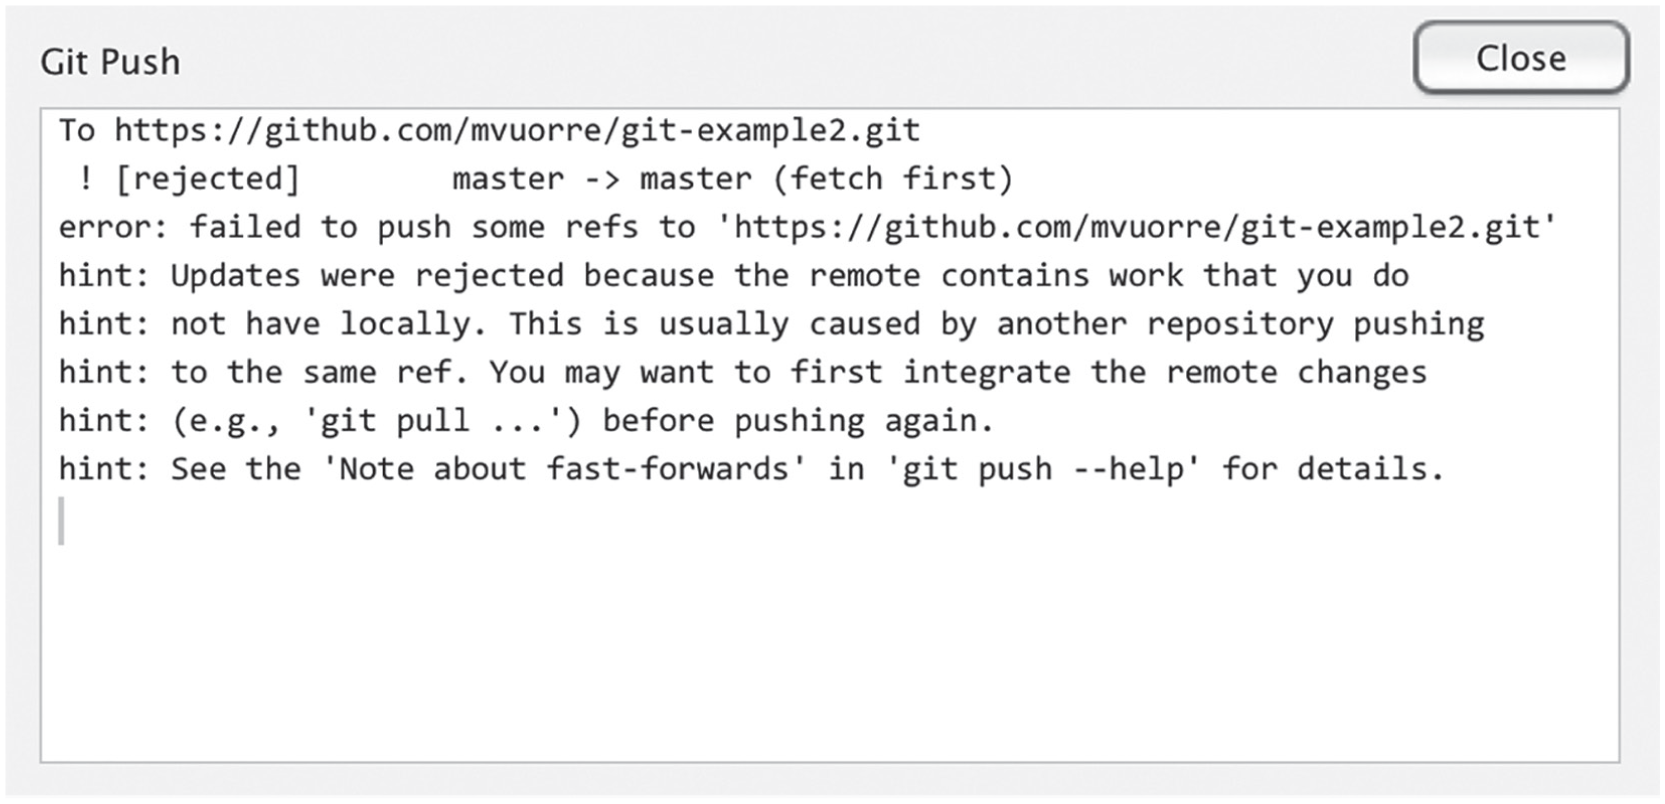
Screenshot showing how RStudio displays a Git warning if a user attempts to push conflicting changes to the remote repository.
After user A pulls the changes from the remote repository, Git will automatically merge the two conflicting versions of the README file into one file in the local repository. (Git will indicate in which file the conflict occurred; see Fig. 13.) Git will not remove anything, and therefore user A will need to decide which lines of the changed file to save and which ones to discard. User A can open the README file with RStudio’s text editor, and it might look like this:
# Example Git Project <<<<<<< HEAD [user A’s proposed version of the text] ======= [user B’s proposed version of the text] >>>>>>> 212ffb5de589755ae4fda57fb5af60194283dae8
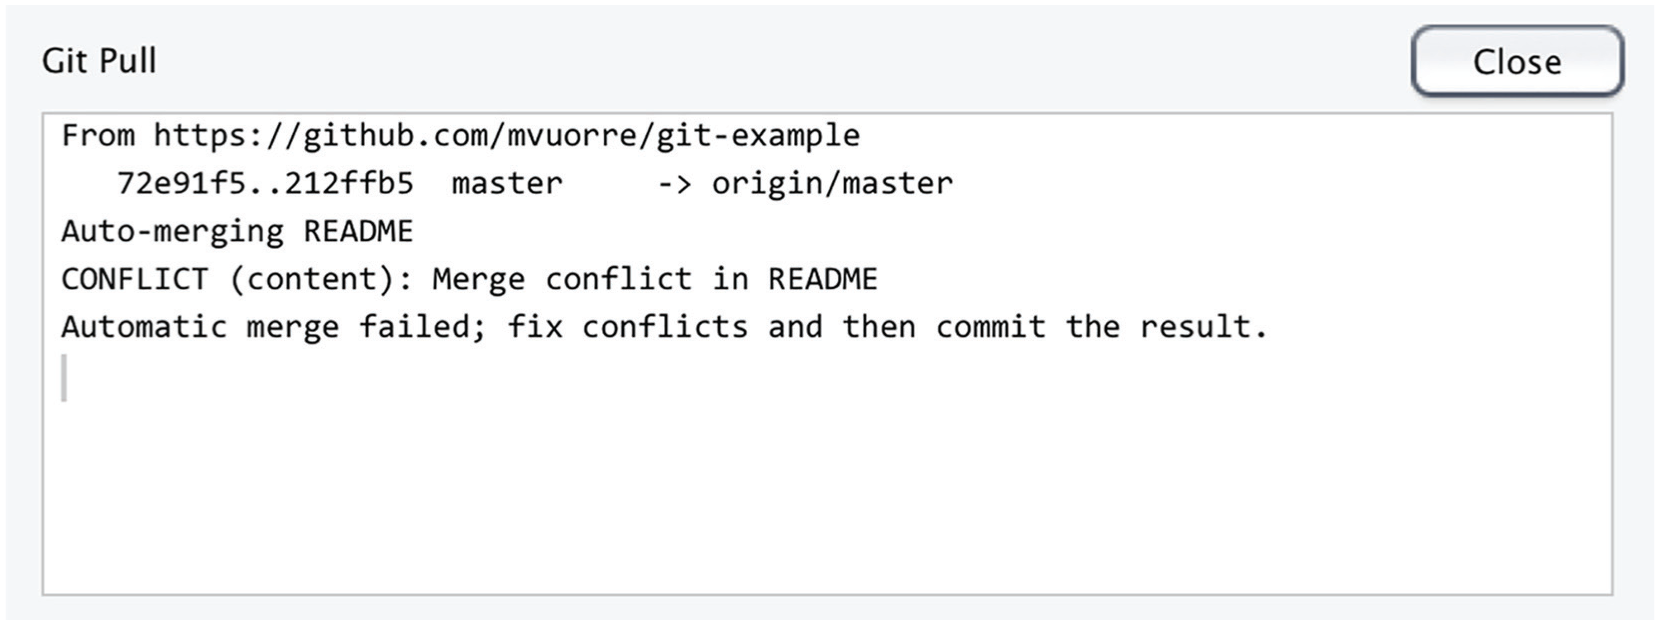
Screenshot from RStudio showing an error message for a conflict in the README file. Whenever a user pulls changes from the central repository and there is a conflict with the local repository, a conflict warning will indicate the file (or files) with a conflict.
This passage indicates that the first line of the file is identical in the two users’ versions, but after the first line, “<<<<<<< HEAD” indicates that what follows are the to-be-integrated lines of text. First, user A’s version is presented, and then, after “======,” user B’s changes from the remote repository are presented, followed by the SHA key for those changes. User A can then edit this file however she chooses and then add the changes to Git’s staging area and commit the changes. Once the commit is done, the conflict has been resolved, and user A can push the changes to the GitHub remote repository.
The options for dealing with conflicts within RStudio’s Git panel are somewhat limited, and we present more detailed information on managing conflicts with Git’s command-line tools in the Supplemental Material. There are additional kinds of conflicts that depend on how users collaborate with one another; however, a detailed explanation of all potential scenarios is outside the scope of this Tutorial. 13 Most important, even in the event of conflicts, all committed changes are saved in Git’s history and can be retrieved, so experimenting with different approaches to resolving conflicts is safe.
Private or public collaboration?
By default, all GitHub repositories are public: Anyone with an Internet connection can use his or her Web browser to inspect the contents of your repository, or even clone it to his or her computer. This may sound unfamiliar to researchers used to working more privately, and clearly necessitates planning and thought with respect to issues such as data privacy and sharing sensitive materials. However, for many projects—including writing this Tutorial—we see very few downsides to working “in the open.”
When collaborators wish to work privately, they have the option of placing the central repository for a Git project on the research team’s private server instead of GitHub, but it is also possible to make the repository private on GitHub (this can be done when the repository is first created or afterward). Private GitHub repositories, and their contents, are accessible only to invited team members and are therefore ideal when a team would like to work without revealing their work to the public. For example, you might want to work in a private repository initially and make it public only once you feel the material is mature enough for public consumption. Note, however, that making a repository public makes all of its contents public, including its Git history.
To make a GitHub repository private, navigate to its Web site with a Web browser and click on “Settings” and then “Make this repository private.” Once one user has set the GitHub repository to private mode, anyone wishing to clone or view the repository, push changes to it, or pull changes from it must provide his or her GitHub username and password. Only if they match an invited team member’s username and password can the user access the repository. At the time of this writing, GitHub users can have up to five private repositories for free (see note 12).
Connecting a GitHub repository to other services
OSF is designed for organizing and communicating research materials and is quickly becoming a popular service for sharing data sets and stimuli, among other content. Researchers can easily link GitHub repositories to their OSF projects by following on-screen instructions on the OSF Web site (http://help.osf.io/m/addons/l/524148-connect-add-ons).
Hosting a research project’s materials online on GitHub also makes the materials themselves citable. To facilitate citation, researchers can connect their GitHub repositories to Zenodo, an archiving Web site that will assign DOIs (digital object identifiers) to the repositories. Instructions for obtaining a DOI for a GitHub repository can be found online (https://guides.github.com/activities/citable-code/).
Discussion
In this introductory Tutorial, we have explained how to use the Git VCS for curating and collaborating on research assets in behavioral sciences. The essential Git workflow includes adding and committing incremental changes to a version controlled repository, which can be worked on collaboratively by many researchers through the online GitHub platform.
Although we have advocated the use of Git and GitHub, we do not intend to suggest that it is the only, or always the best, method for curating and collaborating on research materials (see Box 3 for other common misconceptions related to Git). For example, hosting a text document on a service such as Google Docs or Dropbox allows collaborators to instantly see each other’s saved edits. Both of these alternatives also allow users to access files’ history (Dropbox’s history is limited to the past 30 days). If documents are worked on in Word with “Track Changes” enabled, collaborators can also see who has edited what and can revert changes in the text. In comparison, Git requires additional operations to send changes to and receive changes from collaborators, which may not be the best workflow for simple collaborative projects, such as editing manuscripts. Online services such as Overleaf (https://www.overleaf.com/) and Authorea (https://www.authorea.com/) also seem potentially useful for collaborative writing, and can be easier to use than Git.
Responses to Common Misconceptions About Git
Misconception: It seems that it would be easy to lose my work with Git.
Response: Git does not change current files or folders unless asked to do so, and therefore using Git does not affect the likelihood that something will happen to them (e.g., because of hardware failure). Essentially, Git saves the history of a file’s contents in a hidden .git folder inside the repository; if users tamper with this folder or run Git commands without knowing their consequences, it is possible to corrupt or lose parts of this history. Further, current uncommitted changes are discarded when a user retrieves (checks out) an older version of the repository. Therefore, users should ensure that important changes are committed before they retrieve an old version.
Misconception: I already back up my work, so I have no need for Git.
Response: Git is a tool for keeping track of changes to projects, not for backing up projects. However, connecting one’s local Git repository to GitHub creates a cloud copy of it (provided one keeps the GitHub repository up-to-date).
Misconception: Saving a file is pretty much the same as a Git commit.
Response: Saving a file overwrites the file’s immediately previous version on the computer’s hard drive. Without Git, the file’s previous versions can rarely be retrieved without a specialist’s intervention. With Git, a file’s previous committed versions can be retrieved from Git’s history.
Misconception: I do not use Git because I want my work in progress to be private.
Response: Any Git repository created on a local computer is private. Even when a local Git repository is connected to a remote online repository, users must perform a separate operation (push) to send the local contents to the online repository. Further, users can set their online repositories to be either public (accessible by anyone) or private (accessible only with a password).
However, for more complicated projects, VCSs, such as Git, have many benefits over these alternatives. For example, we believe it is helpful to think of many manuscripts in the context of a greater project that contains other materials, such as data, analysis scripts, and stimuli. In such cases, collaborators may wish to change not only the text of the manuscript, but also, for example, the associated statistical analyses. Git also helps collaborators to stay up-to-date with all of a project’s components, thus possibly reducing room for error due to, for example, using outdated data or analysis files: Without Git, collaborators must create a different file for each version of the analysis, which can lead to an unwieldy project and confusion as to which version is the most up-to-date or appropriate. Further, because Dropbox and other similar services automatically synchronize files across collaborators, it is sometimes difficult to collaborate on the same file simultaneously using these services. Git allows multiple people to work on the same files simultaneously because the saving and synchronizing steps are separated from each other.
Using Git with RStudio is an especially attractive option for psychologists because the RStudio IDE, with the R Markdown and knitr packages (Allaire et al., 2016; Xie et al., 2016), offers a complete environment for project management, data analysis, and manuscript preparation. Psychologists will also be interested in the papaja package for creating manuscripts formatted according to American Psychological Association style (Aust & Barth, 2018; this manuscript was prepared with the papaja package).
Although this Tutorial includes enough material for readers to get started, Git (and GitHub) is a vast ecosystem with great opportunities, some of which are discussed further by Perez-Riverol et al. (2016; see Box 4 for additional resources on using Git and GitHub). For example, the concept of “born-open data” (i.e., research data that are automatically posted online upon collection) can be implemented easily with the Git + GitHub workflow (Rouder, 2016). The challenges to reproducibility are many, and they have only recently received the targeted attention they deserve in the collaborative effort to improve the reliability of empirical sciences. Curating research assets and focusing on the practical aspects of the scientific workflow is important for ensuring the continuity of one’s work, and for efforts toward a cumulative and reliable science.
Additional Resources for Learning About Git
• The Basic Workflow of Git (an infographic explaining how Git’s version control system works): https://www.git-tower.com/blog/workflow-of-version-control
• Git + GitHub (information on using Git and GitHub in an R programming context): http://r-pkgs.had.co.nz/git.html
• GitHub’s Git cheat sheets (reference sheets on the most commonly used Git commands; available in multiple languages): https://services.github.com/resources/cheatsheets/
• GitHub Glossary (a glossary of Git and GitHub terminology): https://help.github.com/articles/github-glossary/
• Pro Git (Chacon & Straub, 2014; a complete manual of Git): https://git-scm.com/book/en/v2
• tryGit (an interactive Web site for learning the basics of Git): https://try.github.io
Supplemental Material
VuorreOpenPracticesDisclosure – Supplemental material for Curating Research Assets: A Tutorial on the Git Version Control System
Supplemental material, VuorreOpenPracticesDisclosure for Curating Research Assets: A Tutorial on the Git Version Control System by Matti Vuorre and James P. Curley in Advances in Methods and Practices in Psychological Science
Supplemental Material
VuorreSupplementalMaterial – Supplemental material for Curating Research Assets: A Tutorial on the Git Version Control System
Supplemental material, VuorreSupplementalMaterial for Curating Research Assets: A Tutorial on the Git Version Control System by Matti Vuorre and James P. Curley in Advances in Methods and Practices in Psychological Science
Footnotes
Acknowledgements
We thank Tom Hardwicke, Travis Riddle, Judy Xu, and two anonymous reviewers for feedback on earlier drafts of this manuscript.
Action Editor
Alex O. Holcombe served as action editor for this article.
Author Contributions
M. Vuorre and J. P. Curley designed the format of this Tutorial. M. Vuorre drafted the manuscript, and J. P. Curley provided critical revisions and comments. Both authors approved the final version of the manuscript for submission.
Declaration of Conflicting Interests
The author(s) declared that there were no conflicts of interest with respect to the authorship or the publication of this article.
Funding
This work was supported, in part, by Institute of Education Science Grant R305A150467. The authors are solely responsible for the content of this article.
Open Practices
All materials have been made publicly available via the Open Science Framework and can be accessed at https://osf.io/txgn8/. The complete Open Practices Disclosure for this article can be found at http://journals.sagepub.com/doi/suppl/10.1177/2515245918754826. This article has received the badge for Open Materials. More information about the Open Practices badges can be found at ![]() .
.
Notes
References
Supplementary Material
Please find the following supplemental material available below.
For Open Access articles published under a Creative Commons License, all supplemental material carries the same license as the article it is associated with.
For non-Open Access articles published, all supplemental material carries a non-exclusive license, and permission requests for re-use of supplemental material or any part of supplemental material shall be sent directly to the copyright owner as specified in the copyright notice associated with the article.