
Abstract
Pathology to the proximal biceps tendon has the potential to be a major source of pain in the shoulder, secondary to complex superior labrum from anterior to posterior (SLAP) lesions, partial biceps tears, and subluxations. In order to restore function and improve the patient’s quality of life, repair of these injuries is crucial. Tenodesis has long been the ideal treatment of persistent pain caused by pathology of the proximal biceps tendon. A biceps tenodesis helps prevent biceps pain and cramping during movement and avoids the cosmetic deformity associated with a biceps tenotomy. However, the location of the tenodesis and technique of the procedure itself have been debated throughout the literature. We present an arthroscopic biceps tenodesis technique in which the tendon is secured to the implant prior to implantation into the humerus to gain complete control of the tendon and ensure adequate fixation and tension.
Introduction
Many surgeons believe the diseased proximal biceps tendon is a source of shoulder pain. 1 –3 Due to the intra- and extra-articular segments of the tendon, there are subsequently various sources of potential pain generation. 3 Proximal biceps pathology includes tendinitis, rupture, subluxation or instability, pulley lesions, and Superior Labrum from Anterior to Posterior (SLAP) lesions. 4,5 Patients often have significant pain associated with the anterior portion of the shoulder and during shoulder flexion. This pathology rarely occurs in isolation and is typically associated with subacromial impingement, glenohumeral arthritis, and/or rotator cuff tears. 4,6,7 Diagnosing proximal biceps pathology with physical exam maneuvers, such as a Speed’s, Yergason’s, and O’Brien’s tests, has had inconclusive results in the literature. 8,9 In order to restore function and improve the patient’s quality of life, repair of these injuries should not be delayed. Werner et al. found an increase of incidence of biceps tenodesis from 2008 to 2011, with arthroscopic biceps procedures gaining in popularity. 10
Tenodesis is the ideal treatment for persistent pain caused by pathology of the long head of the biceps tendon. 11,12 The location of the tenodesis has been debated regarding the upper portion of the bicipital groove or the distal subpectoral location. 13 –16 The optimal location of the biceps tendon during a tenodesis is debatable in the literature. A biceps tenodesis helps prevent biceps pain and cramping during movement and helps avoid the cosmetic deformity with a biceps tenotomy. 17 We present an arthroscopic biceps tenodesis technique in which the tendon is secured to the implant prior to implantation into the humerus to gain complete control of the tendon and ensure adequate fixation and tension. Although several biomechanical studies demonstrated adequate fixation, this method allows a reliable portion of the tendon within the implant prior to placement into the humerus. 8,18
Surgical technique
The patient is placed in the lateral decubitus position with the arm suspended in 40° of abduction and 15° of forward flexion. The weight on the traction is 10 pounds. The standard anterior and posterior portals are made to assess the pathology within the glenohumeral joint, including the biceps tendon. A probe is used to advance the proximal biceps into the glenohumeral joint to assess the quality of the tendon intra-operatively. If the pathology of the proximal bicep is confirmed (Figure 1), arthroscopic scissors are used to detach the proximal long head of the biceps from its attachment at the labrum. It is allowed to retract free out of the joint. The remaining biceps stump is debrided from the labrum. The scope is moved to the subacromial space from the posterior portal, and an anterolateral portal is created slightly more anterior than is used for typical subacromial decompression. This will allow easier viewing of the bottom of the bicipital groove just above the pectoralis major tendon. An additional low anterior portal is created perpendicular to the biceps attachment site for drilling purposes. A 10-mm Passport Cannula (Arthex, Naples, Florida, USA) is placed to facilitate instrument passage and fixation.
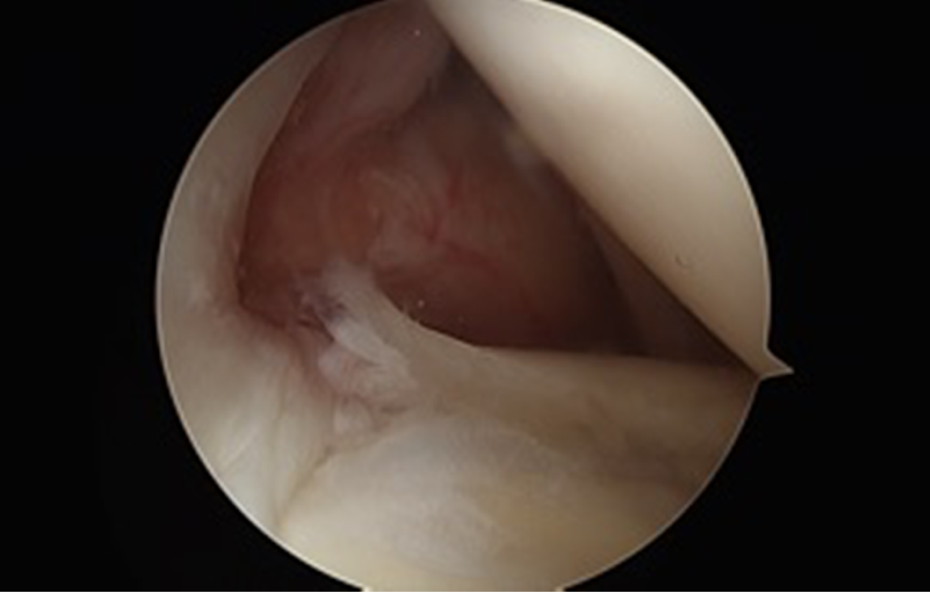
Proximal biceps tendon pathology with an intra-articular view from a posterior portal with the patient in a lateral decubitus position.
The first step is to find the biceps very low down in the groove just above the pectoralis major tendon. A leash of vessels which travel with the tendon in the groove will help identify the tendon’s location. An arthrocare wand is used to bovie these vessels, and the biceps sheath is opened identifying the tendon. To gain complete control of the long head of biceps (LHB), a grasper is used to pull the tendon out of the groove and it is brought out of the Passport Cannula (Figure 2): 3 cm of tendon can usually be pulled out of this cannula. The tendon is then sutured outside the body with No. 2 FiberLoop or Fiberwire (Arthrex), with several passes ending 3 cm from the tenotomized edge. The distal 5–10 mm is cut as only 20 mm of tendon from the suture will fill the drilled tunnel. The tendon that is measured is usually 7 mm or 8 mm in thickness.

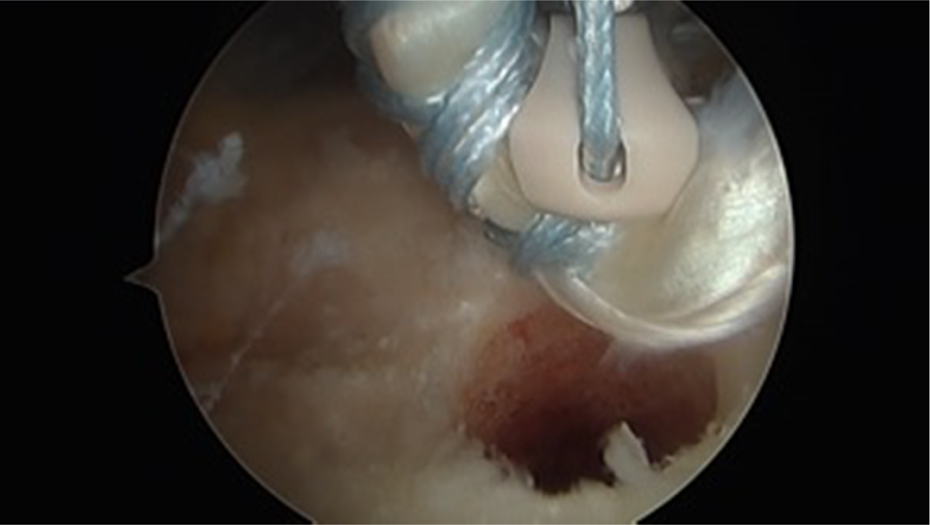
The proximal biceps tendon is engaged within the fork anchor outside of the shoulder to ensure adequate fixation with the tendon.
At this point, all the soft tissue below the bicipital groove and above the pectoral major is removed with an arthrocare. For a 7-mm tendon, a 7.5-mm reamer is brought through the Passport Cannula (bypassing the tendon) and then the tendon is pulled back up the cannula away from the reamer for protection. The 7.5-mm pilot headed reamer drills a perpendicular socket 20 mm in depth (Figure 3). The reamer is then gently removed by hand. The tendon is pulled back out of the cannula with the previously passed Fiberwire. Outside of the cannula, each limb of the Fiberwire is wound around the tendon (2–2.5 cm from the edge) in opposite directions and then, individually, each one is threaded through each of the two eyelids in each end of the forktip SwiveLock tenodesis anchor (Forked Eyelet, Naples, Florida, USA). This allows the forktip to wrap around the tendon securing complete control (Figure 4) The forktip anchor/tendon construct is now placed back through the Passport Cannula and under direct visualization and is easily placed into the previously drilled socket. The SwiveLock tenodesis screw is deployed with one thread left proud for the cortical purchase. An arthroscopic knot is tied over the screw, with the suture, which is through the tendon and through the eyelet of the forktip (Figure 5).
Proximal biceps tendon is positioned from the subacromial space arthroscopically to obtain appropriate tension.

The proximal biceps tendon is shown looped through the fork anchor to provide secure fixation of the tendon within the humerus.

The fork anchor is engaged into the humerus with complete the arthroscopic proximal biceps tenodesis.
Discussion
The arthroscopic tenodesis of the long head of the biceps offers a viable option to maintain elbow flexion and supination power, avoid cosmetic deformities, and prevent biceps pain and cramping with function. 19 To our knowledge, there is no level 1 or level 2 study that demonstrates superior results in the placement of the tendon above, within, or below the bicipital groove. Many authors have described their own techniques and innovations of the procedure in treating proximal biceps pathology, since Gartsman et al. 20 first reported on the technique of an arthroscopic biceps tenodesis. 4 Several authors describe differences in approach, ranging from the number and placement of arthroscopic ports to the position in which the patient is placed. Other authors describe differences in fixation technique, reporting methods including interference screw fixation and suture anchor fixation. 16,21 –25 However, all of the different techniques enable the same goal to provide patients with satisfying therapeutic effects and excellent functional recovery.
In regard to fixation techniques, suture anchors have often been used during arthroscopic repair of rotator cuff tears, demonstrating that fixation with suture anchors provides strong initial fixation. 4 Shen et al. described a technique in which two suture anchors were used, each with two sutures: one going through the tendon and the other not passing through. This method ensured that tendon avulsions would not occur. 4 By passing the free ends of the FiberLoop through the implant, it ensures the tendon is captured within the suture anchor to avoid failure at the implant bone interface. Valenti et al. describe a more “relaxed” fixation technique by leaving a bioabsorbable screw relaxed by 5 mm. Their goal was to decrease persistent postoperative bicipital pain caused by inflammation in the bicipital groove due to the continual stress placed on the tightly fixed tendon. They found that this technique limited the risk of persistent tendon pathology and pain without a cosmetic deformity such as a Popeye sign. 15
This article presents a novel method in minimally invasive all-arthroscopic tenodesis by securing the proximal biceps tendon to the interference screw prior to fixation into the humerus. The benefits of the technique may avoid the tendon pullout from the screw-bone interface as described by Slabaugh et al. 26 Although many techniques are used in practice and reported in the literature, it is certain that many young active patients with significant pathology will benefit from tenodesis. This all-arthroscopic technique represents an additional option to provide patients with satisfactory outcomes while regaining function of the injured tendon.
Footnotes
Declaration of conflicting interests
The author(s) declared no potential conflicts of interest with respect to the research, authorship, and/or publication of this article.
Funding
The author(s) received no financial support for the research, authorship, and/or publication of this article.