
Abstract
Wood is a highly heterogeneous material with a variable and three-dimensional (3D) anatomy at the microscopic level. Research and application of wood depend on well-educated individuals, who understand the wood anatomy. The teaching and learning of that complex structure are challenging with common teaching resources, which are mostly based on two-dimensional microscopy images. Innovative teaching materials may involve 3D data provided by micro-computed tomography (micro-CT). Using 3D data of wood, this article suggests approaches to make teaching and learning of wood anatomy more engaging. Whereas 3D visualizations can be added as a new resource to teaching presentations, digital 3D models of wood features can be incorporated into virtual data libraries allowing students to move freely through the 3D structure. These models can also be printed using additive manufacturing providing hands-on material in class. These teaching materials have the potential to become a valuable and future-oriented educational toolkit for promoting students’ learning experience and motivation. To encourage the use of 3D data in teaching, 3D data of selected anatomical features of softwoods and hardwoods are provided along with the article.
Introduction
The knowledge of the anatomical structure of wood is the basis for understanding wood properties. Anatomical features of wood, such as cell types, cell arrangement, and density, for instance, directly affect the mechanical and physical properties of wood. 1 Researchers studying wood must be able to relate anatomical features with wood quality attributes such as strength, treatability, durability, and resistance to decay. Wood researchers are also exploring techniques to alter wood properties through treatments, such as heat and chemical modification, or impregnation with wood preservatives, to make wood more durable and resistant to abiotic (e.g., fire and moisture) and biotic (e.g., fungi and insects) environmental factors. 2 Knowing the anatomy of wood helps to understand how treatments will affect the properties of the wood. Therefore, effective wood research depends on well-educated individuals who understand the anatomical complexity of wood.
In university courses, however, lecturers encounter numerous challenges in teaching students the anatomy of wood. 3 The major challenges may be associated with the complexity, three-dimensionality, variability, and microscopic nature of the wood's anatomy. Wood is a porous and fibrous material whose microscopic anatomy is not visible to the naked eye but requires magnifying equipment like microscopes to observe. Furthermore, the cellular composition of wood is highly complex and variable as it is evolutionarily adapted to the biological and mechanical needs of the tree. 4 Therefore, different wood species have varying anatomical features (e.g., vessels, fibers, parenchyma, and tracheids) that differ in size, abundance, and arrangement.5–8 These anatomical features are, in addition, organized hierarchically from the microscopic to macroscopic level and arranged three-dimensionally in the three main directions or planes of sections.4,9 In other words, wood features can be arranged longitudinally, radially, and/or tangentially. To visualize and characterize the complex and three-dimensional (3D) wood anatomy, two-dimensional (2D) microscopy techniques, like light and scanning electron microscopy, are widely used. Due to the diverse structure, the concept of wood anatomy often remains abstract and challenging to visualize and understand. Students may have difficulty relating this concept to the physical structure of wood.
To foster the teaching and learning experience of the complex and species-specific wood anatomy, innovative and engaging teaching strategies are needed. Lachenbruch 10 introduced a concept where students develop their own physical models of anatomical features in 3D (e.g., vessels, pits, and wood rays) at different scales using materials such as modeling clay, paper, drinking straws, and toothpicks. Another concept, suggested in this article, is the use of digital-based 3D visualizations of wood anatomy. Such 3D visualizations can be obtained from 3D imaging techniques such as magnetic-resonance imaging or micro-computed tomography (micro-CT) systems. Micro-CT overcomes obstacles associated with traditional 2D imaging methods and thus has been established in wood research for all kinds of studies in the last two decades.11–15
The digital 3D data generated in this micro-CT process represent new opportunities for lecturers to address students’ interest and motivation in wood as a material. From these data, high-quality wood anatomy teaching resources, such as detailed anatomical 3D models or images, can be extracted, providing engaging and comprehensive learning experiences. While such digital concepts can aid in visualizing the complex wood anatomy, nothing beats hands-on learning with physical objects of anatomical features. In these terms, 3D printing of wood structures, as introduced by Wimmer et al. 16 , can be a valuable educational tool for understanding the complex anatomy of wood. 3D printing, known as additive manufacturing, is a material extrusion process using thermoplastic polymers like polylactic acid (PLA). One of the most popular extrusion processes is fused deposition modeling (FDM). FDM is a 3D printing process that uses a continuous filament of a thermoplastic material to produce layer-based objects.17,18
Despite these opportunities of using 3D data, 2D microscopy images and drawings of the wood structure such as those by Mägdefrau 19 are still usually used to depict the complex and 3D wood anatomy. The reasons for this may be the limited availability of 3D teaching materials due to high investment costs for tomographic 3D imaging techniques and the effort needed to unravel the complexity of the 3D wood tissue and to create 3D visualizations. To motivate the use of 3D data in teaching, this article gives lecturers an impression of how to augment the teaching of wood anatomy through 3D data. As teaching materials regarding wood anatomy in 3D are not readily available, 3D data of different softwood and hardwood structures are provided to support and encourage the teaching and learning of wood anatomy.
Material and methods
The wood tissue of three softwood species including juniper (Juniperus communis), larch (Larix decidua), and pine (Pinus sylvestris) and six hardwood species including beech (Fagus sylvatica), European ash (Fraxinus excelsior), plane tree (Platanus sp.), poplar (Populus sp.), oak (Quercus petraea), and black locust (Robinia pseudoacacia) were exemplarily imaged. The wood samples, approx. 2
The working principle of micro-CT is based on the natural X-ray attenuation of the wood sample. The attenuation of X-rays as they pass through the sample is strongly dependent on the density, thickness, and elemental composition of the sample. The different attenuations of the sample are transferred by the detector into a grayscale-based 2D projection image. Thereby, dark or black pixels represent areas of low attenuation (e.g., air), while gray pixels represent areas of higher attenuation (e.g., wood). Inorganic particles, which have a higher X-ray density than organic wood, refer to white regions in the micro-CT image. By rotating the sample through 360°, a stack of 2D projection images is collected in many angular steps. These 2D images are transferred into a 3D dataset with a spatial Cartesian coordinate system. Thereby, pixels of the 2D projection images are transferred into voxels of the 3D dataset with the isotropic size of the tomographic resolution.
After image collection, the image analysis and export of 2D and 3D data were performed using the analysis tools of the image analysis software Avizo (FEI, Thermo Fisher Scientific). Therefore, small-sized regions of interest (ROIs) of selected anatomical features were used for image analysis. Image analysis included the extraction, denoising, segmentation, and visualization of ROIs. Image segmentation is the process of identifying and separating distinct regions or structures within the micro-CT data based on their grayscale voxel intensities. Apart from images in TIFF (tagged image file format) file format showing the wood anatomy in 2D and 3D, 3D models as binary STL (standard triangle language) files were exported after image segmentation and surface rendering.
The additive manufacturing using fused deposit modeling was performed with polylactic acid (PLA) and wood-filled PLA filaments, both with a filament diameter of 2.85 mm, using the dual extruder printing device Ultimaker S3 (Ultimaker B.V.). As support material for printing complex objects, PLA or polyvinyl alcohol (PVA) was used. Support material enables the printing of objects with features like overhangs or cavities that would otherwise not be possible due to gravity. Before 3D printing, the data were prepared with the Autodesk Meshmixer (Autodesk, Inc.) and the Ultimaker Cura (Ultimaker B.V.) software packages to get a printable solid model.
Teaching approaches with 3D data
3D visualizations in education
With the micro-CT technology, lecturers have a tool at hand that enables non-destructive and 3D insight views into the structure of wood (e.g.,11,12,20,21). Through the various choices of image analysis, information about anatomical wood features in 3D can be extracted from micro-CT data in various ways, such as 2D and 3D images.
The true potential of micro-CT data is most apparent when voxels of specific materials or structures are separated and visualized in 3D through image analysis. Image analysis, using free and commercial software packages like 3D Slicer, Fiji/ImageJ, DragonFly, Avizo, VGStudio, or GeoDict, makes it possible to separate and visualize materials of different densities (e.g., air, cell-wall material, and inorganic deposits) separately. Apart from visualizing the cell wall of wood cells (Figure 1), separating the air-filled lumen of wood cells allows innovative visualizations and conclusions about the 3D morphology of individual cells (Figures 2–3). For example, Figure 2(b) shows the elliptical pit chambers of two bordered pits between latewood tracheids. Also, the vessel extensions in Figure 3(g), which are difficult to unveil with common imaging methods in 2D images, 22 can be visualized accurately.
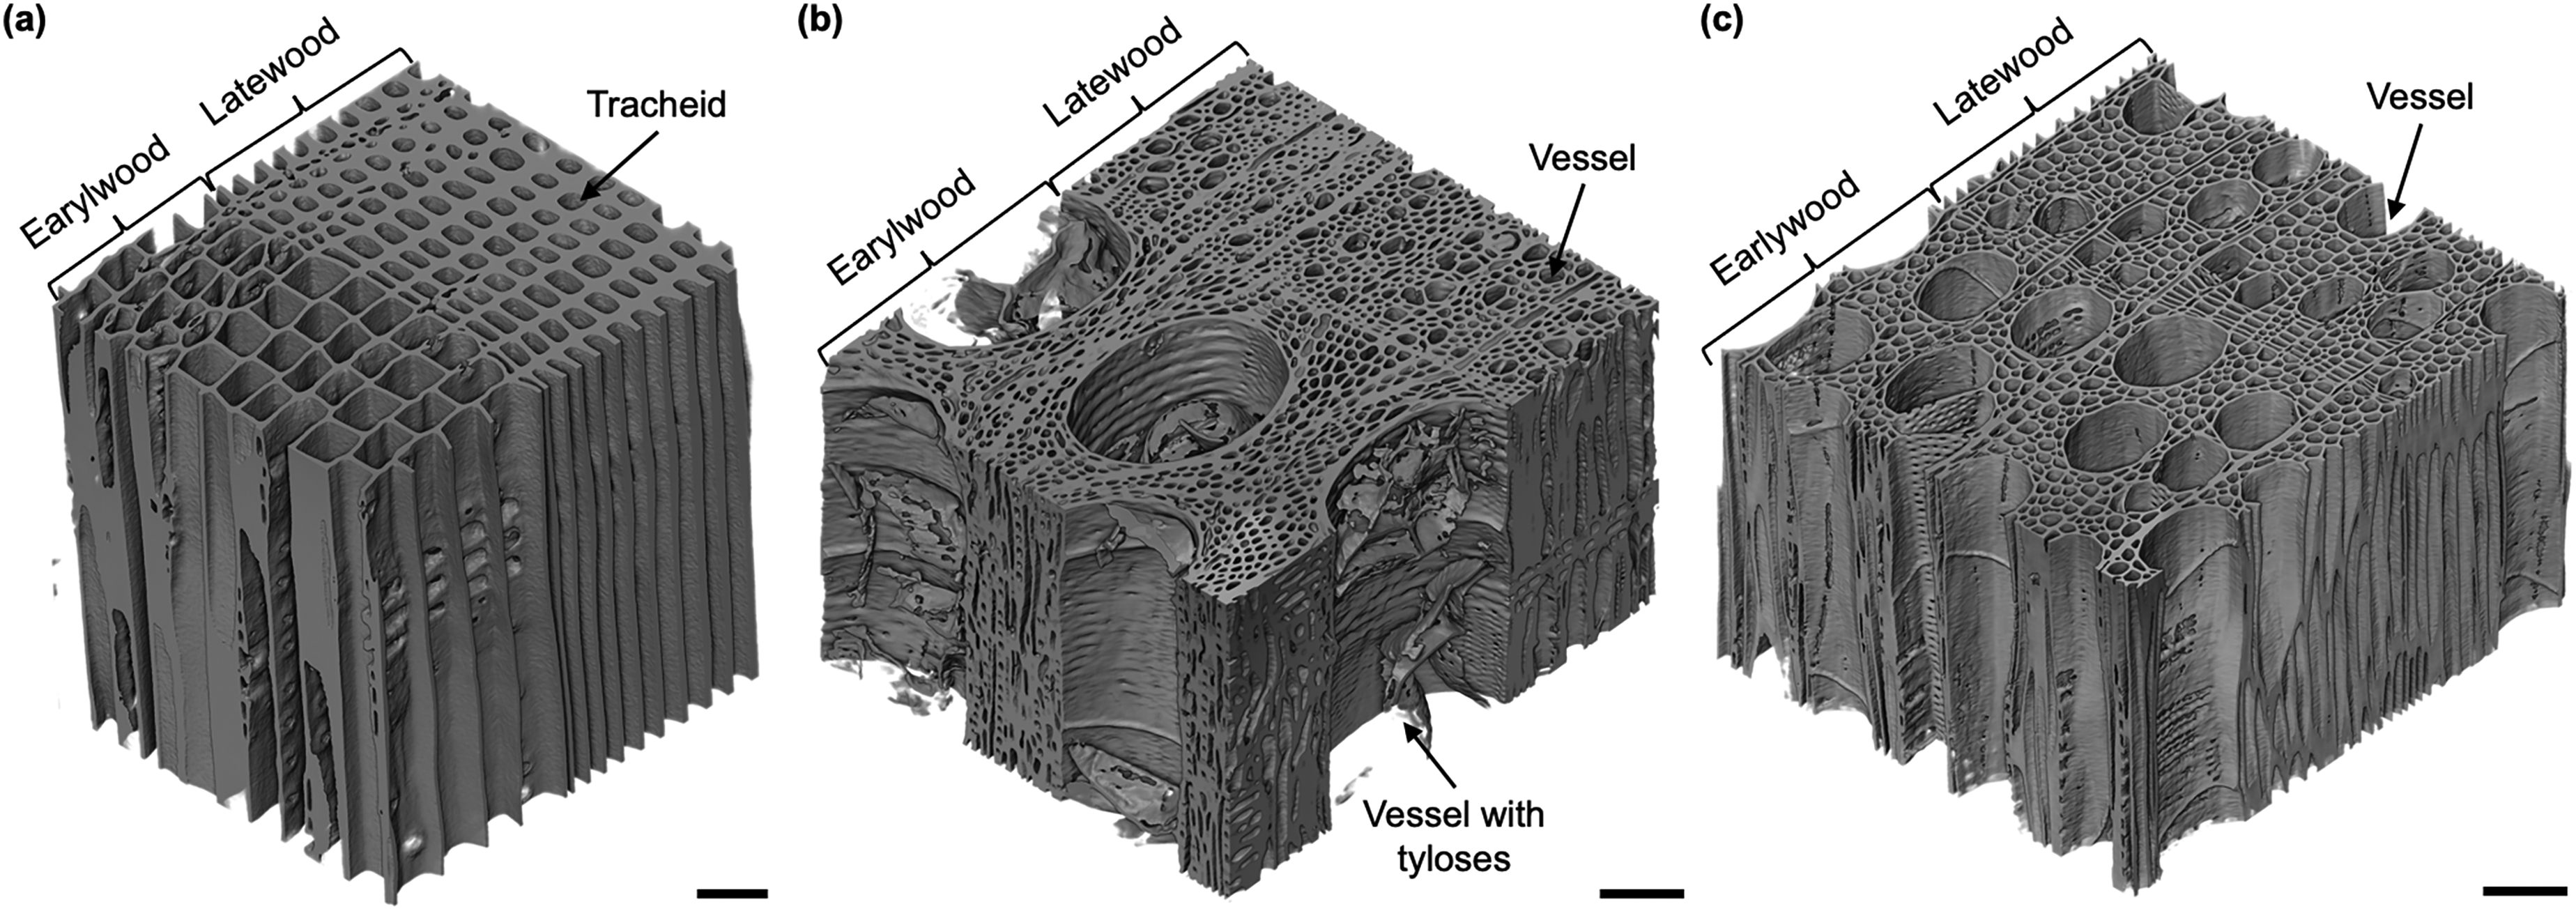
Volume rendering of the 3D softwood and hardwood tissue at the growth-ring boundary. Scale bars: 100 µm.
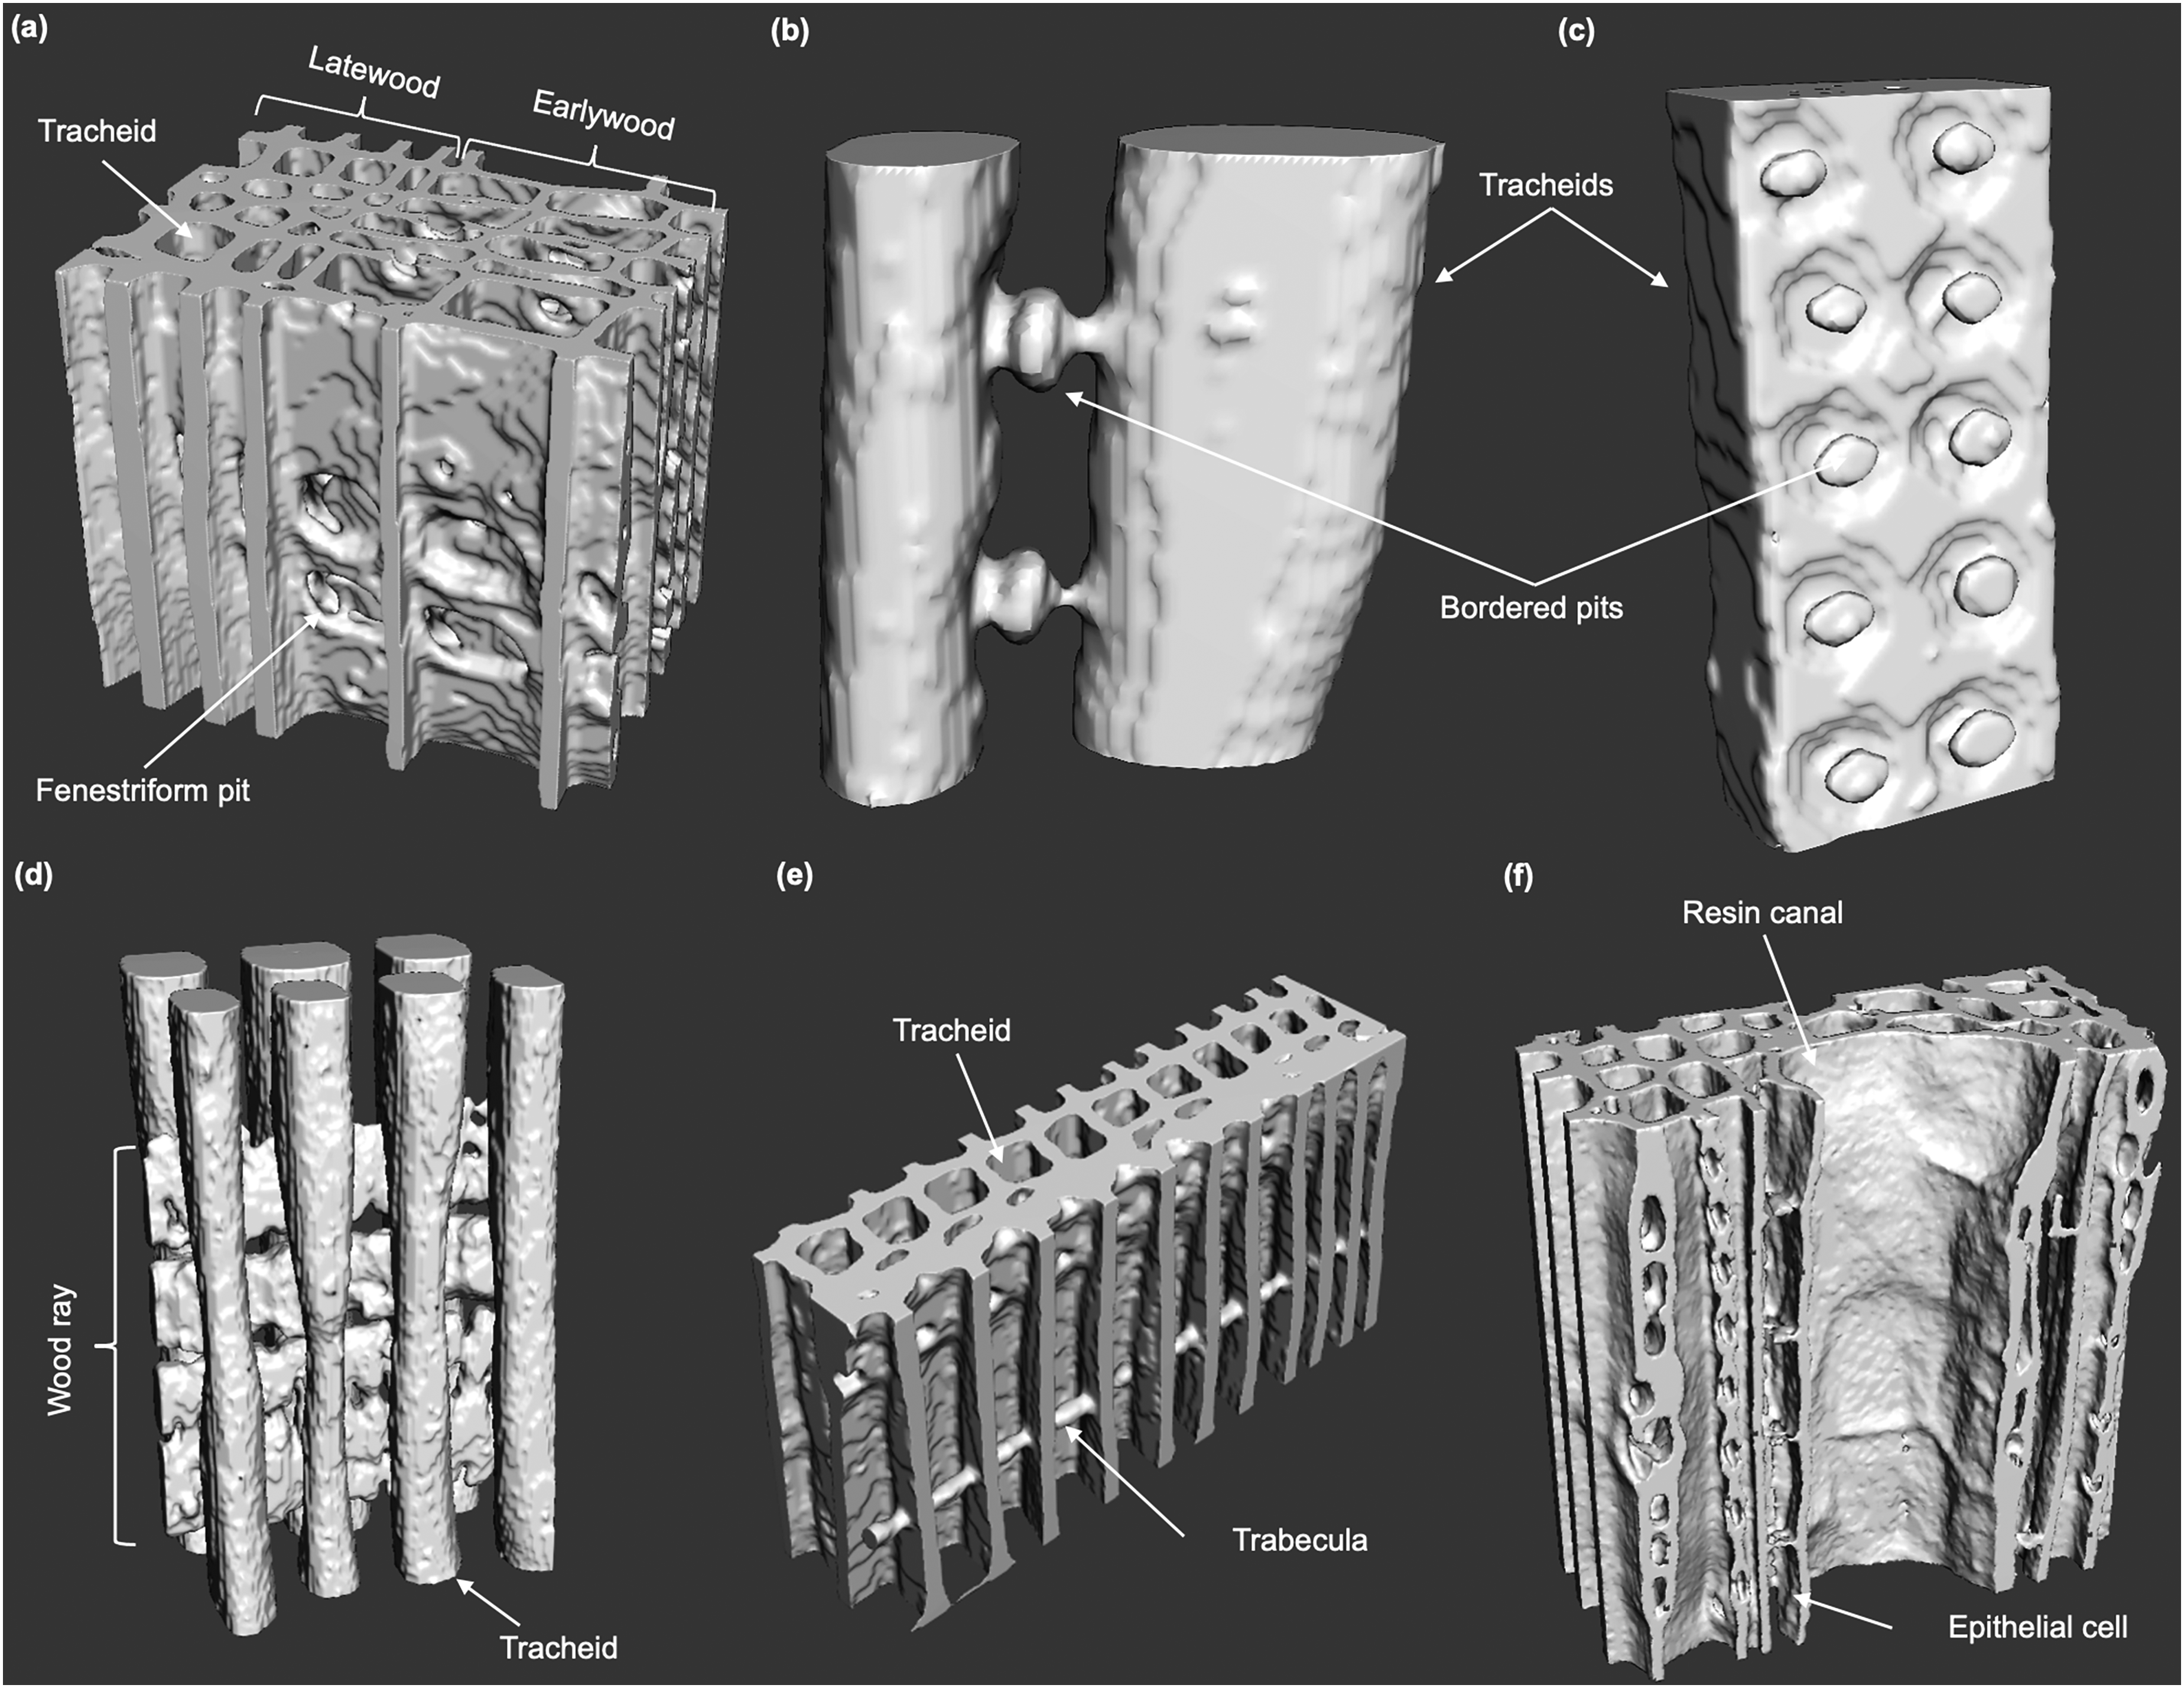
Examples of 3D models of selected softwood structures.

Examples of 3D models of selected hardwood structures.
Another powerful type of visualization is the 3D cutaway visualization, in which certain surface elements and sections are removed to expose internal features. In the region of interest (ROI) of Figure 3(i), for example, some wood material was removed to show the radial arrangement of inorganic deposits in ray parenchyma cells. To highlight certain cell morphologies within visualizations, individual cells or inorganic particles can also be colorized upon image analysis (Figure 4). Moreover, entire 3D volumes or smaller ROIs can be exported as a stack of individual sectional slices corresponding to 2D images as seen from microscope sections (e.g., transverse, radial, and tangential sections). That way lecturers and students will have no trouble visualizing and ultimately understanding the wood anatomy that is observed from reference microscope slides as depicted in regular teaching materials.
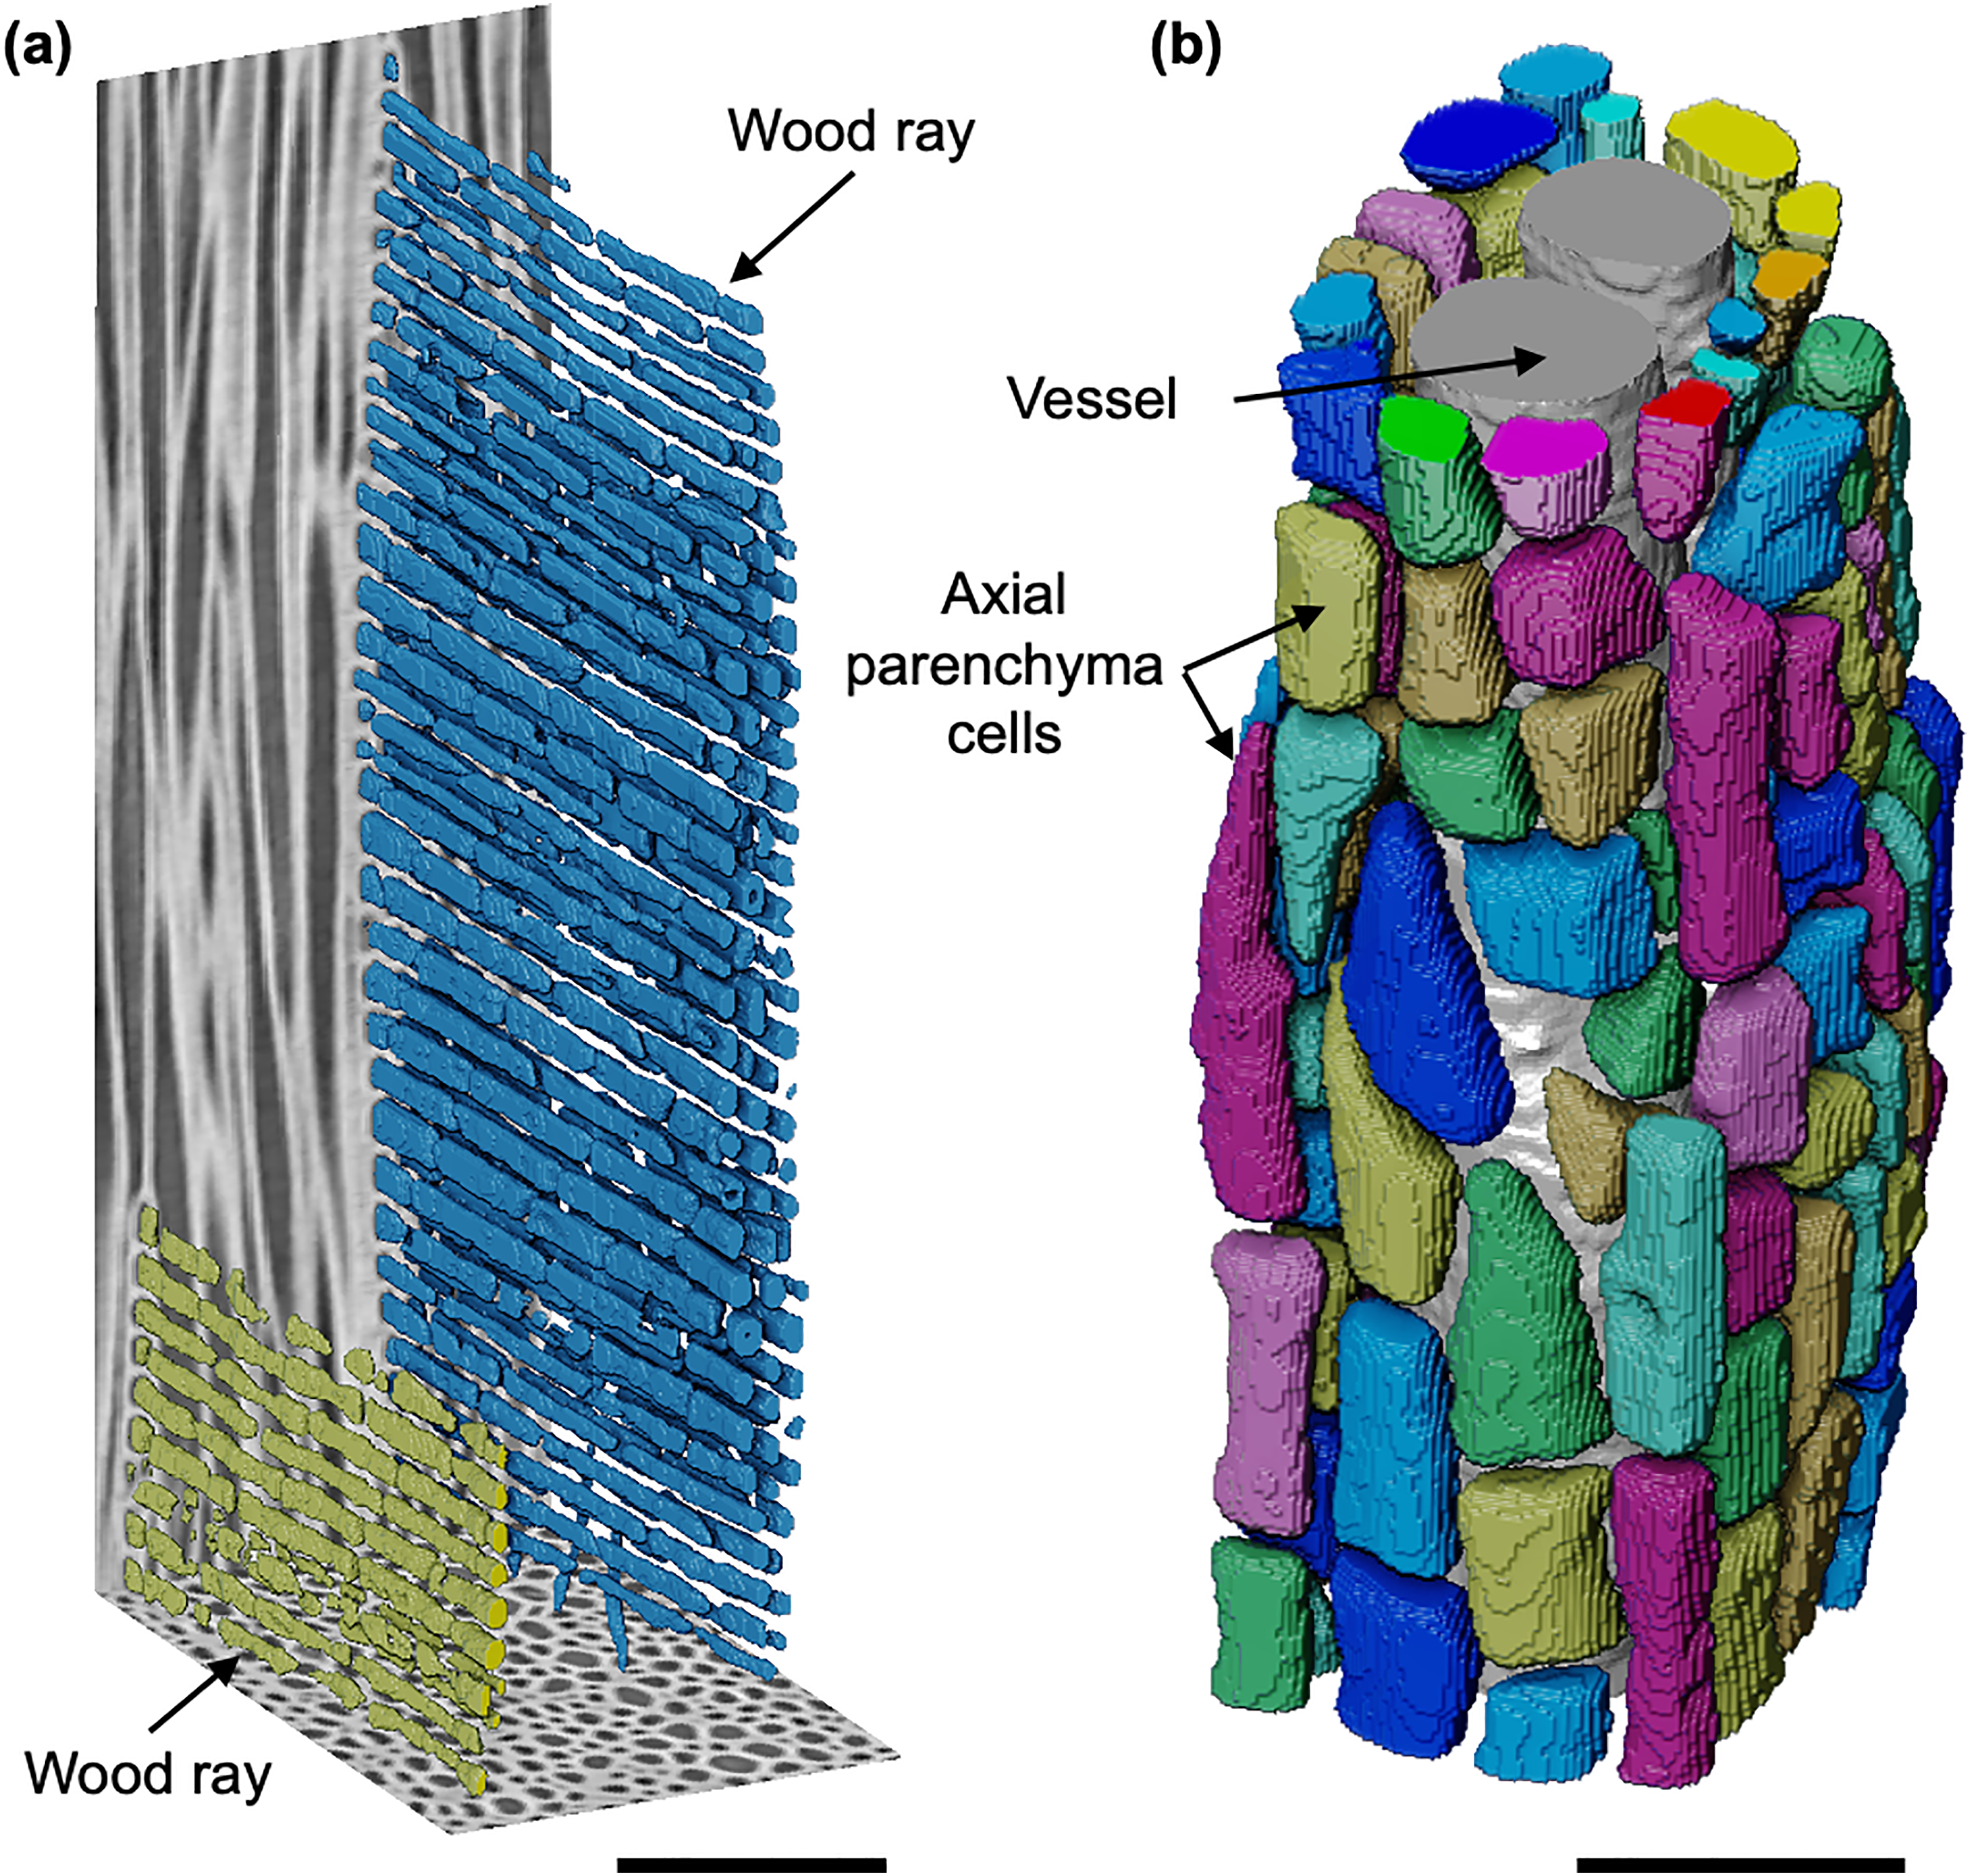
Examples of colorized cell lumina in wood.
Lecturers can add these different visualizations as innovative resources to traditional teaching materials with 2D microscopy images. In particular, 3D and colorful visualizations of the wood anatomy will make teaching and learning more engaging and will help to enhance student's attention span, motivation, and learning experiences.
Although the known wood anatomy will not change significantly with 3D imaging,12,23 micro-CT, though, offers innovative insights into the complex structure of wood (Figures 1–4). Numerous wood anatomical features could be easily identified with commercially available micro-CT. Smaller features, such as the membrane of the bordered pits and thin-walled epithelial cells, whose sizes are close to the obtained tomographic resolution of 1 µm, are not or hardly visualizable as discussed in previous studies.24–26 Recent studies, however, vividly showed that the ongoing advances in 3D scanning technology (e.g., improved detectors, higher resolutions) lead to improved detection and detailed imaging of even small wooden features.11,27,28
Lecturers and users should be aware that the process of creating 3D images requires time, a powerful computer system, and know-how in the acquisition analysis of images. Depending on the micro-CT system, the scanning needs approx. 0.5–4 h. When it comes to image analysis (e.g., visualization), simple 3D volume renderings of ROIs, as shown in Figure 1, can be created with a few clicks in minutes. More advanced images, such as Figures 3(i) and 4, require more attention and time due to several steps of image analysis. For instance, the 3D cutaway visualization in Figure 3(i) was created in 20 min, while it took up to one hour to complete the colorful visualization in Figure 4(b). Despite the time needed for a final visualization, micro-CT data once generated are lasting resources for extracting a variety of replicable 2D and 3D teaching materials.
3D models in education
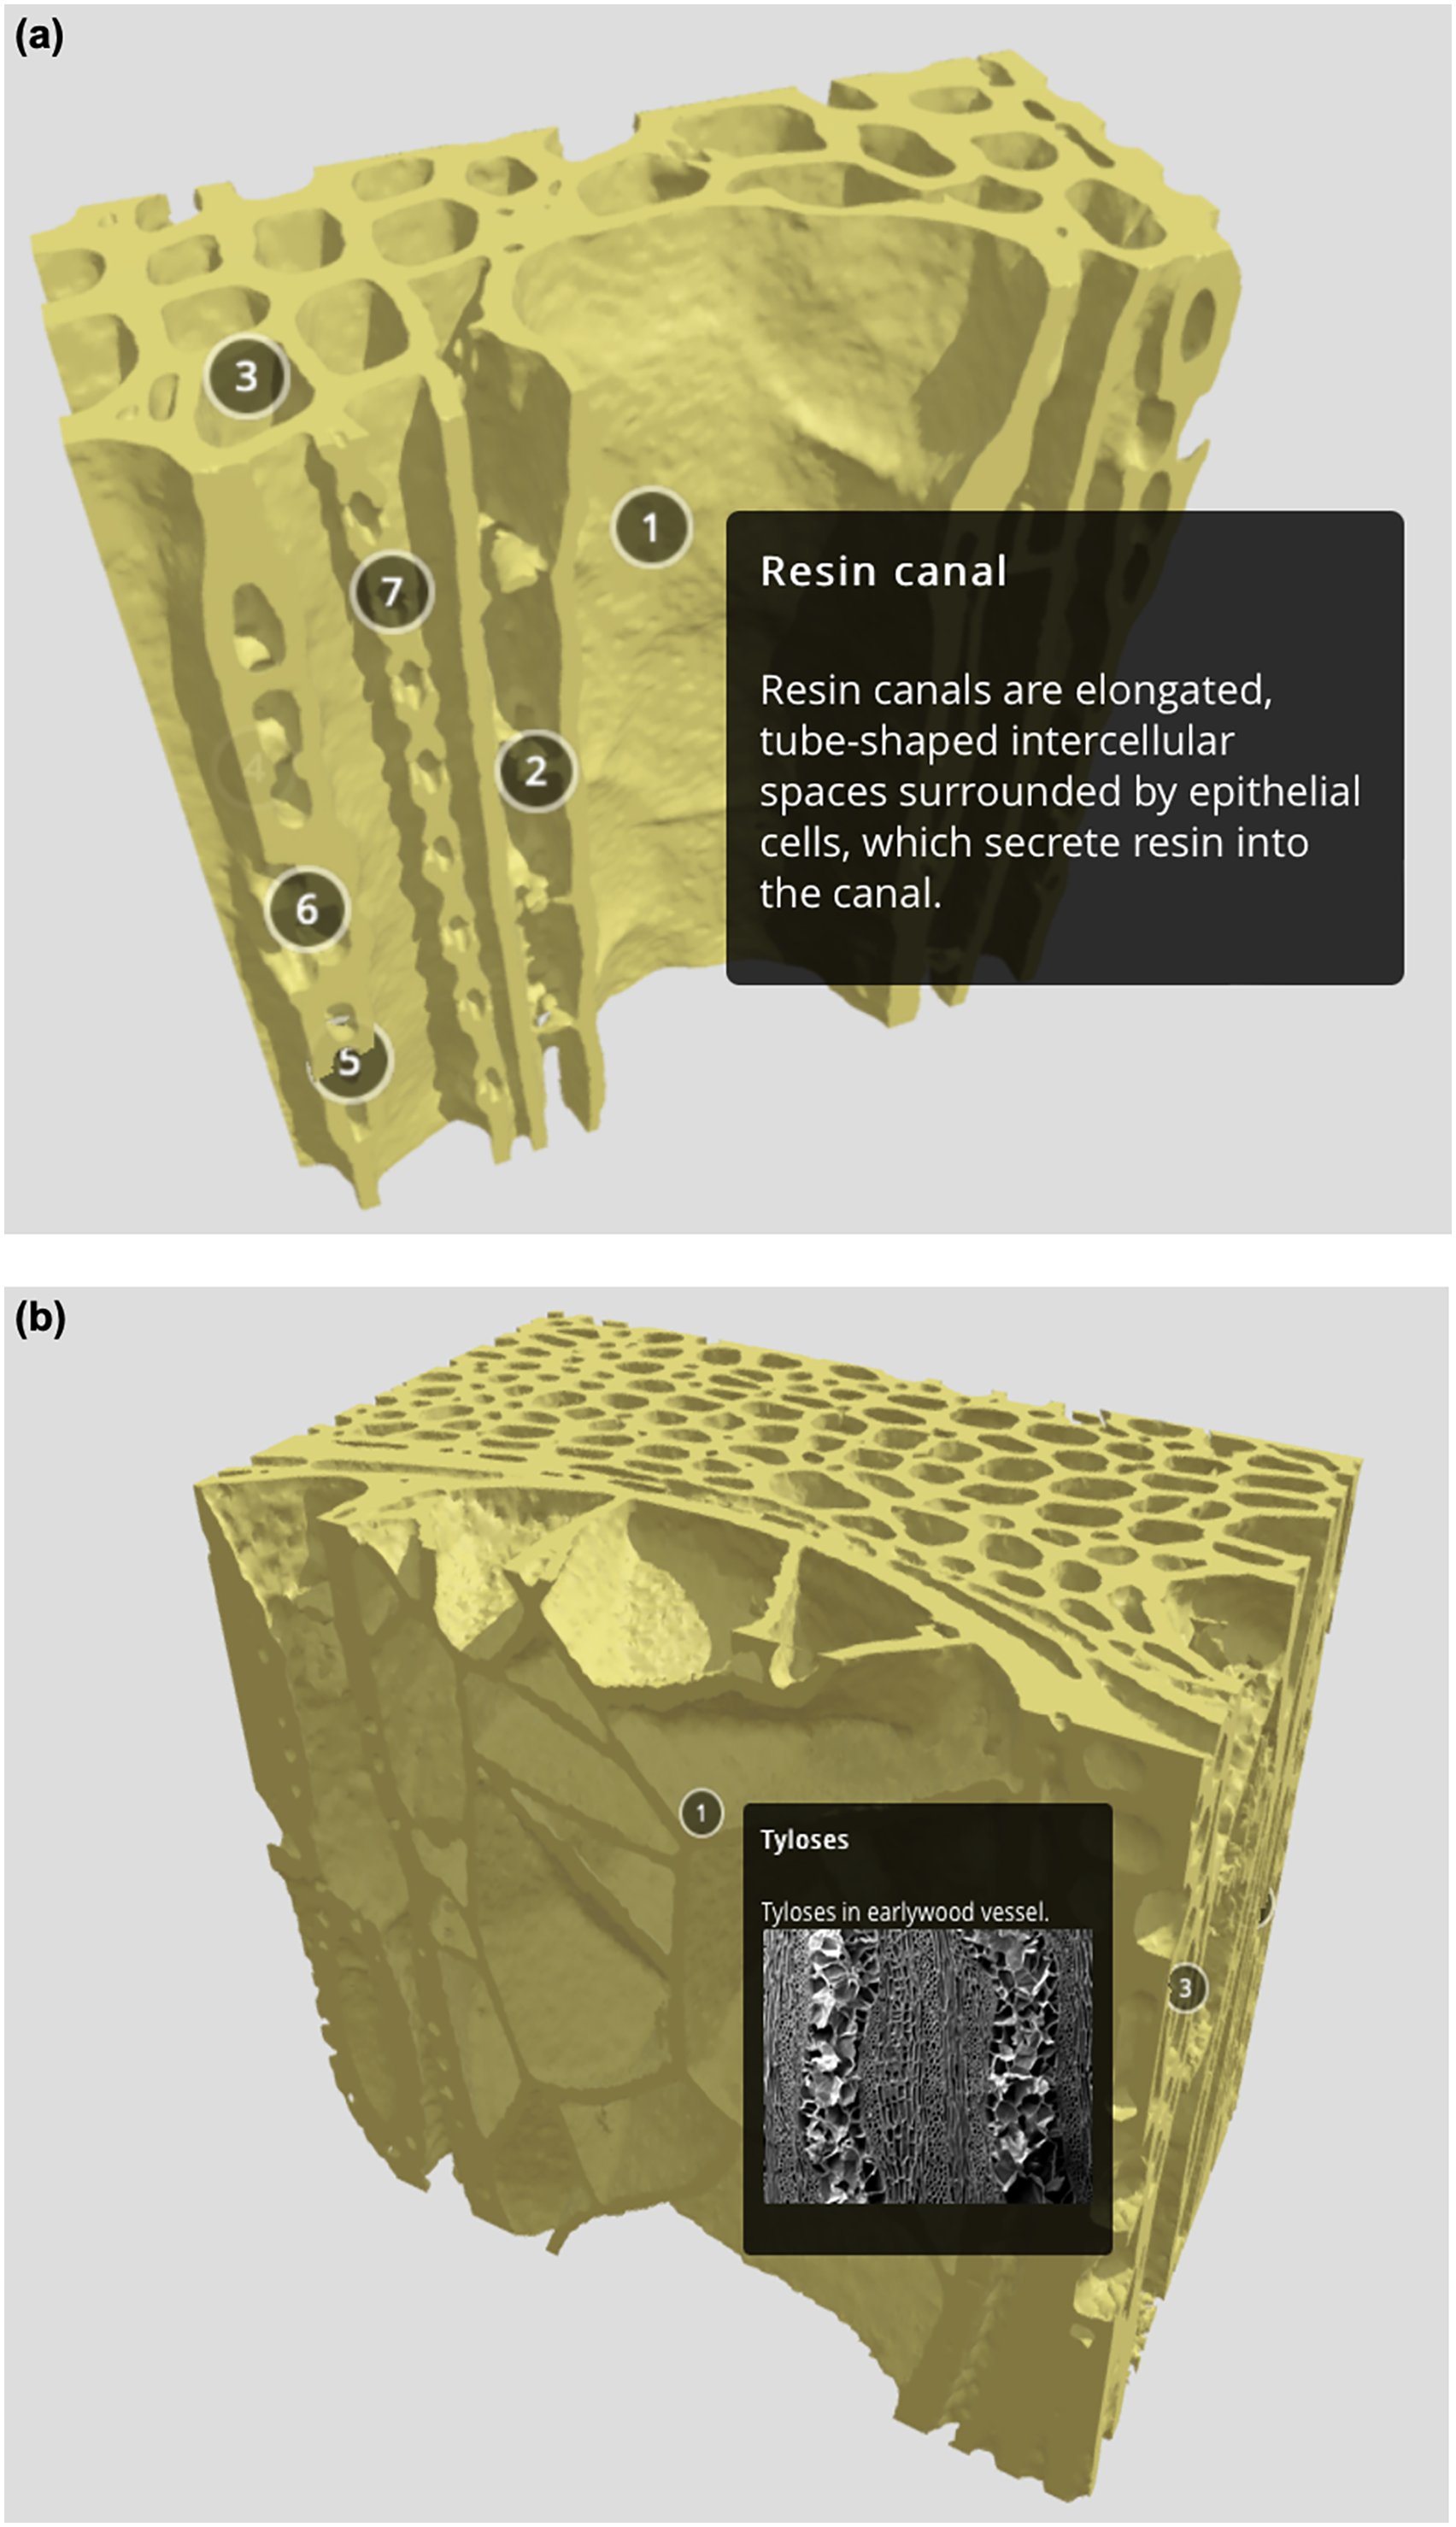
As the digital micro-CT data can be processed ad infinitum and imaged from any desired perspective, (e.g., cutaway visualizations) there are various ways to present the 3D wood anatomy.12,23 Apart from images, showing the anatomical features in 3D (Figures 1–4), micro-CT data also enables the export of 3D models in STL file format, for instance. With the integration of 3D models of wood features in digital data libraries or portals accessible via the internet, students and all interested parties are allowed to explore anatomical features of wood in 3D even outside the classroom. The COVID-19 pandemic has sustainably revealed that new and contemporary forms of learning provision and teaching support are needed in higher education.29,30 In particular, the shift from face-to-face teaching to digital teaching units in virtual rooms makes teaching and learning the complex wood anatomy challenging. Using interactive 3D models of wood structures may assist in distance learning by motivating students to engage with course content even from their home computers. To this end, models are presented on the 3D Data Portal on the homepage of the Department of Wood Biology and Wood Products of the University of Göttingen (www.holz.uni-goettingen.de). The 3D models are currently integrated on the homepage using the services of Sketchfab.
The major key to these 3D models is that they allow everyone to move freely through the 3D wood structure using a computer mouse. The display of the 3D models, which are approximately 20 to 200 MB in size, can not only be manipulated (e.g., to rotate and zoom) from the home computer but can also be viewed via smartphone. Since some 3D representations might be initially unfamiliar, the integration of supplementary labels, descriptions (e.g., labeling of cell and pit types), and complementary 2D images from light and scanning electron microscopy helps to get familiar with the 3D wood anatomy (Figure 5). For online teaching materials, these models of the wood's microstructure can be combined with 3D models of the macroscopic wood structure. Such macroscopic scale models are provided via Sketchfab in the 3D Virtual Wood Collection (https://skfb.ly/6YU8E) of the Department of Wood Science and Technology of the University of Ljubljana, Slovenia.
Virtual data library with 3D models of selected anatomical wood features on the department's homepage.
Apart from digital virtual libraries or collections that can be accessed via the internet, it should be mentioned that Microsoft PowerPoint allows embedding 3D models in STL file format. This enables lecturers to insert 3D models of wood features directly into their teaching slides making the teaching more vivid and engaging. Showing 3D models in the classroom helps students familiarize themselves with the 3D nature of wood anatomy before exploring other wood models at home. Another promising application of 3D models in teaching might be the use of virtual reality systems to help the students interactively learn the anatomy of wood as demonstrated in the survey by Feng et al. 31
When generating STL files from micro-CT scans for 3D applications, lecturers and users should be aware of the trade-off between the voxel and file sizes. The size of voxels plays a crucial role in defining the level of detail and resolution achievable in the micro-CT data. The achieved voxel size of around 1 µm was sufficient for visualizing many anatomical features of the scanned softwoods and hardwoods.22,23 However, the choice of a small voxel size comes at the expense of the size of STL files. The STL file format uses a collection of triangular facets, or polygons to convey the 3D model's surface. Therefore, the more triangles in the mesh, the larger the resulting STL file size, but the more details are visible. Small voxel sizes and high resolutions in micro-CT scans inevitably result in denser meshes, with more triangles, leading to larger STL files. After surface extraction in Avizo, the surface of wood structures represents a polygonal mesh consisting of up to several million triangles. Depending on the size of the ROI chosen, an STL file can have several hundred MB. Hence, the choice of voxel size and mesh density should be made considering the specific requirements of your application. The challenge is finding an acceptable trade-off between having a well-detailed, non-pixelated 3D model and a file that is small enough to be easily shared and handled with computers and smartphones. For smooth visualization performance of such models, small file sizes are obligatory. As a high voxel size of the micro-CT images is required to obtain detailed images of the microscopic wood structures,23,26 two options are suggested to reduce the file size. (i) It is common practice to extract small ROIs of selected wood features (Figures 1–4). Small ROIs are used to focus the visualization on specific anatomical features, such as bordered pits (Figure 2(b)) and vessel perforations (Figure 3(e)). A small ROI has the benefit of a smaller file size due to a low mesh density. (ii) During image analysis, the mesh density of the surface image can be simply reduced in Avizo or using 3D CAD software packages like Autodesk Meshmixer for larger ROIs, for instance. However, a reduced mesh density comes with a loss of information. Before exporting a 3D model, lecturers should consider what the model is intended to represent. For example, to display the arrangement of vessels in hardwoods, large ROIs are required but a high degree of structural detail is not necessary. Thus, mesh reduction was performed for mainly larger ROIs. In Figure 3(a), for instance, the mesh density of the poplar wood tissue was reduced from 13.2 million triangular facets with a raw file size of 661 MB to 1.8 million triangular facets with a raw file size of 89 MB (File S3). The relationship between polygon density, the degree of detail visualization, and file size is indicated for pine wood in Figure 6, exemplifying the considerations when working with micro-CT data and STL files.
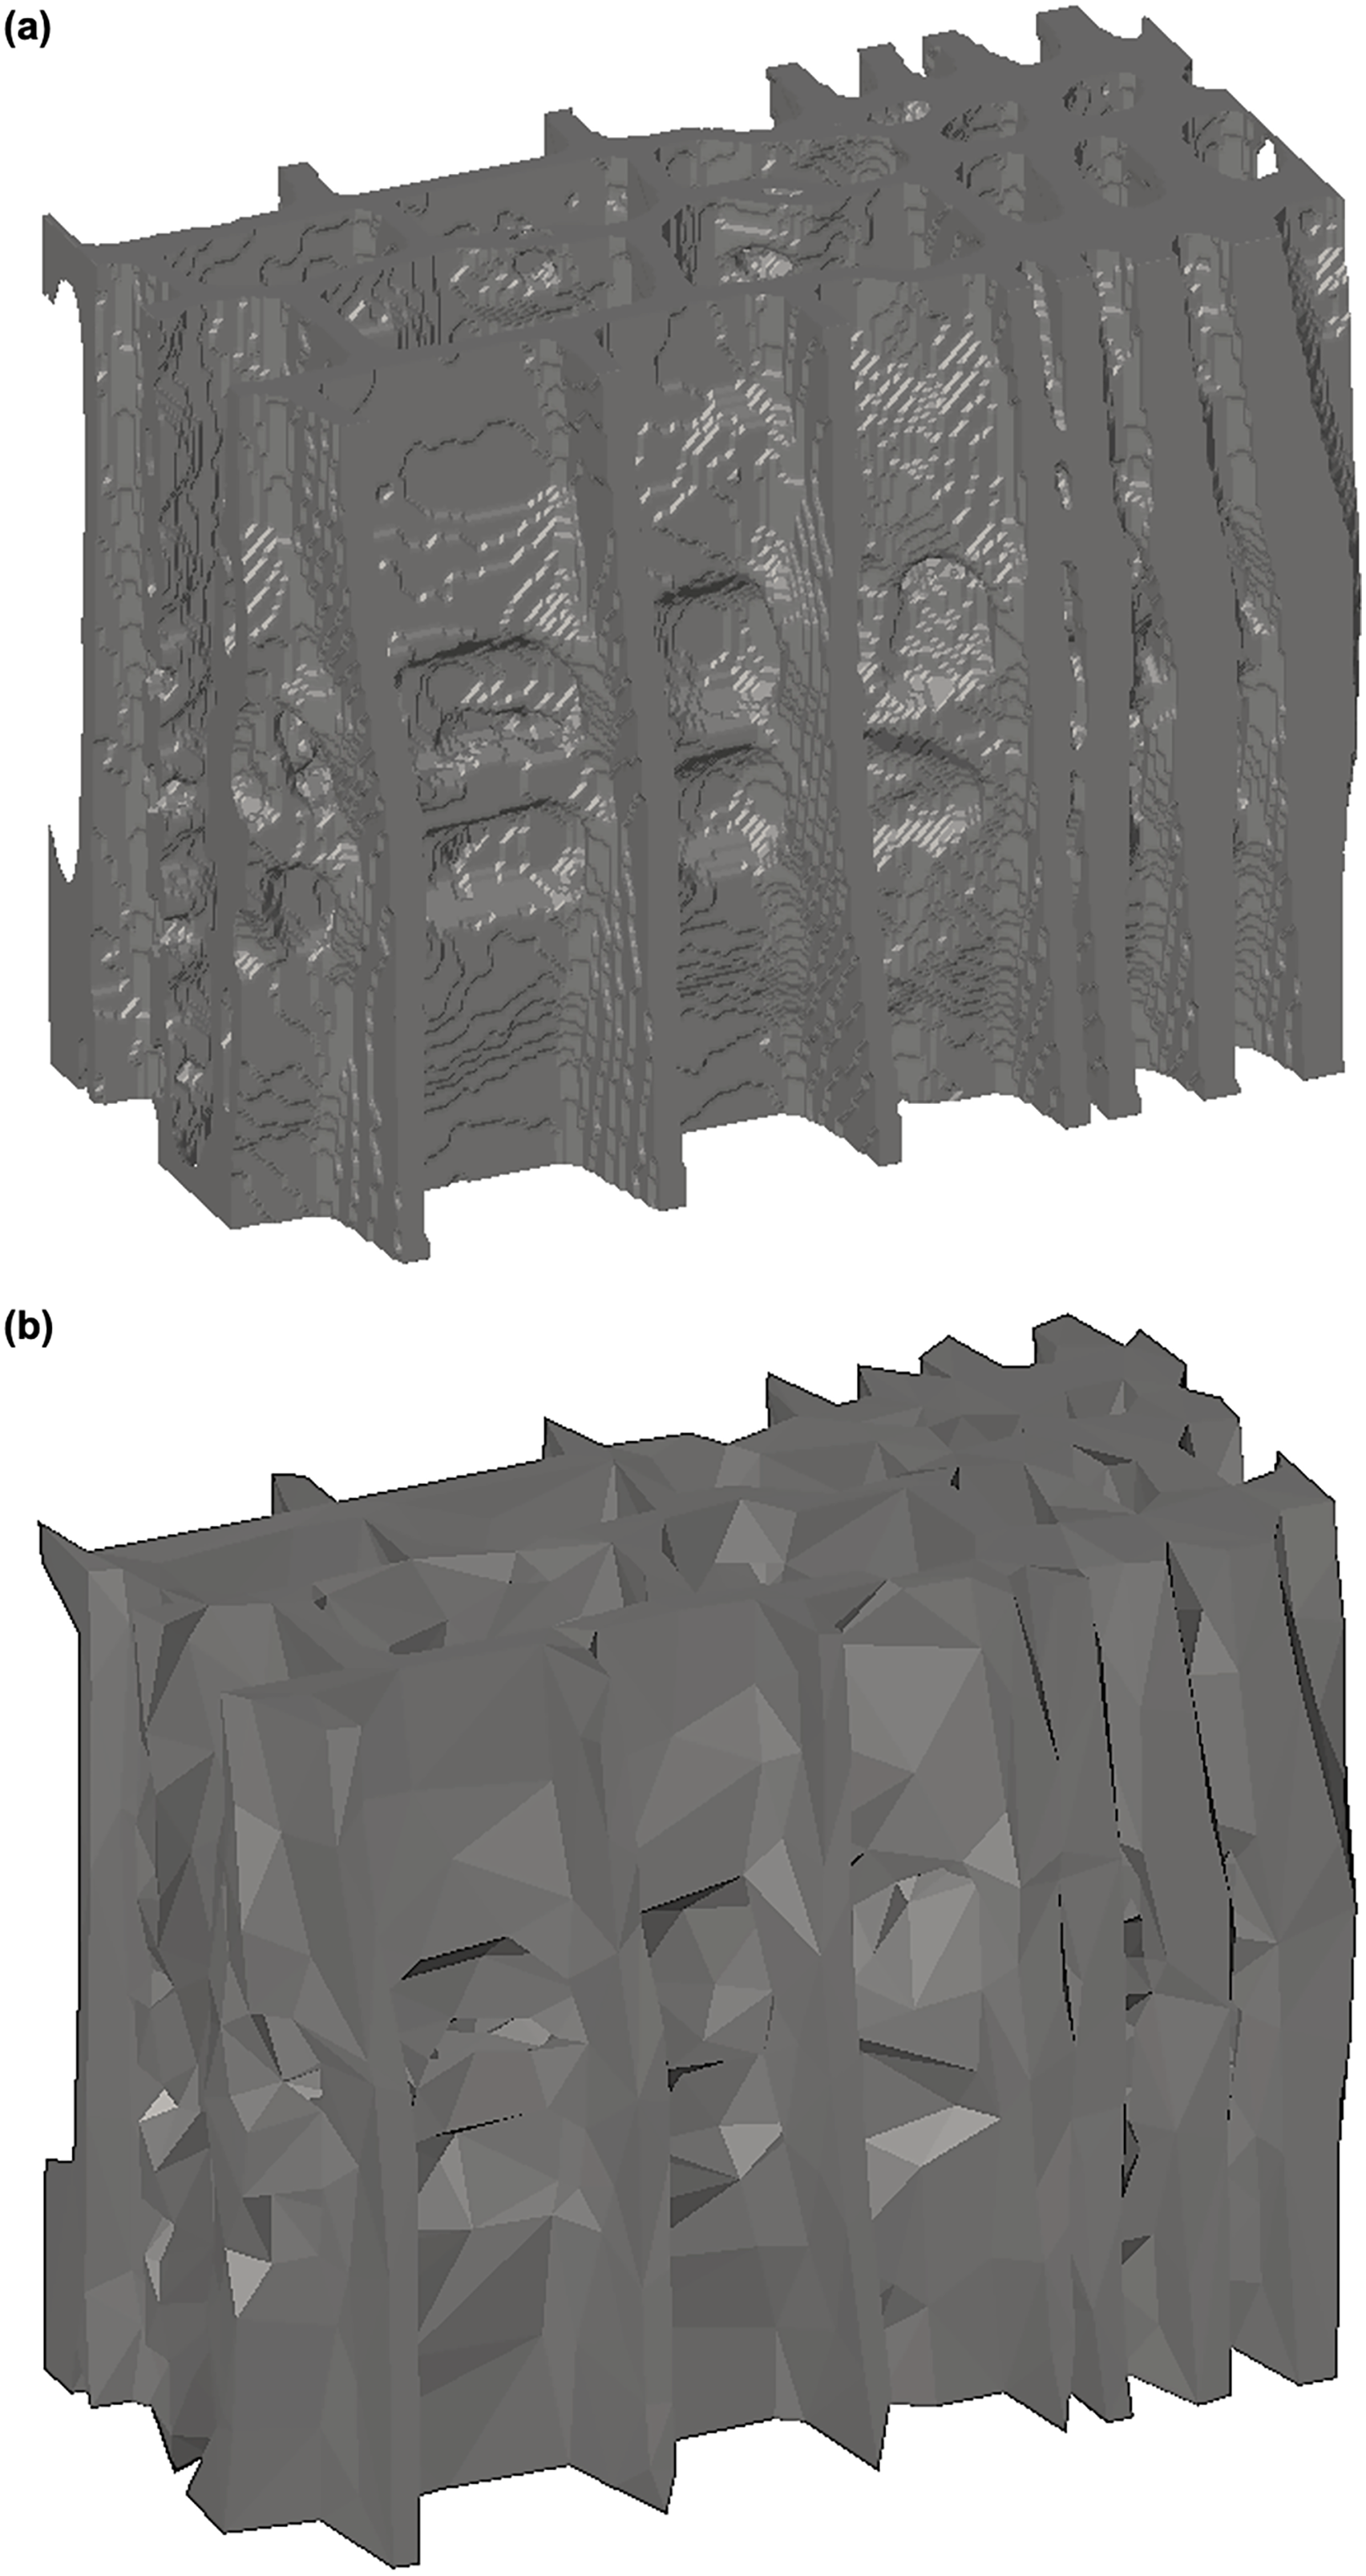
Relationships between polygonal mesh density, detail visualization, and file size of an STL file of pine wood.
Small-sized digital 3D models, easily accessible via the Internet in the lecture hall or at home, are a useful and future-oriented add-on to the existing teaching material for all wood-based courses. Through this 3D digitization of wood anatomy, the transfer of knowledge and information regarding the wood structure can no longer only be realized analogously, but also digitally in virtual 3D libraries, collections, or portals. Lecturers are encouraged to use the 3D models provided in the Supplementary Materials (Files S1–S6) and those presented on the 3D Data Portal on the department's homepage for teaching wood anatomy.
3D prints in class
3D technology, such as micro-CT, breaks the boundaries of real and virtual worlds and provides various opportunities.16,31,32 Recent advances in 3D printing technology have provided low-cost systems capable of translating digital 3D structures of wood into physical models within hours. Creating replicable 3D prints of wood features can be a valuable educational tool for understanding the intricate anatomy of wood. Using 3D data in STL file format of real physical wood features, it is also possible to print specific wood features in different scales using additive manufacturing (Figure 7). In addition to pure but colorful PLA printing, PLA filaments filled with wood particles are also possible. 16 Such 3D prints provide a wood-like, physical representation of wood anatomy that students can touch, rotate, and explore (Figure 7). Such tactile learning experiences in lectures as well as at wood fairs indicate that students and interested parties are keen on exploring wood structures. Such prints allow them to see the 3D arrangement and spatial relationship of cells (e.g., vessel sizes in ring-porous and diffuse-porous wood, fibers, tracheids, and parenchyma cells) from various perspectives. These perspectives provide a more intuitive comprehension of how these wood features are arranged and interconnected in the three anatomical planes of section.
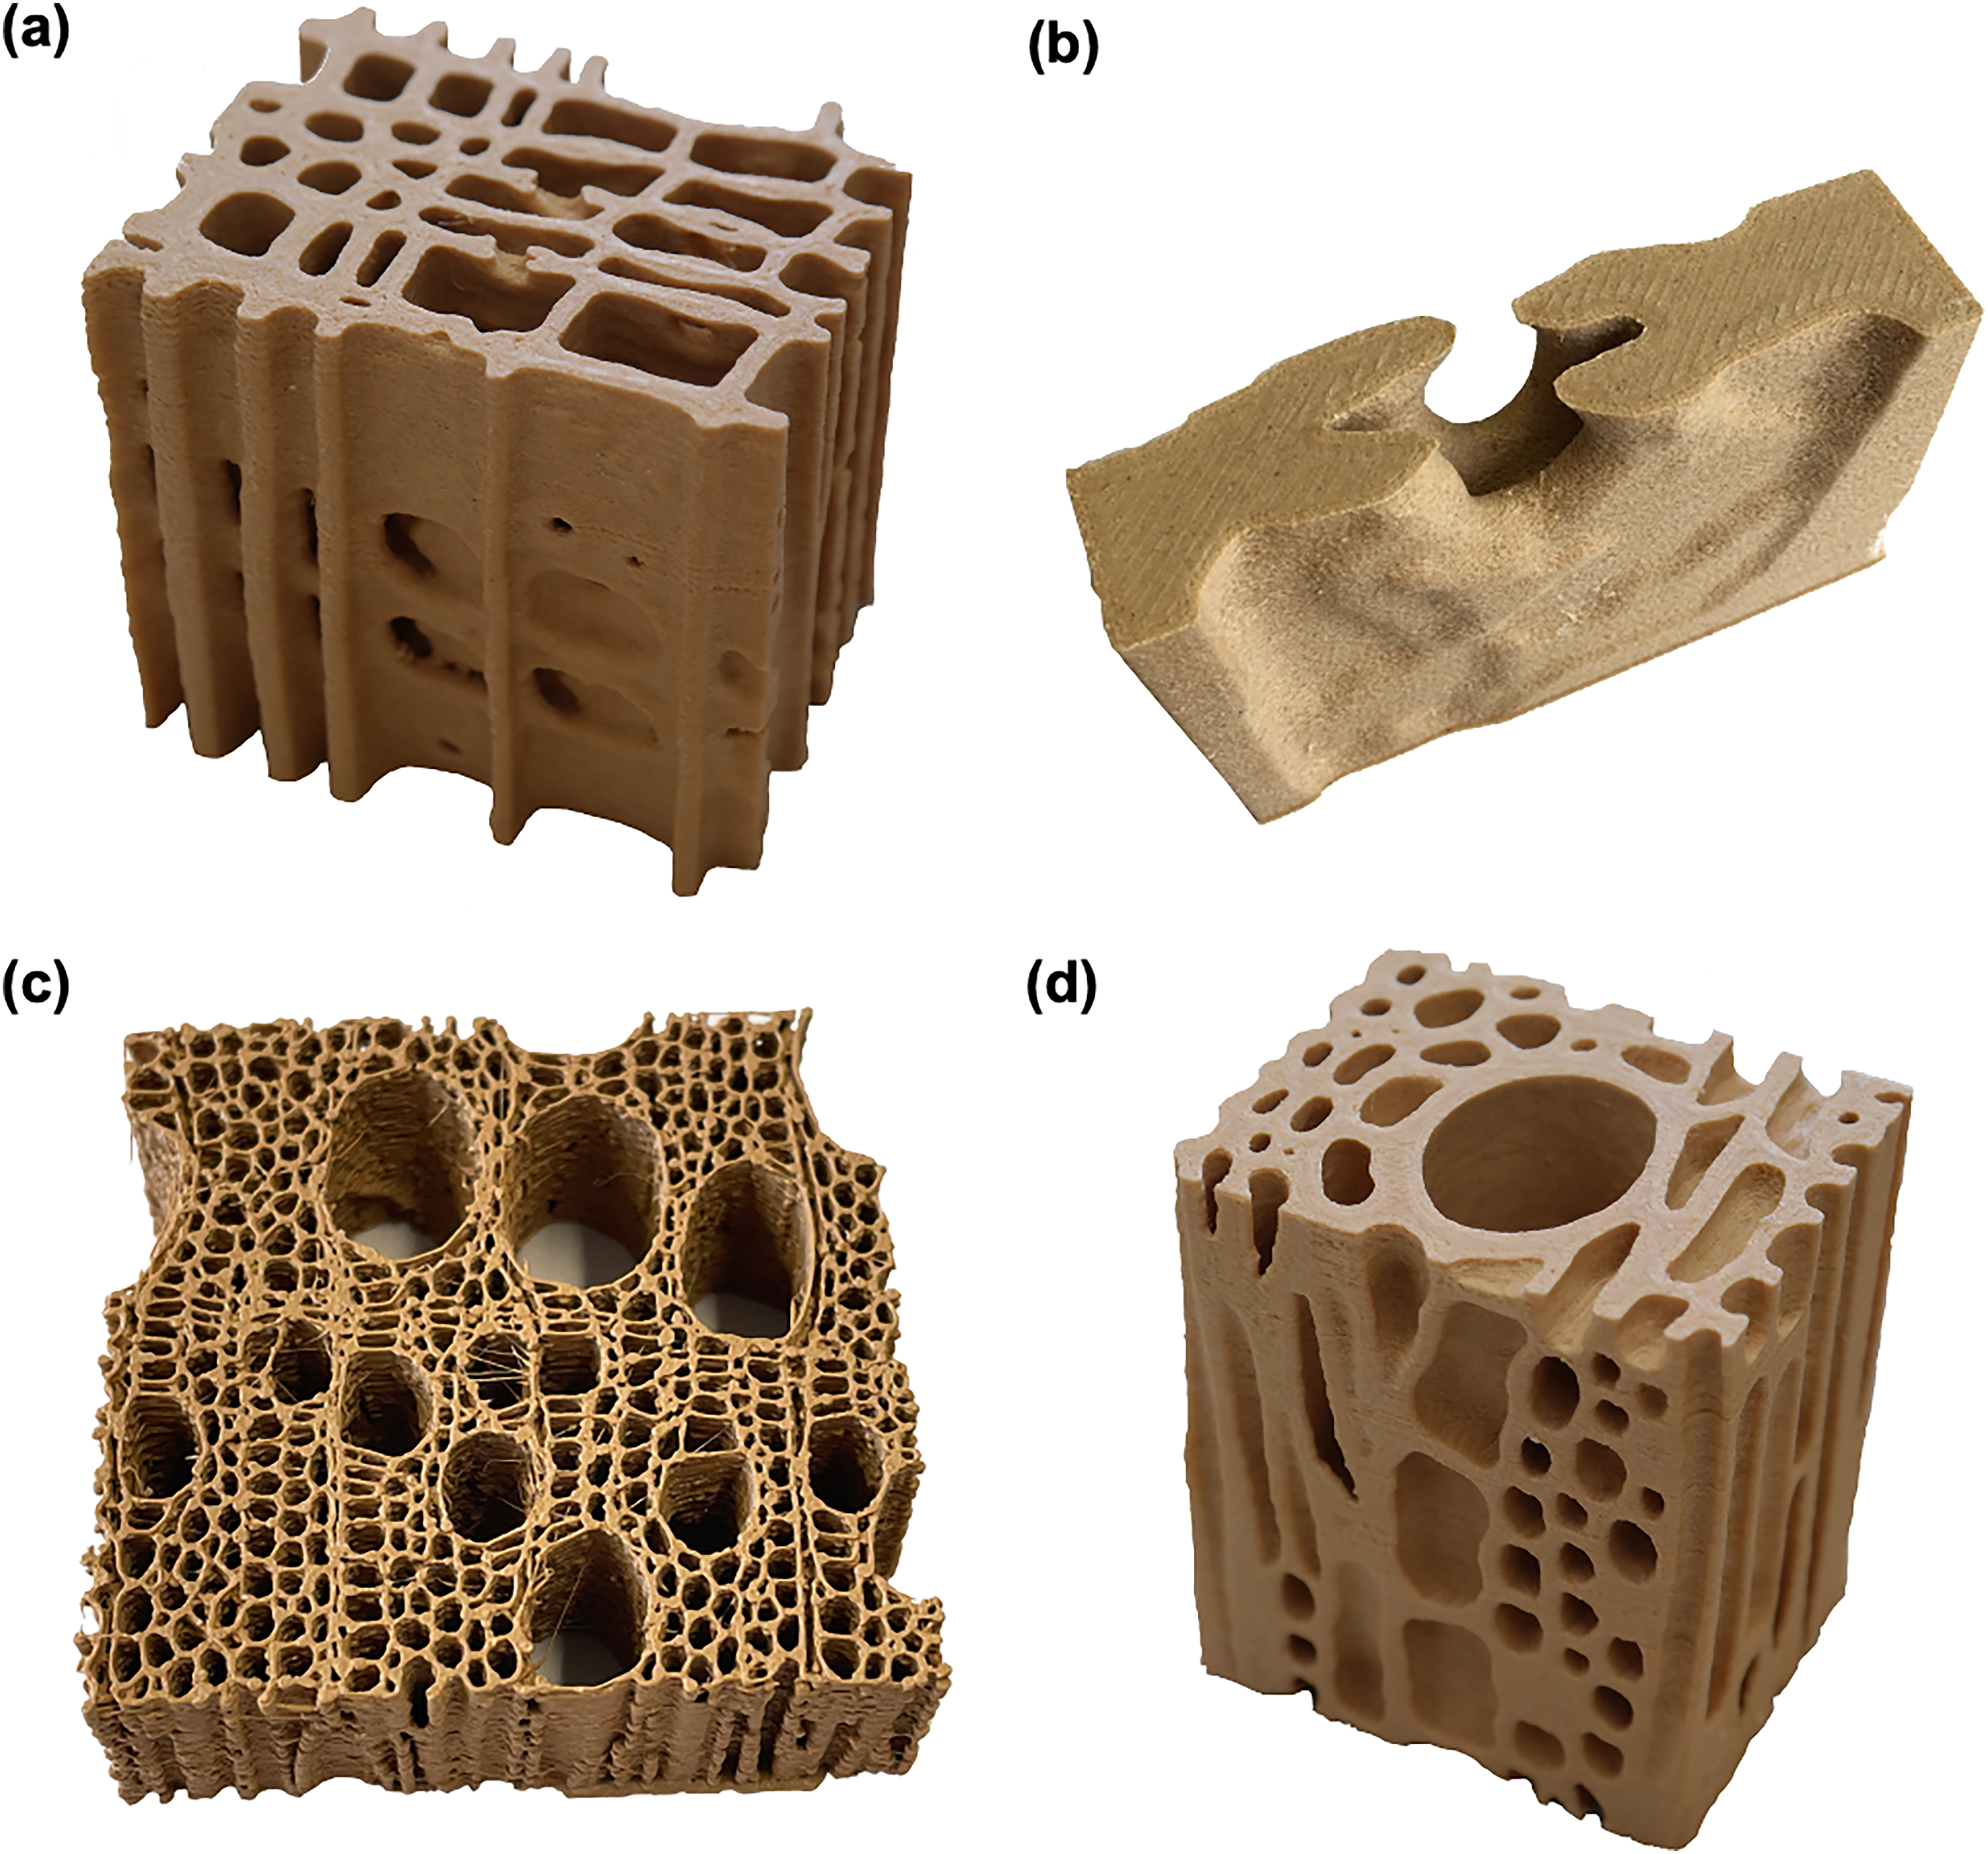
Examples of wood structures 3D printed with a wood-filled PLA filament.
One possible use of 3D prints in the classroom could be the parallel use with 3D models, embedded in presentation slides, of the same wood features. Lecturers can show and explain anatomical features in 3D, whereas students can use 3D prints to re-find and identify these features. Such interactive learning approaches can add important elements in teaching students as they will increase their attention span and help to strengthen what they have learned.
There is another underrated benefit of 3D tactile models. Students with visual impairments struggle to understand traditional teaching concepts in education because images, digital 3D models, and other visuals are not accessible to them. 3D models design tactile teaching aids accessible to visually impaired or blind students.33,34 By touching 3D-printed up-scaled wood features, they can learn the anatomical characteristics such as differences in cell sizes between earlywood and latewood at the growth-ring boundary (Figure 7). Concisely, 3D printing provides a tangible, wood-like teaching aid for understanding the complexity, variability, and three-dimensionality of the wood tissue and encourages active engagement with wood.
When printing complex shapes or ones with partially enclosed or internal cavities, polyvinyl alcohol (PVA) is highly recommended for working with a dual-core extruder. PVA is a highly moisture-sensitive material, thus, PVA can be used and easily removed by dissolving in warm water. That makes PVA a useful support structure material for 3D printing allowing the printing of all types of parts, no matter how complex the design. Standard supports using PLA (polylactic acid) may have been difficult to print, for partially enclosed cavities or protruding structures, or to remove in these situations. However, when the right printing parameters are set, 3D prints once produced can serve as a permanent visual aid for students in classrooms or labs. Thus, 3D printed models are a valuable add-on to regular teaching materials and might promote students’ interest and motivation to learn about wood anatomy.
Conclusion
This article suggests innovative approaches to make teaching and learning the wood anatomy more engaging. These approaches include the use of 3D images, 3D models, and 3D prints of anatomical wood features, obtained from micro-CT data. By incorporating digital and tactile 3D models into educational practice, students can explore the structural three-dimensionality and complexities of wood with unprecedented clarity and depth. This approach might herald a new era in teaching strategies to augment student motivation and comprehension. 3D visualization emphasizes the importance of adopting contemporary methods in higher education of wood structures and engaging students’ self-directed learning. However, for these emerging educational tools to ever make real inroads into face-to-face or virtual classrooms accessible 3D models are needed. Therefore, lecturers and researchers are encouraged to share their 3D models of wood features to provide 3D data for those who do not have access to costly 3D imaging technologies, such as micro-CT. Data can be made persistently available via online open-access data repositories, such as Figshare or Mendeley Data, allowing public access to data without barriers. To enable access to 3D models for 3D printing, for instance, six STL files of selected wood features, like those shown in Figures 2–3, are provided in the Supplementary Materials (Files S1–S6).
Supplemental Material
sj-stl-1-iwp-10.1177_20426445241302178 - Supplemental material for How to make teaching of wood anatomy more engaging with 3D data
Supplemental material, sj-stl-1-iwp-10.1177_20426445241302178 for How to make teaching of wood anatomy more engaging with 3D data by Tim Koddenberg in International Wood Products Journal
Supplemental Material
sj-stl-2-iwp-10.1177_20426445241302178 - Supplemental material for How to make teaching of wood anatomy more engaging with 3D data
Supplemental material, sj-stl-2-iwp-10.1177_20426445241302178 for How to make teaching of wood anatomy more engaging with 3D data by Tim Koddenberg in International Wood Products Journal
Supplemental Material
sj-stl-3-iwp-10.1177_20426445241302178 - Supplemental material for How to make teaching of wood anatomy more engaging with 3D data
Supplemental material, sj-stl-3-iwp-10.1177_20426445241302178 for How to make teaching of wood anatomy more engaging with 3D data by Tim Koddenberg in International Wood Products Journal
Supplemental Material
sj-stl-4-iwp-10.1177_20426445241302178 - Supplemental material for How to make teaching of wood anatomy more engaging with 3D data
Supplemental material, sj-stl-4-iwp-10.1177_20426445241302178 for How to make teaching of wood anatomy more engaging with 3D data by Tim Koddenberg in International Wood Products Journal
Supplemental Material
sj-stl-5-iwp-10.1177_20426445241302178 - Supplemental material for How to make teaching of wood anatomy more engaging with 3D data
Supplemental material, sj-stl-5-iwp-10.1177_20426445241302178 for How to make teaching of wood anatomy more engaging with 3D data by Tim Koddenberg in International Wood Products Journal
Supplemental Material
sj-stl-6-iwp-10.1177_20426445241302178 - Supplemental material for How to make teaching of wood anatomy more engaging with 3D data
Supplemental material, sj-stl-6-iwp-10.1177_20426445241302178 for How to make teaching of wood anatomy more engaging with 3D data by Tim Koddenberg in International Wood Products Journal
Footnotes
Acknowledgments
The author thanks Lea Bächle for her support with the micro-CT scanning of wood. Moreover, the author acknowledges discussing teaching strategies with Holger Militz and Marcus Cordier. The author acknowledges the support by the Open Access Publication Funds of the University of Göttingen.
Declaration of conflicting interests
The author declared no potential conflicts of interest with respect to the research, authorship, and/or publication of this article.
Funding
The authors disclosed receipt of the following financial support for the research, authorship, and/or publication of this article: This work was funded by the German Agency for Renewable Resources (FNR) under the Forest Climate Fund program (grant number: 2219WK25X5).Further financial support was granted by the German Research Foundation (grant number: 275616905).
Supplementary materials
A selection of 3D models of wood features is available in STL file format. It should be noted that the files may require processing before 3D printing. ![]() ). ROI size: 615 × 549 × 386 µm3 (L × R × T); 75 MB.
). ROI size: 615 × 549 × 386 µm3 (L × R × T); 75 MB.
References
Supplementary Material
Please find the following supplemental material available below.
For Open Access articles published under a Creative Commons License, all supplemental material carries the same license as the article it is associated with.
For non-Open Access articles published, all supplemental material carries a non-exclusive license, and permission requests for re-use of supplemental material or any part of supplemental material shall be sent directly to the copyright owner as specified in the copyright notice associated with the article.