
Abstract
Background:
The absence of external ear may be due to congenital, traumatic, or surgical causes. Many case reports only describe impression techniques to record details of the defect side and the natural ear. The purpose of this case report is to explain in detail simple clinical and laboratory procedures involved in fabrication of ear prosthesis.
Case Description and Methods:
The use of three-part mold helps in the application of pigmented silicone in specific areas. The use of direct adhesive fixation provides the best esthetic result and if properly used the most satisfactory form of treatment.
Findings and Outcomes:
The patient was satisfied with the life-like appearance of the prosthesis. The use of direct adhesive fixation gave the patient a sense of security and improved his confidence.
Conclusion:
The technique described is economical, and additional steps of implant placement are avoided. The esthetics of the prosthesis made by hand carved clay pattern provides good details.
Clinical relevance
The technique describes the method of direct adhesive fixation of the prosthesis giving it a life-like appearance. The confidence of the patient is also restored.
Background
Auricular defects occur secondary to congenital malformations, trauma, or removal of neoplasms. Complete congenital absence of the auricle (anotia) is rare. The usual deformity is a small, malformed lobule, which is called microtia. 1 Microtia is a developmental anomaly characterized by hypoplasia or aplasia of the pinna of the ear, associated with an impatent or absent external auditory meatus. 2 There are different modalities for proper management of these patients. These include no surgical treatment, rib graft ear reconstruction, prosthetic ear, and psychological counseling.
A maxillofacial prosthodontist must cope with not only the difficulty of constructing an acceptable and esthetic prosthesis but also the psychological reaction of the patient and the public. 3 Literature is replete with various techniques describing the impression technique of the natural and the defective ear. The purpose of this article is to describe simple clinical and laboratory procedures involved in the rehabilitation of auricular defect by prosthetic means. All steps of impression making, clay pattern, three-part mold, placement of silicone color swatches, and finally securing the prosthesis with the adhesive are described.
Case Description and Methods
A 33 year-old male patient reported to the Department of Prosthodontics with the chief complaint of poor esthetics due to the congenital absence of the right ear. The patient gave the history of an unsuccessful past surgical attempt and was apprehensive of any surgical intervention including the option of implant-retained prosthesis. It was determined that the patient would be best served with a removable auricular prosthesis and the patient’s informed consent was taken for the same. The treatment protocol was approved by the institutional ethical committee.
Procedure
Making of the impressions4–6
Before commencing with this type of impression, marks were made with an indelible pencil in the defect area, so as to allow correct alignment of the prosthesis with the natural ear. These marks were the junction of the helix with the side of the head and the junction of lobe with the side of the head. Patient was prepared with towels and was positioned on his side to allow full access to the area. Thin plastic containers were used to define and contain the impressions.
Before pouring the alginate impression material (Tropicalgin; Zhermack, Badia Polesine, Rovigo, Italy), Vaseline was applied over the area of impression and the external auditory canal was blanked off with petroleum jelly-coated cotton wool with a string tied to it. Alginate mixed to fluid consistency was then poured. Bent paper clips were inserted before setting so as to have retention with plaster backing. Model plaster (Type II; Dentex Prevest Denpro Ltd, Jammu, India) was then poured over the alginate.
After setting, the patient was asked to wrinkle his skin and the impression was slowly removed, keeping in mind the angle of undercuts. The impression obtained was then boxed with modeling wax and Hydrocal ((Type III dental stone) Kalstone; Kalabhai, Mumbai, India) was poured into it. Master cast of the defect side was retrieved once the stone was set.
To enable a good carving to be made, an impression of the existing natural ear was taken. The same procedure was repeated here, except that the back part of the helix was poured first, so as to provide support for the helix when the full amount of alginate would be added to obtain a two-piece impression (Figure 1(a)). Hydrocal (Type III dental stone) was then poured to obtain the master cast of the natural ear (Figure 1(b)).
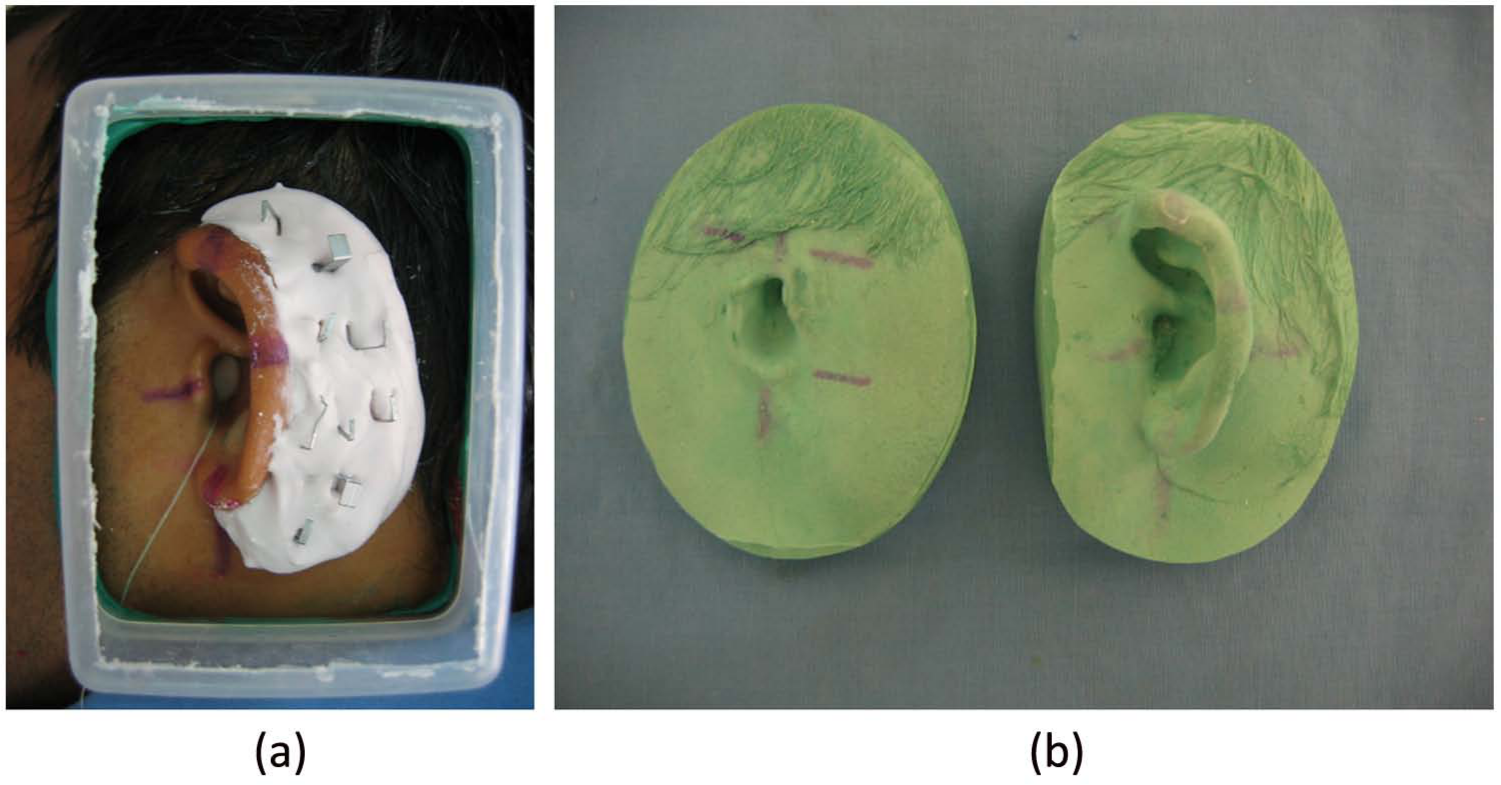
(a) Preparation for two-piece impression and (b) master casts of defect and normal side.
Clay pattern1,6
While carving the clay pattern, the operator should keep in mind the anatomic structure of the ear, taking the remaining ear as a guide. A simple technique by Lemon et al. 7 was followed for sculpting the clay pattern. A transparency copy of the contralateral anatomical part was made and was placed in the reverse side over the working cast to guide in sculpting the clay pattern. Tin foil was molded on the defective ear area of the master cast, and small strips of modeling clay were added one upon the other until the height and the contour of the helix matched those of the natural ear. Then small pieces of clay were added to complete the pattern. After final shaping, the clay was characterized and smoothened.
Try-on of the clay pattern 4
The fit of the prosthesis on the tissue was checked at the try-on stage with the clay pattern. Care was taken to correctly align it horizontally with the natural ear. The projection of the ear in relation to the side of the head and integrity of the margins during simple jaw movements was also checked.
Construction of the stone molds 4
The clay pattern was then sealed to the model and the leading edge thinned as much as possible so as to allow the silicone edges to feather into the natural skin. A three-part mold was used to achieve easy placement of the silicone. The model was embedded in the plaster up to the leading edge. Locations were cut in the helix area of the mold to allow the second piece of the mold around the helix to locate accurately. A coat of Vaseline was applied over the plaster for easy separation. The helix undercut was poured in Hydrocal (Type III dental stone). When pouring the section, care was taken to finish the plaster, so that the flashline is on the undercut side of the helix, thus making it less apparent. After setting, grooves were cut to allow location with the top half of the mold (Figure 2(a)). The mold was again coated with Vaseline and the clay pattern was fully invested with stone. When set, the clay pattern was removed leaving a three-part mold (Figure 2(b)).
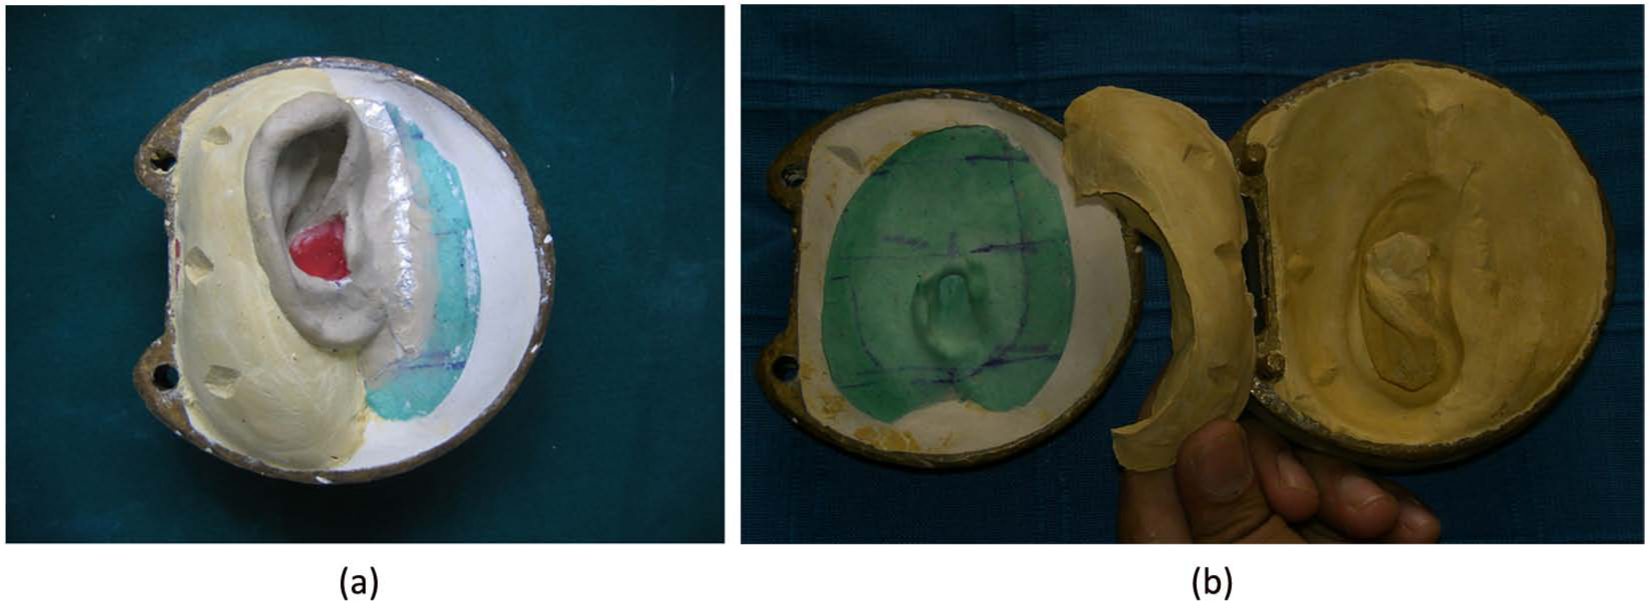
(a) Preparation for three-part stone mold and (b) three-part stone mold.
Color matching 4
Medical grade silicone (MP Sai Enterprise, Mumbai, India) was used for the prosthesis. The colors used were the dry pigments: red, white, yellow, light brown, dark brown. Color matching was done in artificial light as the patient used to spend most of his time indoors. Base skin shade was developed into a shade guide for the material to be used. The base shade selected for the patient should be slightly lighter than the lightest skin tones of the patient, because as the color is added the prosthesis will darken (Figure 3(a)). Different color swatches were made by adding color to the base color and were introduced gradually into the mold and then base shade was introduced to fill the mold (Figure 3(b) and (c)). The mold was allowed to cure for 24 h at room temperature. After curing, the prosthesis was carefully removed from the mold and any flash, if present, was removed. Final removal of the flash can be achieved by trimming with a fine tooth metal bur.
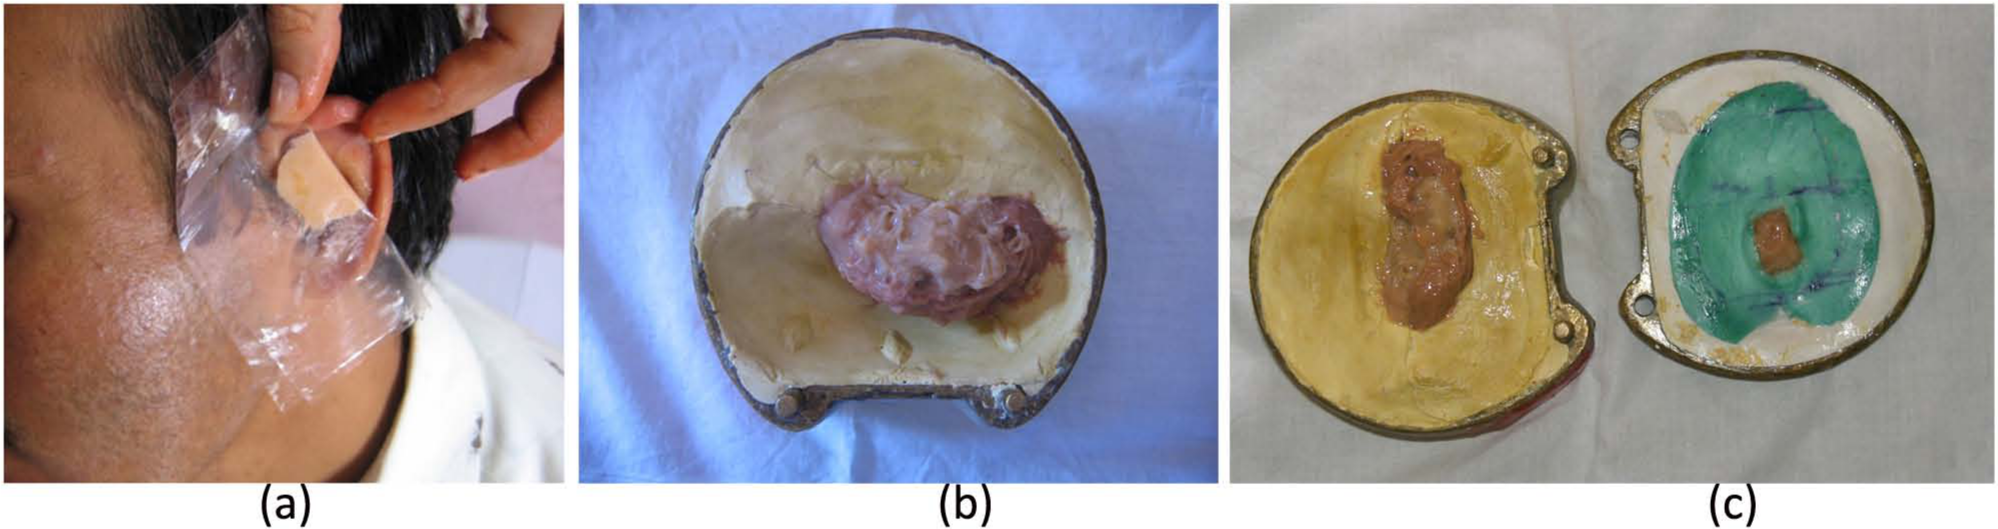
(a) Base shade selection and (b and c) different color swatches being packed in specific area.
Adhesion and fixation4,6
Adhesive (removable) (Shreecryl SS-505; Shree Vinayak Organics (I) Pvt Ltd, Mumbai, India) was applied on the tissue side of the prosthesis. It was then secured on the defect side and care was taken to align it according to the normal ear (Figure 4(a) and (b)). Two layers of adhesive were applied and it was held in place for 5 min. Instructions were given for the care and removal of the prosthesis.
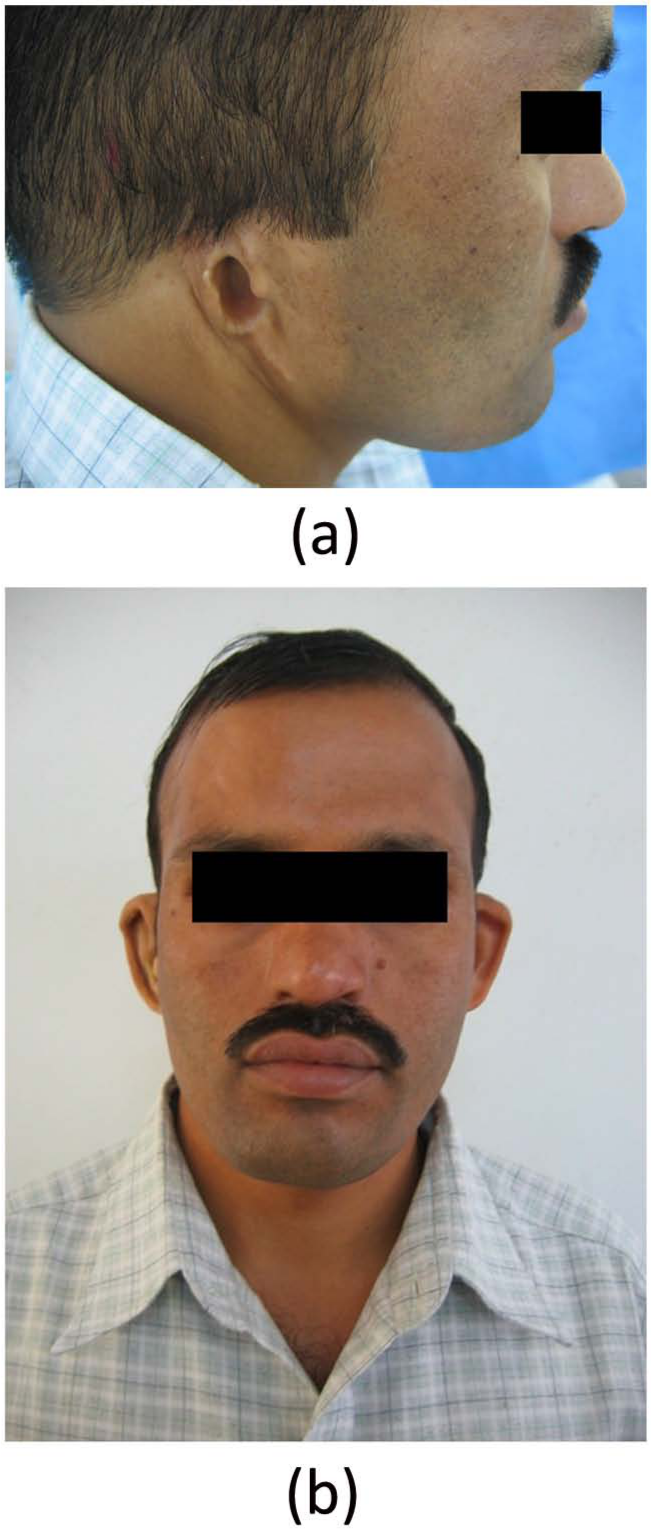
Defect side (a) before prosthetic rehabilitation and (b) after prosthetic ear fixation with adhesive.
The patient and his family members were satisfied with the results. The appearance and the esthetic appeal of the prosthesis gave the patient the confidence to wear it in public. The patient was advised to keep long sidelocks so as to camouflage the borders of the prosthesis.
Findings and Outcomes
Maxillofacial prosthesis can be made with conventional methods and advanced techniques such as computer-aided design (CAD), computer-aided manufacturing (CAM), and rapid prototyping (RP). Limitations to the use of advanced technologies include high cost of the equipment, complicated machinery, and reliance on special expertise to run the machinery during production. 8 This case report describes steps in fabrication of the ear prosthesis by the conventional method. Literature describes different techniques for making impression of the ear. The impression of the defect side should be accurate, as the fit of the prosthesis depends on it. In addition, the impression of the normal ear is equally important as it serves as a guide to construct a pattern. The making of impression of the normal ear is difficult as the helix may get distorted under the weight of the impression material. Therefore, a modified impression technique was used, which combined the advantages of techniques used by Kubon et al. 9 and Mathews et al. 10
If preoperative casts are not available, the prosthesis can be sculpted from the beginning (wax or clay) or by the donor technique. Wax pattern of the mirror image can be obtained from the ear bank or by impression from a donor. 1 This is comparatively easy as not much alteration is needed at the try-on stage. When it is not available, it has to be carved from clay. Since better sculpting can be achieved with clay, it was used in the case described. A simple technique of using a transparency for producing a mirror image as described by Lemon et al. 7 was used. This technique duplicates the defect side as that of normal ear and its relationship to the surrounding ear. A three-part mold is necessary to achieve easy placement of the silicone.
In our case, dry color pigments were intrinsically used for the ear prosthesis. Intrinsic coloration is better than extrinsic coloration as it makes the prosthesis less susceptible to environmental changes and provides better handling. According to studies by Leow et al., 11 coloring pigments are known to undergo discoloration after some time due to exposure to ultraviolet light, elevated temperatures, and sweat. The patient was informed regarding the weathering of the prosthesis and was advised for refabrication of the prosthesis when required.
The retention of the prosthesis is done in various ways. The best and the most reliable method of fixation is bone anchorage using implants. 12 Since the patient did not agree for any kind of surgical intervention, medical adhesives were used in this case. The use of direct adhesive fixation provides a good esthetic result in a noninvasive manner. Moreover, if it is used properly, it provides the most satisfactory form of treatment.
Conclusion
The gross loss or the absence of an ear may be corrected by prosthetic means. The advantages and disadvantages should be explained to the patient. A simple step-by-step technique of constructing an artificial silicone prosthetic ear is described. This is less costly and less time-consuming as compared to the advanced techniques, which require additional steps of implant placement. The various medical disciplines should be made aware of the improved materials and methods in maxillofacial prosthetics, and the public should be informed about the availability of this type of service in most hospitals and rehabilitation centers.
Footnotes
Conflict of interest
None declared.
Funding
This research received no specific grant from any funding agency in the public, commercial, or not-for-profit sectors.