
Abstract
Bite turbos are a relatively new but widespread fabrication used in a variety of orthodontic cases. Bite turbos placed on lingual surfaces of upper incisors help disclude the posterior teeth and open the bite. This report describes a simple, effective, and economical technique to fabricate resin composite bite turbos. This method does not require laboratory procedures and can be manufactured using materials that are usually available in a regular dental practice.
Keywords
Introduction
Bite turbos, bite ramps, or bite planes are descriptive terms for blocks placed on the teeth to open the bite. Although the originof these names is unknown, bite turbos open the bite immediately and effectively after application. 1 Bite turbos are used when malocclusion causes the maxillary incisors to overlap the lower incisors completely, making it difficult to bond mandibular anterior brackets at the commencement of the treatment. 2 Bite turbos can be either anterior or posterior. Anterior bite turbos are used in deep bite and anterior crossbite cases, while posterior bite turbos are used in open bite and posterior crossbite cases. 3 Anterior bite planes are used in class II, division I and II patients to correct deep bites with moderate overjet. 4 They are commonly used by orthodontists to prevent heavy occlusal contact with lower braces in patients with deep bite. 5
Bite turbos are placed on the lingual surfaces of anterior teeth to help disclude posterior teeth. 3 The palatine surface of the upper central incisors is the most common place to bond anterior bite turbos. Although bite turbos can be bonded on the upper lateral incisors, in rare cases, this can be traumatic for these teeth, given their low root/crown ratio, which is usually not compatible with enduring such high force from the occlusion. However, the lateral incisors are still considered an alternative place if the patient exhibits difficulties in speech when the bite turbos are placed on the central incisors. 3
Initially, bite planes were removable. As far back as 1771, Hunter created a removable inclined bite plane on the lower anterior teeth. 6 Then, in 1803, Fox made a posterior bite plane by placing blocks of acryl on the posterior teeth. 6 However, there were numerous disadvantages in removable bite planes, such as mucosa irritation and complete dependency on patient cooperation. 7
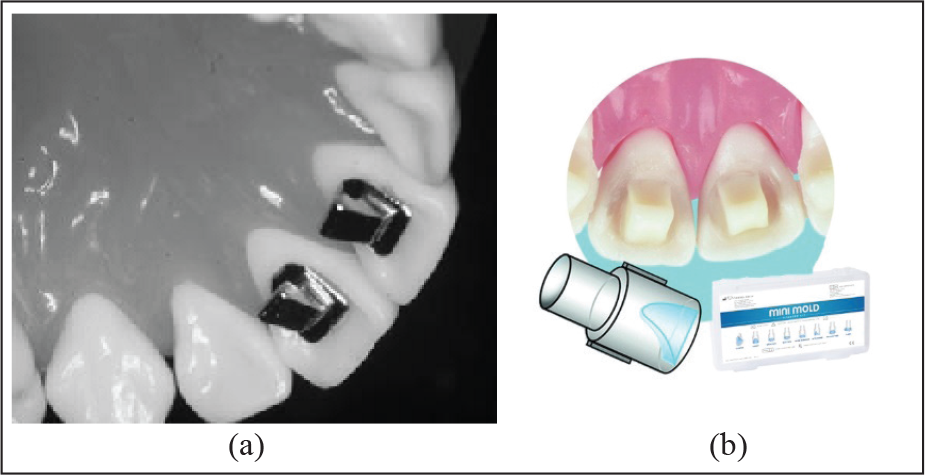
To address the above mentioned drawbacks, in 1944, Mayes made a fixed metal bite turbo for the Ormco company as an alternative to the removable acrylic bite plane, through a simple modification of the lingual bracket. 1 Metal turbos had better muscle deprogramming characteristics than the acrylic bite plane and became widely used because of their simplicity, solidity, and compatibility with oral hygiene procedures. On the other hand, a major shortcoming of these devices was the difficulty of application that stemmed from the anatomical contrast in the palatal surfaces of the teeth (Figure 1a). 8
(a) Metal Bite Turbos. (b) Mini-Mold Bite Turbos.
The development of resin materials, alongside the setbacks of metal turbos, encouraged the incorporation of resin material into the production of bite turbos.
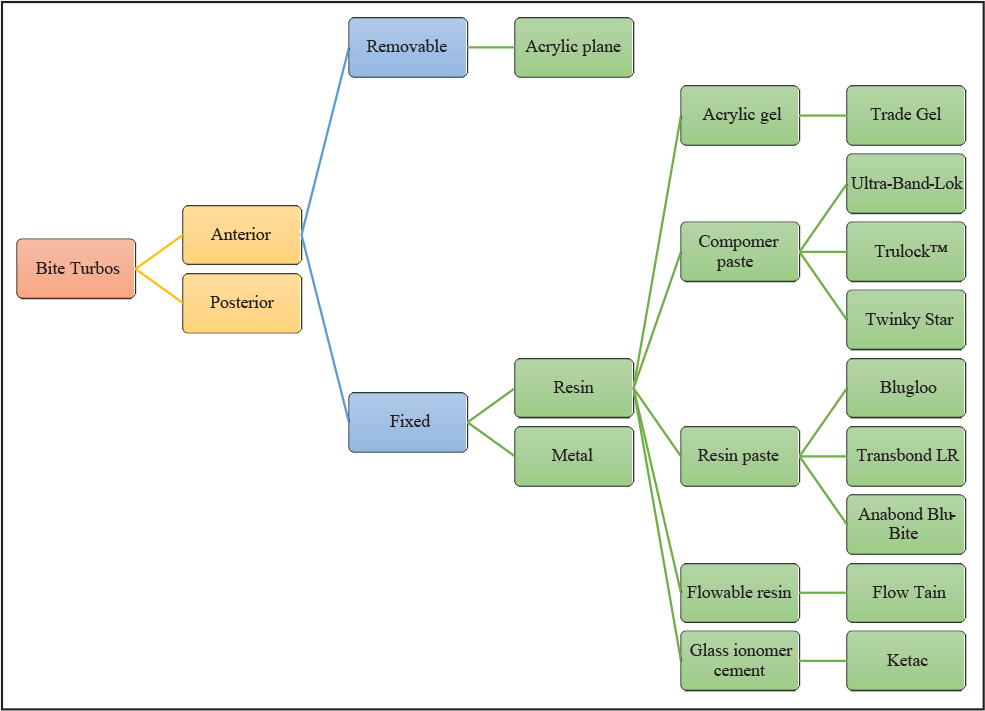
One of these materials still used today is the Trade Gel developed by the Dentsply Sirona Company, which consists of an acrylic gel used in making a bite plate and modifying cast. Ultra-Band-Lok from Reliance Orthodontics and Trulock™ from Rocky Mountain are also used in the production of bite turbos,and these are compomer pastes used as a cement to an adhesive band. These materials are characterized by their ability to bond to metal and release fluoride, as they contain glass ionomer. Their only limitation is the availability of only one color, blue, which causes a blue shadow when applied. Twinky Star from VOCO is a compomer paste used for fillings in deciduous teeth. Resin pastes used to open the bite include Blugloo from Ormco, used in bracket bonding, and the 3M Unitek Transbond LR, which is used to bond lingual retainers. Both these materials have the significant drawback of causing abrasion of opposing teeth. Flow Tain is a flowable resin from Reliance Orthodontics used to bond lingual retainers, but it also has the disadvantage of opposing teeth wear. Ketac™ from 3M Unitek is a resin modified glass ionomer (RMGI) used for teeth restorations, but it has the disadvantage of being difficult to remove. Finally, Anabond Blue-Bite from Anabond-Stedman is a light cure radiopaque composite used for posterior bite raising in orthodontic treatment (Figure 2). 3
Flowchart Summarizing the Types of Bite Turbos and Their Component Materials.
To facilitate the application of resin bite turbos, mini-mold bite ramp techniques were created as a guide for bite turbos fabrication. The kit contains a mini-mold holder and silicone molds. The length of the bite turbos is either 8. 4 mm for Dentaurum or 3. 0 and 5. 0 mm using the Ortho Technology (Figure 1b). After etching the tooth surface with phosphoric acid and applying bond and light cure, composite resin or any materials used to fabricate the bite turbos are put into the mini-mold holder and positioned on the prepared tooth surface, then light cured.
G&H Orthodontics created Bite-Bumpers™ to open deep bites. The Bite-Bumpers™ eliminate the problem of bond failures in mandibular anterior brackets at the beginning of orthodontic treatment.
Description of the Proposed Technique
Direct injection of resin material through a syringe is an inappropriate method of installing bite turbos, as the thickness of the material cannot be controlled appropriately. Bite turbos can be made using prefabricated mini-molds mounted on a holder. Although the mini-mold technique is both effective and simple, there are some associated limitations, such as the requirement for ready availability in the clinic and the relatively high cost. The price of the kit is US$74. 70 for 8 pieces of bite mold and a mold holder (Ortho Technology Company).
In this report, the author describes a simple procedure for fabricating not only mini-molds but also their holder at a lower cost using materials which are usually found in the clinic (bond brush holder, acrylic tooth, and disc separator) and at home (silicone gun). Therefore, this technique is simpler, less expensive, and requires no laboratory procedures. Moreover, using this method, up to 8 bite turbos can be made in no more than 10 to 15 min.
The technique was performed through the following steps:
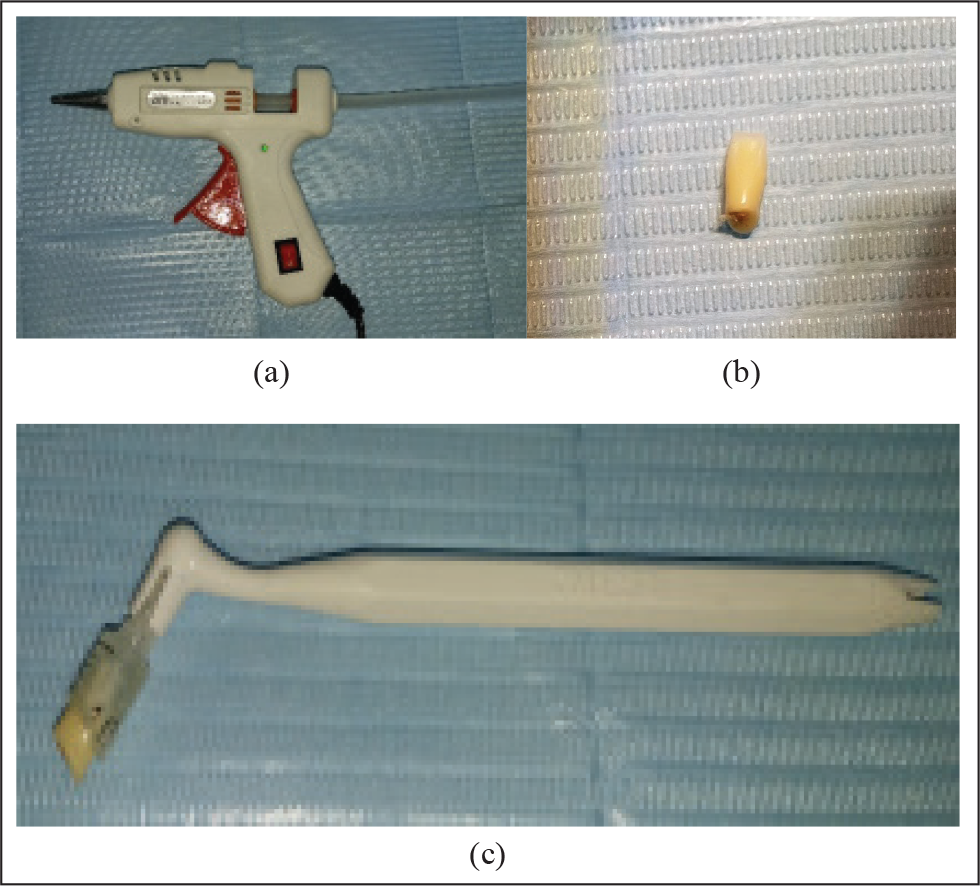
A separator disc was used to cut 10 mm of a plastic insulin syringe at an angle of 120 degrees. The syringe was cut at this angle to make the bite block compatible with the palatal surface of the upper incisors, and, as importantly, to convert shear forces from occlusion into compression forces that would produce intrusion and labial tipping of the upper incisors. This triggers natural physiological bone absorption around the upper and lower incisors, and the teeth will be intruded safely (this force is equivalent or less than 100 mg each time the patient swallows; Figure 3). 9
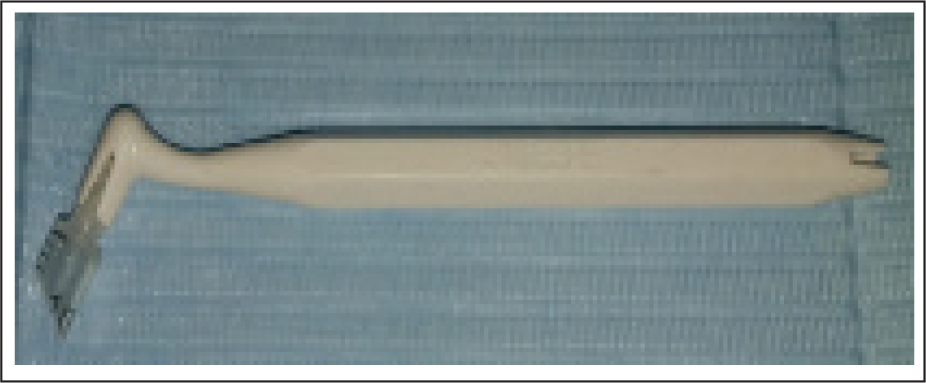
The plastic piece separated from the insulin syringe was then adjusted using a tungsten carbide bur to fit in the bond brush holder that is used as a mold holder (Figure 4).
To fabricate the mold, an acrylic tooth or metal bite block is used (an acrylic tooth is used in this study). The purpose of using an acrylic tooth is that it has two surfaces, flat surfaces and titled surfaces, which imitate the shape of bite block fabricated by mold technique. Mesial and distal aspects of the acrylic tooth are reduced so that it can fit in the syringe separated piece. A mark is made on the buccal aspect of the acrylic tooth to know its direction, then the acrylic tooth is insulated with liquid soup.
Light silicone is used to take an impression of the acrylic tooth into the syringe separated piece to get a mold. To do so, the inner surface of the syringe piece was coarsened using a tungsten carbide bur on a high-speed handpiece, then the light silicone was injected using hot glue silicone gun into the syringe piece, and after insulating the acrylic tooth and before the silicone finished setting, the acrylic tooth was put in the injected silicone as an impression material. After the silicone finished setting, the acrylic tooth was removed from it. The result is getting the syringe separated piece with an impression of the acrylic tooth in it (the tooth considered as a mold for this technique). To ensure the silicone does not detach from the syringe piece, the following was done:
A—the inner surface of the syringe piece was coarsened using a tungsten carbide bur.
B—the acrylic tooth was insulated with liquid soap to facilitate its removal from set silicone (Figure 5).
Excess silicone was removed using a blade, then the flat surface was marked into the inner aspect of the silicone impression (which corresponds to the flat surface of the acrylic tooth). The goal was to directit toward the occlusion plane when the mold is applied on the lingual surfaces of upper incisors.
(a) Cutting 10 mm From the Syringe With the Separator Disc, (b) Bite Turbo Mold.
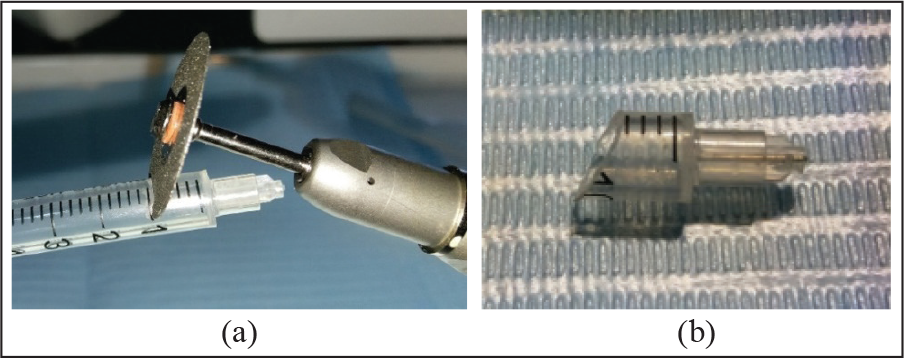
Bond Brush Holder With Syringe Piece.
(a) An Electric Silicone Gun, (b) Acrylic Tooth, (c) a Bond Brush Holder With the Acrylic Tooth Placed in the Plastic Syringe Piece.
In the Orthodontic Model
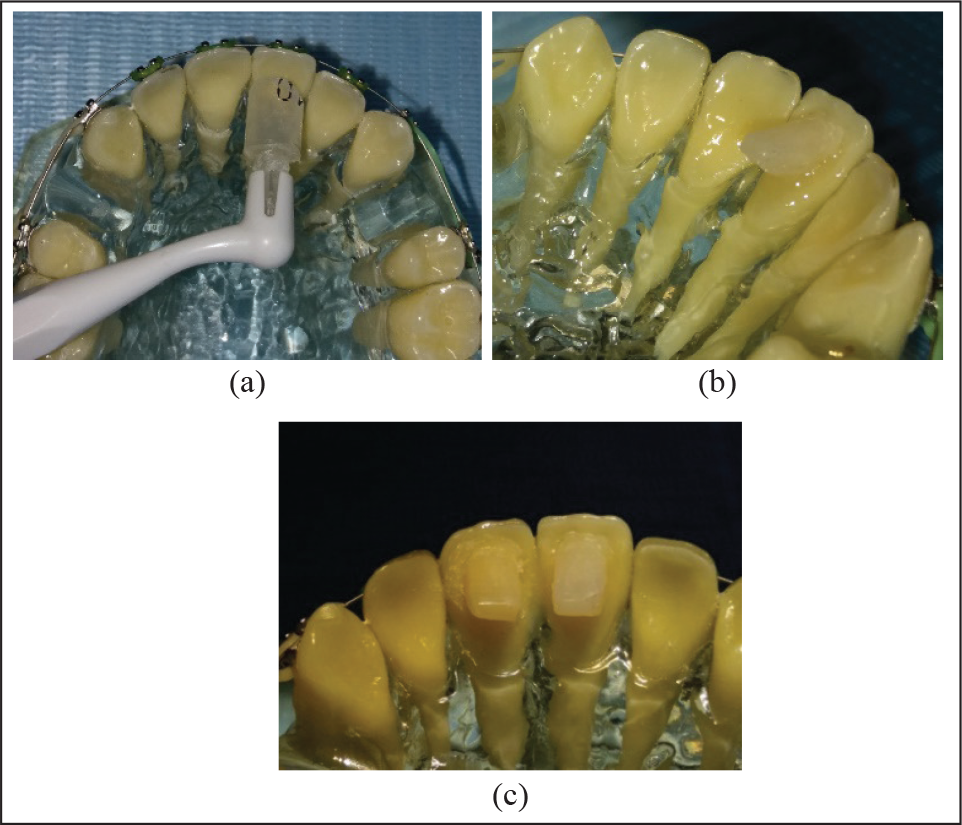
First, 5-mm bite turbos were applied to an orthodontic model after etching the palatine surface using phosphoric acid 37%, for 15 s, followed by washing and drying. Then, bond (3M™ Transbond™ XT Primer) was applied, and light cured for 10 s. Afterwards, composite resin (3M™ Transbond™ XT Light Cure Paste Adhesive) was applied inside the silicone mold and positioned in the location, and light cured for 10 s from all sides to produce the completed 5-mm bite ramps (Figure 6).
(a,b, and c) Applying Bite Turbos to An Orthodontic Model.
In the Clinic
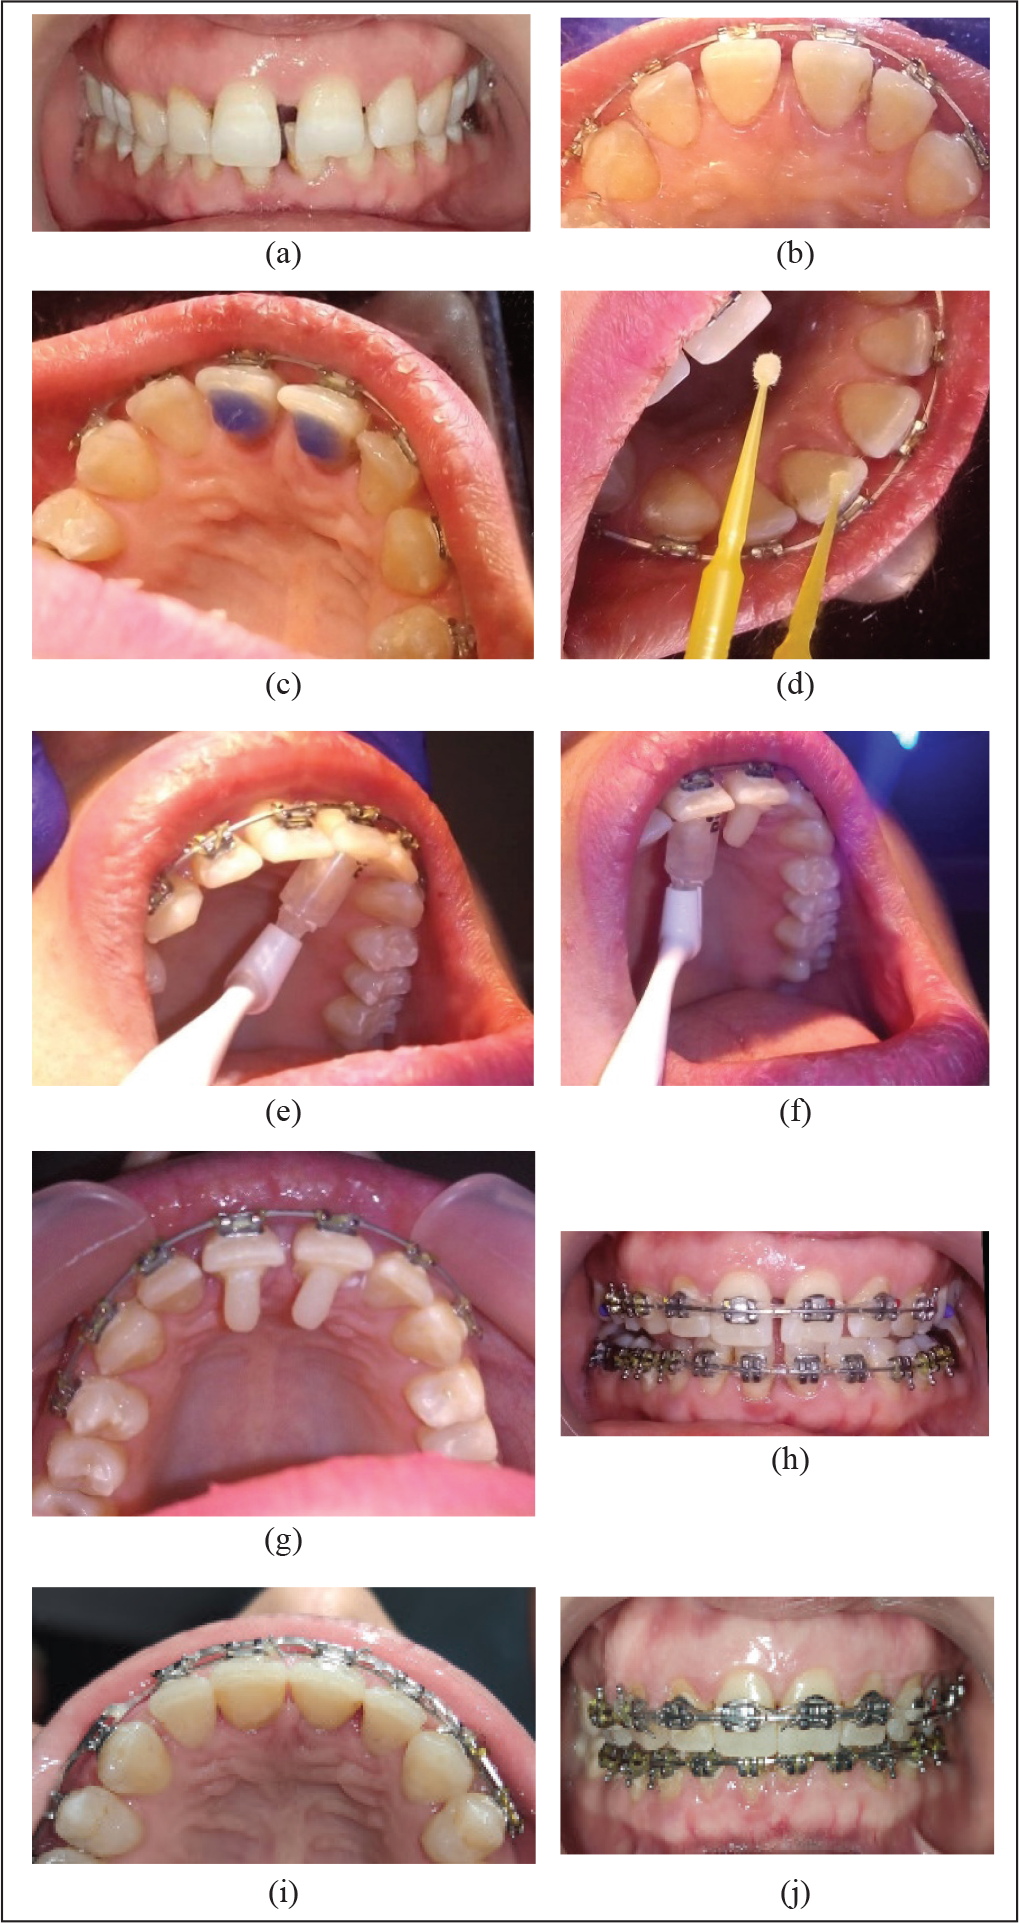
The bite turbos were applied to a patient with a deep bite, hence,the upper and lower brackets could not be bonded at the beginning of the treatment (Figure 7a, b). Similarly, to the above laboratory trial, the palatal surface of the upper incisors was etched with phosphoric acid 37% for 15 s (Figure 7c), followed by washing, drying, bond application (3M™ Transbond™ XT Primer), and light curing for 10 s (Figure 7d). Composite resin (3M™ Transbond™ XT Light Cure Paste Adhesive) was applied into the silicone mold (bite ramps 8. 4 mm in length), and then it was positioned on the palatal surfaces of the upper central incisors and light cured for 10 s from all sides (Figure 7e to g). The immediate observation of the bite turbo application was a considerable decrease of overbite, accompanied by an immediate opening of the bite (Figure 7h). The occlusal view illustrates the removal of the bite turbo after 5 months of application (Figure 7i). The anterior view shows the amount of bite discrepancy after the bite turbo was removed (Figure 7j).
Clinical Stages of Applying the Bite Turbos.
Discussion
Class II patients are usually characterized by having a deep bite and an increased curve of Spee, which can be caused by extrusion of the lower incisors and the second molars. When this is the case, appropriate correction of the deep bite requires leveling of the curve of Spee by extruding the premolars and the lower first molars, in addition to intruding of the incisors, canines, and lower second molars. 3
Bite planes are to be used at the beginning of the treatment in order to open the bite and enable the orthodontist to bond lower anterior brackets with little concern about recurrent breakage of those braces. Removable appliances with an anterior bite plane can help correct deep bite by extrusion of the posterior dentoalveolar segment and intrusion of the lower anterior teeth. 10 When the patient occludes on the lower anterior bite plane, the thickness of the acrylic can prevent the lower anterior teeth from making contact with the upper incisors, thus creating a posterior space into which the posterior segments could extrude. This process continues until the posterior teeth reach the new plane and correct the deep bite. 6 Resin turbos are either applied using a bond brush or directly from a syringe on the tooth surface. Although both of these methods are simple, they have many limitations, the foremost of which would be the inappropriateness of applying the resin material directly on the teeth without proper measurement of the applied amount. This would create uneven masses of resin on the teeth, thus putting those teeth under different amounts of occlusal force. The mini-mold bite ramps technique, on the other hand, tackles all of the previous problems with its precise placement of adequate, identical, and well-formed bite turbos. Yet, it has associated problems, such as its limited availability in some countries, and its relatively high price.
This 10-mm length was chosen because there are two options for bite turbo length: (a) 8. 4 mm for Dentaurum, (b) either 3. 0 or 5. 0 mm for Ortho Technology. The thickness of the silicone injected into the syringe piece would be from 1. 5 mm to 2 mm, and thus, the bite turbo height obtained within the syringe piece would be from 8 mm to 8. 5 mm. The 10-mm plastic syringe piece becomes identical to the original design in terms of length; thus, the bite turbos can be shortened by a coarse diamond burr until the desired length is achieved. The reason for the difference in lengths between the two companies is that Ortho Technology uses a length of 3 mm when the protrusion is normal, and thus, the goal is either to prevent the breakage of the lower front braces or to open the bite by extrusion of the posterior teeth, while in cases of large protrusion, a length of 5 mm is used in order for the turbo to come into contact with the lower incisor,as with the smaller length there will be no contact. Meanwhile, with Dentaurum, a length of 8. 4 mm is used, which can be shortened to suit each case.
Applying bite planes is a vital part of treatment in cases such as deep bites and anterior crossbites. While removable bite planes are usually a good choice, their major drawback is their dependency on patient compliance. Bite turbos are fixed attachments that work effectively as bite planes opening the bite during treatment, which can be bought ready-made or fabricated using pieces of equipment such as the mini-molds. The drawback here would be that both premanufactured bite turbos and the original molds can be unavailable or unaffordable in some countries. In this report, the author presented an easy method to fabricate a simple, efficient, and, most importantly, economical substitute for the original mini-mold kit, comprising mold and holder, using materials that are usually available within a regular dental practice.
Footnotes
Statement of Informed Consent
Informed consent was not sought for the present study because no identifiable images were used
Declaration of Conflicting Interests
Funding
The authors received no financial support for the research, authorship, and/or publication of this article.