
Abstract

The role of an O&M specialist is essential to provide professional training and recommendations to promote safe, independent street crossings for people who are blind or have low vision. The outlined strategies in this Practice Perspective are a novel approach to teaching crossing strategies to individuals with visual impairments in a sequential manner to allow them to generalize the strategies across multiple intersections, when controlled by S
Street crossing fundamentals can be performed both indoors and outdoors. As demonstrated with virtual reality training, there are several advantages to teaching O&M skills indoors, such as more concentration on the tasks, less risk for injury, fewer time constraints, and better repeatability (Lahav & Mioduser, 2000; Lahav et al., 2012, 2015a, 2015b; Schloerb et al., 2010). In addition, there are several training kits available that assist learners who are blind to conceptualize the layouts of streets, sidewalks, vehicles, and other elements that are often present at intersections (Edman, 1992; Steele, 2015). These strategies can be used with any modifiable tactile training kit, such as the Picture Maker Wheatley Tactile Diagramming Kit, sold by the American Printing House for the Blind, and could be applied to learners with either low vision or blindness.
Tactile maps, kits, and models have been shown to enhance spatial learning and cognition (Almeida et al., 2015; Bleau et al., 2023; Ungar et al., 1998), judge distances (Ottink et al., 2022; Ungar et al., 1997), and develop spatial concepts (Pogrund et al., 2012; Wiener et al., 2010). However, there is little focus on teaching learners using tactile maps for the purpose of improving safety outcomes. To my knowledge, the article presented here is the only one to outline how to use tactile maps to teach risk analysis to people with visual impairments for crossing streets.
Using tactile maps for risk analysis involves more than exploration of tactile maps; it also involves the understanding of potential consequences associated with decisions made by the traveler. Thus, these strategies should not be applied too early in training and are more advantageous to learners who have experience using tactile maps or kits. Also, it is preferred that the learners have minimally been accompanied by others during actual street crossings outdoors. This instruction may be integrated into the educational curriculum of a child when they are learning the concepts at intersections to appreciate and understand the risks associated with crossings. Alternatively, it may be used with an adult to assess their current understanding of intersections and the associated risks of crossings, considering the modernization of intersections. These strategies may be performed either (a) before beginning independent street crossing lessons, (b) when recognizing gaps in knowledge in risk analysis (e.g., during the O&M assessment), or (c) to generalize risk analysis across different intersections.
Conceptualization of the Intersection and Signalization
Before analyzing the risks associated with specific crossings, it is important for the O&M specialist to validate the learner's understanding of intersections. The amount of time required for this procedure varies considerably, based on the learner's prior knowledge, learning ability, capacity for abstraction, and prior visual and travel experiences. This procedure may be incorporated into a risk analysis lesson, depending on the learner's abilities. This lesson should be conducted in a quiet, indoor setting. It is not necessary that the intersections being taught mirror those where the O&M lessons will be conducted, although it may help certain travelers relate to the lesson when they are mentally crossing familiar intersections, particularly at the start of the training. The O&M specialist should begin with the simplest type of intersection (as represented in Figure 1A) and gradually increase the complexity of the intersection according to the learner's comprehension.
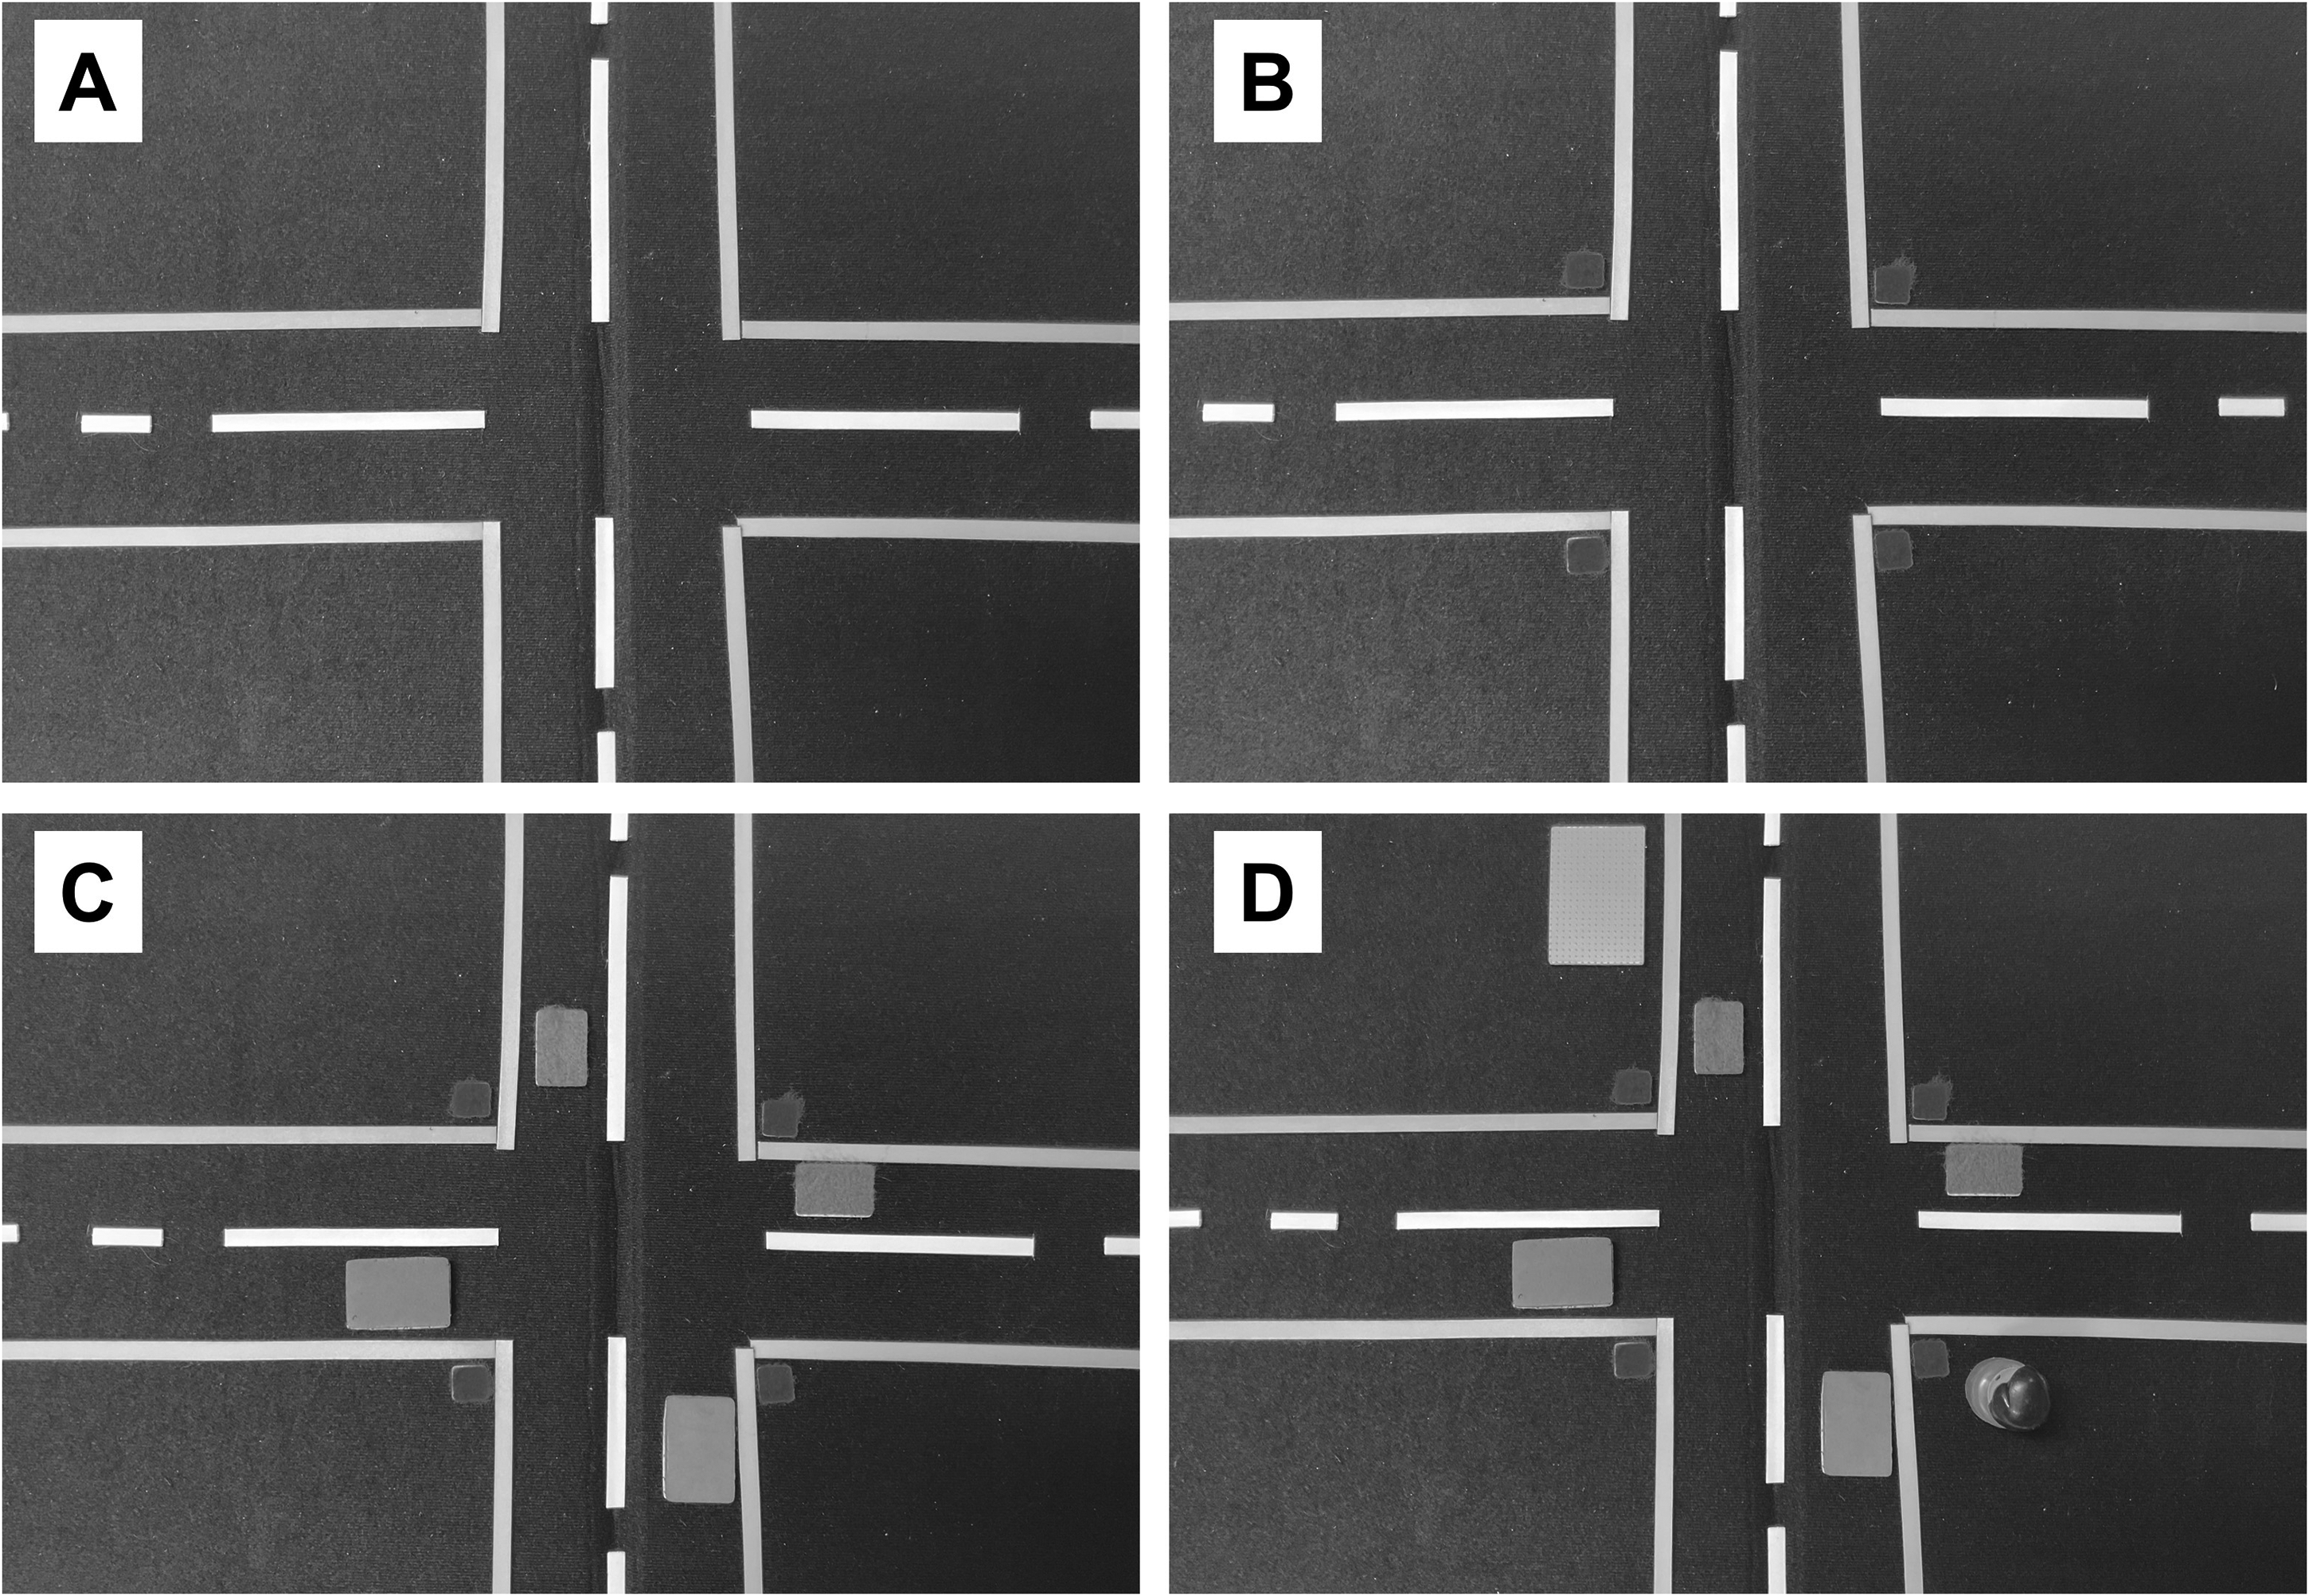
Conceptualization Procedure for a Plus-Shaped Two-Way Intersection using the Picture Maker: Wheatley Tactile Diagramming Kit (APH). (A) Basic Shape of a Plus-Shaped Intersection with Two-Way Traffic Along Both Roads using Line Symbols. (B) Correct Positioning of Point Symbols, Representing STOP Signs. (C) Correct Positioning of the Vehicles, Represented by Larger Point Symbols, At the STOP Signs. (D) Placement of a Destination at North of the Northwest Corner of the Intersection and the Figurine at the Southeast Corner of the Intersection.
Equipment Required
The equipment required for the lesson being described in this section includes:
a large board that is about the size of two standard sheets of paper laid side-by-side (ideally, the board will use Velcro, which will allow the items included in a tactile kit to stick to it); multiple line symbols at various lengths (note that similar line symbols should be the same texture); multiple point symbols of various sizes; and a small figurine (e.g., a Lego or Playmobil play-set person).
Lesson Method
The lesson is conducted in the following order:
Make the shape of the intersection with basic lines with the tactile kit, including dotted or solid lines to symbolize the direction and number of vehicular lanes. Ask the learner to describe the shape of the intersection, and correct the learner, if necessary Tell the learner if this intersection is fully controlled by S Hand the learner small point symbols to represent the S Have the learner place the “signs” where they think they are placed along the street, and correct the learner, if necessary. (Note: The sign should not be placed in the street, but rather on the inside or on the sidewalk to not block the flow of vehicular traffic). Hand the learner larger point symbols to represent vehicles. Alternatively, small models of cars could be used if their movement is restricted. Have the learner place the “vehicles” at the S Place a large point symbol on the board to represent the destination. Hand the learner a small figurine to represent themselves. Have the learner move their figurine from a fixed location, determined by the O&M specialist, to the destination according to municipal street crossing laws.
Once all steps in the lesson have been completed, the O&M specialist can then move the destination, and this exercise can be repeated.
At the end of this exercise, one of the following decisions should be made by the instructor:
If the O&M specialist has concluded that comprehension has been mastered, they may perform the risk-analysis procedure (see the next section). The O&M specialist may choose to repeat the exercise with more complex intersections.
See Figure 1 for an example of the conceptualization lesson for a plus-shaped intersection controlled by S
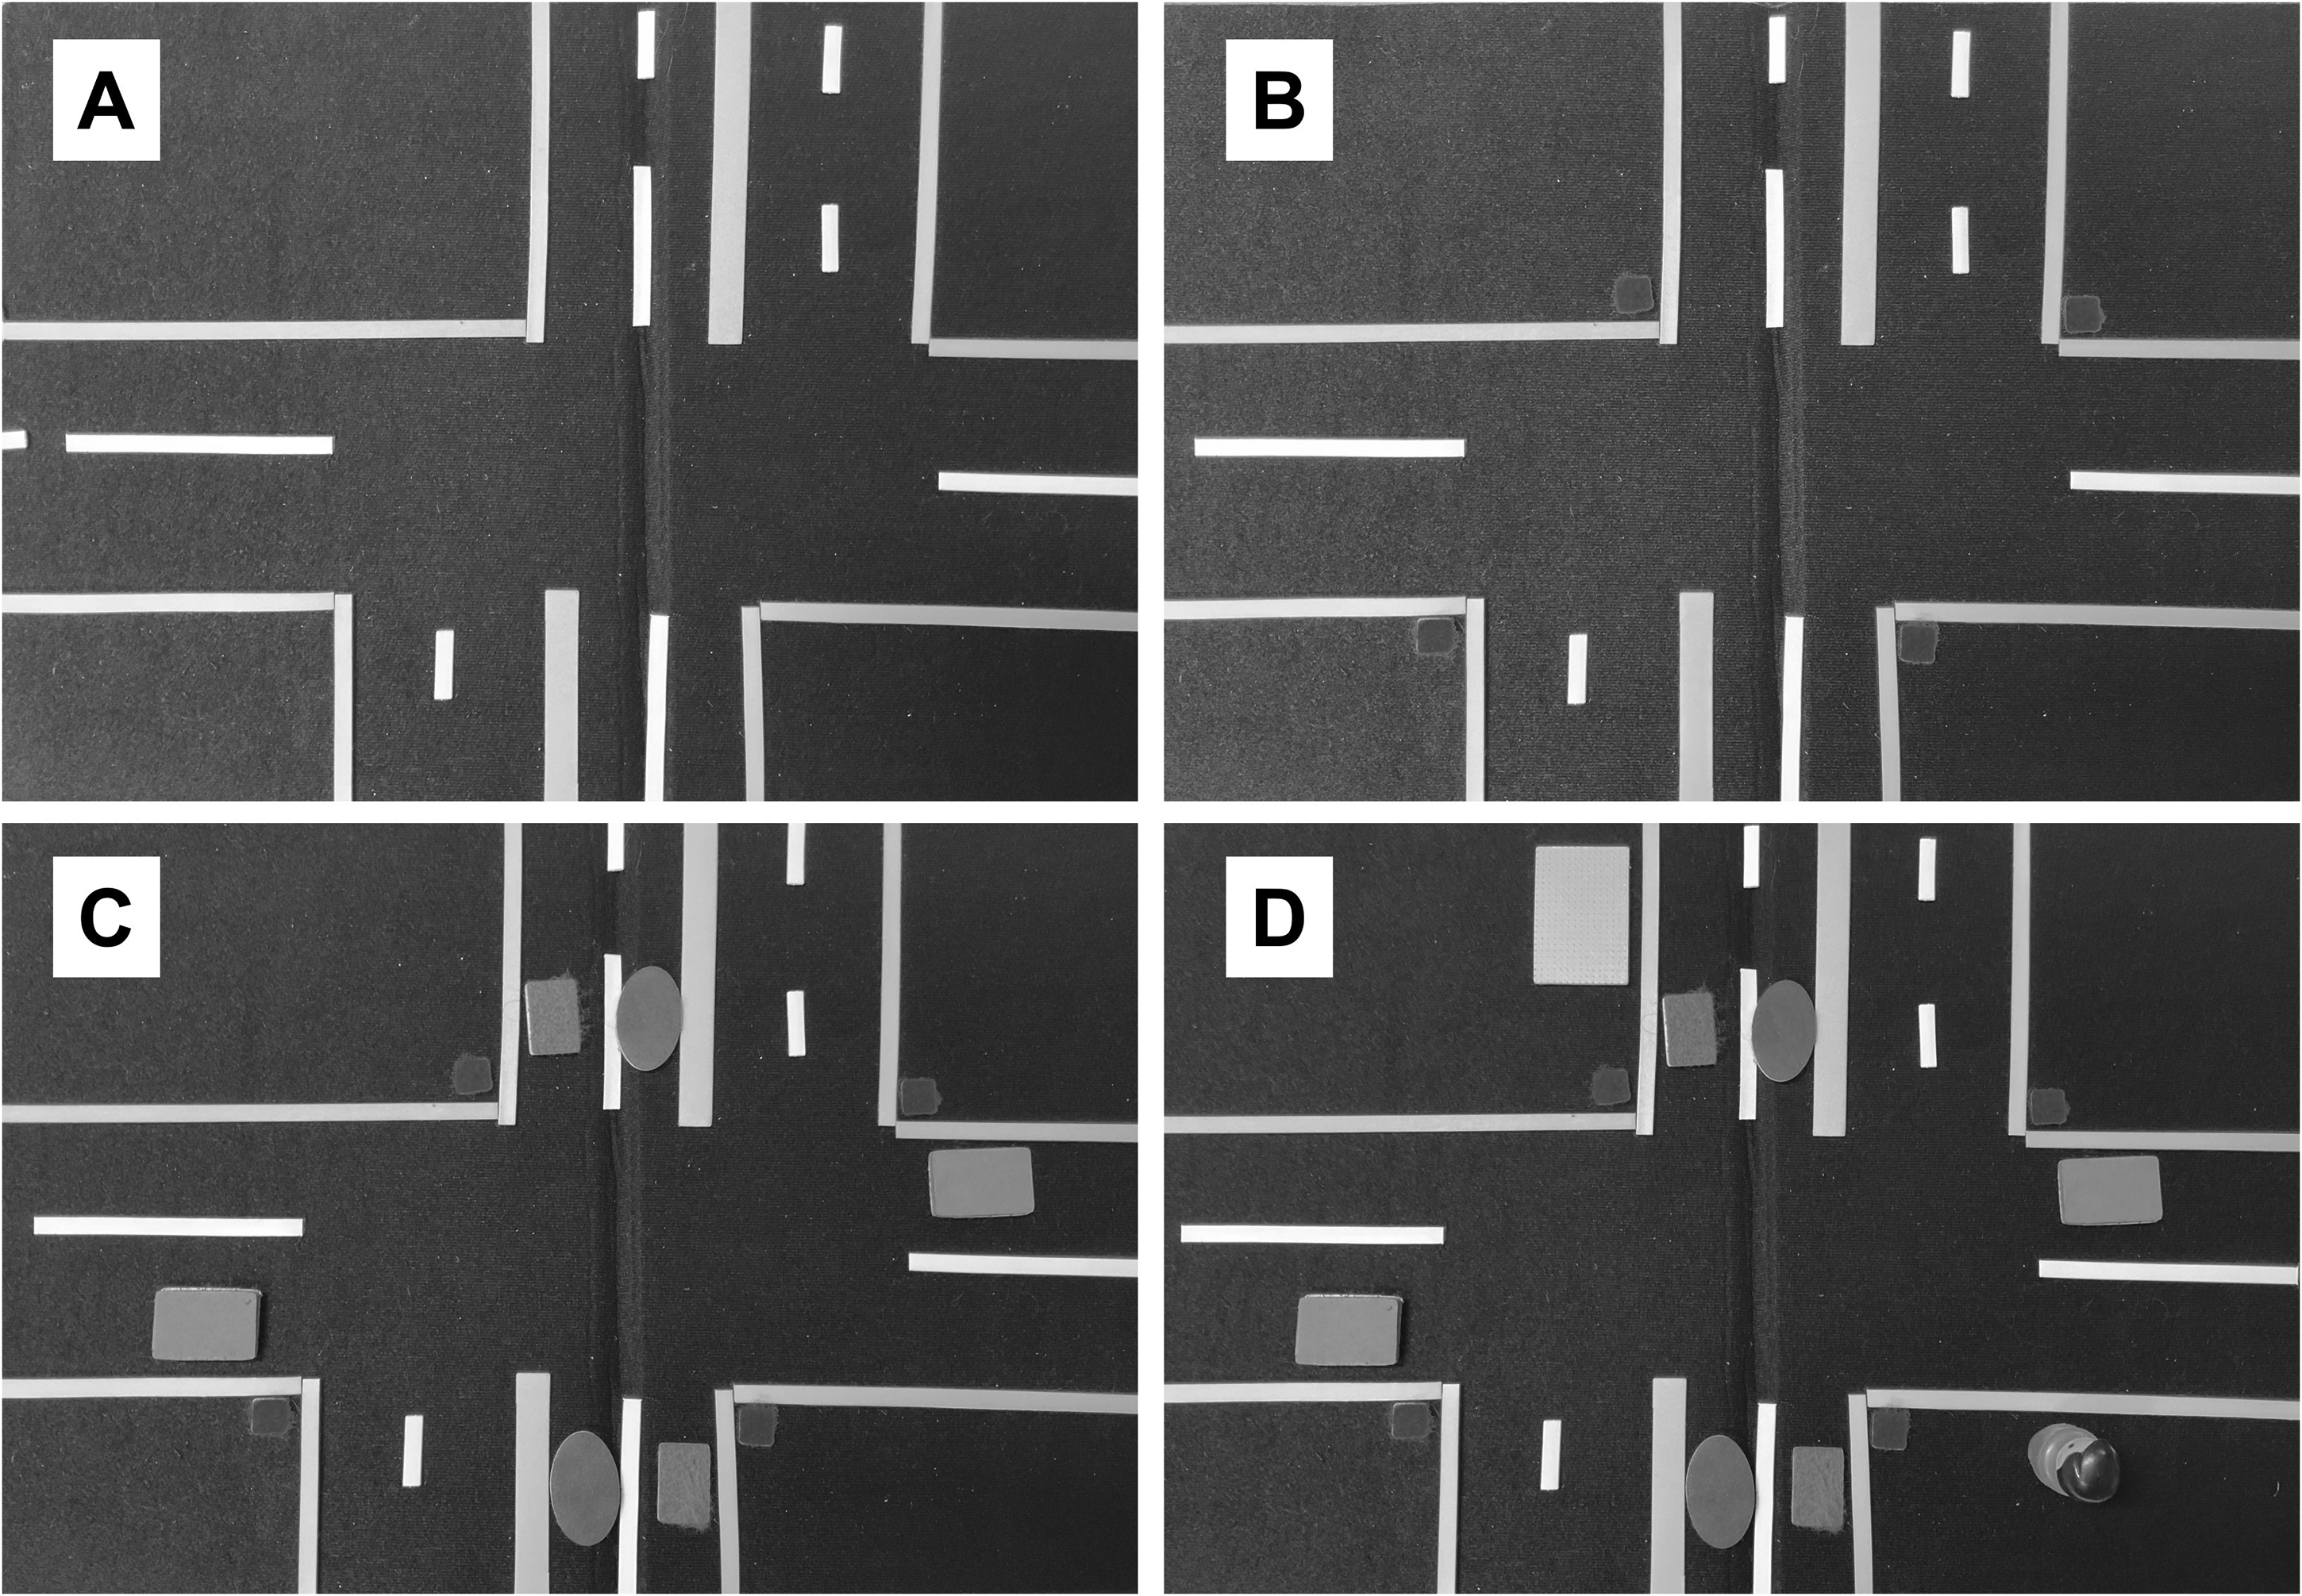
Conceptualization Procedure for an Offset Two-Way Intersection using the Picture Maker: Wheatley Tactile Diagramming Kit (APH). (A) Basic Shape of an Offset Intersection with Two-Way Traffic Along Both Roads using Line Symbols. (B) Correct Positioning of Point Symbols Representing STOP Signs. (C) Correct Positioning of the Vehicles, Represented by Larger Point Symbols, At the STOP Signs. (D) Placement of a Destination at North of the Northwest Corner of the Intersection and the Figurine at Crossing Position for the Southeast Corner of the Intersection.
Analysis of the Risks Associated With Specific Crossings
Once the basic intersection concepts outlined in the previous section have been mastered, as determined by the O&M specialist, the procedure for the risk analysis can begin. The complexity of this lesson may depend on the skills of the learner, as well as the environments that they need to learn or will encounter. If the learner is expected to become a universal traveler (i.e., a person who travels to new locations independently), it is important to include as many types of intersections as possible. The learner's risk-analysis skills should become more rapid as the teaching progresses.
There are numerous risks that a learner who is blind must analyze to safely cross intersections, including the type of traffic control, visibility, crosswalk position, shape of the intersection, width of the street to be crossed, direction of traffic flow, speed of traffic, and volume of traffic (Pogrund et al., 2012). The following procedure provides general information regarding the type of traffic control, crosswalk position, shape of the intersection, width of the intersection, and direction of traffic flow. However, it cannot provide dynamic and variable information, such as the speed of a vehicle or the visibility of the learner, which are necessary factors for determining the safest time and position for a successful street crossing.
Lesson Method
The lesson is conducted in the following order:
Create an intersection that is outlined by line symbols that features S Have the learner explore the intersection and describe the following:
shape of the intersection, width of the streets, direction of traffic flow, control of traffic on each street, and any particularities (e.g., median, railroad tracks, slopes, truncated domes, pushbutton pedestrian signals, and the like). Correct the learner on each of these elements, as necessary. Hand the learner the figurine and have them move it from a fixed location, determined by the O&M specialist, to the destination according to street crossing laws. Separate the crossing based on the directionality of vehicles (i.e., there should be two parts for a two-way street one part for a one-way street). Have the learner describe the risks associated with the first part of the initial crossing (the learner may consult risk-analysis diagrams, if necessary; Nemargut, 2023):
ask the learner to describe verbally, move the vehicles, or draw or point with their finger to indicate the risks; ensure that all the risks are mentioned before moving onto the second part of the crossing; and mention any risks that were not reported by the learner. Have the learner describe the risks associated with the second part of the initial crossing, if applicable. Repeat steps 6 and 7, as applicable, until the learner has reached their destination. Test the generalization at a similar, real-life intersection. Repeat this complete procedure at more complex intersections (e.g., roundabouts, railroad crossings, intersections with bike lanes, and the like).
Generalization
Once mastery has been achieved by the learner across several intersections, the O&M specialist can conclude that risk analysis using a tactile map has been properly integrated. To promote generalization across intersections, the O&M specialist should assess the learner's risk-analysis skills at intersections where the configuration, direction of traffic, width of the street, and level of traffic are similar to those represented on the tactile map.
It should be noted that certain elements of the intersection may be poorly interpreted by the learner when confronted with actual real-life intersections. Thus, the O&M specialist may allow the learner to perform the risk-analysis and street-crossing procedures independently or while guided, depending on the student's abilities. The risk analysis may be incorporated into other O&M lessons at street crossings when deemed necessary (e.g., alignment techniques or sound localization). For learners with low vision, this approach could be integrated into the risk-analysis diagram, visual-scanning plan, and visual intersection analysis checklist (Nemargut, 2023). Once the risk analysis has been mastered and incorporated with other street crossing techniques, the traveler may be able to understand and assess the risks associated with each crossing independently.
Once the O&M specialist is comfortable with the crossing abilities of the learner, they may perform the crossings independently. A learner that has successfully integrated these approaches should also be able to determine if new intersections are too dangerous to be crossed independently.
Case Examples
The following case examples provide information about how the approach described in this Practice Perspective has been successfully incorporated into O&M lessons.
A Young Adult Who Is Blind
I applied these strategies with a young adult woman who is blind who had mastered indoor travel and orientation and the use of tactile maps. As the learner and I began street crossing sessions outdoors at simple S
After undergoing the strategies outlined in this paper, she understood the configuration of intersections, direction of traffic, placement of S
A Middle-Aged Adult Who Is Blind
In a second example, I worked with a man in his 40s who is blind and lived in a residential area. He traveled almost exclusively by paratransit. He requested to walk to a convenience store nearby. When navigating walking routes near his home, he only crossed streets controlled by S
After performing the risk-analysis lesson with the tactile map, he was able to cross while vehicles were present, and he no longer had to adjust the time of day during which he would travel to avoid traffic.
Conclusion
Teaching a learner who is blind to cross a street is a risky endeavor. As described in the two case studies included in this article, when beginning to work with these learners outdoors, there are numerous unpredictable factors that can contribute to increasing the amount of stress felt that diminishes the concentration ability of learners. The Practice Perspective presented here described a method that O&M specialists can use to assist learners who are blind in conceptualizing intersections and the risks associated with each street crossing. By following this sequential teaching exercise, the learner is first taught to understand and analyze intersections in a calm, quiet environment before they are asked to apply their knowledge during outdoor O&M lessons.
Footnotes
Declaration of Conflicting Interests
The author declared no potential conflicts of interest with respect to the research, authorship, and/or publication of this article.
Funding
The author received no financial support for the research, authorship, and/or publication of this article.