
Abstract
Maintaining sterility during hair transplant procedures is critical to preventing infections and ensuring optimal outcomes. This article outlines a comprehensive protocol for instrument sterilisation in hair transplant surgeries, emphasising adherence to guidelines from centers for disease control and prevention (CDC), World Health Organisation (WHO), Association of Perioperative Registered Nurses (AORN) and American Academy of Medical Instrumentation (AAMI). The protocol includes steps such as disinfection, enzymatic soakage, ultrasonic cleaning, drying, inspection, lubrication, packing, sterilisation, and validation. Key methods include autoclaving at 121°C and ethylene oxide (ETO) sterilisation, with appropriate use of chemical and biological indicators for quality assurance. Special focus is placed on the sterilisation of frequently neglected tools, such as follicular unit extraction (FUE) handpieces, adhering to standards for dental equipment sterilisation. Proper documentation, consumable checks, and storage practices are integral to maintaining sterility and addressing medicolegal considerations. This guide aims to enhance awareness and standardisation in the field, ensuring both patient safety and procedural efficacy.
Keywords
Introduction
Nowadays, various branches of medicine undertake hair transplants as one of the common surgical treatments. 1 Hair transplantation is frequently considered a routine surgical surgery and is not given sufficient medical care. Even though post-procedure infections after hair transplants are uncommon, when they do occur, both the patient and the surgeon operating on them may find it very challenging. 2 Keeping a sanitary environment is therefore one of the fundamental prerequisites for hair transplant treatments. Sterile equipment and a clean operating room are essential to this operation. Training our staff might be challenging if we, as operating surgeons, are unaware of these procedures.
Creating a Protocol
Developing a protocol to adhere to is the first step in streamlining the sterilising process. Using the existing guidelines, it is possible to construct these protocols. centers for disease control and prevention (CDC), World Health Organisation (WHO), Association of Perioperative Registered Nurses (AORN) and American Academy of Medical Instrumentation (AAMI) are the most often utilised guidelines. Each of these guidelines provides specific instructions for sterilising instruments and the operating room. Although these standards were developed for conventional hospitals, they are also applicable to small clinics with hair transplant theatres and daycare centres.
Basics of Protocol3–6
Outline of steps in instrument sterilisation.
Disinfection
Enzymatic soakage ± ultrasound
Drying
Inspection
Packing
Validation
Autoclave or ETO
Consumable check
Documentation
Steps in instrument sterilisation.
Disinfection
Disinfection or decontamination of the instruments is the most critical phase in the sterilisation process for lowering the infection burden. It also helps to avoid the production of biofilm, which can make subsequent sterilisation processes more difficult. 3 This is a manual procedure, and the personnel in charge of it should be highly motivated to do it thoroughly. This can be accomplished by combining a liquid detergent with an enzymatic solution containing several enzymes.3,4 The most critical stage in this process is cleaning the cracks, joints, and rough surfaces of the instruments with a brush with medium bristles. Using little brushes, inaccessible locations can be cleaned 5 (Figure 1). After cleaning the instruments, they are thoroughly washed under running water. The TDS value of the water used to clean the instruments should be monitored frequently to ensure that it is not excessively hard water so that the instruments do not rust rapidly. 3
(A, B) Cleaning of Instruments Using Brushes. (C) Ultrasonic Cleanser Machine.
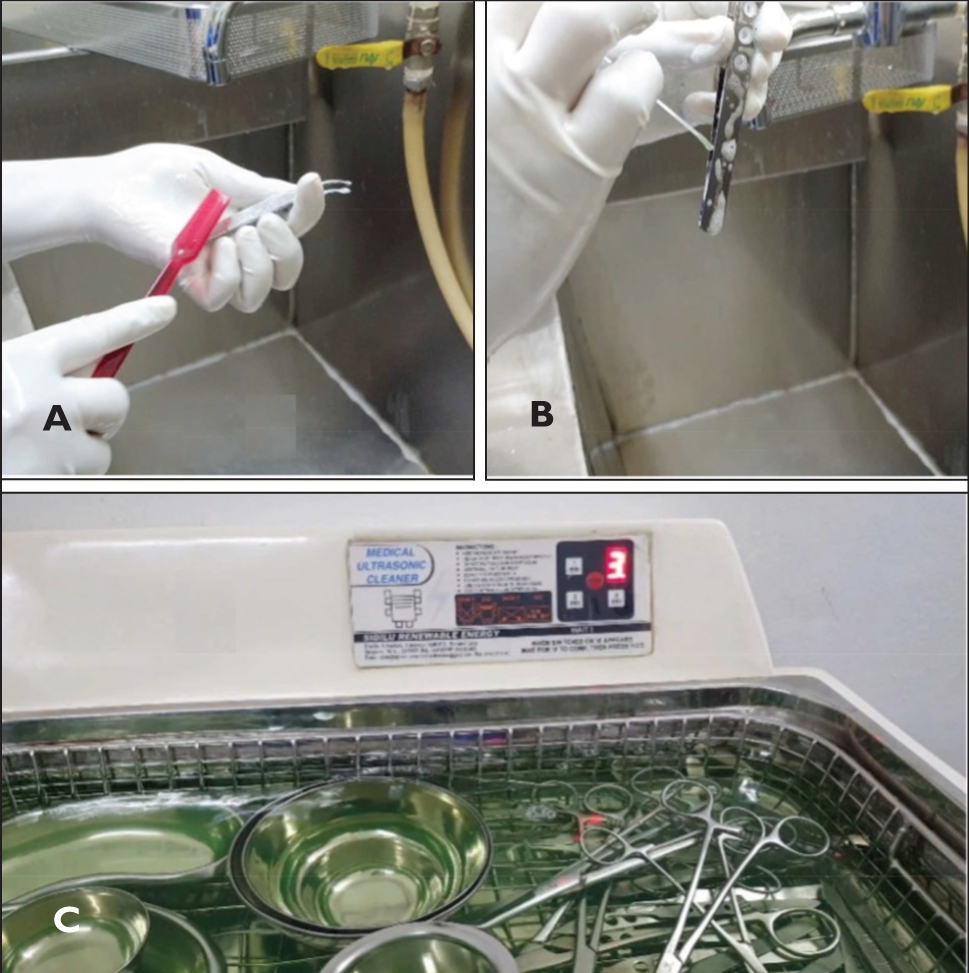
During the surgical operation, saline or spirit gauze should be used to remove blood and other tissues from surgical tools. This can prevent the production of biofilm, which occurs when blood and tissues get dry. Once a biofilm has formed, it is difficult to eliminate it entirely.
Enzymatic Soakage
Using an enzyme solution including various enzymes such as protease, and lipase can remove any adhering tissues such as dried blood. To better activate the enzyme, the solution should be diluted with warm or hot water. 3
If an ultrasonic bath is available, the enzyme solution can be utilised in the ultrasonic bath, which uses ultrasound to vibrate and can remove any dried-up tissues from difficult-to-reach locations much more effectively (Figure 1C). After the time of soakage, the instruments are then washed again in flowing water. 4
Drying
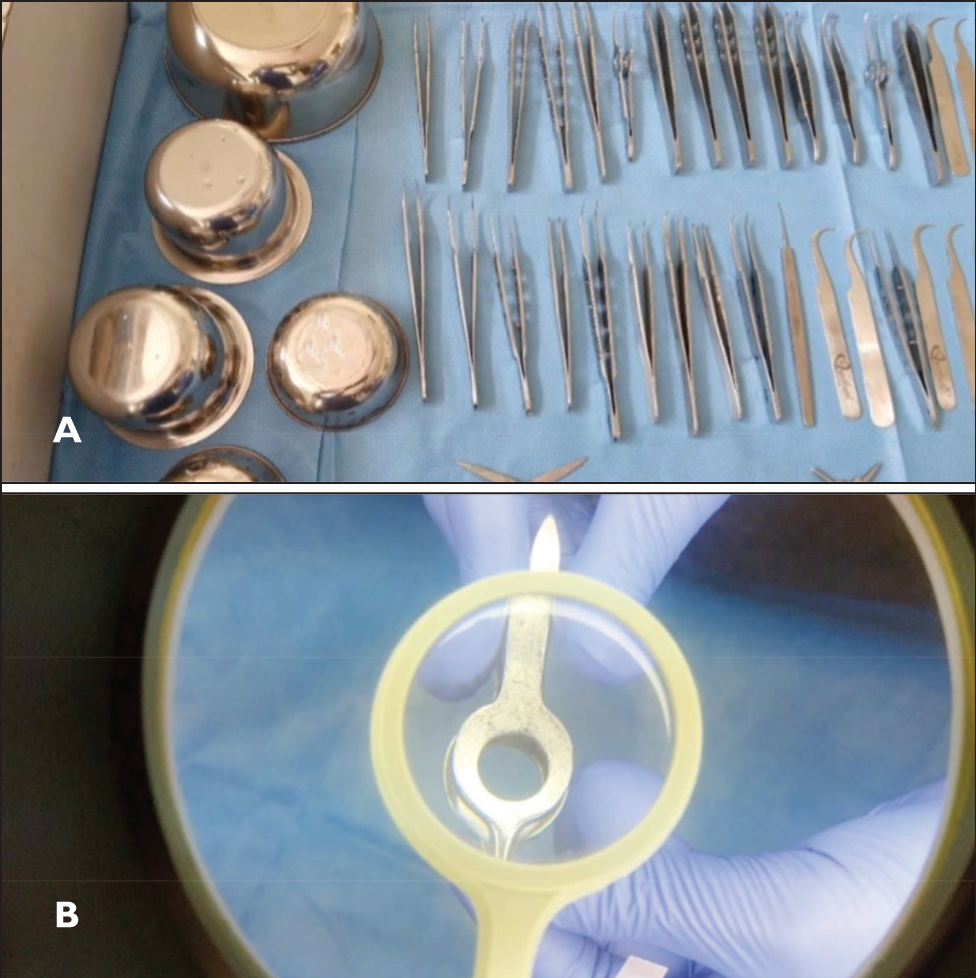
The instruments are allowed to air-dry or an oil-free air compressor is used to spray air on them to dry them3,4 (Figure 2A).
Inspection
The instruments must be inspected thoroughly under magnification and good lighting in order to spot any damage, flaws, or rust.3,5 If there are any, the instruments are removed (Figure 2B).
(A) Instruments Kept for Air-dry. (B) Examination Under Magnification.
Lubrication
At this stage, instruments, particularly those with joints, can be lubricated by immersing them in a lubricant-diluted solution.3,4,7,8 The instruments are then once again dried.
Packing
The instruments that require autoclaving are arranged on trays. Similarly to how instruments are cleaned and disinfected, autoclave trays are also cleaned and sanitised. Silicon mats can be used in autoclave trays to prevent instruments from being damaged during travel and handling.
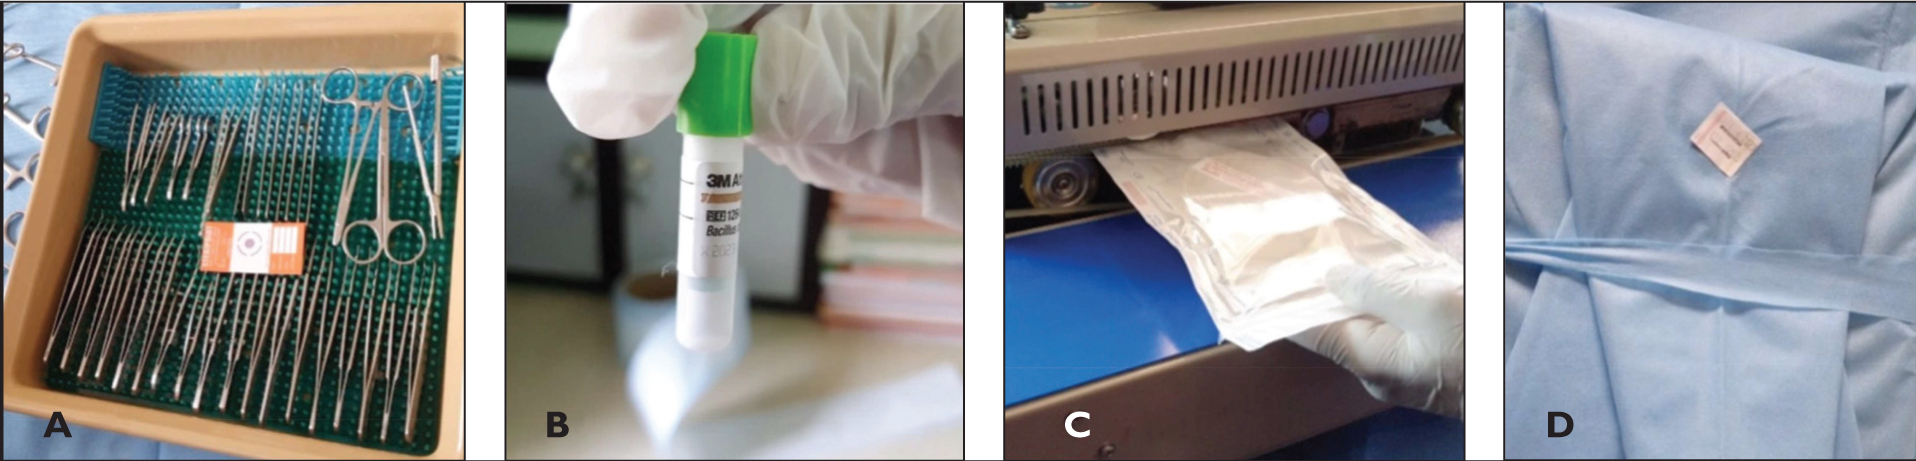
After the instruments have been placed in the tray, a chemical indicator strip (Class 5) is placed within the tray, and the autoclave tray is then closed (Figure 3A). The autoclave tray is wrapped with an SMS wrap sheet in two layers (Figure 3D). The tray is then labelled with a Class 1 sticker bearing the autoclave date, expiration date, the name of the person who performed the autoclave, and the batch number, if applicable.3-10
Instruments and items that must be delivered for ethylene oxide (ETO) are packaged in transparent plastic covers with a chemical indicator for ETO and then sealed using a sealing machine (Figure 3C). As with autoclave trays, a Class 1 label is affixed to each sealed item.3-10
(A) Instrument Arranged in a Tray with Chemical Indicator, (B) Biological Indicator, (C) ETO Packing, (D) Double-wrapped Instrument Tray for Autoclaving.
Chemical Indicators
There are six classes of chemical indicators that are available to validate the process of autoclave. 11 We commonly use the Class 1, Class 2 and Class 5 indicators.
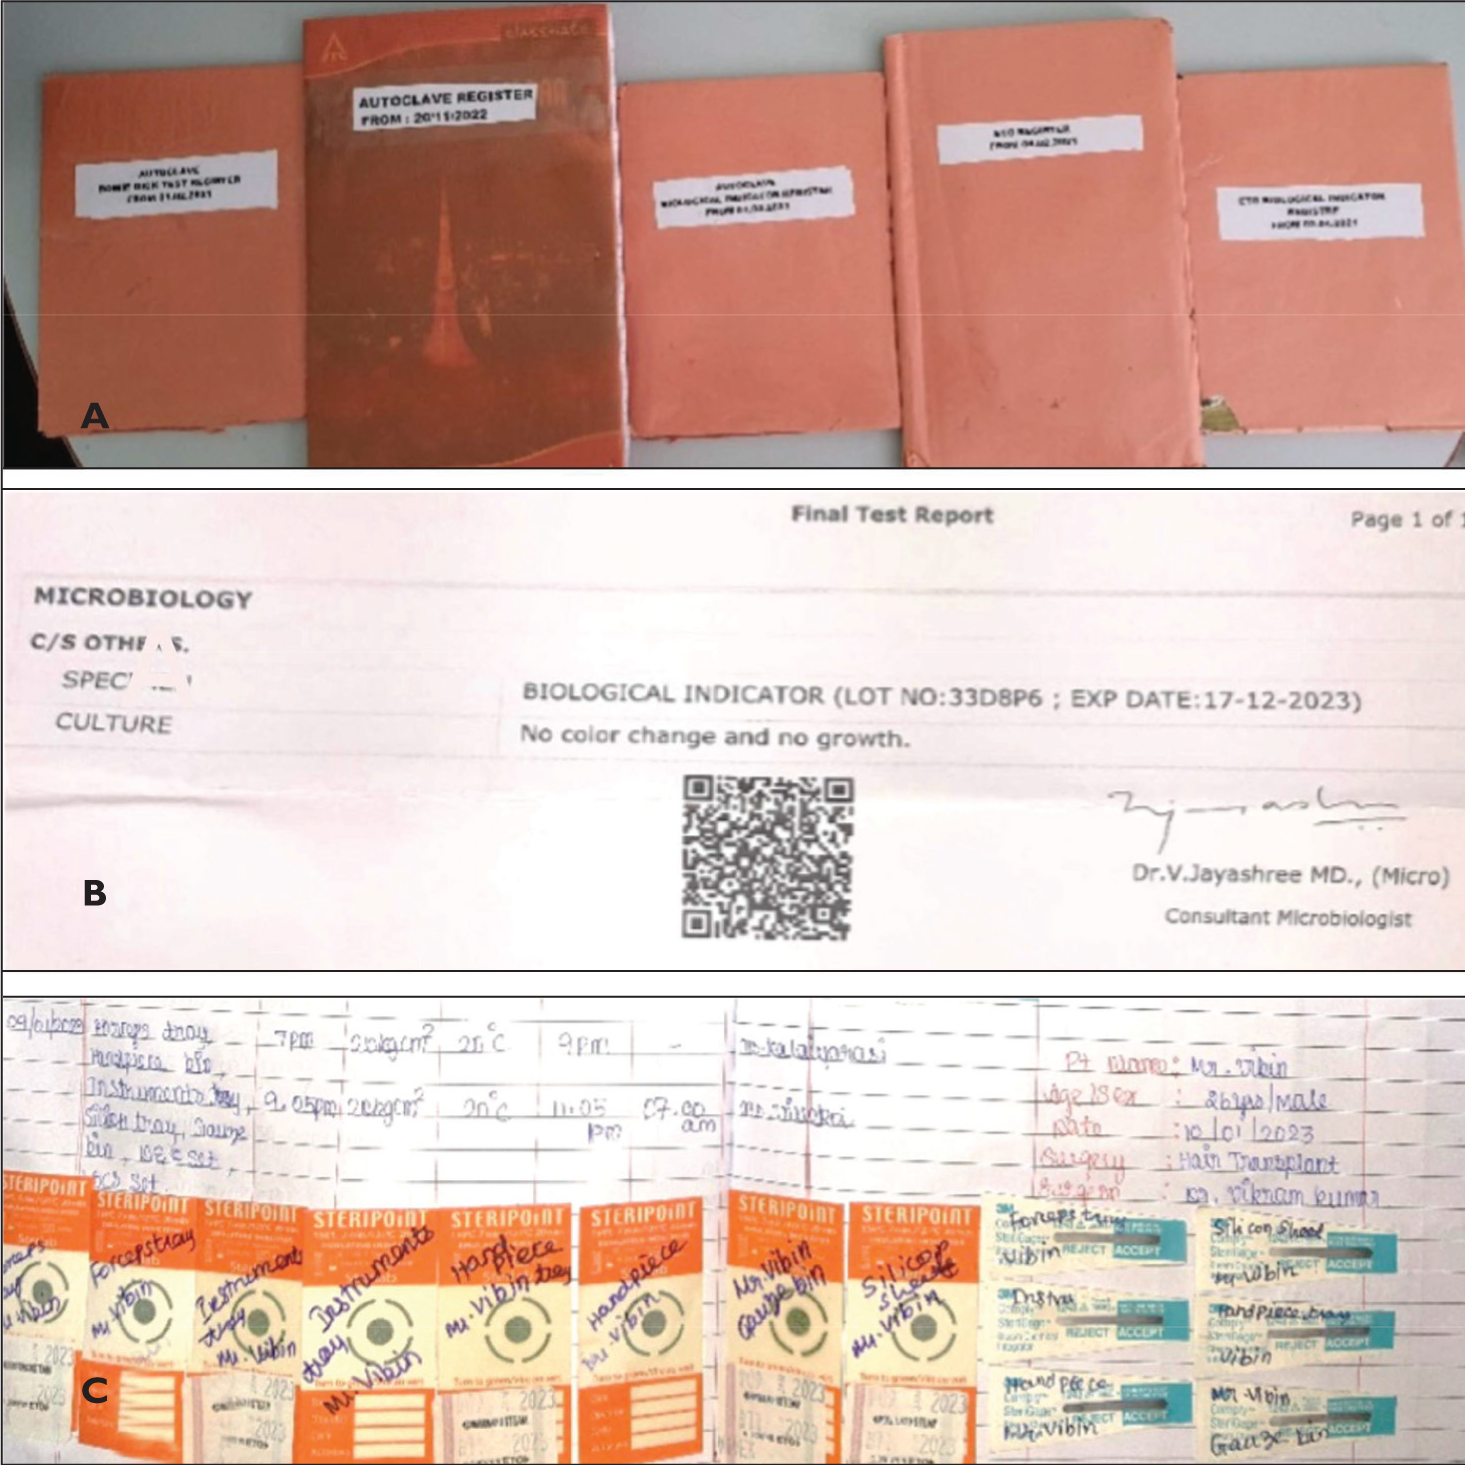
As soon as the autoclave tray or ETO-sealed packets are opened, the operating surgeon or floor nurse must check the status of the indicators before using the instrument set in the operating room. This provides greater assurance of quality (Figure 4C).
(A) Registers for Record-keeping, (B) Biological Indicator Report, (C) Chemical Indicators from Trays Post Autoclaving.
Sterilisation Process (Table 1)
Detailing the Instruments and Items Usually Used in Hair Transplant Procedures, as well as How to Adequately Sterilise Them.
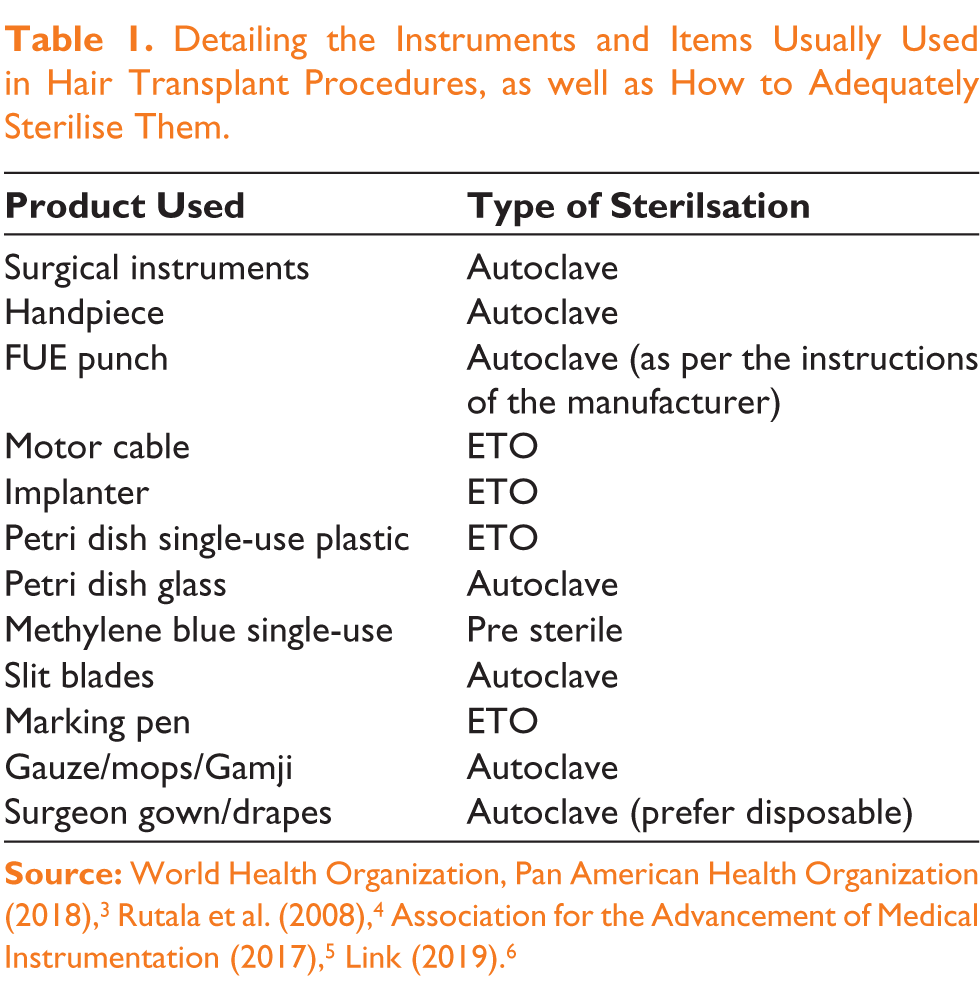
The 121°C temperature with 15 pounds of pressure for 20 minutes is the standard practice for autoclaving. The most crucial step is to allow sufficient time for drying after autoclaving. The autoclave can only function properly if the vacuum is created properly. The Class 2 indication or the Bowie Dick test can be utilised to confirm this.
ETO is performed according to the manufacturer’s guidelines. Since ETO is a poisonous gas, we must give ample time for degassing before utilising sterile devices. Also, the staff doing the ETO should wear the required safeguards such as safety gloves and air filter masks.
Storage
The autoclaved instruments in the trays should be stored in a clean, dry location, preferably in a sterile setting where they will not come into touch with soiled instruments. Similarly, the instruments that have been subjected to ETO are also stored in clean cupboards after allowing time for degassing in an open area.
Sterilisation of the FUE Handpiece
This is emphasised because, in the majority of clinics where hair transplants are performed, handpiece washing and sterilisation are neglected. Most facilities only wipe the outside of the handpiece with an alcohol-containing solution before placing it in formalin or ETO chambers.
The follicular unit extraction (FUE) handpiece, which is identical to the dental handpiece, must be sterilised according to the CDC’s criteria for dental handpiece sterilisation. Manually scrub the exterior of the handpiece with detergent containing an enzymatic solution and a brush. They are cleansed with running water on the exterior, taking care that water does not penetrate either end of the handpiece. It is then air-dried. Using a lubricant spray, the handpiece is lubricated from both the ends. Connecting the handpiece to the motor and allowing it to run allows lubrication to coat small parts within the handpiece. It is then dried once more.4,7,8
If we are utilising a handpiece that can be autoclaved, it can be placed in the autoclave tray or autoclavable sheets and then autoclaved. The CDC specifies that dental handpieces must be autoclaved before being used on another patient, which should also be done in hair transplantation.4,7,8
There are some handpieces which have a plastic body they can be subjected to ETO after doing the cleaning and lubrication
Validation
Biological indicators Figure 3B represent the gold standard. Biological indicators contain viable bacterial spores that will be eradicated only if the sterilising procedure is precise (Figure 4B). The indicators can be forwarded to a microbiological lab determine whether the sterilisation process eradicated the bacterial spores. The reports are then documented. Using biological indicators in all instrument sets can be costly, so we should employ them at least once per week or every two weeks.
Using a chemical indicator to test the quality of the autoclave or ETO process is less expensive. These are compatible with all instrument trays and sealed packets. Class 5 indicators are comparable to biological indicators.
The indicator in each pack should be checked by the operating surgeon before starting the procedure. The indicators can then be preserved and documented against the name of the patient undergoing the procedure for internal auditing and medicolegal purposes.3-10
Consumable Check
Individually, two members of staff examine the consumables utilised in the surgery for packaging problems such as tears, expiration dates, and foreign objects one day before the procedure. In a number of instances, we have discovered that even refutable syringe packs have small tears that are readily overlooked during surgery. It can disrupt the sterile cycle in the operating room.3-6
Documentation
It is essential to document each stage of the sterilising process. We maintain the quality assurance of the sterilising procedure through documentation (Figure 4A). It also helps us with internal audits by identifying the processes that need to be modified if a post-operative infection occurs.3-5 In the event of a mishap, paperwork might also assist with medical-legal issues.
Footnotes
Declaration of Conflicting Interests
The authors declared no potential conflicts of interest with respect to the research, authorship and/or publication of this article.
Funding
The authors received no financial support for the research, authorship and/or publication of this article.