
Abstract
Background:
Proximal hamstring tendons are commonly injured among athletes, and when tendon tears are indicated for surgery, the gold standard has been open repair with suture anchors. However, endoscopic repair techniques like the technique described in this study for hamstring undersurface concealed crescentic injuries (HUCCIs) have been shown to have high patient satisfaction and limit perioperative complications.
Indications:
General indications for surgery for hamstring tears are 2-tendon, partial tears with >2 cm of retraction or 3-tendon complete tears that have been recalcitrant to nonoperative treatment. This technique focuses specifically on the repair of partial undersurface tears of hamstring tendons that are often concealed by partially intact superficial tendon tissue.
Technique Description:
This technique guide describes a minimally invasive endoscopic technique for repairing proximal HUCCIs using 4 interlinked knotless suture anchors to create an X-formation repair construct. Patients are positioned prone with the operative leg resting on a Mayo stand to help extend and abduct the leg during the procedure. Two portals are used primarily, one in the distal gluteal crease and another proximal lateral portal used primarily for anchor placement. Sciatic nerve identification, neurolysis, and mobilization are performed under direct visualization. The undersurface injury is identified, bursectomy is performed, and a split is made in the interval between the conjoint tendon and semimembranosus. Through the interval, the ischial tuberosity is decorticated, and 4 interlocked, knotless anchors are used to create the HUCCI-X repair.
Results:
Patients treated with endoscopic proximal hamstring repairs generally have significant improvement in patient-reported outcome metrics equivalent to open repair techniques. In the literature, return to sport after endoscopic proximal hamstring repairs has ranged from 77% to 95%.
Discussion:
The HUCCI-X repair technique offers a novel, safe, and effective way to repair undersurface proximal hamstring tears endoscopically. This technique combines the benefits of a minimally invasive endoscopic hamstring repair, including lower perioperative complications, with the compressive force of “suture staples” created by interlinked knotless suture anchors. Future studies may focus on patient postoperative outcomes after treatment with this technique.
Patient Consent Disclosure Statement:
The author(s) attests that consent has been obtained from any patient(s) appearing in this publication. If the individual may be identifiable, the author(s) has included a statement of release or other written form of approval from the patient(s) with this submission for publication.
This is a visual representation of the abstract.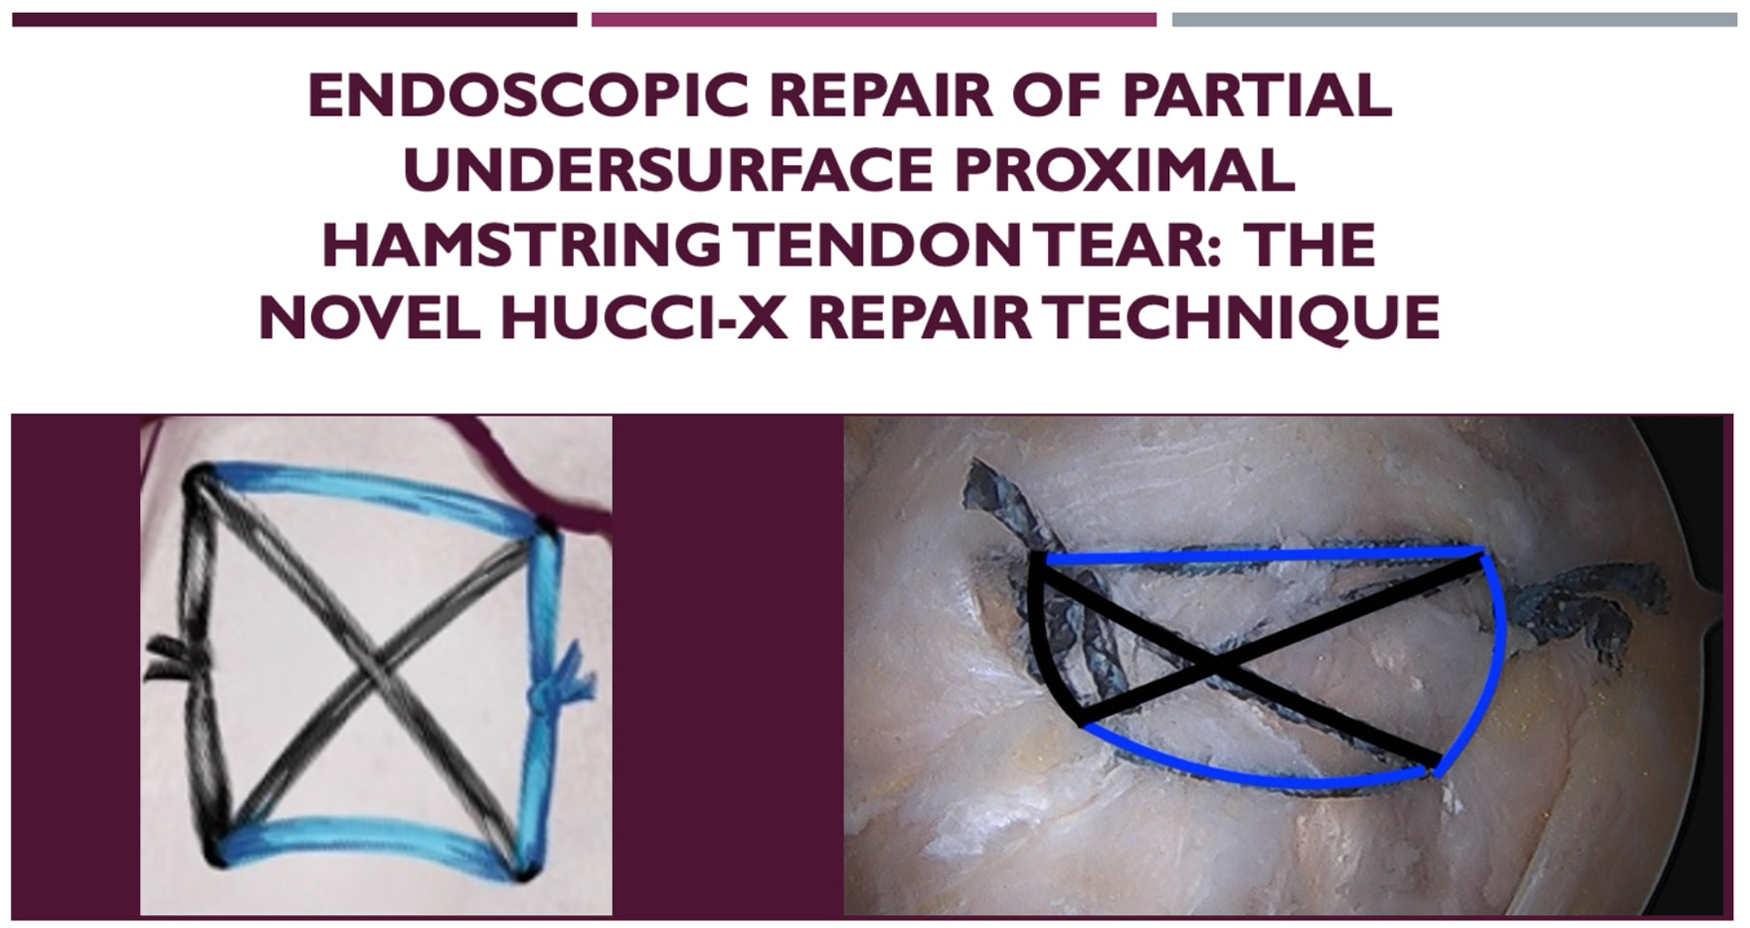
Keywords
Video Transcript
In this video, we present our technique for an endoscopic repair of a partial undersurface proximal hamstring tear, a repair technique we call the hamstring undersurface concealed crescentic injury repair using an X formation construct, or the HUCCI-X repair technique. Here are our disclosures. Here is a brief overview of our video.
Background
Injuries to the proximal hamstring tendons are common, especially among athletes.2-5,9 When surgery is indicated, the gold standard has been open repair.5,6,10 Endoscopic repairs are thought to have high patient satisfaction and fewer complications than open repair. 6 This technique guide describes an endoscopic method for repairing hamstring undersurface tears with 4 interlinked suture anchors to create an X-formation repair construct.
Patient Presentation
Our patient is a 52-year-old woman with 6 of 10 posterior left hip pain that began after a fall while on a treadmill. Her pain was made worse with bending and sitting for prolonged periods of time. She has trialed nonsteroidal anti-inflammatory drugs (NSAIDs) and physical therapy (PT) without success. She underwent an ultrasound-guided ischiofemoral space cortisone injection with 70% to 80% improvement of her symptoms. However, the injection had worn off after a few months. This type of injection can improve proximal hamstring tear symptoms but on its own is nonspecific for differentiating pathologies of the deep gluteal space. On examination, she had a nonantalgic gait, negative scour, and positive flexion, abduction, and external rotation (FABER) tests. She had a negative ischiofemoral impingement test but did have persistent deep hamstring origin pain that worsened with hamstring strength testing, providing support for primary proximal hamstring pathology.
Imaging
Her radiographs show no bony avulsion of the left ischial tuberosity. Axial magnetic resonance imaging (MRI) shows left-sided hamstring tendinosis with partial-thickness tearing. There is no quadratus femoris edema, decreased ischiofemoral space, or other signs of ischiofemoral impingement. Sagittal view shows the superior to inferior extension of the crescentic tearing of the hamstring origin. Coronal imaging shows the medial-to-lateral extension of our crescentic injury affecting the lateral conjoint tendon and medial semimembranosus. There is minimal retraction, less than 2 cm.
Indications
Our indications for surgery in this patient are failure of NSAIDs, PT, and all other conservative modalities. She had improvement with an ischiofemoral space injection, and her MRI showed partial-thickness, undersurface 2-tendon tearing with less than 2 cm of retraction.
Contraindications
Our contraindications for the HUCCI-X repair include 2 to 3 tendon tears that have not trialed conservative treatment or are retracted more than 2 cm, 3-tendon complete tears, ischial tuberosity avulsions, or revision cases.
Preoperative Planning
When planning preoperatively, it is important to closely evaluate the MRI for sciatic nerve variant anatomy, measure the distance of the nerve from the ischial tuberosity, and confirm that no bony abnormalities would prevent anchor placement.
Technique Description
Patient Positioning
The patient is positioned prone. Large gel rolls extend from the chest to the anterior superior iliac spine (ASIS). The arms are placed in a “superman position” with foam pads at the medial elbow to prevent ulnar nerve compression. Circular gel pads are placed at the knees to prevent pressure injuries.
Portal Placement and Marking Skin
The ischial tuberosity is palpated and the bony borders are marked. The distal portal is marked as a 1-cm horizontal incision in the distal gluteal crease just lateral to the edge of the ischium. The sciatic nerve is marked 1.2 cm lateral to the ischium. The proximal lateral portal is marked as a 1-cm horizontal incision, 3 fingerbreadths lateral to the ischial tuberosity and 2 cm proximal to the tip of the ischium. A third, proximal medial suture management portal can be marked just off the lateral edge of the ischial tuberosity proximally.
Prep, Draping, and Room Arrangement
For prepping and draping, one person lifts the leg in the air, supporting the knee, while 2 sterile split drapes are applied. The operative skin of the buttock is pulled medially while the person holding the leg abducts it to prevent “bow-stringing.” A stockinette is rolled up past the knee to the mid-thigh. The foot is included in the surgical field so that an assistant can vocalize if there is any motor twitching while working around the sciatic nerve. Ioban strips are placed to create a full, 360° coverage of the leg. A sterile Mayo stand is then brought next to the operating room (OR) table, and the knee is placed on the Mayo stand to allow for further abduction and extension of the leg to take tension off the sciatic nerve. A draped large C-arm is brought in from the contralateral side. The monitors are positioned on either side of the C-arm, with the surgeon positioned between the Mayo stand and the OR table.
Portal Incisions and Triangulation
We will transition to a right-sided cadaver. The 1-cm distal portal is made, and a switching stick is placed deep to the glute max fascia aimed at the ischial tuberosity. The tuberosity is palpated with the switching stick, and fluoroscopy can be used to confirm placement. The arthroscope is inserted and fluid is turned on to insufflate with an inflow fluid pressure around 20 mm Hg.
The proximal lateral portal incision is made and a switching stick is inserted under direct arthroscopic visualization. Fluoroscopy can be used to confirm placement. Direct visualization lowers the risk of direct injury to the sciatic nerve, but this step should be performed with caution.
Sciatic Localization, Bursectomy, and Neurolysis
Transport cannulas are passed over a switching stick for both portals for ease of passing instruments. A shaver is introduced into the proximal lateral portal and used with light suction to clear bursal tissue. The teeth should be facing away from the nerve. The back of the shaver is used to bluntly dissect along the nerve to free up any adhesions. An assistant should keep a hand on the foot and let the surgeon know if there are any motor twitches. The posterior femoral cutaneous branch may be visualized and can be used to identify the sciatic nerve. Here you can see the shaver between the posterior femoral cutaneous nerve on the left and the sciatic nerve, which sits deep and to the right side of the screen.
Preparation of Hamstring Footprint
Once the sciatic nerve has been freed of adhesions, the shaver or ablator can be used to visualize the raphe between the conjoint tendon and the semimembranosus. An ablator can be used to palpate the tendons, and a “bubble sign,” in living patients, can be visualized, indicating abnormally increased mobility and an undersurface tearing. The ablator is then used to open the interval between the conjoint tendon and the semimembranosus. The arthroscope can be switched to the proximal lateral portal to better view the ischial tuberosity en face, and a probe can be inserted in the distal portal to probe the undersurface of the tear. The hamstring footprint is decorticated using the shaver and an arthroscopic burr to expose bleeding bone to promote healing.
Anchor Placement Technique
In this fixation construct, four 1.4-mm knotless Iconix anchors are used. Two anchors are placed proximally and 2 anchors placed distally. We place the proximal anchors, first starting medial, and then place the distal anchors, ending with the lateral anchor. It can be helpful to use 2 different repair suture colors and alternate them to make for easier identification when shuttling.
The arthroscope is placed in the distal portal, and the anchors are drilled and placed through the proximal lateral portal. The first anchor is placed proximal and medial along the footprint of the conjoint tendon. The ablator is used to mark an appropriate spot for the drill guide and clear soft tissue. The drill guide is placed and the drill can be cycled to ensure there is a clear path for the anchor. Care should be taken to not drill bicortically for any of the anchors to avoid injury to any intrapelvic structures. The guide is left in place, and the anchor is set into bone using a mallet.
The 3 sutures exiting the anchor are tensioned together to soft-set the anchor. The 2 white sutures can then be pulled, alternating to ensure that the sutures slide easily within the anchor.
The second anchor is placed proximal and lateral along the proximal semimembranosus footprint. The anchor is drilled, set, and cycled. A grasper is used to pass the repair suture from anchor 1 into the looped suture of anchor 2. The repair suture is shuttled from anchor 1 into anchor 2, creating a proximal horizontal limb of the HUCCI-X repair. The tail from each of the shuttled repair sutures should be left in place to be tied at the end.
The third anchor is placed distal and medial along the distal conjoint tendon footprint in the same manner as the previous two. The repair suture from anchor 2 is passed into the looped suture of anchor 3 and shuttled across the tendon and into anchor 3. The fourth anchor is placed distal and lateral along the distal semimembranosus tendon footprint in the same manner as the previous anchors. The repair suture from anchor 3 is shuttled across the tendon and into anchor 4. The repair suture from anchor 4 is then shuttled across the tissue and into anchor 1.
Pull on each repair suture tail sequentially to ensure there is appropriate tension and tissue compression. The tails from each anchor could be cut at this point, as the tension of each limb should be set with the knotless anchor. However, we prefer to tie the repair suture tails laterally and medially to provide further compression. The 2 repair sutures from anchors 1 and 3 are tied using a knot pusher and alternating half-hitches to provide compression of the tissue medially. The same steps are performed to tie the suture tails to compress the repair laterally. The tails are cut, and the final HUCCI-X suture construct can be documented.
Potential Complications
Sciatic nerve injury is minimized with this technique by abducting and extending the leg on a Mayo stand, draping the foot in to identify motor firing intraoperatively, making the second portal under direct visualization, and triangulating with a switching stick. The sciatic nerve is revealed with careful blunt dissection and light suction on the shaver, and the teeth are pointed away from the nerve at all times.
To minimize issues when drilling the anchors, do not penetrate 2 cortices to avoid injury to intrapelvic structures. Cycling the drill in and out of the bone can help make for easier placement of the anchors. Soft-setting the sutures after placing the anchor can ensure it has deployed correctly. Alternating pulls of the white loop and passing suture confirms that they will pass smoothly within the anchor. Using a loop grasper to run the length of the sutures individually before shuttling prevents twists and tangles.
Rehab Protocol and Return-to-Sport Guidelines
Our rehab protocol includes 4 weeks of flatfoot, 20% weightbearing with crutches and a knee brace to allow for symmetric hip and knee range of motion to 90°. Four to 6 weeks postoperatively, patients are working on proprioception with weightbearing. In weeks 6 to 12, they normalize their gait. In weeks 12 to 16, their goal is to have 5/5 hip flexor and quad strength and 4+/5 hamstring strength.
Between weeks 16 and 24, patients can initiate jogging and sports testing. Prior to returning to sport, they should have a limb symmetry index of 90 for quad, hamstring, abductor, and adductor testing. However, the final return-to-sports clearance should be designated by the surgeon after their physical therapist feels they have met their return-to-sports goals.
Results
Regarding patient outcomes, a systematic review and meta-analysis found that surgical repair had higher patient satisfaction and increased hamstring strength compared to nonoperative treatment. However, their complication rate was 23.17% with open hamstring repairs. 1 Studies have shown that endoscopic repairs have significant improvements in patient-reported outcomes that are equivalent to open repairs.5,9
Discussion/Conclusion
Fletcher et al 7 analyzed endoscopic repairs and found 90% high satisfaction, with 80% of patients attaining a patient acceptable symptomatic state and a complication rate of 3.3%. Finally, in an article published in Arthroscopy in 2020 studying endoscopic repairs, the authors found 100% returned to work and 95% returned to sport. 8 This is our list of references. Thank you for taking the time to view our video.
Footnotes
Submitted April 7, 2025; accepted July 28, 2025.
One or more of the authors has declared the following potential conflict of interest or source of funding: J.G.W. has received financial support for consultation from Stryker Corporation. AOSSM checks author disclosures against the Open Payments Database (OPD). AOSSM has not conducted an independent investigation on the OPD and disclaims any liability or responsibility relating thereto.