
Abstract
Background:
Before the rise of arthroscopic rotator cuff repair (RCR), mini-open RCR was the preferred method of repairing a torn rotator cuff. However, in the recent fluid shortage that limited the viability of performing arthroscopic procedures, we felt that mini-open RCR could be a viable method to achieve satisfactory patient outcomes while limiting arthroscopic fluid utilization. Little information, particularly in video form, exists describing how to perform a mini-open RCR.
Indications:
Our patient presented with a symptomatic chronic rotator cuff tear that was affecting her ability to work. She wanted to undergo surgical intervention at a specific time to minimize the impact of the recovery time on her work. At that time, we were experiencing a fluid shortage, which limited our ability to perform arthroscopic procedures; thus, we elected to perform a mini-open RCR.
Technique Description:
We utilized a small 4-cm incision on the lateral aspect of the shoulder and performed a deltoid split to expose the rotator cuff tear. In a similar fashion to an arthroscopic procedure, we debrided the rotator cuff footprint. We then performed a double-row transosseous equivalent repair through the open incision, as would be performed arthroscopically.
Results:
Previous literature suggests that mini-open RCR leads to similar functional and patient-reported outcomes as arthroscopic RCR. The open procedure may have a shorter operative time. Some evidence indicates that mini-open RCR may lead to an early increase in pain compared with arthroscopic repair, which tends to normalize within 1 week. We were able to limit the amount of arthroscopic fluid utilized to ≤3 L per case.
Discussion/Conclusion:
While mini-open RCR may be an older technique, there are instances when either arthroscopic equipment or fluid may not be available, and mini-open RCR may be the most viable technique for repair. Mini-open RCR can achieve satisfactory outcomes comparable to arthroscopic RCR.
Patient Consent Disclosure Statement:
The author(s) attests that consent has been obtained from any patient(s) appearing in this publication. If the individual may be identifiable, the author(s) has included a statement of release or other written form of approval from the patient(s) with this submission for publication.
This is a visual representation of the abstract.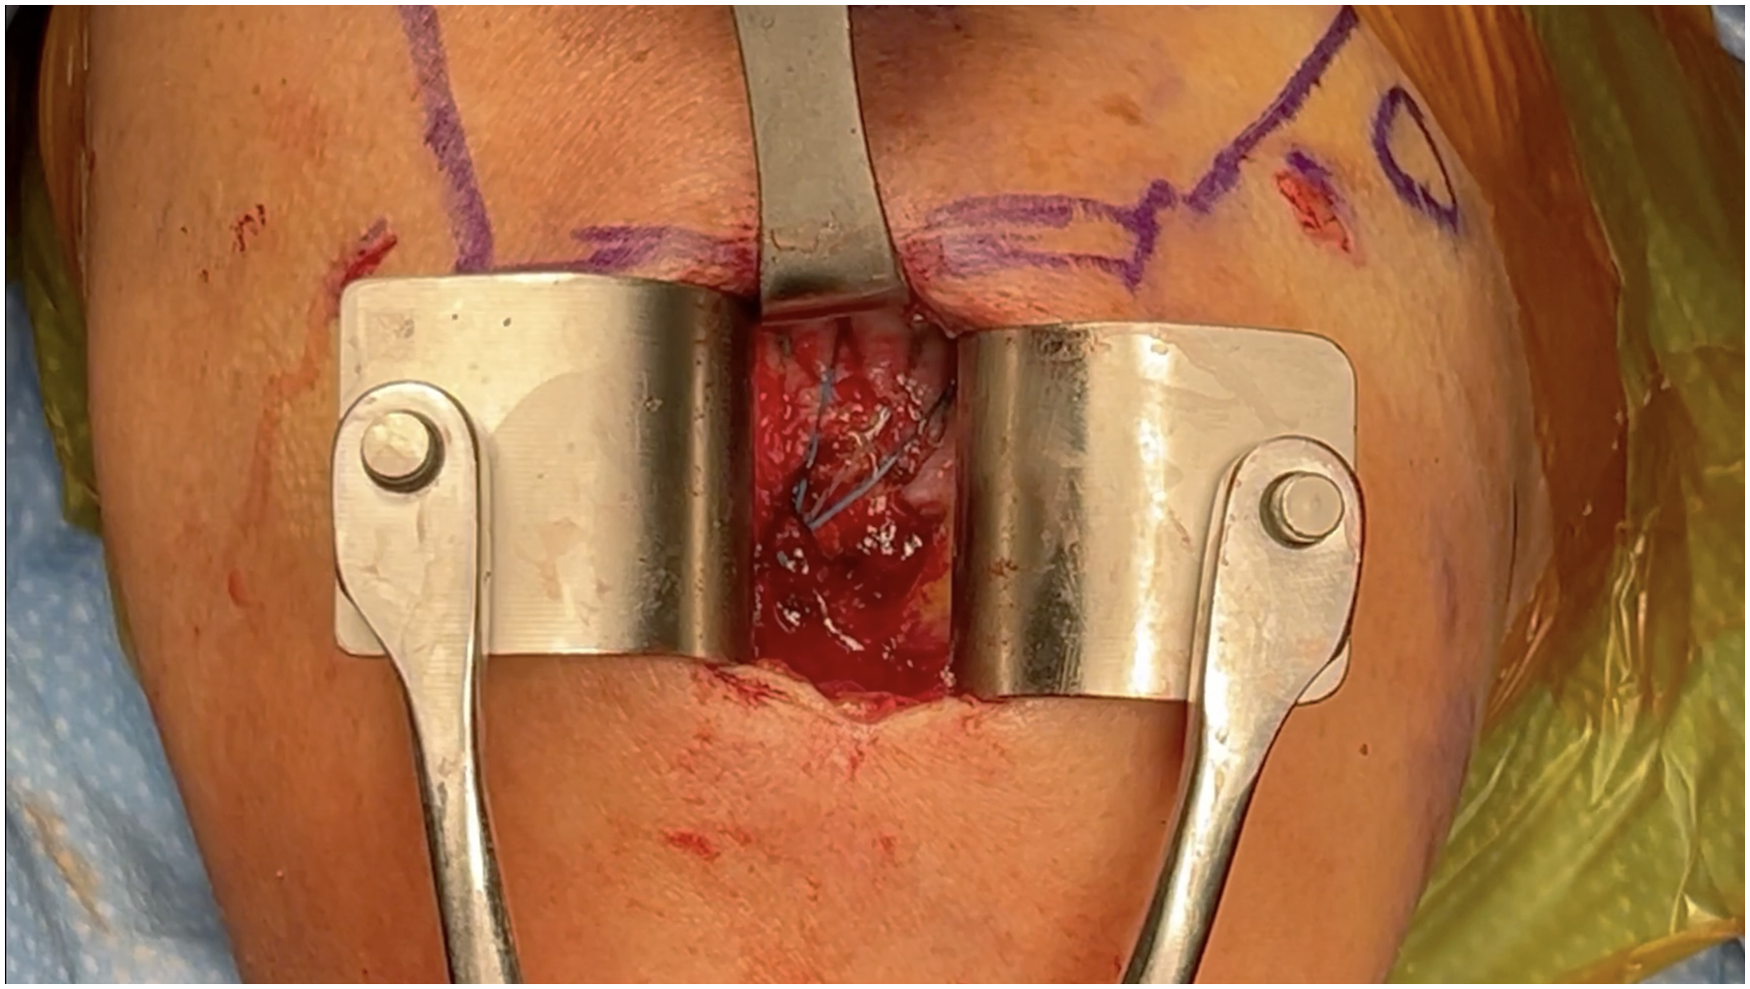
Video Transcript
Background
Rotator cuff repair (RCR) has a long history dating back to the early 1900s and has undergone substantial changes over the past 100-plus years. The first successful open RCR was performed by Dr Codman 3 in 1911. However, this involved detachment of the deltoid, which often led to significant postoperative pain, weakness, and stiffness. As techniques evolved, Levy et al 5 reported the mini-open RCR in the 1990s, which led to better functional outcomes than the traditional open method. Eventually, in the 2000s, we began to shift more toward arthroscopic-assisted RCR. Initially, the arthroscopic method was challenging and less accessible. However, as new surgeons began training in arthroscopy, the popularity of the arthroscopic method grew and is now the most common method of repair.9,10 The mini-open procedure can be performed using either a direct lateral or anterolateral incision. The benefit of the anterolateral incision is that you can address bicep pathology simultaneously with the rotator cuff tear.
Indications
Mini-open RCR can provide an alternative to arthroscopic RCR that, according to the literature, provides satisfactory patient and functional outcomes.2,7,8 The mini-open RCR technique is commonly used as a “bail-out” technique. This can occur in instances where there is poor visualization due to bleeding that is limiting the ability to perform the procedure, failure of the arthroscopic equipment, or if the arthroscopic equipment is unavailable. In the recent fluid shortage, there were limitations to the ability to perform arthroscopic procedures. Some patients wanted their procedure to be done at a specific time to ensure that the recovery process did not interfere with their future recreational or occupational activities. In this instance, mini-open RCR provides a viable alternative to minimize arthroscopic fluid usage and still allow the repair to be performed. While the mini-open RCR used to be performed routinely, this was largely in a time prior to video journals documenting how to perform the procedure. Given the lack of literature and videos describing the technique, we felt that it was prudent to fill in the current gap that was present.
To describe our technique, we present 1 of our patients who was interested in undergoing a mini-open RCR. The patient was a 63-year-old woman who presented with right shoulder pain that had been present for 4 years, starting after someone pulled on her arm. She had been having night pain as well as difficulty moving her arm to perform her job as a photographer. She attempted multiple nonoperative treatments over the years—including nonsteroidal anti-inflammatory drugs and physical therapy.
On examination, she had full range of motion but had pain and weakness with the empty can test. She also had biceps symptoms.
She had a magnetic resonance imaging of her right shoulder that demonstrated a small full-thickness supraspinatus tear without fatty atrophy. Additionally, she did have some tenosynovitis of the biceps tendon.
We discussed with the patient that, given the failure of the nonoperative treatment and the persistence of her symptoms in the setting of a full-thickness rotator cuff tear, we would recommend a right shoulder arthroscopy with subacromial decompression, acromioplasty, RCR, and mini-open biceps tenodesis. She was initially scheduled for an arthroscopic RCR. However, by the time her surgery date was approaching, the hospital system was going through an intravenous fluid shortage, limiting our ability to perform many arthroscopic procedures. Given the patient's occupation, she wanted to complete her rehabilitation process before entering her busy work season and wanted to have the procedure performed. With this in mind, we offered to perform a mini-open RCR, to which she agreed.
Surgical Technique
Positioning, Diagnostic Arthroscopy, Subacromial Decompression
We began by positioning our patient in the standard beach-chair position. We then performed our diagnostic shoulder arthroscopy after creating a standard posterior and anterior portal. We moved into the subacromial space and created a lateral portal at approximately the 50% mark based on the width of the acromion. Upon entering the subacromial space, we utilized the shaver and radiofrequency ablator to perform a subacromial decompression. We then used a bone-cutting bur to perform an acromioplasty. You can see the depth of the acromial spur and the level of resection to flatten the spur.
Approach
Once we completed our minimal arthroscopic procedure, we turned our attention to creating our mini-open incision. We demonstrate the location of our incision by extending the previous incision from our lateral portal. It is important not to exceed >5 cm from the edge of the acromion for your incision, as larger incisions increase the risk of injury to the axillary nerve.
Illustrated here is the course of the axillary nerve as it wraps around the humerus. While the nerve is typically 5 cm from the lateral edge of the acromion, there is variability in its course, and it could be at a closer distance, depending on the patient's size.
We then began our superficial dissection, initially with the knife to go through the skin and continuing with the knife for the subcutaneous dissection until we identified the deltoid fascia. In terms of retractors, we started with Senns and switched to a Weitlaner superficially. As you can see in the direct lateral approach, we were able to identify the location of our initial lateral portal. We then made our incision through the deltoid fascia and bluntly dissected through the deltoid itself. Once we were through the deltoid, we exchanged our retractors for Kolbel and Army-Navy retractors. We then identified the underlying bursal tissue on top of the rotator cuff tendons. We then performed an additional bursectomy and excised this tissue sharply with a knife. As you can see, we had adequate mobilization of the rotator cuff.
If you are unable to achieve adequate mobilization of the rotator cuff, you can still utilize a traction stitch as you would in an arthroscopic procedure. Here, we used the open approach to place a suture through the tendon in a modified Mason-Allen formation. You could also utilize your arthroscopic portal sites for traction stitch placement. This can be particularly helpful if you are performing an anterolateral incision, as seen here in a different patient.
At this point, we had adequate mobilization of the rotator cuff tendon and felt we could move on to prepare the rotator cuff footprint. We used a shaver to begin to debride the cortex. We subsequently utilized a rongeur and curette to continue our debridement. At this point, we were down to good underlying bleeding bone to aid in the healing of the rotator cuff tear.
Rotator Cuff Repair
We placed our medial row suture anchors just off the articular surface of the footprint in the same fashion as when performing RCR arthroscopically. We then began passing our sutures through the rotator cuff tendon. We did this in a horizontal mattress fashion. Again, this was done in the same manner as in an arthroscopic procedure. We then tied down the medial row sutures utilizing alternating half hitches.
We then took 1 suture limb from each of the tied sutures to prepare for the proper placement of the lateral row. These sutures will be placed in a single lateral row anchor. The remaining suture limbs will be utilized for a second lateral row anchor. We will have 1 anterior and 1 posterior lateral row anchor.
We then began to place our lateral row anchors. We started by drilling some healing holes into the area of the footprint to stimulate blood flow and healing. We then utilized an awl to create a guide hole at the location for our lateral anchor. At this point, we loaded the sutures into the anchor and inserted it after appropriately tightening all the suture limbs. With internal and external rotation of the shoulder, one can see that the tendon is nicely anchored down to the bone without any dog-ear edges.
Alternative Approach and Concomitant Biceps Management
While the direct lateral approach is very useful for an isolated RCR, there are instances when concomitant biceps pathology must also be managed. This can be accomplished with a modification to the approach location.
Here, you can see in a different patient that you can alternatively perform an anterolateral approach from the anterolateral edge of the acromion. Again, one must be cautious not to exceed >5 cm distally with their incision to minimize injury to the axillary nerve.
It is also important to note that a suprapectoral biceps tenodesis can be performed through an anterolateral incision, as seen in a different patient. You can see in the picture on the left where we localized the biceps groove. In the image on the right, we externalized the biceps tendon. We were then able to place suture anchors into the bicipital groove and perform the biceps tenodesis in our standard fashion.
Closure
An important step in the procedure is the closure. We began by performing a closure of the undersurface of the deltoid, first placing sutures in a figure-of-8 fashion. Once we had closed the deep layer adequately, we proceeded forward to closing the superficial layer and deltoid fascia, also utilizing a figure-of-8 formation. Here, you can see the final closure of the deltoid. This anatomic closure is critical to minimize future deltoid dysfunction.
The complications of mini-open RCR largely reflect the complications you would expect from arthroscopic RCR. However, there is some evidence that some complications are more specific to the mini-open procedure. Given the larger incision and split made through the deltoid, there is a higher risk of deltoid dysfunction and potential risk of injury to the axillary nerve. While the risk of axillary nerve injury is low when performing safe dissection techniques, injury can still occur. Additionally, we recommend performing the closure technique as described in the video to adequately repair the deltoid. There is also a risk of increased scar formation. We also recommend early passive motion to try to minimize adhesion formation. Some literature suggests that there is an increase in pain in the early postoperative period that may be higher than that seen with arthroscopic RCR.1,7,10 While both techniques have a very low rate of infection (<1%), there is a suggestion that there could be a minimal increase in infection rate given the larger incision utilized for the mini-open RCR. 11
Results
Generally, we followed the same postoperative rehabilitation protocol that we utilize for arthroscopic RCR.
As stated before, the outcomes for mini-open RCR compared with arthroscopic RCR are quite similar in terms of functional and patient-reported outcomes.4,6,8 Again, there is some increase in early postoperative pain. 4 Overall, we utilized <3 L of arthroscopic fluid per mini-open RCR. This could be further limited should you not perform the initial arthroscopic diagnostic arthroscopy and acromioplasty.
Discussion/Conclusion
Overall, there are a few specific pearls that can lead to a successful mini-open RCR:
Be aware of the axillary nerve location: This is often approximately 5 cm from the lateral edge of the acromion, but can be widely variable.
Determine the best location for your incision: Depending on the tear location, as well as if you need to concomitantly manage the biceps, the location of the incision may need to shift from a direct lateral location to an anterolateral location.
The next 2 pearls go together: Do not hesitate to utilize secondary portals to aid in mobilization and visualization. Additionally, use arthroscopic instrumentation for suture passing as needed. The arthroscopic instruments can easily allow suture passing in a narrow working space. The ability of the arthroscopic instruments to access areas of the rotator cuff that would be otherwise challenging to see can be very helpful. If available, the arthroscopic camera can also help visualize anchor placement or provide better visualization if needed.
Finally, perform a layered closure to maintain deltoid viability: Keeping this layer intact is critical to deltoid healing and not causing detriment to a patient's future deltoid function.
Footnotes
One or more of the authors has declared the following potential conflict of interest or source of funding: E.C.M. is a paid consultant for Biomet and Bioventus; receives royalties from Biomet and Zimmer; receives publishing royalties from Elsevier; is a paid presenter or speaker for Vericel; is a board or committee member for the American Journal of Sports Medicine, AOSSM, and the International Society of Arthroscopy, Knee Surgery, and Orthopaedic Sports Medicine; and receives research support from Arthrex Inc, Mitek, Breg, Ossur, DJ Orthopaedics, and Smith & Nephew. AOSSM checks author disclosures against the Open Payments Database (OPD). AOSSM has not conducted an independent investigation on the OPD and disclaims any liability or responsibility relating thereto.