
Abstract
Background:
Ankle sprains are common injuries that can result in chronic ankle instability.
Indications:
Indications for surgical management include recurrent instability, failed conservative management for 3 to 6 months, and inability to return to play or activity.
Technique Description:
The patient’s ankle is initially examined under anesthesia with anterior drawer testing to confirm the diagnosis of ankle instability. Ankle arthroscopy is then preformed to identify and treat additional intra-articular pathology prior to modified Broström repair. During arthroscopy, care is taken to protect the superficial peroneal nerve. Routinely we perform a “drive-through sign” to assess syndesmotic stability and also debride pathologic intra-articular tissue such as hypertrophied synovium. Following the completion of arthroscopy, an incision is made directly over the fibula. The anterior talofibular ligament (ATFL), calcaneofibular ligament (CFL), and distal fibular periosteum are dissected off the fibula. Two 3.0-mm suture anchors are placed at the origin of the CFL ligament and the ATFL ligament, and previously dissected tissue is incorporated for repair. We reinforce the CFL and ATFL tissues with incorporation of the distal fibular periosteum. Suture tape augmentation is considered for patients at high risk of recurrence, such as those with ligamentous laxity. After completion of our repair, the ankle is again examined under anesthesia with satisfactory confirmation of improved ankle stability.
Results:
Outcomes of our technique are promising, with improvement in patient-reported outcome measures, restoration of range of motion, return to sport as high as 94%, and low failure rates.
Discussion:
For patients with chronic instability, our described technique for sequential examination under anesthesia, ankle arthroscopy, and our modified Broström result in satisfactory improvement in ankle stability and patient symptoms.
Patient Consent Disclosure Statement:
The author(s) attests that consent has been obtained from any patient(s) appearing in this publication. If the individual may be identifiable, the author(s) has included a statement of release or other written form.
This is a visual representation of the abstract.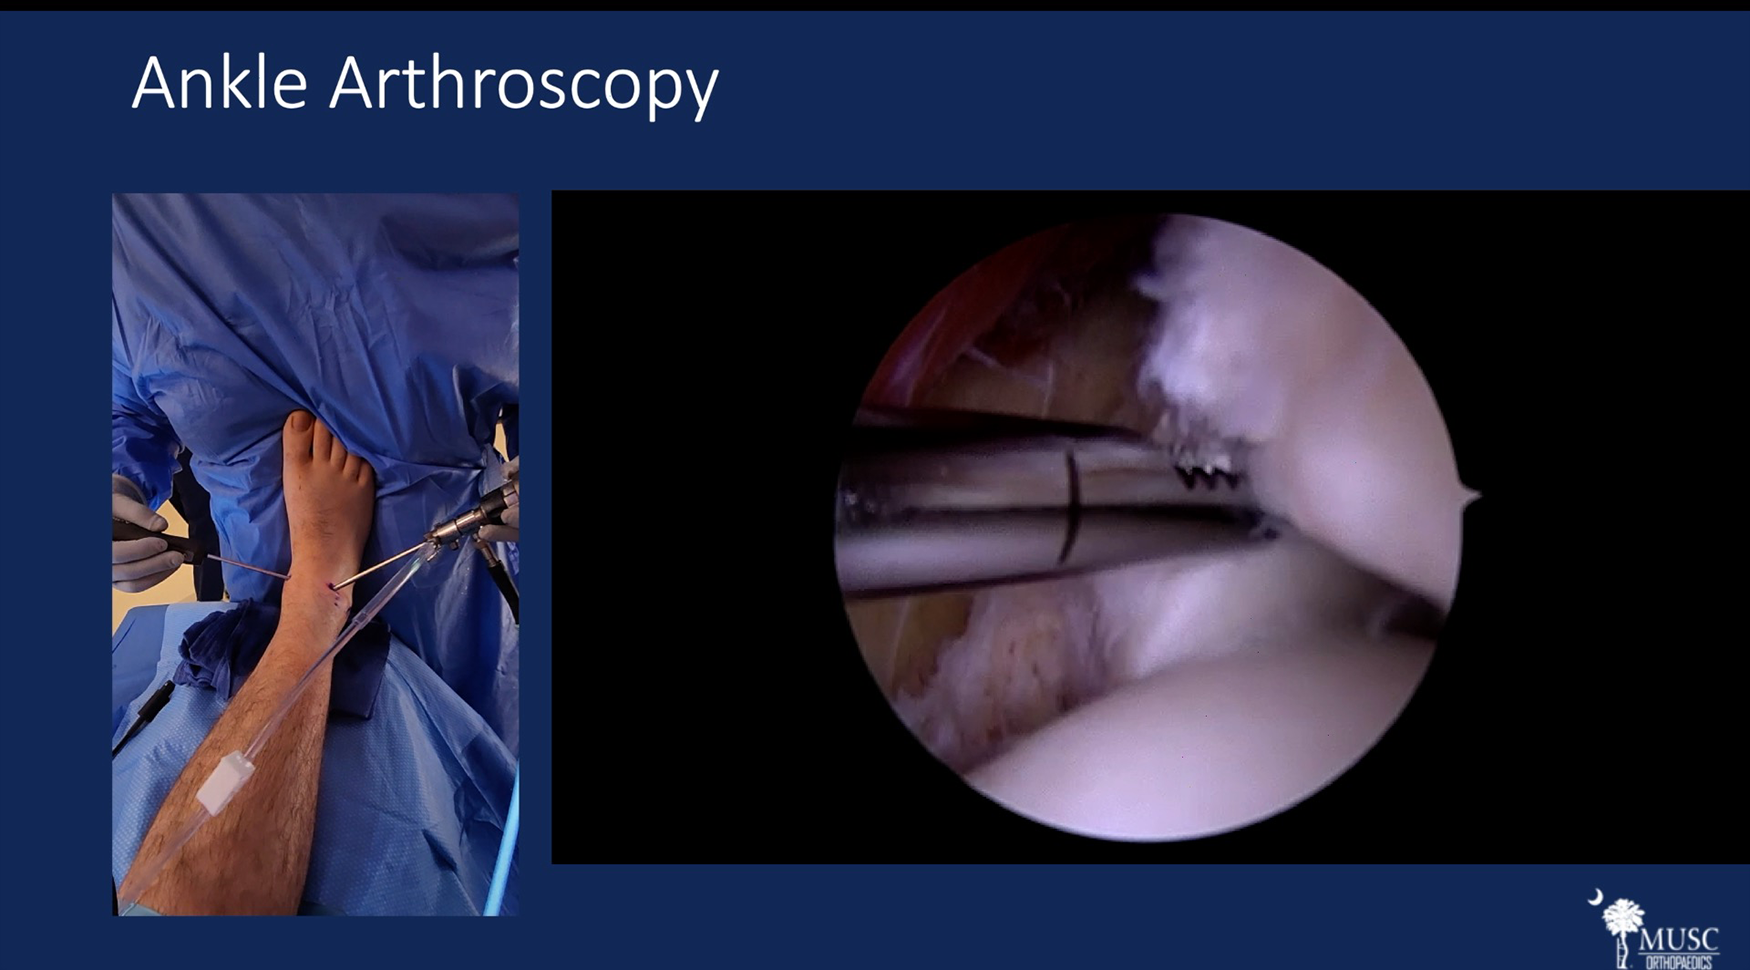
Video Transcript
This video details our operative management of lateral ankle instability.
Our relevant disclosures are listed here.
This presentation will start with an overview of the appropriate workup for diagnosis of ankle instability including appropriate radiographic assessment. We will review conservative management options followed by our preferred surgical management consisting of an examination under anesthesia, ankle arthroscopy, and a modified Broström technique.
To review, ankle sprains are common athletic injuries, with 20% of ankle sprains developing into chronic ankle instability.4,7,15 The anterior talofibular ligament (ATFL) is the most commonly sprained ligament. 4
Upon presentation, important details to ascertain include the frequency of ankle sprains, prior ankle sprain treatment, and evidence of hyperlaxity represented by the presence of Beighton criteria. These details can help determine the best next steps in treatment and help determine which patients are at high risk of recurrence.
Ankle stability can be assessed using the anterior drawer, talar tilt, and anterolateral drawer tests.2,7 To review, the ATFL with anterior drawer is best evaluated in plantarflexion, and the calcaneofibular ligament (CFL) is best evaluated in dorsiflexion. 1 It is also important to evaluate ankle range of motion, the presence of an effusion, and the alignment of the hindfoot. A subtle cavovarus foot, which can be appreciated with a peekaboo heel, demonstrated here on the bottom right image, places patients at an increased risk of recurrent ankle sprains and may need to be addressed to optimize outcomes.3,7
Initial weightbearing radiographs are useful to confirm ligament injury, identify other contributors of pain, and rule out other injuries. Stress radiographs are useful in confirming the diagnosis of ankle instability. 2 Anterior drawer test with an increase of translation by 10 mm is positive for anterior instability. Talar tilt test with varus and valgus stress with an increase of 10° of inclination demonstrates lateral ankle and medial ankle instability, respectively. 2 External rotation or gravity stress views can also be used to assess the syndesmosis and deltoid ligament. Here, you can see intraoperative fluoroscopy shots demonstrating anterior and lateral ankle instability with anterior drawer and varus stress radiographs.
Prior to operative intervention, a magnetic resonance image should be obtained.2,9 Evaluation of the ATFL and posterior talofibular ligament (PTFL) is best appreciated on axial T2 images just distal to the tibiofibular ligaments as shown here. Coronal images are best used to evaluate the CFL and further evaluate the PTFL. From left to right, you can see varying degrees of PTFL and CFL tearing or discontinuity.
Initial conservative management should promote mobilization. Pain relief may be obtained with rest, ice, compression, and elevation. Physical therapy with proprioceptive training is key as it has been demonstrated to reduce the recurrence of ankle sprains in both those with or without previous ankle sprain history. 11
Indications for surgical management include recurrent instability, failed conservative management for 3 to 6 months, and inability to return to play or activity. 14
Our surgical management begins with an examination under anesthesia followed by ankle arthroscopy. Benefits of arthroscopy are that it allows for effective identification and treatment of intra-articular pathologies, has a low complication rate, and has a minimal increase in operative time.2,13 Stability of the syndesmosis ligament can be assessed with a “drive-through” sign, which we will elaborate on shortly. 12 For our Broström repair, we only utilize suture tape augmentation for those at high risk of recurrence due to concerns of overtightening.2,6
Patient positioning can be seen here. We have a tourniquet around the thigh, a 10 × 15 sealing off our operative field, bone foam underneath the ipsilateral extremity, a bump underneath the ipsilateral hip, and the toes are pointing toward the ceiling. Prior to incision, we perform an examination under anesthesia. After prepping and draping, the surgeon stands at the foot of the bed. The arthroscopy screen should be placed in direct visualization of the operative surgeon.
The anteromedial portal, which is medial to the tibialis anterior, is identified. Traction is placed on the fourth toe. The superficial peroneal nerve is traced out, and then the lateral portal is identified adjacent to it. A spinal needle is used to identify the joint space. Dorsiflexing the foot can increase the space for needle placement. After correct identification of the joint space, the needle is removed. An incision is made through skin. Next, the trocar followed by the camera is placed into the anteromedial portal. Under scope visualization, a spinal needle is used to establish the lateral portal.
An incision is made just through skin after confirmation of portal placement. We then bluntly dissect with a hemostat down to the joint capsule and insert the hemostat into the joint under visualization. Next, the arthroscopic shaver is then inserted into the joint.
Next, you can see our hand positioning as we debride pathologic tissue within the joint including a hypertrophied synovium as well as an accessory anterior inferior tibiofibular ligament. We then use the shaver to perform a “drive-through” sign where we try to insert the shaver between the tibia and fibula. The fact that the shaver does not pass through this space indicates the syndesmosis is intact. 12
We continue our debridement of osteophytes within the joint.
After the completion of arthroscopy, we turn our attention laterally where we make an incision centered over the fibula. We then dissect through skin, taking care not to damage branches of the superficial peroneal nerve. The peroneal tendon sheath is identified and then incised. We then identify any peroneal tendon tears and perform a tenolysis or tendon repair as needed. We then identify the distal aspect of the fibula and peel off the respective ATFL and CFL tissue.
Attention is then turned toward the periosteum on the distal fibula, and some is dissected off proximally for later incorporation into our repair. Here, we demonstrate our CFL and ATFL dissected off the distal fibula. Using a rongeur, we create a bleeding bone trough for suture anchor placement on the distal fibula. We then place two 3.0-mm suture anchors in the CFL and ATFL origins, respectively. These suture anchors should be approximately 1.5 cm apart. Tugging on the suture anchors with a gentle pull lifting the leg off the table confirms adequate suture anchor purchase. The ATFL suture anchor limbs are passed through the ATFL tissue. This process is repeated for the CFL anchor. The limbs of the suture anchor are then tied. The foot is placed in dorsiflexion and eversion while this is performed. The four suture limbs are then passed back though the periosteum dissected off earlier. This process is repeated for all four suture limbs. These limbs are then passed back through the previously incorporated tissue for repair, and these suture limbs are then tied again. Suture limbs are then cut with a scalpel.
A repeat examination under anesthesia is performed with improved ankle stability as demonstrated here.
Potential complications of this technique include risk of recurrence, overtightening leading to stiffness, superficial peroneal nerve injury, wound healing complications, and superficial infections.10,13 Adhering to our proposed rehabilitation protocol can mitigate the risk of recurrence and ideally decrease the rate of wound complications and infections. We are selective in our use of suture tape augmentation to prevent overtightening, and tracing of the superficial peroneal nerve with blunt dissection during lateral portal creation decreases injury rates.2,7
Postoperatively, for the first 2 weeks, patients are immobilized in a controlled ankle motion boot. From 3 to 6 weeks, we begin working on restoration of range of motion and progress to full weightbearing. Proprioception training and progressive strengthening begin in weeks 7 to 12, with return to sport-specific activity at 13 weeks. 10
Return to sport rates vary, but the average return to play occurs at 4.7 months, with most athletes returning fully at 8 months. Criteria for return to play include painless range of motion, no feelings of instability, and ability to perform painless sport-specific activities. 5
Outcomes of our technique are promising, with improvement in patient-reported outcome measures, restoration of range of motion, and low failure rates. Return-to-sport rates vary but are as high as 94%.8,10
Our references are shown here.
We thank you for your attention.
Footnotes
Submitted May 17, 2023; accepted June 30, 2023.
One or more of the authors has declared the following potential conflict of interest or source of funding: C.C.A. has received support for education from Peerless Surgical. J.B.G. has received support for education from Peerless Surgical. D.J.S. is a board or committee member for American Academy of Orthopaedic Surgeons and American Orthopaedic Foot and Ankle Society; receives research support from Arthrex, Inc, Orthofix, Inc, and Paragon 28; has received support for education from Peerless Surgical; has received travel expenses from Integra LifeSciences; and is a paid consultant for Metric, Orthofix, Inc, and Redpoing. AOSSM checks author disclosures against the Open Payments Database (OPD). AOSSM has not conducted an independent investigation on the OPD and disclaims any liability or responsibility relating thereto.