
Abstract
Medical museums around the world have many specimens of historical and teaching value in their collections. Some of these are bones that have been prepared to illustrate normal anatomy. Others consist of organs preserved in liquid fixative (“wet” specimens) and mounted in glass or plexiglass containers that demonstrate the pathology of disease. Digitization of these specimens has the advantage of making them available for viewing by more students or website visitors than is possible in the museum itself. Photogrammetry is one method for doing this that enables the reconstruction of high-quality 3D models using standard specimen photographs. However, although relatively easy to perform on bones, its use with “wet” objects is more difficult and special steps are required to achieve optimal results. Using specimens from the Sir William Osler aortic aneurysm collection at the Maude Abbott Medical Museum, we developed a relatively simple and cost-effective photogrammetry process that gave good reconstructions of most specimens. We expect that future developments, such as the use of artificial intelligence-based techniques, may improve this result.
Introduction
The medical museum at McGill University is named after Maude Abbott, one of the first female medical graduates in Canada and the Director of McGill’s medical museum for the first part of the nineteenth century. 1 As curator Abbott collected many specimens, particularly those that demonstrated congenital cardiovascular anomalies. 2 During her tenure, the museum also had many specimens collected by William Osler from autopsies he performed at the Montreal General Hospital between 1876 and 1884. These included a number of aortic aneurysms, which Abbott felt were one of the most important sources of Osler’s early clinical-pathological experience. 3 She used these as well as other Osler specimens and her own cardiovascular collection for demonstrations to medical students as part of the medical school curriculum.
Although some institutions still use museum specimens as a tool for teaching pathology, 4 the role of museums in medical education has decreased considerably since Abbott’s time. 5 In fact, at McGill University in 2023, almost no pathological material is being used for this purpose. Despite this, we believe that preserved organ specimens are still valuable as examples of the natural history of disease and as paradigms of various aspects of medical history. Innovative ways of using them for teaching other aspects of the medical curriculum, such as close observation and narrative medicine, have also been explored. 6 Despite these uses, the cost of maintaining “wet” specimens and the competition for space in academic institutions present challenges for medical museums and can significantly limit the use of their specimens as an educational resource. 7
Several methods of adapting medical museum specimens for teaching and making them more widely accessible have been developed since the early 1900s. One of the most impressive was that proposed by Sidney Daukes, Director of the Welcome Foundation, in 1929. In an extensively illustrated book, 8 he advocated that medical museums use educational material such as radiographs, ECG tracings, and patient photographs in addition to pathological specimens in displays that more completely document the clinicopathologic features of disease. Other attempts to increase accessibility include the use of re-colorized transparency films 9 and, in our own time, web based 2D image displays. 10
Digitization and preparation of 3D models is another technique that can be used to enhance specimen viewing. In addition to being relatively easy to perform by curators or other museum staff with minimal training, the procedure offers a more comprehensive understanding of the anatomy and spatial relationships between adjacent structures than standard photography. 11 Importantly, 3D models also can be used to illustrate both specific features of individual specimens and the general features of disease to a much larger audience than visitors to the museum itself. The Maude Abbott Museum website developed an exhibit showing and discussing its Osler collection in 2010. 12 Since that time, it has been visited by many thousands of individuals; in 2022, for example, the virtual exhibit site had over 8,500 unique page views. Many of the website’s two-dimensional images offer adequate representations of a specimen’s pathology. However, more complex specimens include abnormalities such as aortic aneurysm rupture sites that cannot be appreciated on a frontal view as seen in a typical display case. Visualization of multiple aspects of such specimens via 3D images results in a much better understanding of their abnormalities and of the natural history of disease. Moreover, manipulation of 3D representations has been shown to increase both motivation to view material objects and learning related to them, particularly in younger individuals. 13 For these reasons, we felt that it would be worthwhile to explore the feasibility of 3D imaging of some of our heritage material.
Photogrammetry is a method by which photographs of a specimens are acquired from various angles and then used to digitally reconstruct a 3D model. 14 The costs are relatively small, the only requirements being a camera (even one as simple as a smartphone), 15 good lighting and photogrammetry software, which can be free and open-access. 16 However, while photogrammetry has been used to digitize dry museum collections by several groups,17,18,19 there are few studies that demonstrate good reconstructions of “wet” specimens. 20
In an attempt to improve the quality of such reconstructions, we developed a photogrammetry setup to digitize “wet” pathological specimens mounted in glass jars. We then used Blender (Blender Foundation, Amsterdam), a 3D graphics software to perform additional manipulation on the photogrammetric reconstructions to optimize the final appearance. We present here the results of this work on a small number of specimens as a pilot project to assess the feasibility and outcomes of the procedure.
Materials and Methods
Specimens
We selected 10 aortic aneurysms from the Sir William Osler collection of the Maude Abbott Museum for detailed 3D representation (Table 1). 21 These specimens were chosen for several reasons. First, is their historical significance. Osler is one of the most famous physicians of the late nineteenth to early twentieth centuries and has been referred to as the “father of modern medicine.” 22 His entire collection as well as the specimens we selected for study have been discussed in detail by other authors. 23 The annual meeting of the American Osler Society routinely attracts over 100 participants, including medical historians, archivists, and physicians, many of whom have accessed the museum website. Moreover, as demonstrated by our website visitor numbers, the collection has also clearly generated public interest. Finally, all the specimens we selected had features such as rupture sites or areas of adjacent organ compression that cannot be identified by looking at the front aspect of the specimen jar meant for display and that could theoretically be appreciated on 3D representations.
List of Specimens with Details.
The containers housing the specimens are all made of glass and are likely the original ones used for mounting between 1876 and 1884. However, caulking sealant on the jar top lid is clearly not original in nine containers, and fluid replacement has been done at least once in these. The nature of the fluid preservative is not certain, but we believe is Kaiserling III. 24 Although we have not investigated this, it is possible that the glycerin contained in this version of Kaiserling solution affects the refractive index of the fluid and causes some distortion effect. 25 Each specimen is attached by thread to a scaffold of glass rods that serves as a framework to stabilize it within the container. Like the jars themselves, these are almost certainly those that were used originally.
Imaging Setup
Camera model and settings
We used a digital SLR camera (Nikon D5300) with a standard 18 to 55 mm zoom lens for digital photography. To maintain consistency, we imaged all specimens on manual mode with the same camera settings: ISO range at 200, f-stop at f8, and shutter speed of 1/80. These settings were selected to reduce image blur and provide good image depth. Once each specimen was properly framed and focused, the zoom was not altered.
Photogrammetry setup
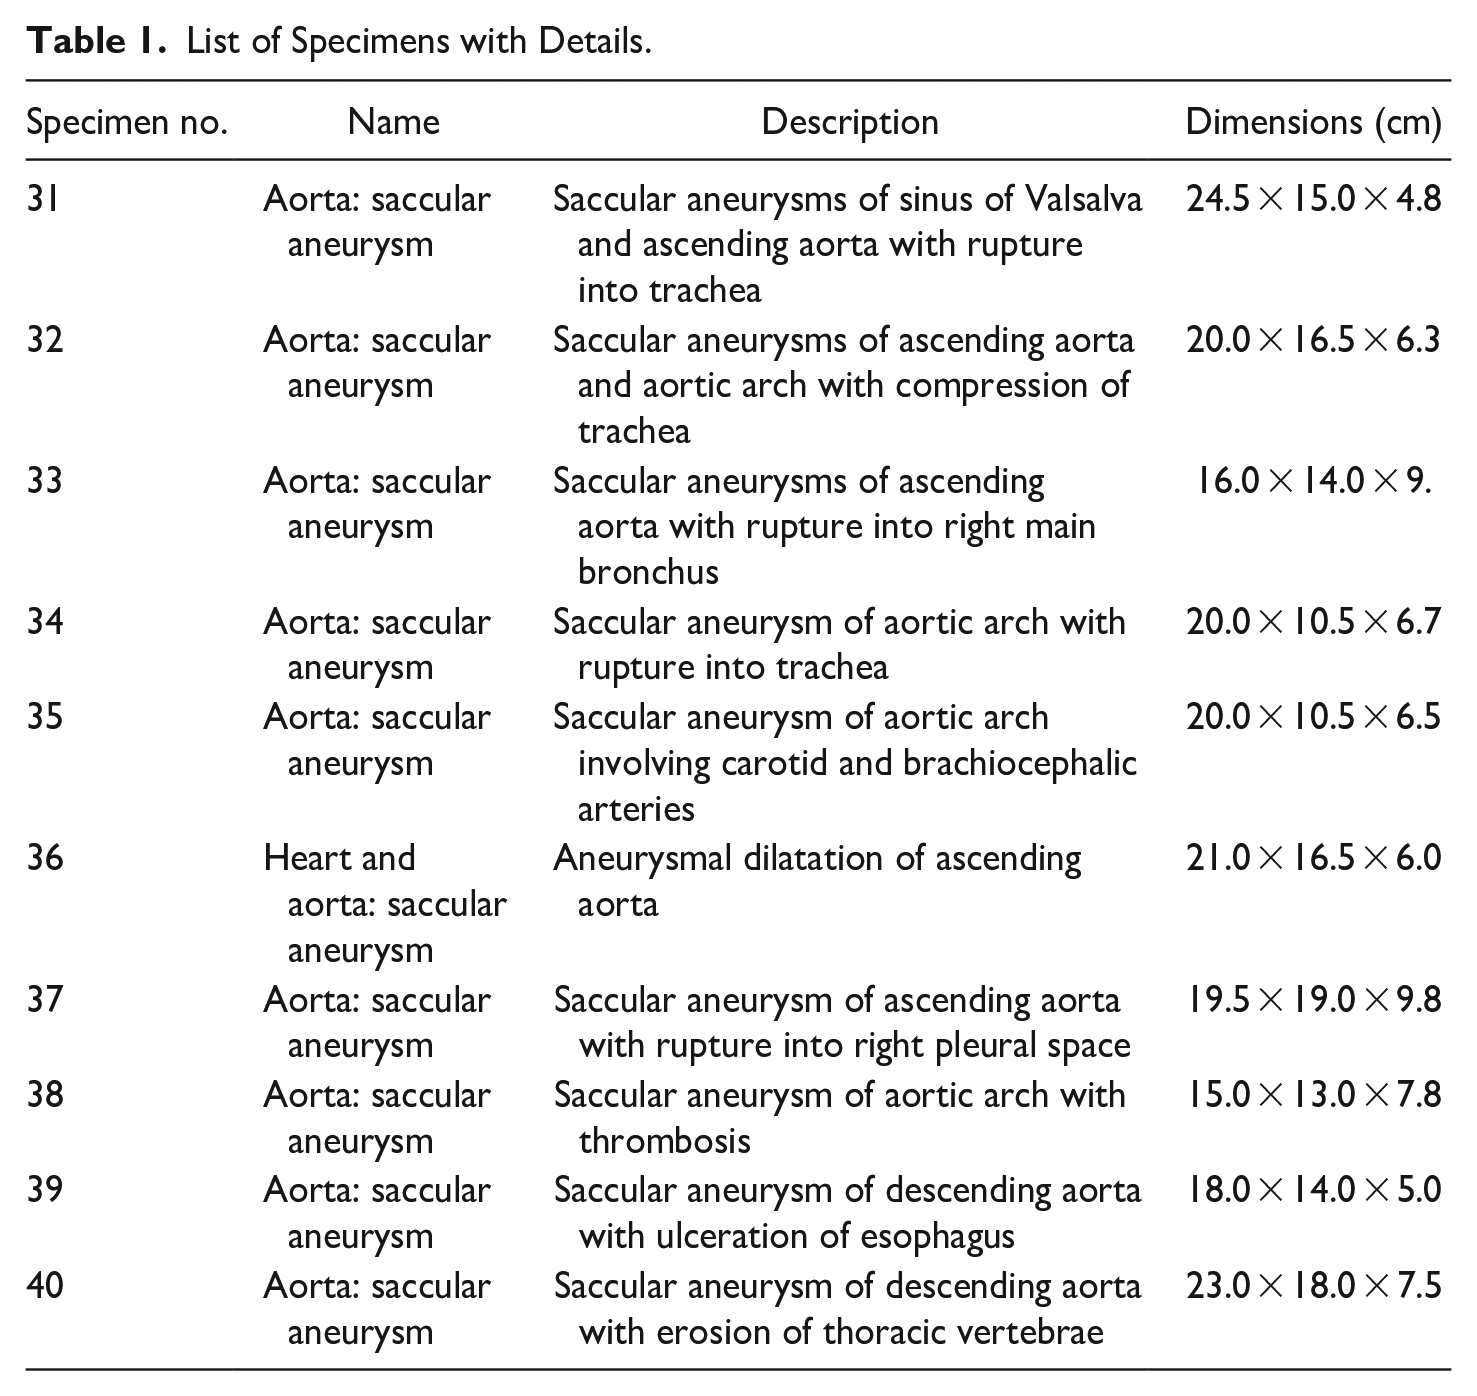
This consisted of a large photo box containing LED light strips (Amzdeal 20-inch foldable photo studio box), an automated turntable to support and rotate the specimens (Foldio360 smart turntable, manufactured by Orangemonkie, San Diego), and a tripod stand (Figure 1). The intensity of light and color temperature was maintained at the same level during imaging of all specimens. The turntable was controlled using a smartphone with Bluetooth connectivity. It was synced to the camera which automated photo acquisition with each rotation. We set the turntable to rotate clockwise by 7.5° with each turn, resulting in 48 photos for each specimen. Additional closeup photos were also taken and used to enhance the texture of the final 3D models.
Photogrammetry setup.
Photogrammetry Software
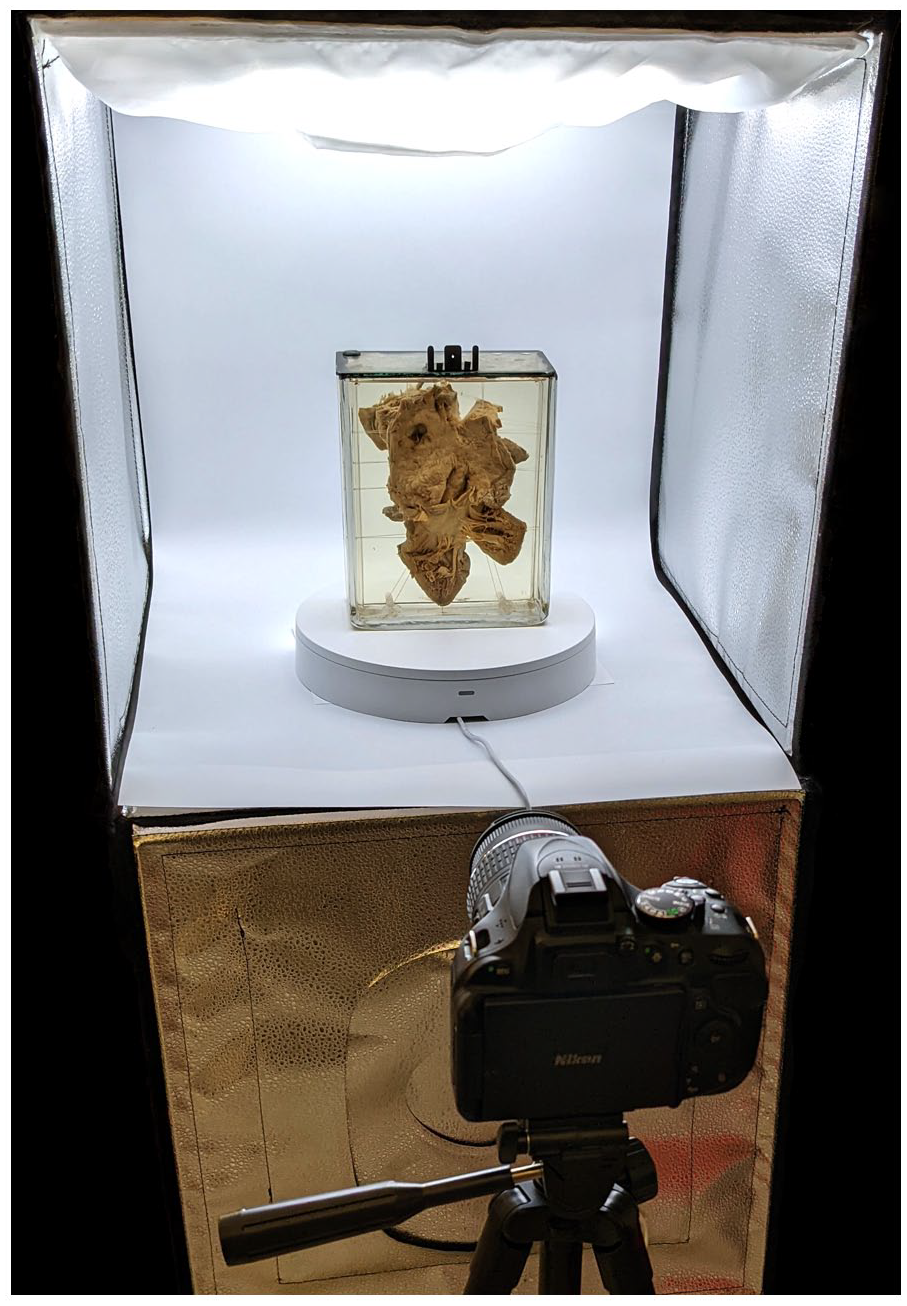
We used Agisoft Metashape (Standard Edition, version 1.8.1) because of its simplicity and ease of use. 26 From successive photographs taken as the specimen was rotated, measurements between key points were connected to create a 3D point cloud (Figure 2a). After this, a surface was overlaid on the connected points to produce a dense mesh model; photographs were in turn overlaid to provide texture.
(a) Point cloud, (b) unedited dense cloud, and (c) edited dense cloud.
For each specimen, 48 to 60 photos were imported into Agisoft Metashape and aligned using the highest accuracy setting (Figure 2a). Dense clouds were created in high quality from the aligned point cloud (Figure 2b). The generated dense cloud was then edited to remove sections unrelated to the actual specimen, for example, the background and the jar (Figure 2c). This provided improvements in texturing and reduced the size of 3D models.
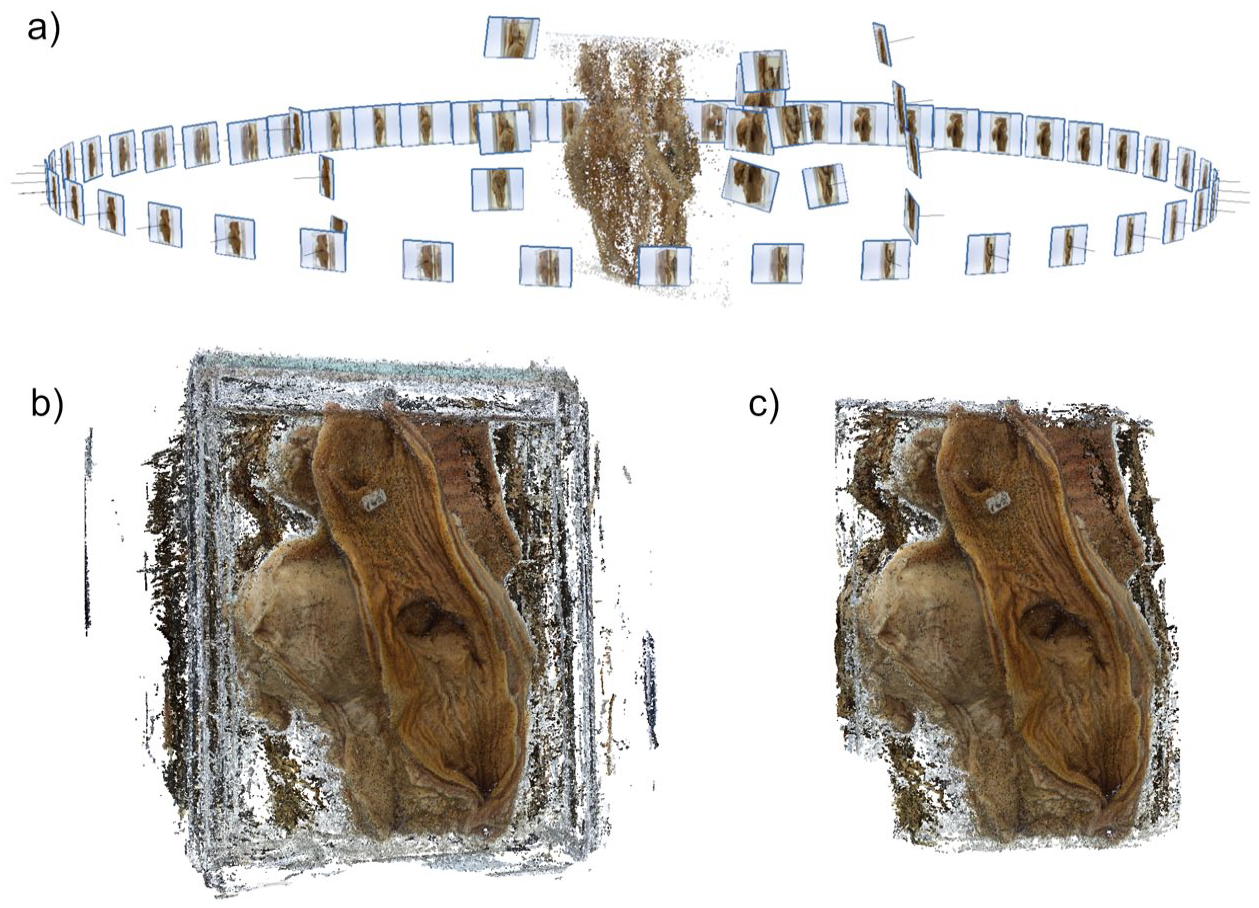
A mesh was then generated using the high setting and high face count (Figure 3). While this resulted in a model with higher file size, details of the specimen were better preserved. The texture was exported in 4K resolution as a portable network graphics (PNG) file, which is a lossless data compression format. All other settings in the mentioned steps were left as default. The resulting model was exported in OBJ file format, a 3D geometry definition file format (Wavefront Technologies, Santa Barbara, California).
(a) 3D model created from dense cloud and (b) textured 3D model.
Mesh Processing
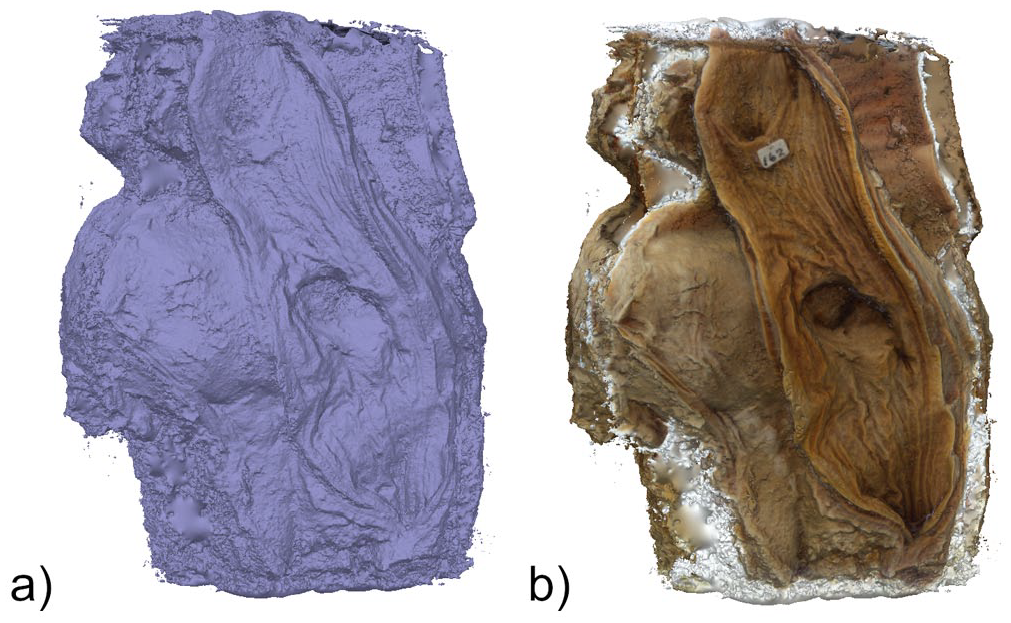
Blender (Blender Foundation, Amsterdam) is an open-source, 3D graphics software that was used to edit the “rough” model OBJ files. Initially, models were decimated into lower polygon counts while retaining details. This reduced file size and permitted faster editing. Unnecessary features were removed and any holes in the model were closed. In some cases, two halves of the specimens were reconstructed separately and then combined. Using digital sculpting, the models were enhanced to resemble the actual specimens (Figure 4). The textures from the photogrammetry software can lack finer details. To improve them, the painting tool in Blender was used to overlay closeup photos of the specimen and paint over the 3D model (Figure 5).
(a) Dense cloud model from photogrammetry software and (b) same model after digital sculpting using.
(a) Initial texture from photogrammetry software and (b) same texture after editing in Blender.
Results
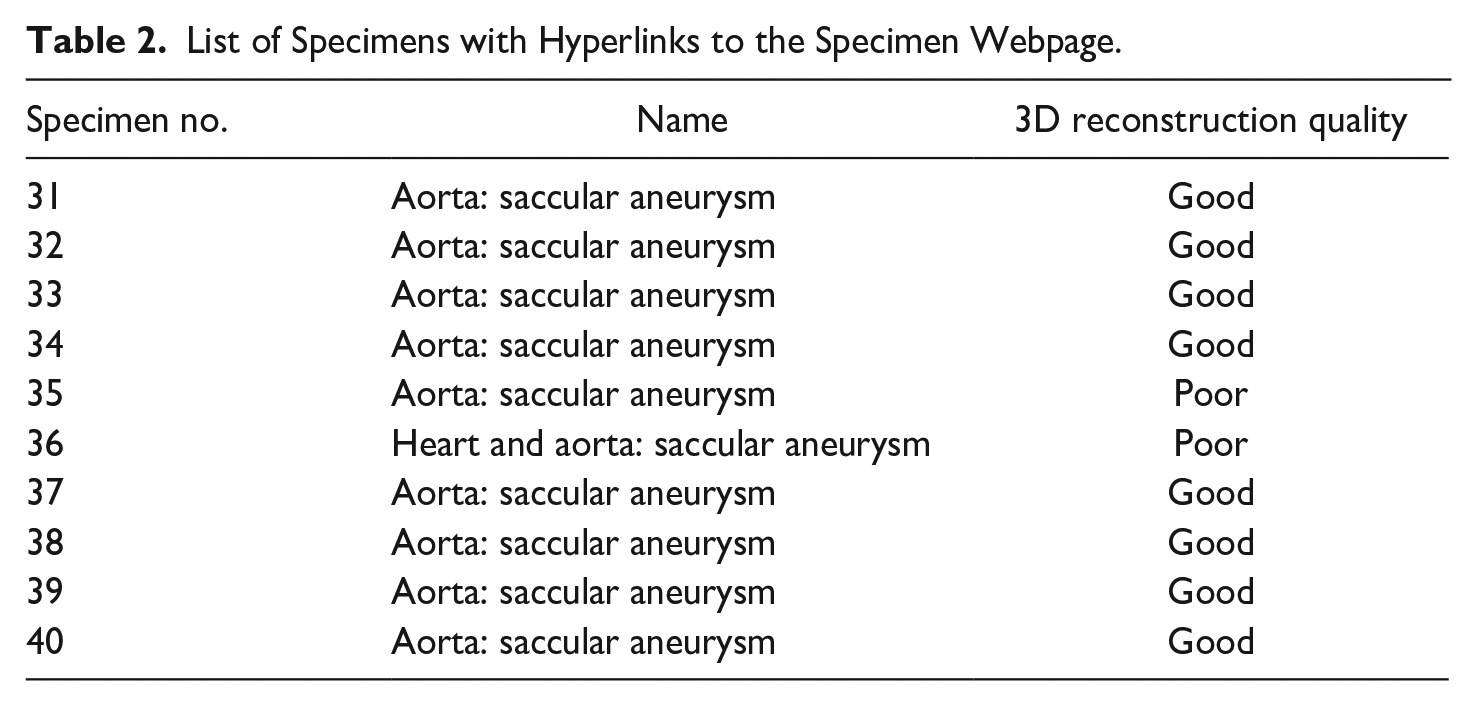
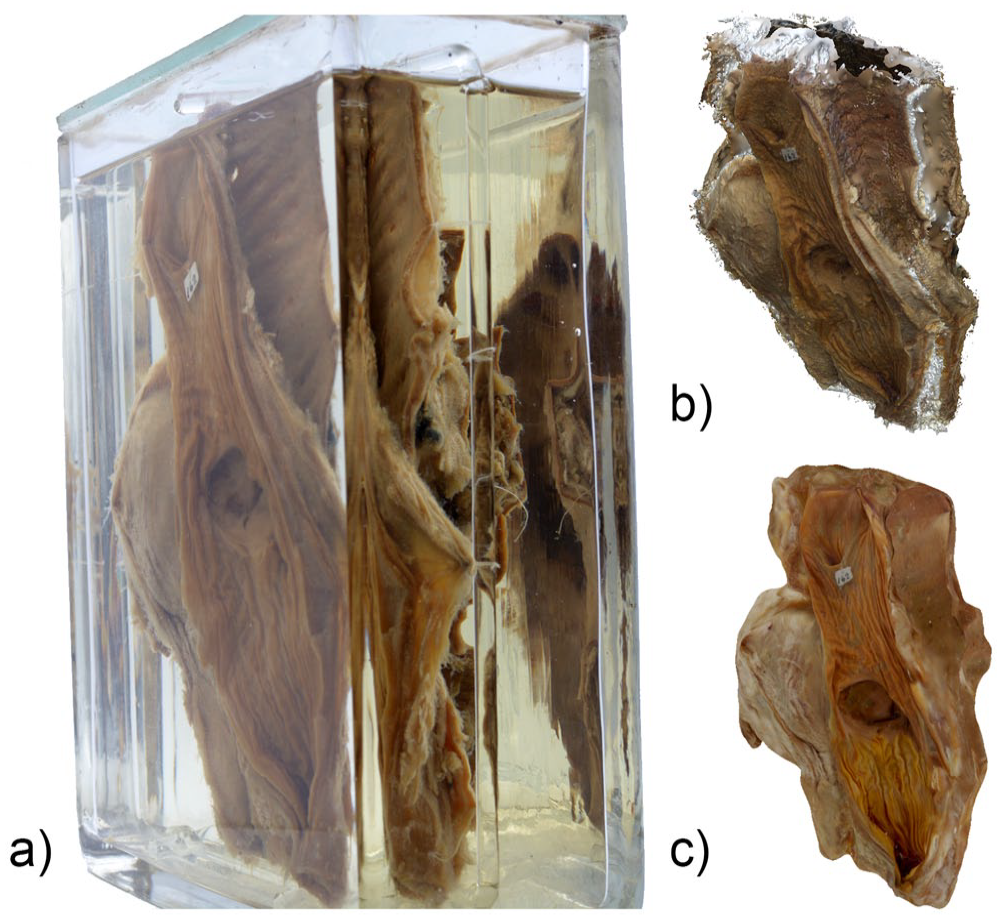
Comparison of the final 3D model with the actual specimen showed what we considered to be good 3D representations of eight specimens (Figure 6). (“Good” was defined subjectively by a combination of image clarity, similarity to the original organ, and ease of identification of important features such as rupture sites. “Poor” was applied subjectively to those models which had morphologic features that were moderately or markedly different from the actual specimen.) Despite intensive efforts, we could produce only poor representations in two others. All models retained the dimensions of the actual specimen. The textured models of the “good” reconstructions can be viewed by clicking “3D model” on their specific webpages on the museum website https://www.mcgill.ca/medicalmuseum/exhibits/maude-abbott-medical-museum-osler-collection/specimens/aneurysm or by hyperlinks in Table 2.
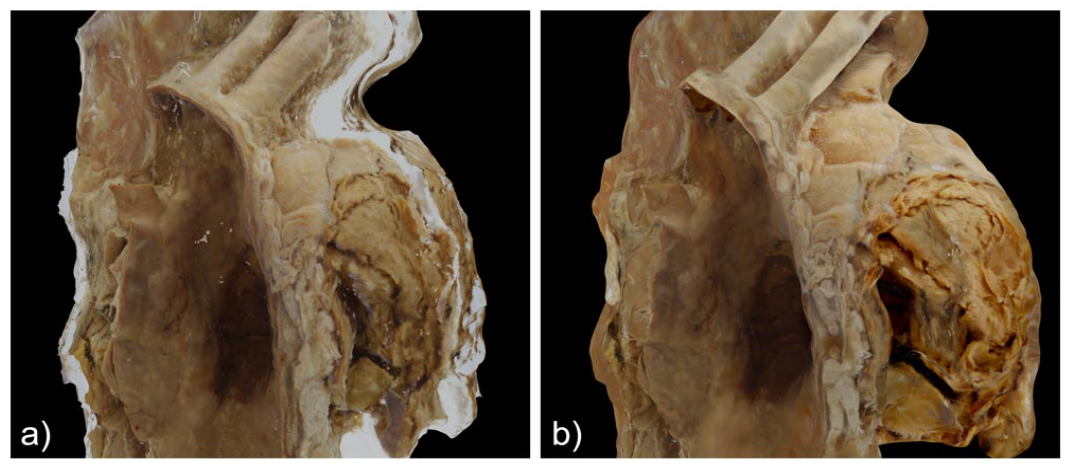
Images of specimen 39 considered by us to be a good reproduction: (a) aneurysm containing laminated intraluminal thrombus (arrow) and (b) esophageal diverticulum (arrow) adherent to the aneurysm.
List of Specimens with Hyperlinks to the Specimen Webpage.
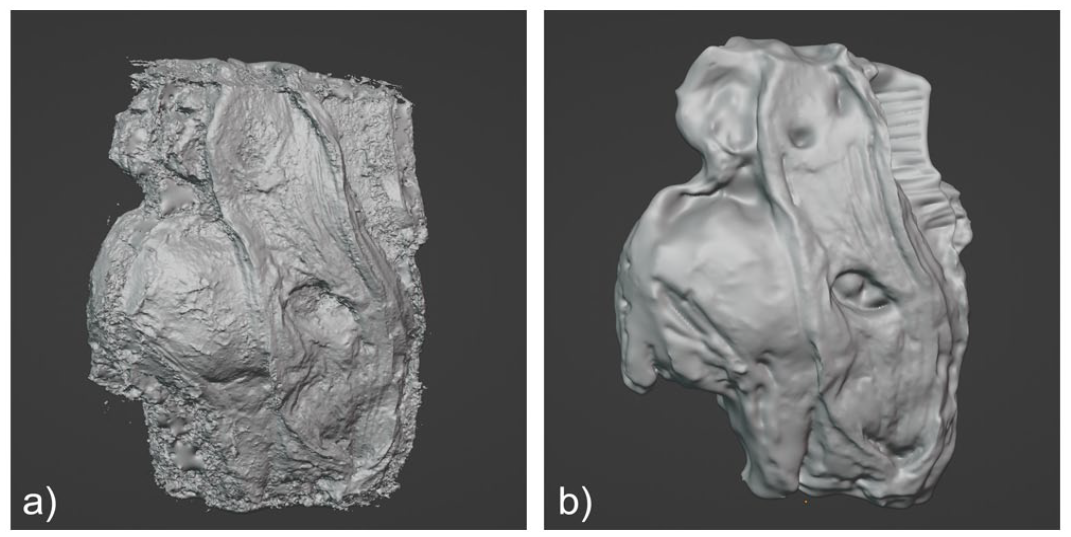
We identified several difficulties in the reconstruction process. The most important was distortion related to corner edges and differences in glass wall thickness. There were also problems related to internal reflections of the specimen on the glass (Figure 7a). While some of these could be masked during photogrammetric reconstruction, the extent of the distortions could not be corrected in some instances. The lids on some jars were only partly transparent or were relatively thick, resulting in additional distortion that hindered efficient photography in the vertical plane. Finally, all the specimens are supported within the container on thin glass rods. Although these could be digitally removed, most of the superior and inferior aspects were incomplete (Figure 7b) and had to be manipulated using Blender (Figure 7c).
(a) Photograph of specimen 39 showing image distortion and internal reflections, (b) presence of a large void on the superior aspect of the reconstructed 3D specimen model, and (c) same 3D model that has been digitally sculpted using Blender.
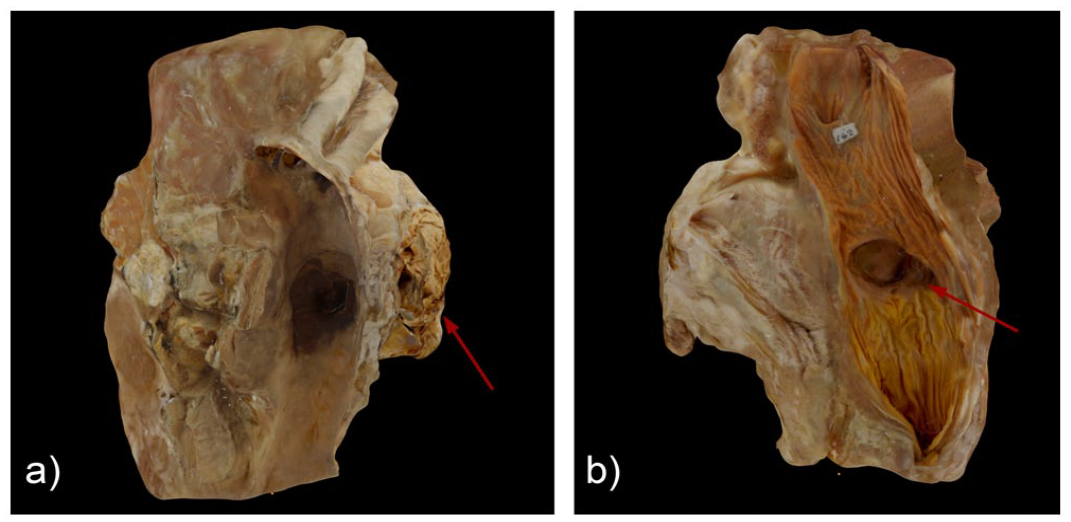
The two specimens considered to have poor photogrammetric reconstructions had a smaller antero-posterior dimension at their lower end. For example, specimen 36 measured 6 cm at the upper end, and only about 2 cm at its bottom (Figure 8a). The shorter dimension led to exaggerated distortion at the bottom, resulting in photogrammetric models with unusually larger antero-posterior length (Figure 8b). This specimen also has numerous chordae tendineae that were difficult to reconstruct effectively and to enhance (Figure 8c).
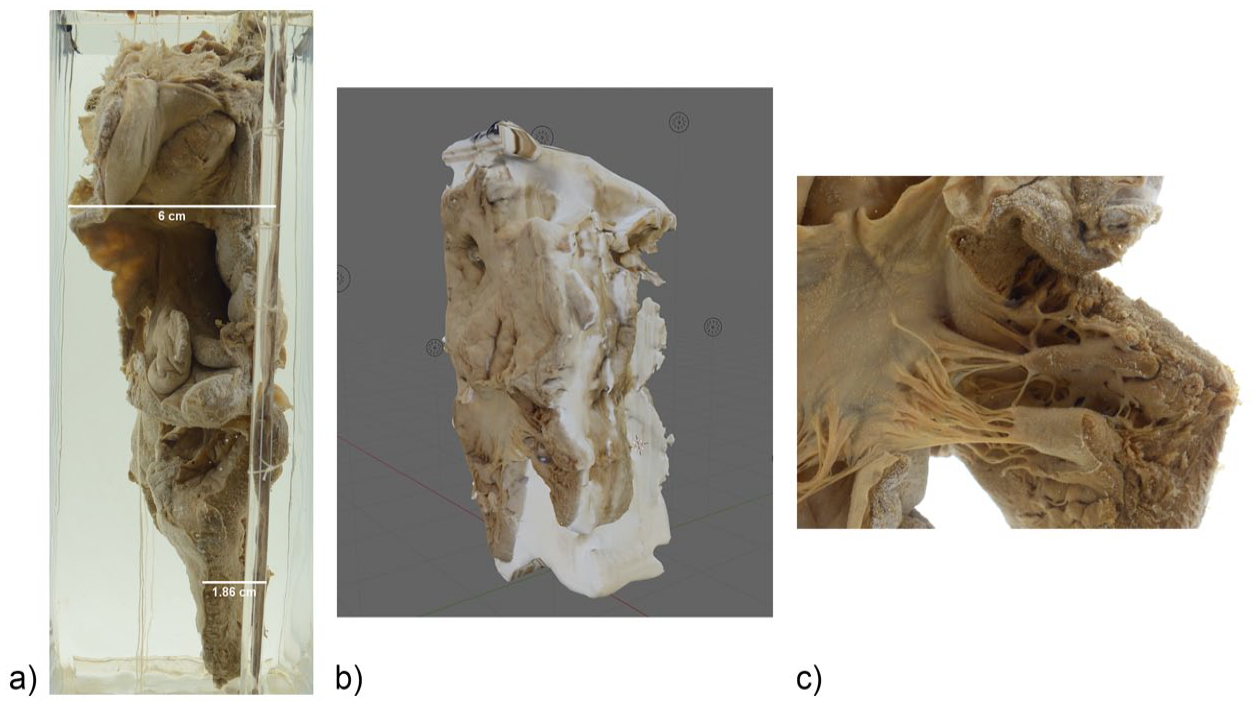
(a) Photograph of specimen 36 from the side showing larger antero-posterior length (6.0 cm) along the upper and shorter length (1.8 cm) along the lower end, (b) photogrammetric reconstruction of same specimen showing exaggerated thickness, and (c) detail view of chordae tendineae in the same specimen.
Discussion
The aneurysms reconstructed in this study are historically significant. They derive from one of the most acclaimed physicians of the twentieth century, were used by him in scientific publications on the subject, 27 and have been the subject of detailed discussion by several medical historians. 28 In our experience, they are also rare, particularly in the “natural” (i.e., unoperated) state in which they have been preserved.
One of the most important educational features of many of the Osler aneurysms is a rupture site which led to death; this is usually located on the side or back of the specimen and is thus difficult for a viewer to appreciate on a standard museum display shelf. The glass rods from which the specimens are hung in the containers are fragile, making their handling and turning to better see the rupture site a risk to specimen integrity. For these reasons, the development of 3D models that demonstrate the details of the specimens on all sides without significant handling is desirable. Although such details also may be evident on 360°-rotating images, 29 the ability to virtually manipulate a reconstruction in three dimensions gives additional information as well as clearer views of the site of rupture (e.g., trachea, esophagus, or pericardial space) and impingement on other structures (e.g., vertebra or main bronchus). The added element of viewer participation in this manipulation is likely a bonus from both motivational and learning points of view. For example, in one recent study of over 500 Czech adolescents, the use of “dynamic visualization” strategies, including 3D images, was found to significantly increase interest, active participation, and competence in learning science subjects such as chemistry and biology. 30 Other investigators have found similar value for the use of 3D models in anatomy, pathology, and surgical education and training.31,32,33
Photogrammetry has been extensively used to digitize museum specimens.34,35,36 However, although the procedure has been shown to give good quality reconstructions of dry specimens,37,38 few investigators have demonstrated similar quality for “wet” ones. Four specimens from the University of Glasgow’s Hunterian collection were digitized using a similar approach as ours (although not with editing after photogrammetric reconstruction). 39 The authors of that study obtained what they considered to be fair to good quality reconstructions in two specimens. They compared reconstructions using four different photogrammetry software and found only one (Agisoft Photoscan, currently called Agisoft Metashape) that gave what they considered to be good results. No conclusive reason for better performance on selected specimens was offered.
We found that imaging is challenging with “wet” specimens because of distortion caused by the edges of the glass containers and variations in lid thickness and glass transparency. Distortion related to refractive differences at the fluid–glass interface was also seen, but this is expected in two-media photogrammetry. 40 One way to overcome such distortion, at least partly, is by using 3D graphics software such as Blender to digitally sculpt the photogrammetric models. Enhancement of the texture by painting over the 3D model can also add realism to the final product. However, experience using the software is required to create models that closely resemble the actual specimens. Photogrammetric reconstruction is also time consuming, especially if the settings are on highest quality. It takes about 10 minutes to prepare our photogrammetry setup and 5 minutes to photograph each specimen. The 3D reconstruction takes between 30 and 50 minutes per specimen; refining the models using the graphic software varies between 2 and 4 hours. Moreover, even after significant time and effort, reconstructions of two of the specimens were not deemed adequate for viewing.
Despite these limitations, we believe that photogrammetric reconstruction of museum specimens such as the Osler aneurysms is worthwhile and deserves more study. Given the fame of and interest in Osler as a physician, improved understanding of the nature of the collection is useful from an historical point of view. 3D reconstruction also better illustrates both the pathology (vessel dilatation) and the pathophysiology (rupture and death) of disease. As an educational tool, it likely increases viewer interaction with the specimen and thus learning of both these biological features. The fact that our museum website collections are viewed by thousands of individuals suggests that the potential for such education is significant. Other medical museums with large wet collections, such as the Mütter in Philadelphia and the Hunterian in Glasgow, may also find the process useful.
The process of 3D imaging is relatively easy and inexpensive. We used an open-source 3D software (Blender) that has several learning resources online. The cost is less than $500 for the camera and the photo light box. Its major current disadvantage is image processing time, which can be significant; it took us from 1 to 5 hours for each specimen. Having said this, we expect familiarity with the procedure will result in a decrease in time expenditure. Moreover, the field of digital representation is constantly improving. For example, artificial intelligence-based techniques such as neural radiance fields (NeRF) show promise in both automatizing the reconstruction process and improving efficiency. 41 We anticipate that with refinements in quality and decreased operator time provided by this and likely other developments, 3D reconstructions of “wet” medical museum specimens will become more utilized for teaching and display.
Conclusion
We used a relatively simple and cost-effective photogrammetry setup and workflow to digitize “wet” specimens from the Osler aneurysm collection of the Maude Abbott Medical Museum. Although somewhat time-consuming, the procedure resulted in what we considered to be good reconstructions in eight of the ten chosen specimens. The use of 3D graphic software to digitally sculpt such historically significant specimens is a modern artform that holds promise to display their essential features better and to a wider audience. With the development of artificial intelligence-based techniques, this could become a more common means of pathology specimen display in medical museums.
Footnotes
Declaration of Conflicting Interests
The author(s) declared the following potential conflicts of interest with respect to the research, authorship, and/or publication of this article: Dr. Fiset reports honoraria for expert consultation from Amgen, EMD Serono, AstraZeneca, Bristol Myers Squibb, Merck, Pfizer, and Hoffmann-La Roche. He has also received grants from AstraZeneca, Bristol Myers Squibb, the Cancer Research Society, and the Canadian Institute of Health research, outside the submitted work.
Funding
The author(s) received no financial support for the research, authorship, and/or publication of this article.
7.
8.
9.
Harris, Pritchard, and Silvo (1977), “Adaptation of Museum Specimens for Use in Anatomical Teaching Aids.”
13.
Teplá, Teplý, and Šmejkal (2022), “Influence of 3D Models and Animations on Students in Natural Subjects.”
15.
Barbero-García, Lerma, and Mora-Navarro (2020), “Fully Automatic Smartphone-Based Photogrammetric 3D Modelling of Infant’s Heads for Cranial Deformation Analysis.”
16.
18.
Fau, Cornette, and Houssaye (2016), “Photogrammetry for 3D Digitizing Bones of Mounted Skeletons: Potential and Limits.”
19.
Matheny, Hagseth, and Schendel (2022), “Photogrammetry as an Access Tool: A Case Study of Small Collections From the Evansville Museum of Arts, History & Science.”
20.
Osnes, Livingstone, and Rea (2016), “Photogrammetric Digitisation of a Selection of Pathological Specimens of Dr. William Hunter.”
25.
26.
30.
Teplá, Teplý, and Šmejkal (2022), “Influence of 3D Models and Animations on Students in Natural Subjects.”
31.
33.
34.
36.
Jędrzejewski, Loranger, and Clancy (2020), “Virtual Anatomy Museum: Facilitating Public Engagement Through an Interactive Application.”
38.
Fau, Cornette, and Houssaye (2016), “Photogrammetry for 3D Digitizing Bones of Mounted Skeletons: Potential and Limits.”
39.
Osnes, Livingstone, and Rea (2016), “Photogrammetric Digitisation of a Selection of Pathological Specimens of Dr. William Hunter.”