
Abstract
Intravital multiphoton microscopy offers valuable spatio-temporal insight into studies of pathogen-host interactions. Although well established for studies with low-risk biohazard studies, the complexity of the intravital imaging technique has been difficult for applications using high-risk pathogens. Here, we delineate our standard operating procedure (SOP) for intravital microscopy studies of Risk Groups 2 and 3 pathogens. Using carefully designed protocols adapted to the pathogens under study, we present strategies that allow application of this complex technique to high-risk studies while maximizing protection of personnel and animals in the facility. While we describe our SOP for studies of HIV in vivo, these strategies serve as a guideline for designing SOPs for a wide variety of pathogen studies employing intravital imaging.
Keywords
Introduction
Intravital multiphoton microscopy enables real-time imaging of various anatomical sites in living experimental animal models such as mice. Among the advantages of intravital multiphoton microscopy, long-wavelength excitation light exhibits low photobleaching and penetrates deeply into observed tissues, permitting prolonged imaging of spatiotemporal events in live tissues in situ. 1 This technique has been widely adopted for immunological studies of cell migration and interaction, resulting in over 200 studies in recent years. However, the use of intravital microscopy for studies of pathogen infection and spread is comparatively rare. As of 2018, approximately 10 studies on Risk Group 2 and 3 pathogens were published. Rarer still are intravital microscopy studies involving Risk Group 3 pathogens, with approximately 2 published studies to date.2,3 Although intravital microscopy is a remarkably valuable technique for the exploration of pathogen-host interactions, the paucity of BSL-2/3 studies using this technique is not without reason. Intravital microscopy is a complex experimental technique, commanding surgical skills and maintenance of animal survival throughout long imaging sessions. When performed with high-risk pathogens, the inherent complexity of the surgical and imaging procedures encompassed by intravital microscopy studies increases drastically. We have established a strategy for performing these studies of high-risk pathogens in living animals.
Among possible sites for studies in living mice, the popliteal lymph node and spleen are ideal for investigating various aspects of infection using intravital microscopy. We previously established the popliteal lymph node for studies of retroviral infection using an amphotropic Murine Leukemia Virus, a Risk Group 2 retrovirus.4,5 The popliteal lymph node is advantageous to studies of host-pathogen interaction in several ways. Following subcutaneous injection, injected material arrives in the popliteal lymph node 5 to 10 minutes after administration. Compared to intravenous and intraperitoneal administrations, subcutaneous administration in the footpad results in lower pathogen or antigen dilution at the draining lymphatic tissue. Furthermore, the popliteal lymph node is easily surgically exposed. Similarly, the spleen can be surgically exposed with relative ease and allows observation of bloodborne pathogens in addition to infection and migration dynamics of lymphocytes. We have recently expanded this technique for BSL-3/ABSL-3 studies of transmitted/founder HIV strains in the spleens of infected humanized mice.
Here, we illustrate our protocol for successfully executing intravital microscopy studies of high-risk pathogens while minimizing researcher exposure through use of engineering controls, personal protective equipment, and effective standard operating procedures.
Standard Operating Procedures
Effective standard operating procedures (SOPs) are critical for maximizing researcher protection and animal welfare during the intravital imaging procedure in addition to engineering controls (Figure 1). While engineering controls and personal protective equipment (PPE) requirements serve as steady-state measures for minimizing researcher exposure, a good SOP lays out step-by-step guidelines to be followed during routine experimental execution as well as emergencies. While the SOP should comprise all components of the intravital imaging procedure, we have described additional considerations for generating an effective SOP (Figure 2).
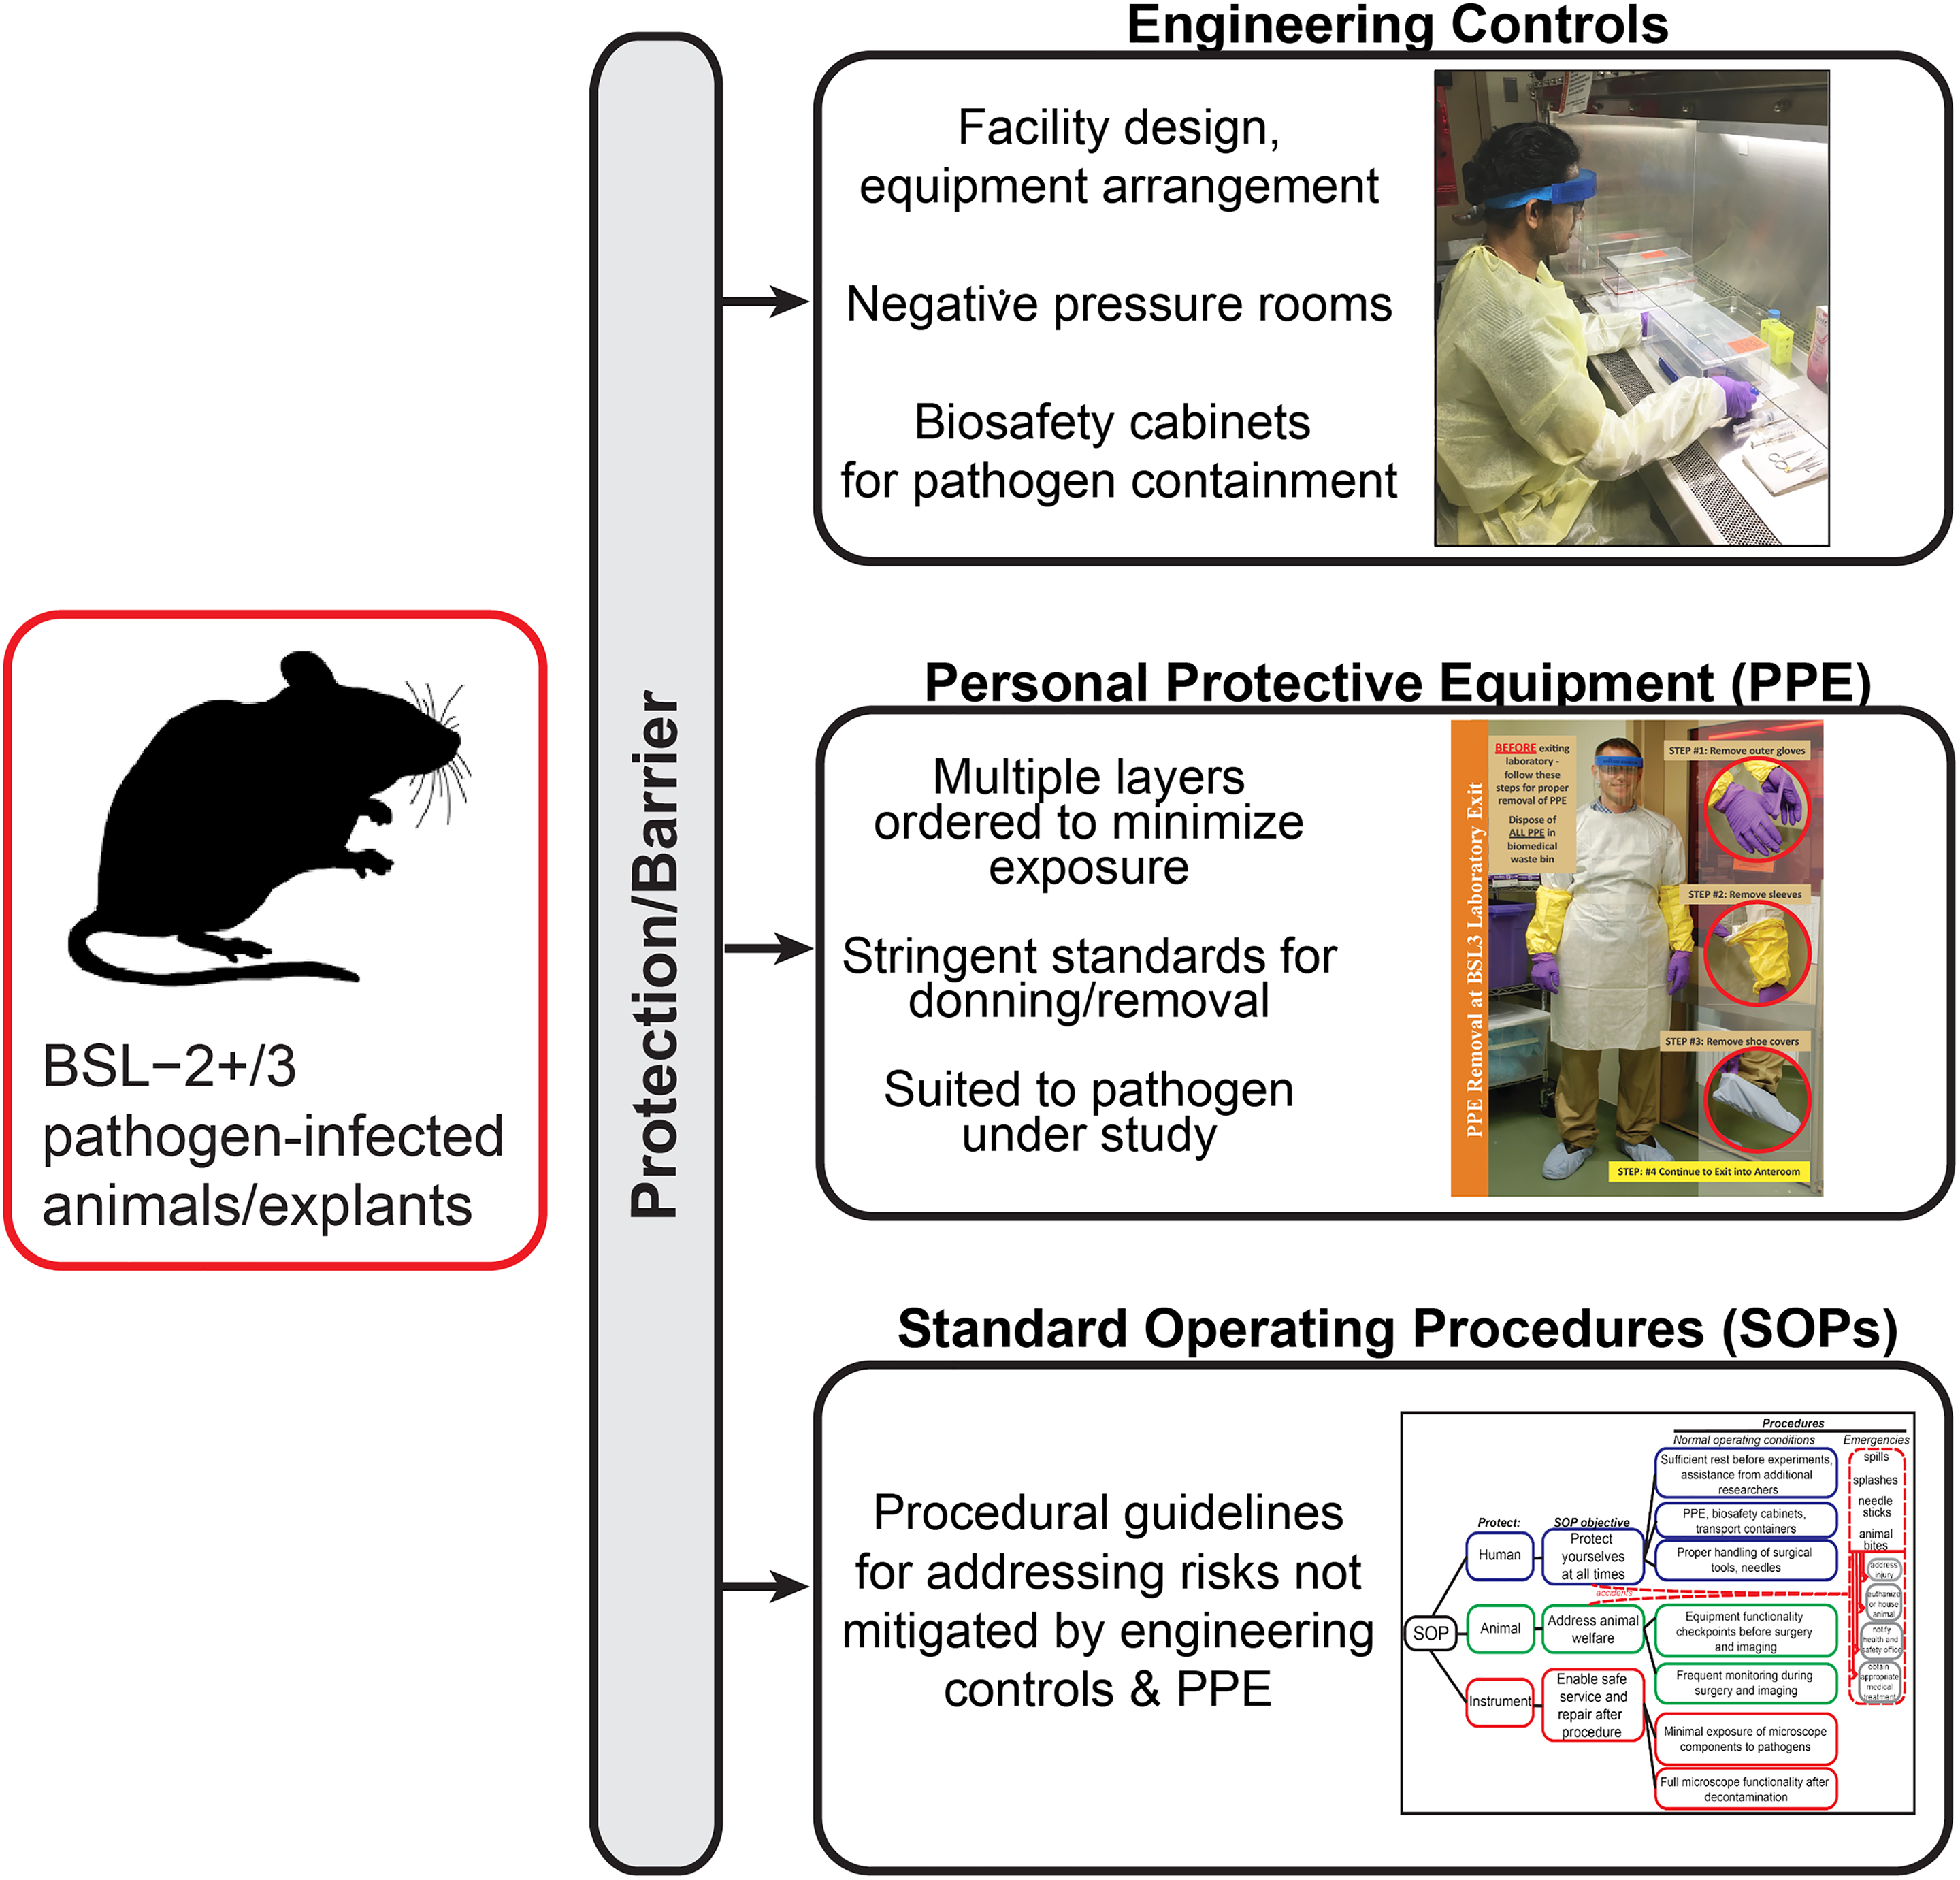
Strategies to minimize exposure risk from BSL-3 pathogens. Engineering controls, personal protective equipment (PPE), and standard operating procedures (SOPs) protect researchers from potential pathogen exposures.
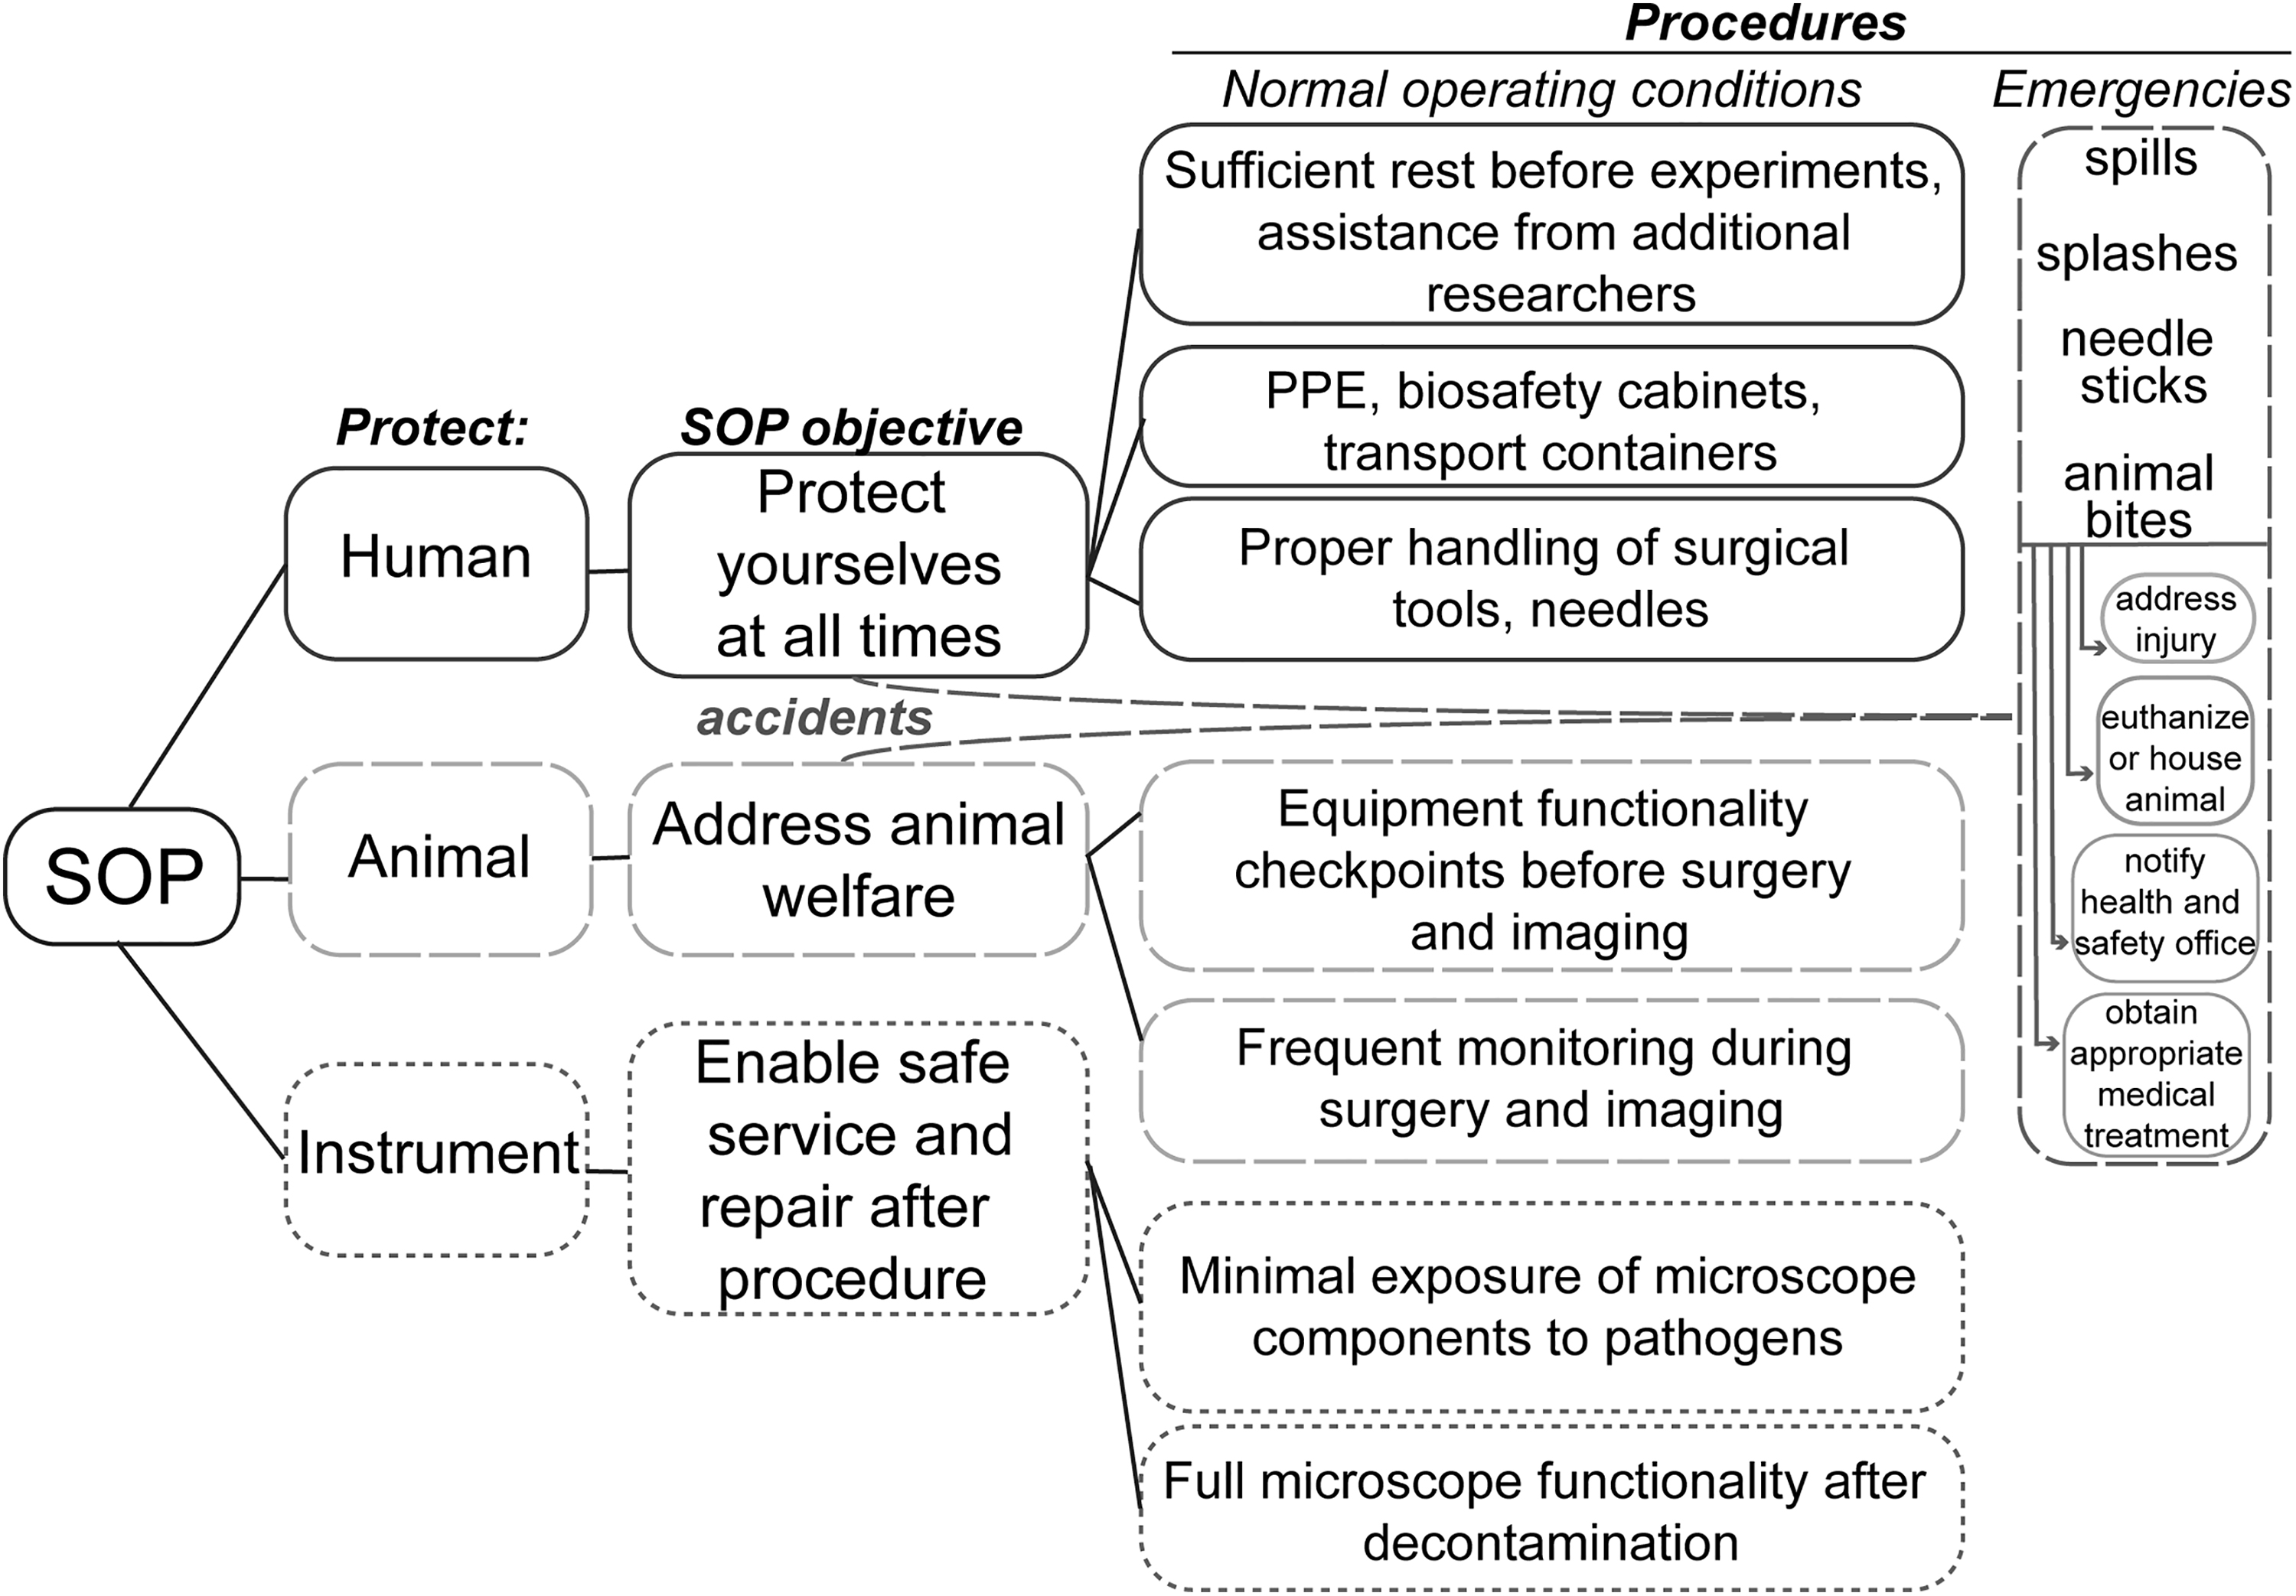
Considerations for generating an effective microscopy standard operating procedure (SOP) for BSL-3 pathogens. SOPs account for protection of the researchers, animals, and instruments involved in the intravital imaging procedure as well as emergency procedures in cases of accidents.
Researcher Preparedness
A critical yet potentially overlooked component of an effective intravital microscopy SOP is researcher well-being. Although exhaustion at times appears brandished as a testament to researchers’ dedication, adequate self-care is critical for effective SOP adherence and the success of the experiment. Even in the absence of high-risk pathogens, intravital imaging procedures are complex, lengthy, and labor-intensive. Short intravital imaging procedures can require approximately 4 hours for completion. Adequate sleep and nutrition are essential for all participating researchers. Similarly, it is recommended that the researchers maintain relatively clear schedules for the day of the procedure. Fundamental as these details may appear, a SOP is only as operative as the researchers executing it.
Two Are Better Than One
When possible, the presence of additional personnel enhances researcher safety during the procedure. In addition to allowing more efficient workflow, the presence of additional personnel allows researcher rotation, curtailing fatigue and minimizing error. The presence of additional team members enhances overall safety should accidental exposures occur. In cases of pathogen exposure, time to medical assistance may influence the outcome of infection in the exposed individual. In such cases, proper evacuation, cleanup, and medical attention is significantly expedited if an additional team member is present to address the animal while the potentially infected researcher follows emergency guidelines.
Spill Preparedness
The risk of large spills can be minimized by limiting volumes of the research materials injected into animals to less than 100 microliters. A BSL-3 spill kit should be kept handy and outside the BSL-3 procedure room to prevent contamination (Note: Disinfectants will vary based on the risk assessment process for each agent under study). The spill kit should contain both undiluted and diluted decontamination solution. We prefer Vesphene or Cavicide as they do not need to be freshly prepared before use and are noncorrosive, protecting the microscope. In addition, they should contain forceps for mechanical collection of items, paper towels or other suitable absorbent material, biohazard bags for the collection of contaminated spill cleanup items, a sharps container, and extra sets of PPE.
In the event of a spill outside the primary containment device, all personnel should evacuate the BSL-3 procedure room immediately. PPE should be removed in the anteroom or access zone, with potentially contaminated components turned inward. Gloves should be removed last. The sequence of PPE removal is different from the normal exit procedure in which it is recommended to remove face protection last before washing hands. Face protection is the least likely PPE item to be contaminated if performing all work inside the biosafety cabinet (BSC) and there has not been a spill. However, in a spill scenario, there is a potential that the face shield could be contaminated, so removing the inner gloves last is recommended. Any exposed skin should be washed with antiseptic soap and warm water. A biohazard spill sign should be posted at the entry of the BSL-3 procedure room to alert others of the spill. The researchers should notify the principal investigator and the institutional environmental health and safety (EHS) office. The BSL-3 procedure room should not be entered until 30 minutes following the spill to allow settling of possible aerosols. The time before cleanup should be carefully considered depending on the supply and exhaust features of the BSL-3 procedure room.
Discussion of the most appropriate decontamination protocol must be reviewed with EHS. Respiratory protection is normally worn for emergency response. Powered air-purifying respirators with full-face hoods also provide protection of facial mucous membranes. If the extent of contamination is minor and permission to reenter the spill area has been granted by EHS, the researcher may don PPE and begin cleaning the spill. Disinfectant-soaked paper towels should be carefully placed over the spill area. Beginning from the outside of the spill area, the researcher should slowly pour concentrated decontamination solution over the spill, slowly working toward the center of the area. This strategy prevents expansion of the contaminated area. During this step, it is essential to avoid creation of new aerosols. The decontamination solution should remain in contact with the spill area for 15 to 20 minutes. During this time, the surrounding area should be washed with paper towels soaked in decontamination solution to remove any possible contamination that may have settled from aerosols generated during the spill. Paper towels used for decontamination may be placed in biohazard bags for disposal following a 15- to 20-minute contact time.
Reusable items such as forceps and scissors may be further decontaminated by soaking them in 0.8% Vesphene or MB-10 for 15 to 20 minutes. Finally, PPE may be removed. Depending on the extent of contamination, outer PPE garments may also be disinfected prior to removal, allowing sufficient contact time. PPE should be removed starting with the most potentially contaminated garments first, such as booties, sleeve covers, and outer gloves, followed by the respirator if worn, the jump suit or back-fastening gown, and then the inner pair of gloves. Finally, the researcher must wash his or her hands well with soap and water for at least 30 seconds.
Waste generated during the cleanup procedure should be transported to the autoclave in the facility. Fresh gloves should be used for transport of waste to the autoclave, and hands should be washed following glove removal. Additional PPE, such as an impact-resistant face shield, heat-resistant gloves, lab coat, and apron, are required for operating the autoclave.
Facility Setup and Equipment
Our intravital imaging BSL-3 procedure room is accessed via passage through an anteroom and is maintained under negative pressure to prevent aerosolized biohazards from entering low-risk areas. Air pressure gauges for the BSL-3 procedure room are visibly installed in the anteroom. In addition to gauges, confirmation of negative pressure is achieved through placement of buoyant strips of material, such as ribbon (VHS film in our facility) adjacent to door vents as a visual indicator of airflow.
We believe that engineering controls and the strategic placement of research equipment and supplies should serve to facilitate experimental procedures and minimize researcher exposure risk. Optimal placement and design of laboratory equipment in the BSL-3 procedure room allows for maximizing containment and facilitating postprocedural cleanup procedures. For high-quality imaging, it is important to eliminate vibrations that limit the performance of sensitive instruments, including multiphoton microscopes. Thus, the microscope must be placed on an air table designed to absorb vibrations through a built-in air-cushioning device. Similarly, we needed a containment device that does not transfer vibrations to the microscope table (Figure 3A, 3C). Our strategic design includes placing the scan head and motorized stage of the 2-photon microscope that comes in contact with pathogen-infected animal within a custom-designed Class I (microscope) BSC from Bigneat, Ltd. (Figure 3). A Class I BSC with 100 ft/min inward airflow through the front opening was specified and provides containment equivalent to a Class II A2 BSC. Sterility was not a primary factor as the animal subjects are euthanized at the end of the procedure. The Class I BSC is placed over the air table such that there is no direct contact with it. The Class I BSC is situated separately on the ground through a metallic frame (Figure 3A, 3C). This strategy ensures that the vibrations generated from the motorized fan of the Class I BSC are not transferred onto the microscope, permitting high-quality imaging. Beam optimizers and laser components are placed outside the Class I BSC. This design ensures minimal exposure of critical laser components to pathogens. In addition, the design allows easy access to the laser components for service, repair, and upgrades. Negative pressure is achieved by enabling airflow through the sides of the Class I microscope enclosure (Figure 3A). We also wrap areas of the microscope that are not easily disassembled for decontamination, such as the microscope stage and objective, with plastic wrap (Figure 3D, 3E). The arm portals in the BSC allow access to the microscope working area. A separate Class II A2 (surgical) BSC is designated for surgical procedures to expose the organ of interest for imaging as it is the step embodying maximum exposure risk.
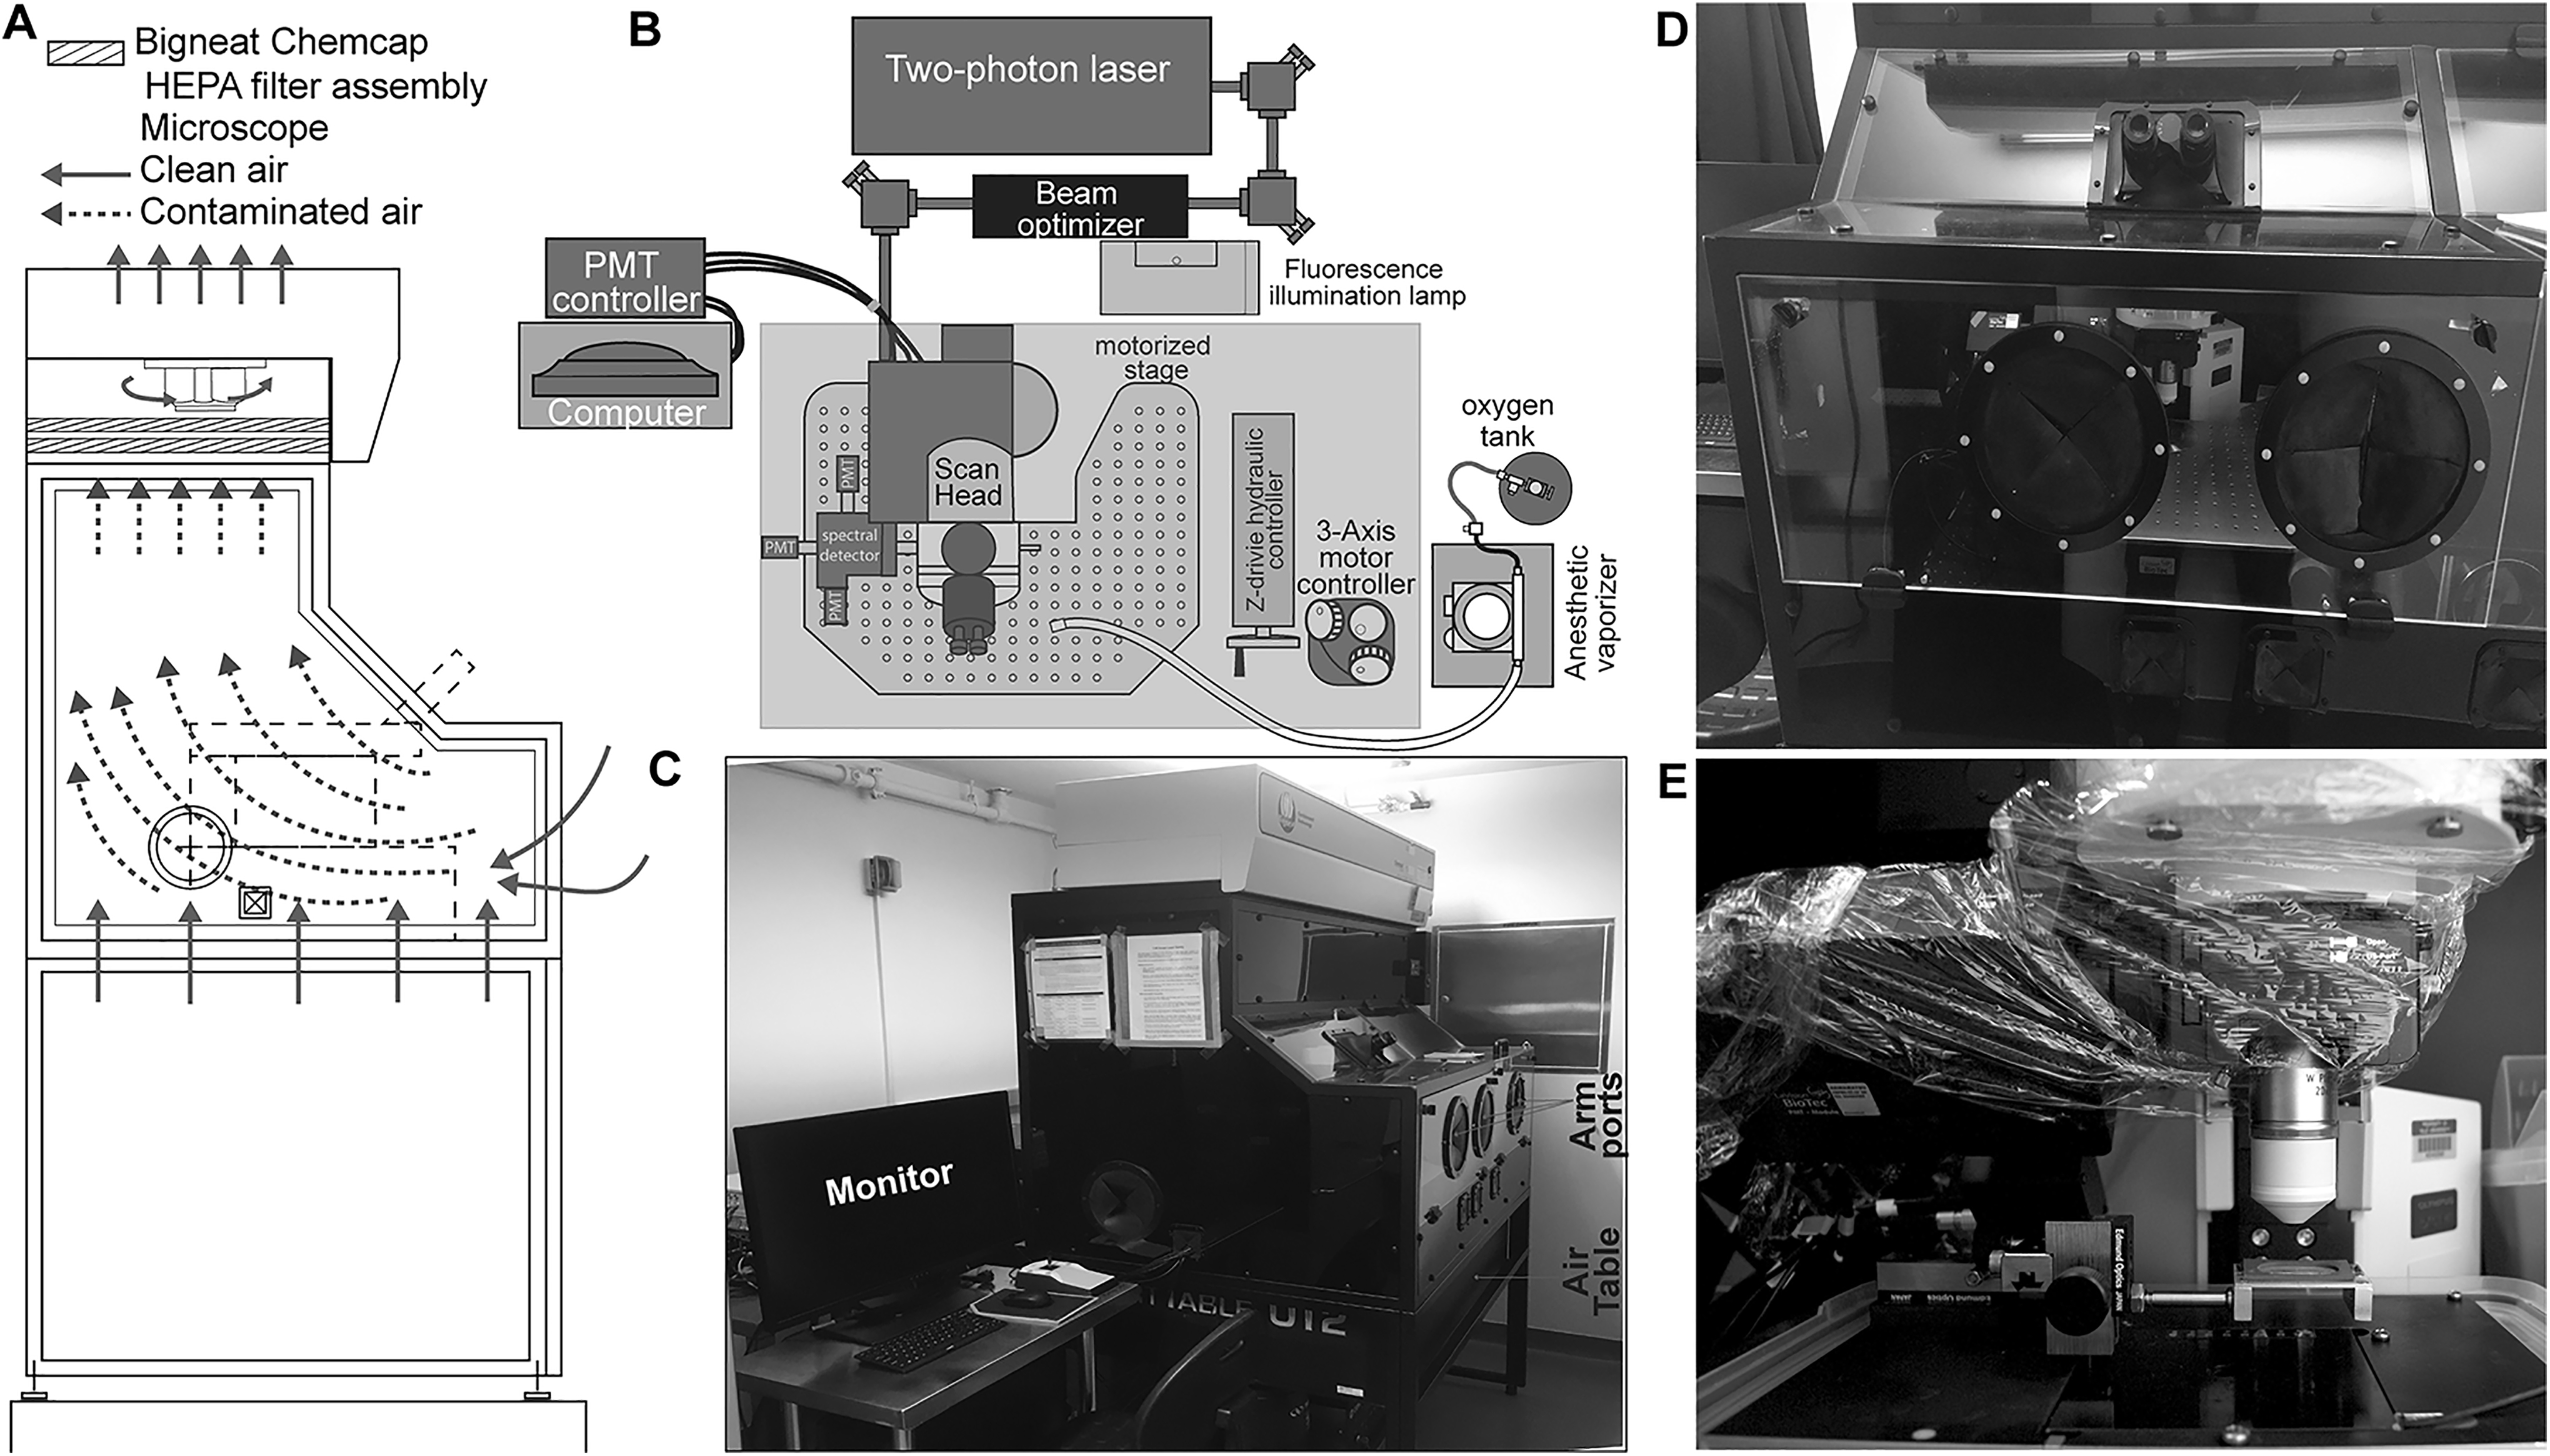
Strategy for protecting laser components from pathogen exposure while maintaining access to laser alignment controllers. (A) Design of Bigneat Chemcap airflow cabinet for housing the microscope scan head and motorized stage and airflow path for pathogen exposure minimization. (B) The microscope laser and assembly and beam optimizer are positioned outside the pathogen-exposed cabinet (shown as shaded area), enabling safe service and repair after decontamination. (C) The Bigneat Chemcap airflow cabinet is situated above the microscope and air table. A separate metallic frame supports the microscope airflow cabinet while preventing direct contact of the cabinet with the microscope and air table, minimizing vibrations. (D) Arm portals enable access to the cabinet interior during the procedure. The clear panes of the cabinet enable animal monitoring during the procedure. (E) The microscope scan head is covered with plastic wrap to minimize pathogen exposure and facilitate easy cleanup.
In addition to necessary research supplies, decontamination and instrument protection materials should be placed at each workstation. Research equipment, supplies, and decontamination materials are itemized in (Table 1). Plastic wrap is readily stored at the microscope working area and removed and replaced at the end of each imaging procedure. Spray bottles containing 70% ethanol are readily stored at each workstation in the ABSL-3 procedure room to allow fast access to disinfectant in the case of accidental spills or exposures. (Note: Disinfectants selected for the agent studied were selected with EHS and the equipment manufacturer.) Finally, waste and sharps repositories are placed in both BSCs and microscope enclosures.
Sample Supply Scheme for Each Procedure Room Workstation.

Researcher Protection
During the intravital imaging procedure, researcher protection is achieved through training in standard operating and surgical procedures, PPE, and prevention and careful monitoring of researcher fatigue. Prior to conducting intravital imaging procedures, each approved ABSL-3 researcher must undergo an additional 15 hours of supervised training in proper animal handling procedures. Researchers may only independently handle animals during intravital imaging procedures following observation by EHS and Animal Care and Use representatives as well as approval by the BSL-3 subcommittee of the institutional biosafety committee.
PPE for intravital imaging procedures provides protection of the researchers’ mucous membranes and skin. These PPE requirements include double gloves, shoe covers, disposable gowns, face shields, and sleeve covers to protect the gown. PPE is donned and removed in strict order, as designated in an institution-approved SOP. First, the researcher applies a pair of nitrile gloves, followed by shoe covers, disposable gown, sleeve covers, a second pair of gloves, and face shield. Sleeve covers should be secured to the hand through thumbholes in the cuff of the sleeve cover to prevent ascension up the arm. The outer pair of gloves should securely cover the cuff of the sleeve cover. Throughout the facilities, the placement of signage depicting the correct PPE donning and removal procedures facilitates adherence to SOPs (Figure 4). PPE should be removed prior to entering other areas of the facility.
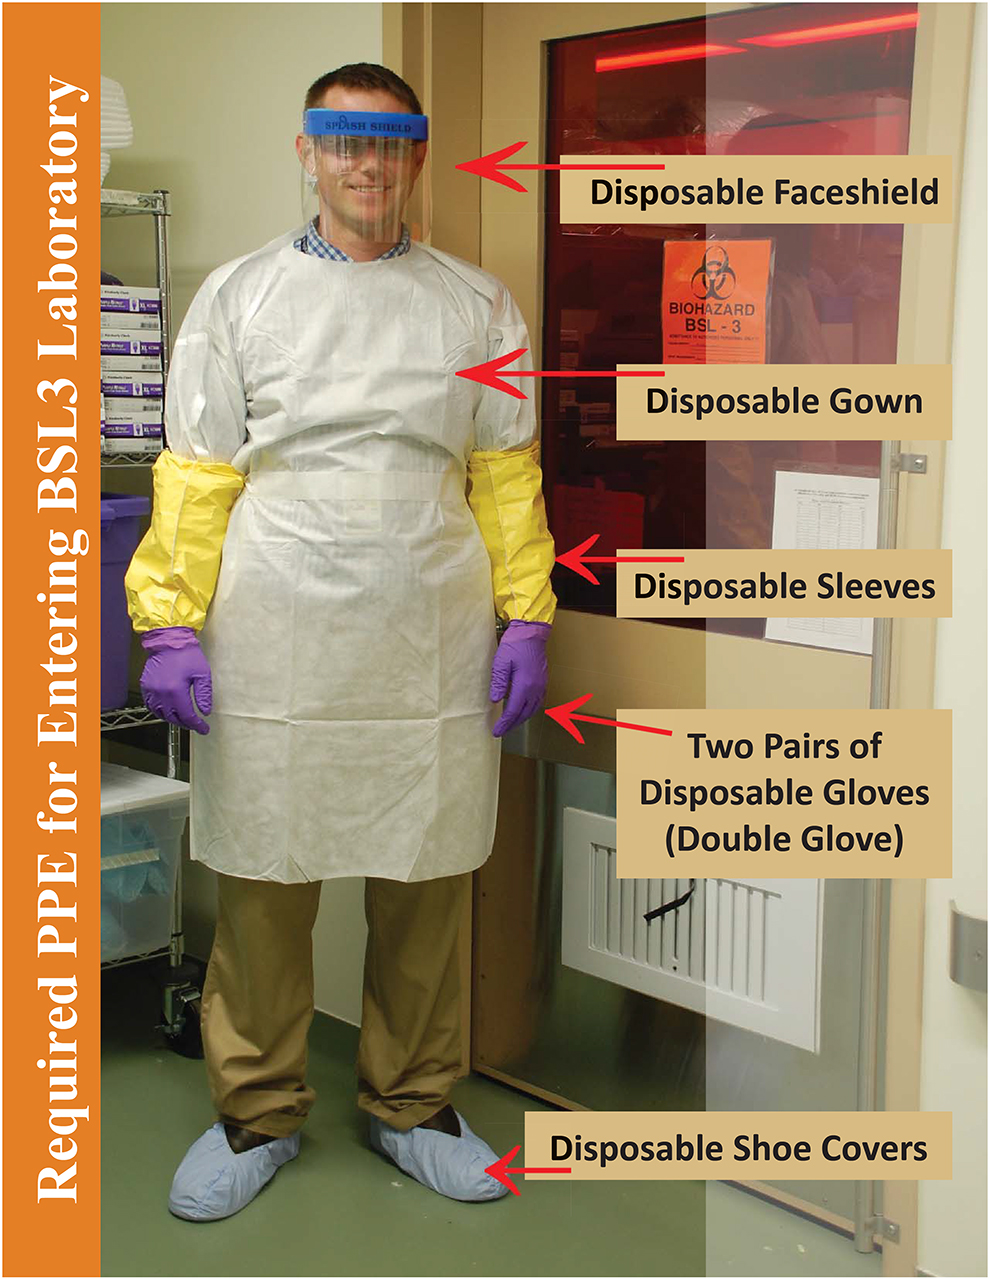
Sample Environmental Health and Safety-issued poster depicting personal protective equipment (PPE) requirements for handling, surgery, and microscopy of BSL-3 pathogen-infected animals.
Startup Procedure
BSL-3 Procedure Room Preparation and Equipment Initiation
Upon entering the facility, the researcher places a sign on the BSL-3 procedure room door signaling the active imaging procedure. It is essential that this sign clearly display the name of the pathogen under study, date and time of the procedure, pathogen biosafety level, and contact information (phone numbers) of the involved researchers in case of emergency. The researcher must also sign into the facility with the date, time, and name of additional accompanying personnel during the procedure. The researcher should also confirm maintenance of negative pressure inside the BSL-3 procedure room.
It is essential to test the functionality of research equipment prior to the start of the imaging procedure to facilitate experimental execution and avoid researcher exposure and unnecessary animal sacrifice. The researcher must satisfy the following checkpoints: (1) Confirm adequate oxygen supply for the isoflurane anesthesia manifold; (2) start both BSCs, designated for animal surgery and microscope use; (3) confirm negative pressure (0.1-0.6 inches of water) for each cabinet; (4) ensure functionality of the microscope laser chiller, maintained at 20°C; and (5) enable the microscope UV lamp and computer, adjust photomultiplier tubes (PMTs), and align lasers. The experimental procedure may not commence until the researcher has completed these checkpoints. At this time, further setup, such as software startup and selection of imaging parameters, may occur. Finally, the researcher should ensure adequate working levels of isoflurane in the anesthesia vaporizer. Establishment of these settings prior to animal introduction and surgery is recommended to maximize work efficiency in the presence of the infected animal, thus maximizing animal welfare and minimizing risk of exposure.
Preparation of the Surgical Area and Microscope Enclosure
Prior to the start of the procedure, it is necessary to complete the setup of the working areas contained within each BSC. Airflow within each BSC must proceed for 10 minutes to establish negative pressure. The BSC used for the surgical procedure should first be sprayed and wiped thoroughly with 0.8% Vesphene, followed by 70% ethanol. Alternatively, the researcher may disinfect the working area with a fresh preparation of MB-10 solution, used within 7 days of preparation. Tools and supplies necessary for the surgical procedure should be prepared inside the working area of the BSC. We recommend a specific workspace organization to facilitate the logistics of the surgical procedure in the presence of the infected animal (Figure 5). Supplies include surgical instruments, anesthesia, phosphate buffered saline, cotton swabs, disposable transfer pipettes, depilatories such as Nair for mouse hair removal and exposure of the incision site, mounting platform for imaging the organ of interest, and locking container to be used for transfer of the infected animal to the microscope (Table 1). The 0.8% Vesphene- or MB-10-soaked paper towels should be placed within the working area to allow contact disinfection of the animal cage and surgical platform. Similarly, decontamination supplies and repositories for waste accumulated during the procedure should be placed within reach of the working area. These include containers filled with 0.8% Vesphene or MB-10 solution to disinfect surgical instruments, a sharps disposal receptacle, and 50 mL conical tubes for storage of exposed sharps during surgical preparation. Open biohazard bags may be secured to the walls of the BSC using tape to facilitate in-procedure waste disposal. Alternatively, beakers filled with disinfectant may be placed inside the working area. The microscope enclosure area should similarly contain a sharps disposal container, biohazard bags for waste disposal, and decontamination solution.
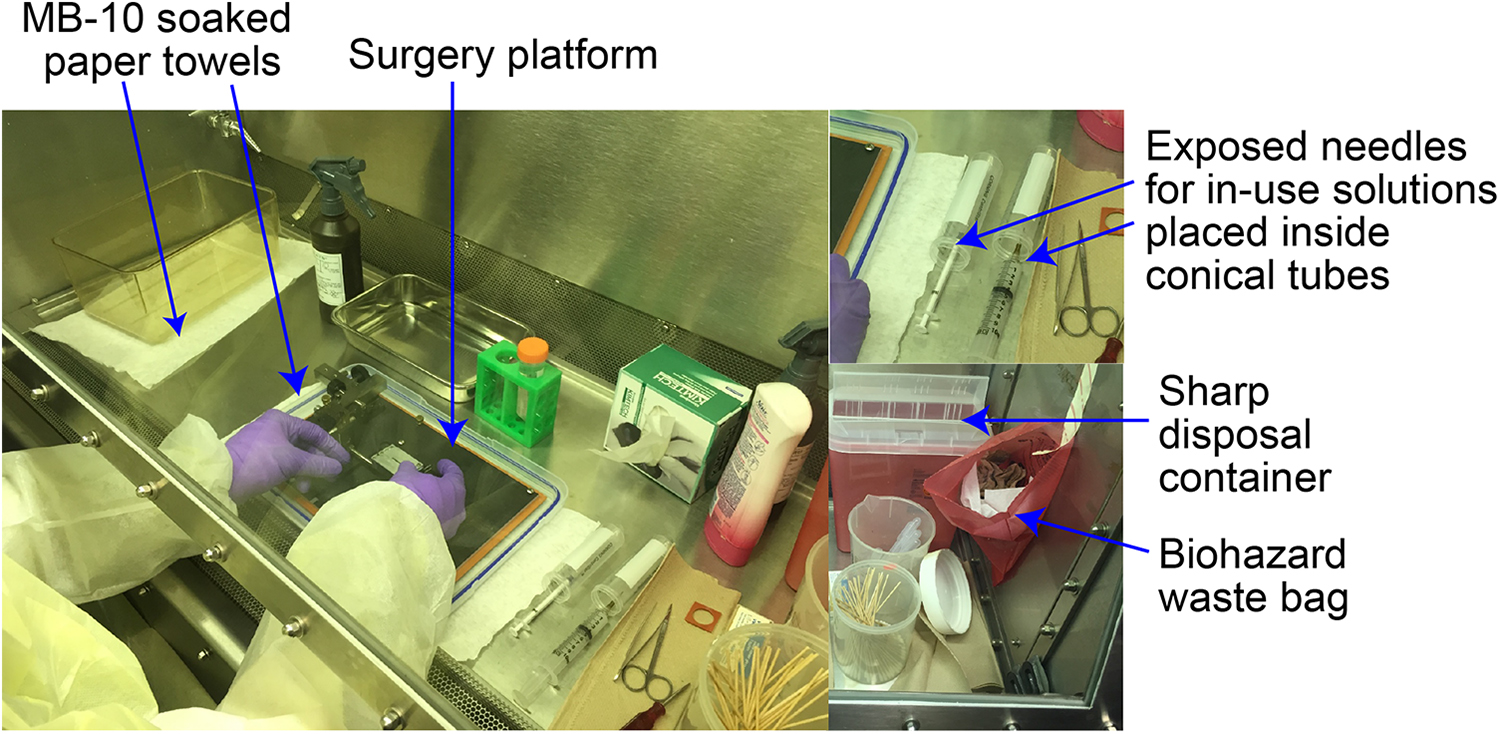
Workspace organization for surgical exposure of infected organs. A strategic layout of surgical tools and supplies inside the surgical cabinet facilitates workflow logistics. Exposed needles are covered with 50 mL conical tubes to prevent needle sticks. Sharps disposal containers and biohazard waste bags are placed inside the biosafety cabinet for convenient and safe disposal of contaminated materials.
It is essential to note that transport of the animal to the BSL-3 procedure room may not occur until functionality of the biosafety components and research equipment of the facility has been confirmed. In this case, the presence of a second researcher to introduce the animal to the BSL-3 procedure room upon confirmation of equipment function facilitates experimental logistics. Secure contact between researchers in different rooms of the facility may be established through the use of cell phones enclosed in zip-lock bags. Alternatively, if a solo researcher is performing the procedure, they may initiate transport of the infected animal to the BSL-3 procedure room only after the entire working area has been established and functionality of the equipment has been confirmed. This will require following the BSL-3 room exit and entry procedures.
Transport of the Infected Animal to the BSL-3 Procedure Room
Depending on the layout of the facility, the experimental animals may be housed in rooms separate from the BSL-3 procedure room. In our facility, the infected animals are strictly housed in a dedicated ABSL-3 animal housing room and must be carried through common areas during transport to the BSL-3 procedure room. In such cases, the infected animal may be transported from the animal room to the BSL-3 procedure room inside labeled and secured microisolator filter-equipped cages or an enclosed container with a locking lid mechanism, such as a large labeled and sealed biohazard transport container.
Prior to the start of the surgical procedure, the researcher must weigh the infected animal to determine the appropriate anesthesia dosage. We recommend weighing the animal prior to transport for reducing the materials and supplies in the surgical area. First, the researcher must prepare the BSC in which the animal will be weighed. This preparation involves placement of two 0.8% Vesphene or MB-10 solution-soaked paper towels on the surface of the working surface of the BSC on which the animal cage and transport container will be placed. Additionally, the researcher must place the balance as well as a box to contain the animal during weighing inside the BSC. Following weighing, the animal is ready to be transferred to the transport container. It is critical that the researcher decontaminate the exteriors of the original animal cage and transport container with 0.8% Vesphene or MB-10 solution. After a 3-minute contact disinfection time (as determined for this protocol), the researcher may remove the original animal cage, where applicable, returning any additional animals to the housing unit.
The researcher must ensure that the infected animal is securely contained during transport to the BSL-3 procedure room. An enclosed container with locking-lid mechanism is sufficient to secure the infected animal in the case of drops on the way to the BSL-3 procedure room. However, if the infected animal will be transported in a nonlocking container, such as a standard microisolator mouse cage, it will be necessary to enclose the container inside a secondary container for added security during transport. In this case, the cage can be placed inside a larger cage; for instance, a mouse cage can be placed inside a large rat microisolator cage. The primary cage containing the animal must be placed on top of a disinfectant-soaked paper towel on the floor of the secondary cage. After placement of the primary cage inside the secondary cage, the lid of the secondary cage must be secured with tape. Finally, the exterior of the transport cage must be disinfected with 0.8% Vesphene or MB-10 solution. Following a 3-minute contact disinfection time, the cage may be removed from the BSC, and the researcher may remove animal room PPE and proceed with the animal to the BSL-3 procedure room.
After donning new PPE, the researcher may enter the BSL-3 procedure room. Once inside the BSL-3 procedure room, the researcher places the animal transport container inside the Class II A2 (surgical) BSC. Where applicable, the secondary container may be removed at this time. The primary animal cage must be placed on 0.8% Vesphene- or MB-10-soaked paper towels. Finally, the container seal may be opened to begin the surgical procedure.
Surgical Procedure and Intravital Imaging
From the start of the surgical procedure, the researchers in the BSL-3 procedure room, especially those maintaining direct contact with the infected animal, are at increased risk of pathogen exposure.
Researchers must remove and dispose of their outer gloves before removing their hands from the BSC and replace them with fresh gloves to maintain the barriers between high-risk pathogen workstations and the rest of the BSL-3 procedure room. Alternatively, the researcher can spray his or her gloves with 0.8% Vesphene or MB-10 and allow for a 30-second decontamination time before taking his or her hands out of the biosafety cabinet.
Intravital imaging presents many challenges to animal survival due to long durations under anesthesia inherent to each procedure. Animal survival during the entire imaging period can be enhanced by regulating the dose of anesthesia used, surgical skills of the researcher, and close monitoring of animal condition. The researcher should place the animal on a 37°C heating pad throughout the duration of the procedure to maintain animal welfare and function of the in vivo tissue environment. The heating pad should be placed inside the container for animal transport to the microscope as the animal will be placed on the heating pad immediately following the administration of anesthesia. We use a labeled sealed transparent plastic box with a locking lid mechanism as a secondary container for transport of the animal from the surgical cabinet to the microscope enclosure (Figure 6). As in the case of the animal cage, the secondary transport container should be placed on paper towels soaked in 0.8% Vesphene or MB-10. We recommend preparing for surgery with the surgical platform placed on top of the primary and secondary container bases, facilitating placement of the container lids following the procedure (Figure 6).
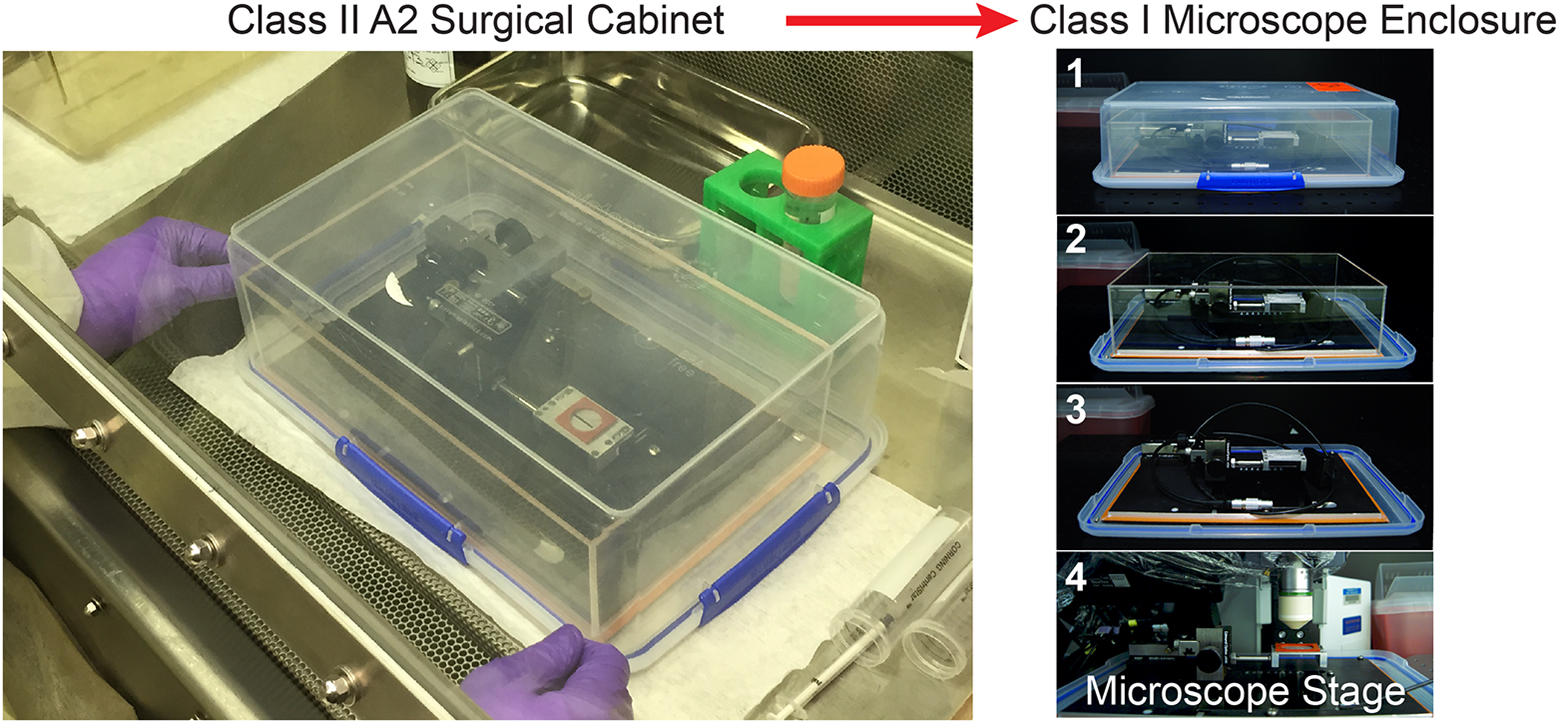
Enclosed container for transport of infected animals from surgical station to microscope stage. Once sealed, the transport container is transferred to the microscope enclosure, where it is disassembled step by step (shown from 1 to 4) to allow placement of the surgical platform with animal subject (not shown) below the microscope objective.
Mice are anesthetized using 10 µL/g body weight rodent cocktail (15 mg/mL ketamine, 1 mg/mL xylazine), injected intraperitoneally. Following rodent cocktail administration, the needle should immediately be placed in a 50 mL conical tube, minimizing infected sharps hazards. Following onset of anesthesia, the animal is placed on the heating pad. At this time, the application of eye ointment is performed to prevent anesthesia-induced eye dessication.
Precision of the surgical incision is greatly impeded by the presence of animal hair. Thus, a depilatory such as Nair is deposited onto the hair above the incision site using cotton swabs. Following a 3- to 4-minute incubation time, the depilatory should be removed using kimwipes, to be placed in the waste collection bag(s) taped inside the BSC. After cleaning the area with phosphate buffered saline (PBS), the researcher may perform the surgical procedure to expose the organ of interest. In the case of spleen and popliteal lymph node imaging, we carefully position the exposed organ on the appropriate surgical platforms. Once used, the surgical instruments must be placed into containers of MB-10 inside the biosafety cabinet. Importantly, we recommend the use of long metal tongs for transport of surgical tools in and out of the decontamination solution to prevent sharps accidents. Surgical instruments must be soaked in MB-10 for a minimum of 3 minutes prior to their removal from the solution.
Once the surgical procedure is complete, the researcher may secure the lids of the surgical platform and secondary transport containers. The outer surface of the transport container must be thoroughly sprayed with 0.8% Vesphene or MB-10 and allowed to react for 3 minutes. The researcher proceeds to discard the outer pair of gloves inside a designated biohazard disposal bag within the BSC. A fresh pair of gloves must be worn to prepare the remaining equipment for the intravital imaging procedure. This process includes powering on the temperature controllers and opening the access door of the microscope-housing Class I (microscope) BSC. Following decontamination of the outer container housing the anesthetized animal, the researcher may place it inside the microscope biosafety cabinet. Subsequent sealing of the access door allows restoration of negative pressure.
For the rest of the procedure, the researcher must access the microscope stage area through the barrier holes in the front of the Class I BSC enclosure. After negative pressure is established, the researcher may remove the lid of the secondary transport container and move the surgical platform onto the microscope stage. At this time, isoflurane and oxygen are introduced to the animal via nose-cone inhalation. The volume of isoflurane is adjusted accordingly throughout the procedure, depending on the depth of anesthesia and animal vital signs. Adequate plane of anesthesia is determined by visual inspection according to institutional guidelines. We record vital signs during surgery and imaging every 15 minutes by monitoring parameters such as (a) response to noxious stimuli, (b) respiratory depth (shallow baseline respiratory depth or deep baseline respiratory depth), and (c) respiratory character (slow baseline or rapid baseline). We find that breath rates indicating optimal anesthesia (55-65 breaths per minute or ∼1 breath per second) can be achieved by administering isoflurane at 1% to 3% with oxygen supplied at 1 L/min. As for the Class II A2 (surgical) BSC, gloves must be removed, discarded within the BSC, and replaced before the researcher draws his or her hands from the microscope enclosure.
Animal Welfare
During the intravital imaging procedure, animal welfare is maintained in part by close monitoring of vital signs. Standardized records are used for documentation of drug administrations, procedural checkpoints, and monitoring of vital signs, as designated by the institutional animal care and use committee (IACUC). Along with pulse, respiratory rate and character are carefully monitored every 15 minutes. Anesthesia depth may be determined through noxious stimuli (i.e., toe pinch). Additionally, modifications to anesthesia, such as addition or change of isoflurane flow, are documented throughout the procedure.
The researcher must consider an image acquisition approach that allows monitoring of animal welfare throughout the length of the intravital imaging procedure. As an example of an approach that allows continual monitoring of vital signs, we have implemented z-stack parameters with 20- to 30-second windows between acquisitions; these pauses afford the researcher sufficient time to monitor the animal’s vital signs during long-term observations. Assisted by a flashlight, the researcher may check the animal’s vital signs through one of the clear panes of the Class I (microscope) BSC. If the animal is found to display abnormal respiratory character, it must be removed from the study.
Cleanup and Shutdown Procedures
Following termination of the intravital imaging procedure, the animal is euthanized via overdose of isoflurane, followed by the creation of a pneumothorax. Death must be confirmed by noxious stimulus. Isoflurane and oxygen flow should be extinguished, and recordkeeping measures should be completed to include all the required details, as per institutional guidelines. The carcass and surgical platform are then moved from the microscope enclosure to the Class II A2 (surgical) BSC used for surgery in a reverse order of that mentioned previously (with decontamination of the exterior of the transport container as noted previously). As this transfer necessitates opening of the microscope BSC, the cabinet should be closed for restoration of negative pressure. As for work in the Class II A2 (surgical) BSC, the researcher must remove and replace gloves prior to withdrawal of his or her hands from the Class I (microscope) BSC. The carcass is then double-bagged into designated biohazard bags, sealed tightly with autoclave tape. The biohazard bag must be decontaminated with 0.8% Vesphene or MB-10 and set aside for 3 minutes to allow thorough decontamination. Surgical instruments, as well as the platform used for intravital imaging, are soaked in 0.8% Vesphene or MB-10 for 3 minutes, then wiped with 70% ethanol. Finally, surgical instruments are prepared for autoclave sterilization by placement in an autoclave-safe, closed container. Wastes accumulated during the procedure, such as tapes for securing the mouse to the surgical platform, are placed in the biohazard bags inside the BSL-2 cabinet. After use, the biohazard bags should be placed inside secondary biohazard bags, with the openings of the primary bags covered by the sealed ends of the secondary bags. The opening of the secondary bag must be sealed tightly with autoclave tape. The outer surface of the biohazard waste bag must be liberally decontaminated with 0.8% Vesphene or MB-10 for 3 minutes. Removal of supplies and biohazard bags may commence following their decontamination. All surfaces of the Class II A2 (surgical) BSC are then liberally sprayed and wiped with 0.8% Vesphene or MB-10, followed by 70% ethanol.
For decontamination of the working area in the Class I (microscope) BSC, the plastic wrap shielding the microscope head and stage must be removed and placed inside the biohazard bags taped to the inside of the cabinet. The microscope stage may decontaminated with Cavicide while the objective is gently cleaned with lens paper and 100% methanol. Similarly, exposed knobs must be gently wiped down with 70% ethanol. The biohazard waste bag must be placed into a secondary biohazard bag and sealed with autoclave tape, as performed for waste in the Class II A2 (surgical) BSC. The waste bag should be wiped with paper towels soaked heavily in Cavicide followed by 70% ethanol to avoid excessive soaking of the microscope. Following decontamination, the waste bag may be removed from the microscope enclosure. The Class I (microscope) BSC should be left on for maintenance of negative pressure overnight, after which the facility may be used for BSL-2, BSL-2-enhanced, or other BSL-3 protocols.
Finally, data transfer and backup may begin following complete decontamination of the working area. To allow the researcher safe access to the data hard disk in low-risk biosafety environments, it should be enclosed in a zip-lock bag. USB cables used during the data transfer process should be decontaminated with 70% ethanol.
Exit Procedure
Before exiting the BSL-3 procedure room, the researcher must remove PPE. PPE must be removed in specific order upon exit of the BSL-3 procedure room (as noted previously) and should be placed inside a dedicated biohazard bag to be autoclaved. Following removal of the outer pair of gloves, sleeve covers, and shoe covers, the researcher should remove the protective gown once in the BSL-3 procedure room anteroom (Figure 7A). Next, the inner gloves, face shield, and respirator, if applicable, are removed. Finally, the researcher may exit the room after thoroughly washing his or her hands (Figure 7B). Posters depicting each PPE removal step should be placed within view of the BSL-3 procedure room exit and anteroom to remind researchers of the proper PPE removal procedure. During BSL-3 procedure room exit, removal of shoe covers must occur last. As each shoe cover is removed, the researcher must place each uncovered foot outside the BSL-3 procedure room, taking care not to step on the BSL-3 procedure room floor with uncovered shoes.
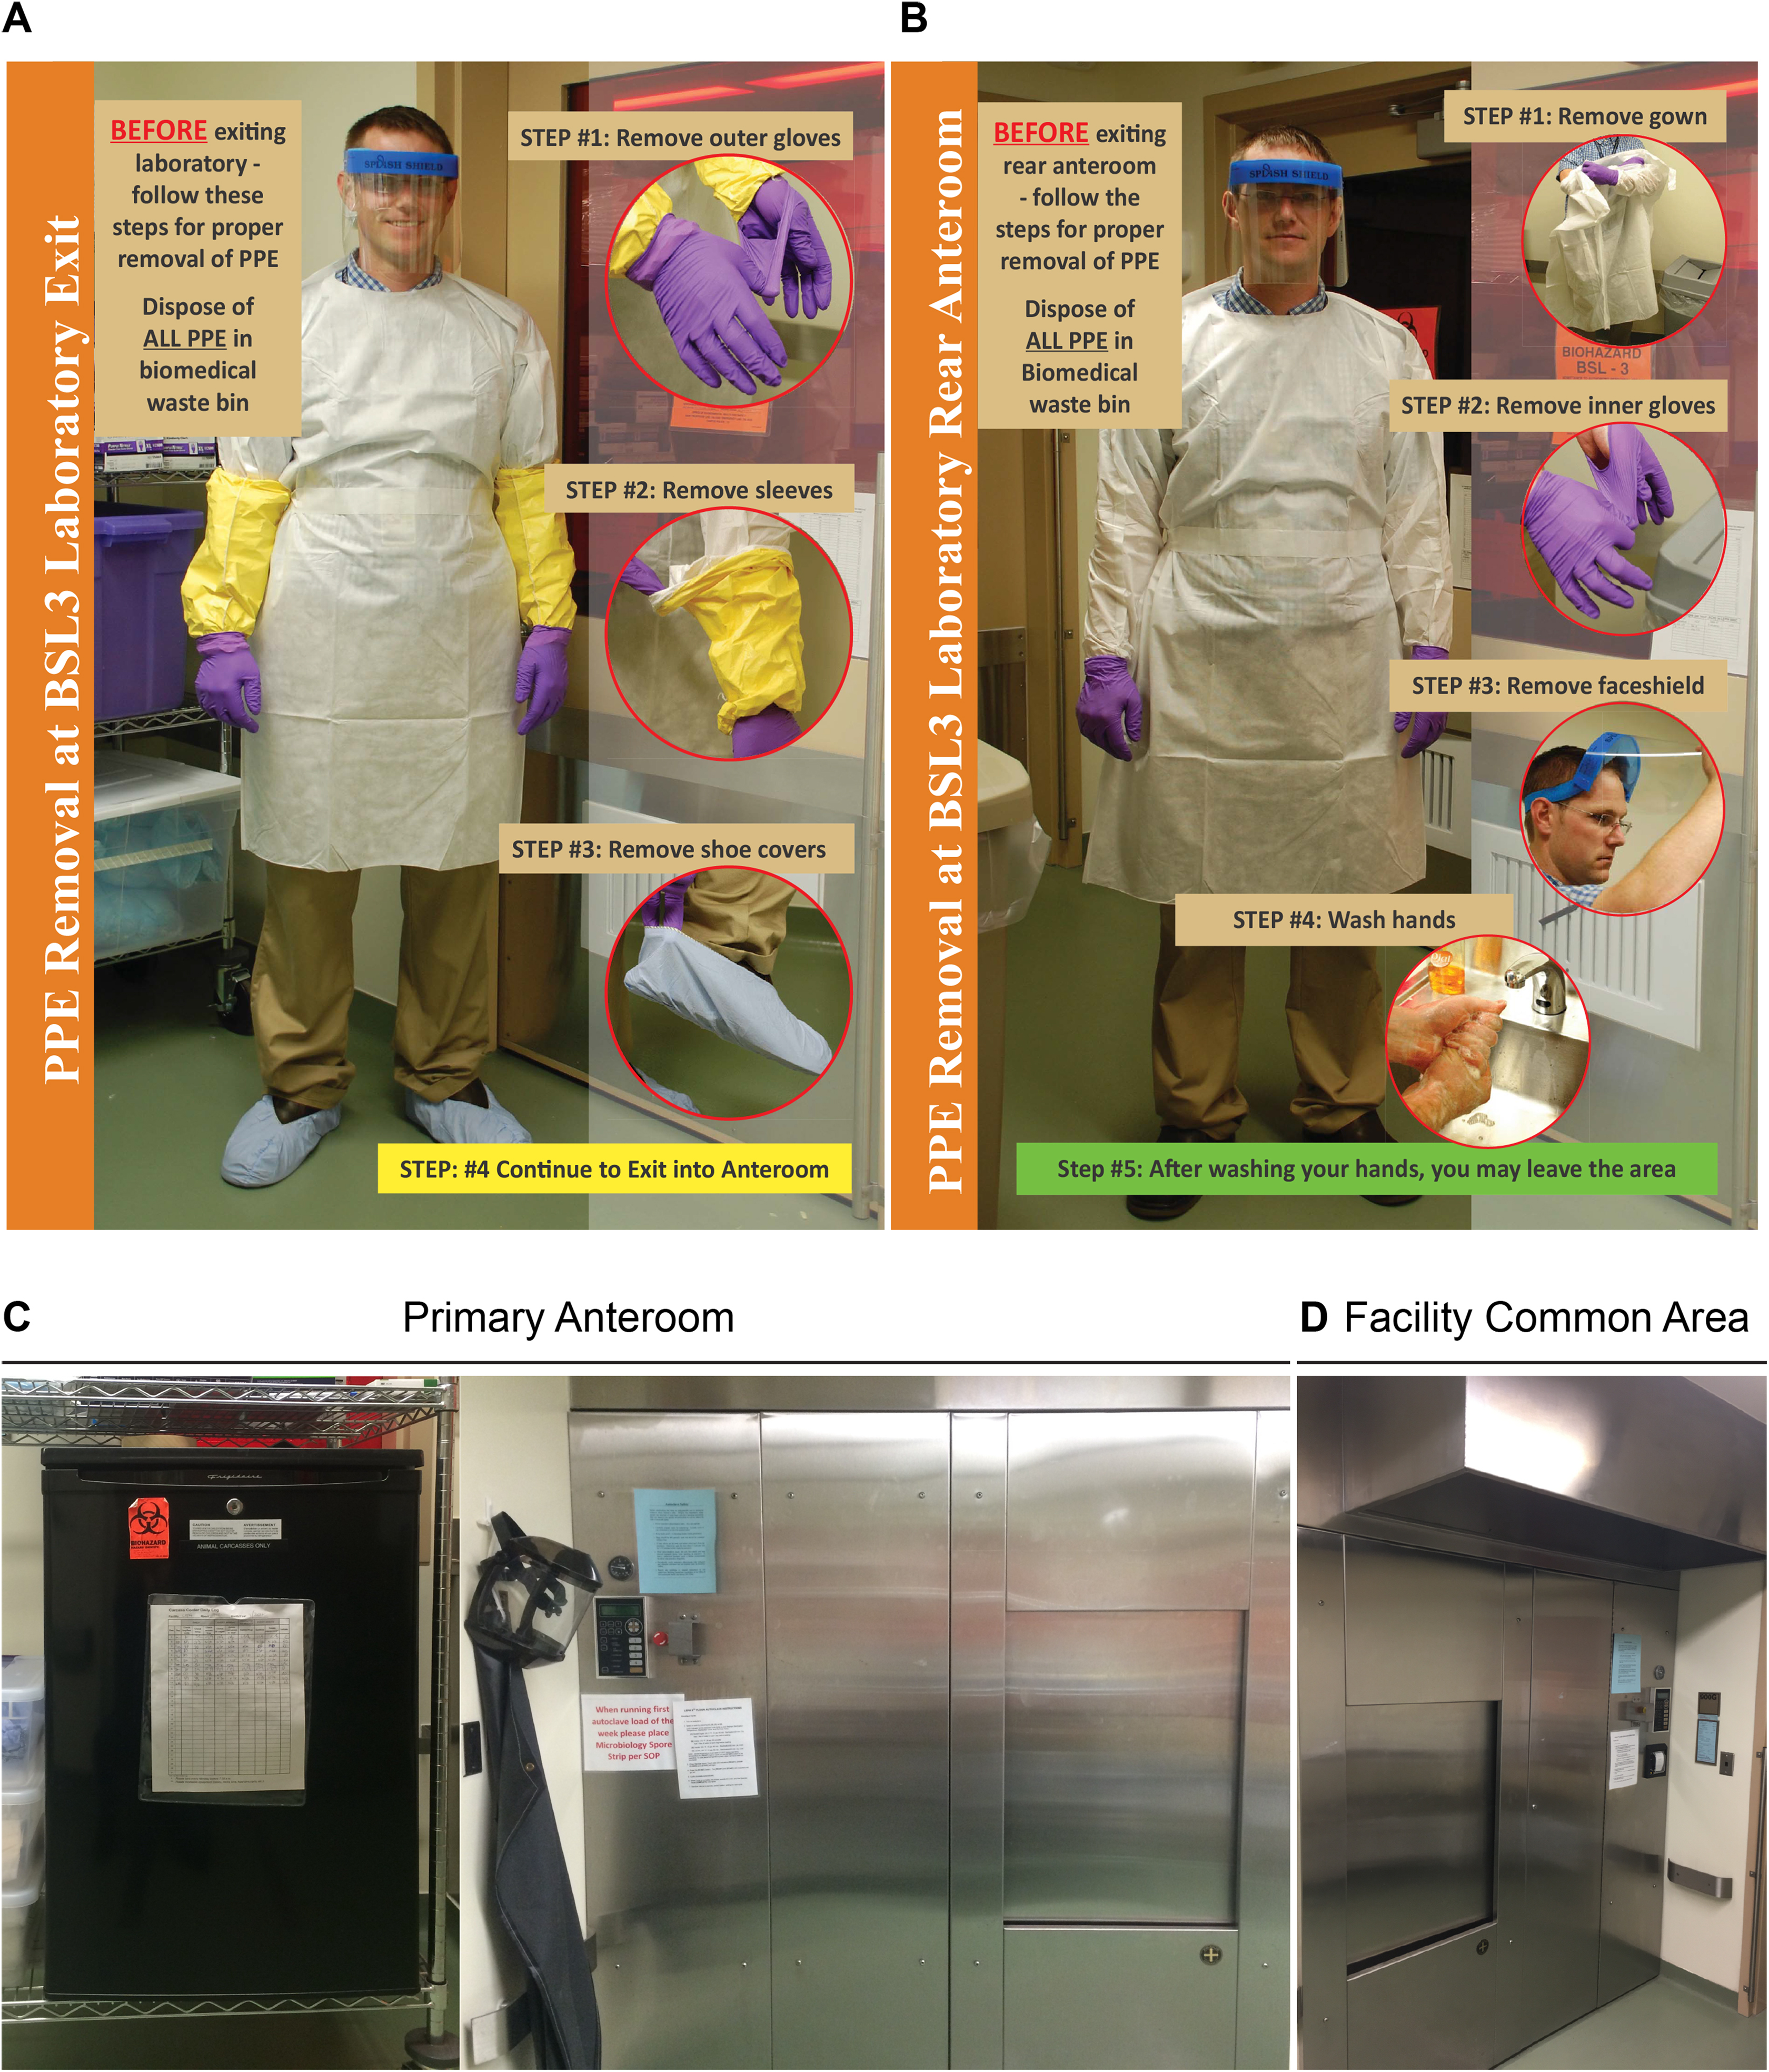
Exit procedure. (A) After exiting the BSL-3 two-photon microscope room, the researcher removes the personal protective equipment (PPE) in the shown order. (B) Once in the primary anteroom, the researcher removes remaining PPE in the depicted order before washing hands. (C) Once outside the procedure room, carcasses are stored in designated coolers, and cages used during the procedure are autoclaved in the primary facility anteroom immediately outside the procedure room. The designated cooler and autoclave loading door are in the facility anteroom, whereas the sterilized autoclave contents are unloaded outside the anteroom, in the facility common area (D) equipped with an exhaust.
After exiting the BSL-3 procedure room, the researcher must properly store carcasses in a designated cooler in the anteroom immediately outside the procedure room. Similarly, cages prepared for decontamination should be placed in the anteroom autoclave at this time. So that sterilized material avoids contact with the anteroom, in which potentially infectious materials have been disposed, the unloading area of the autoclave is located outside the anteroom, inside the common area adjacent to the other BSL-3 laboratories of the facility (Figure 7). The unloading area above the autoclave door is equipped with a fume hood to vent out excess steam. This mechanism prevents excess humidity from escaping into the common room. The intravital imaging procedure notice should be removed from the door, and the oxygen valve should be closed. Finally, before leaving the room, the researcher, along with any additional authorized personnel, must sign out of the facility.
Emergency Measures
Although the SOP is designed to most effectively minimize the exposure of risk, the close proximity of the researchers to the high-risk pathogens during the intravital imaging procedure understandably necessitates clear emergency guidelines. In general, emergency measures should accommodate human and animal well-being, prioritizing human health and safety above that of animals. Although each potential incident necessitates its own specific procedural guideline, as described in the following, researchers should generally address their immediate injuries, secure or humanely handle animals, notify the principal investigator and the institutional environmental health and safety office, and seek prompt medical attention within 2 hours of the incident.
Anesthesia is injected intraperitoneally before the start of the imaging procedure. In cases of needle sticks during the surgical procedure, the researcher should immediately stop the surgery and discard his or her gloves in the waste bag in the surgical cabinet. The affected area should be washed with disinfectant and/or antiseptic soap and warm water for 15 minutes. Next, the animal should be handled appropriately according to institutional regulations. The researcher should squeeze the affected area to encourage outflow of blood from the wound. Finally, the researcher should contact the principal investigator and the institutional OEHS. Medical attention should be obtained as soon as possible.
The researcher should maintain heightened awareness of the possibility of bites from the infected animal, especially during animal handling before the onset of anesthesia. If an animal bite should occur, the researcher should immediately return the animal to its cage. As for needle sticks, the researcher should discard his or her gloves prior to washing and applying pressure to the wound. Before notifying institutional contacts and seeking medical attention, the researcher must replace his or her gloves and return the infected animal to its housing. This step can be handled by the research partner, if present.
Mucous membrane exposures are unlikely due to the chin-length face shields worn during the procedure. However, a truly sound SOP acknowledges secondary courses of action, even for the risk scenarios it is designed to minimize. In the case that a splash to the researcher’s mucous membranes should occur, the researcher should remove the face shield and immediately evacuate the lab and wash the membrane under an eye wash in the anteroom for 15 minutes. The researcher should next manage the animal appropriately and proceed to take care of the other types of injuries. As described previously, this step can be expedited if a research partner is present.
Finally, signage depicting emergency management strategies should be visibly placed within each room of the imaging facility. Signage should indicate the appropriate steps to be taken for each type of emergency in addition to the appropriate contact information for institutional health and biosafety committees.
Conclusions
In this report, we have delineated a SOP for intravital imaging of Risk Groups 2- and 3-infected animals. Through consideration of facility and equipment as well as experimental strategy, our SOP at once accounts for the safety of researchers and animals as well as those responsible for facility upkeep and maintenance. Where applicable, our SOP embodies cost-effective, practical containment strategies that can be adapted to a wide variety of facilities. Our hope is that the procedures outlined here serve as guidelines for establishing systems for intravital imaging studies of other high-risk pathogens suitable for modification to institution-specific regulations.
Footnotes
Authors’ Note
Prior Presentation: 2017 ABSA Yale-Harvard Symposium.
Acknowledgment
We thank Danielle Scavone for assistance with photographs.
Ethical Approval
All research was conducted with prior approval from Yale Institutional Biosafety Committee. The work presented here is original and has not been submitted or published elsewhere. All the authors listed have made a significant contribution to the reported study in the form of either conception, design, execution, or interpretation.
Statement of Human and Animal Rights
All institutional and national guidelines for the care and use of laboratory animals were followed. All research was conducted after prior approval from the Yale Institutional Animal Care and Use Committee and Institutional Biosafety Committee.
Statement of Informed Consent
Not applicable.
Declaration of Conflicting Interests
The authors declared no potential conflicts of interest with respect to the research, authorship, and/or publication of this article.
Funding
The authors disclosed receipt of the following financial support for the research, authorship, and/or publication of this article: Two-photon microscopy work was supported by NIH grants P50 GM082545, R01 CA098727, and S10 RR026697 to W. M. We also thank late Deputy Dean Carolyn Slayman for institutional support.