
Abstract
Lower limb complex arterial obstructions can be difficult to treat by standard endovascular means. Different technical strategies, such as the retrograde puncture of below-the-knee (BTK) vessels, the plantar loop technique, or the transcollateral approach, have been described to approach BTK or below-the-ankle (BTA) chronic total occlusions after a failed antegrade recanalization attempt. However, when the disease progresses into the foot or the plantar arch cannot be crossed for a bidirectional approach, the necessity for mastering extreme distal punctures increases. This review is to summarize different tips and tricks to help operators apply them when facing these complex punctures.
Clinical Impact
When the standard endovascular crossing maneuvers have failed during CLTI recanalization procedures and the distal below-the-knee or proximal below-the-ankle retrograde access is not possible due to chronic occlusion of the vessels, mastering the more distal and complex retrograde BTA punctures may be advantageous.There are scanty reports regarding the retrograde puncture of the mid and forefoot vessels. The aim of this article is to review different tips and tricks related to these techniques to help operators to apply them in specific scenarios to eventually improve procedural success rate.
Keywords
Introduction
The retrograde tibial approach has been increasingly used for the treatment of complex popliteal and tibioperoneal occlusions. There is extensive experience reporting retrograde punctures of the below-the-knee (BTK) and proximal below-the-ankle (BTA) vessels.1 –3 However, due to its increased technical complexity, there are scanty reports regarding the retrograde puncture of the mid and forefoot vessels. 4 This technical note summarizes different tips and tricks to help operators apply them when facing these complex punctures.
Materials and Methods
Due to the anatomical configuration of the foot vessels, the retrograde access becomes more complex as one advances from the ankle (larger and more superficial vessels) to the forefoot. Successful arterial puncture appears to be significantly influenced by its caliber, depth, extent of wall calcification, and the absence of bone support to fix the artery during the puncture. 5
Based on these concepts, BTA punctures can be performed at three different levels: Zone 1 comprises dorsalis pedis (DP) and distal posterior tibial (PT)/common plantar arteries. Zone 2 involves the distal DP, tarsal, medial plantar, and lateral plantar arteries. Zone 3 includes the plantar arch and the digital/metatarsal arteries (Figure 1).

Different zones of puncture of the BTA vessels. Green line: correlates with the ankle joint. Garnet line: runs from the head of the talus/navicular bones to the calcaneal tuberosity. Red line: correlates with the base of the metatarsal bones.
The technical difficulty of retrograde puncture increases from zone 1 to zone 3.
To overcome factors that influence the technical difficulty of the retrograde punctures, in both BTK and BTA arteries, different maneuvers may be considered.
Vessel Diameter
The standard needle of the retrograde access kits is usually a 21-G 4-cm needle (eg, micropuncture pedal introducer access set [Cook Medical, Bloomington, USA]). An alternative is a 22-G needle from a conventional pediatric arterial catheterization set (Arrow, Teleflex, Morrisville, USA). These needles can be easily found in any intensive care pediatric unit, have a lower cost than a dedicated foot access kit, and allow the passage of a standard 0.018 wire. The rationality behind using a lower-profile needle is that the decrease in the caliber of the needle increases the vessel lumen/needle tip ratio and subsequently the chances to cannulate the vessel (especially in severely diseased arteries).
Depth
The low profile of the 21-G needle contributes to its flexibility and, therefore, to the tendency to bend as it progresses through the deep tissues, hindering access to the target vessel. To overcome this issue, the “telescoping needle technique” can be used 6 : This consists of the coaxial insertion of a longer 21-G needle within a short 18-G needle (which provides extra guidance and support) (Figure 2). The distance to the target vessel is usually a more relevant factor when dealing with BTK vessels than with BTA. However, increasing the support at the tip of the 21-G needle with the “telescoping needle technique” clearly improves the penetration power of the 21-G needle when puncturing deep and calcified arteries.
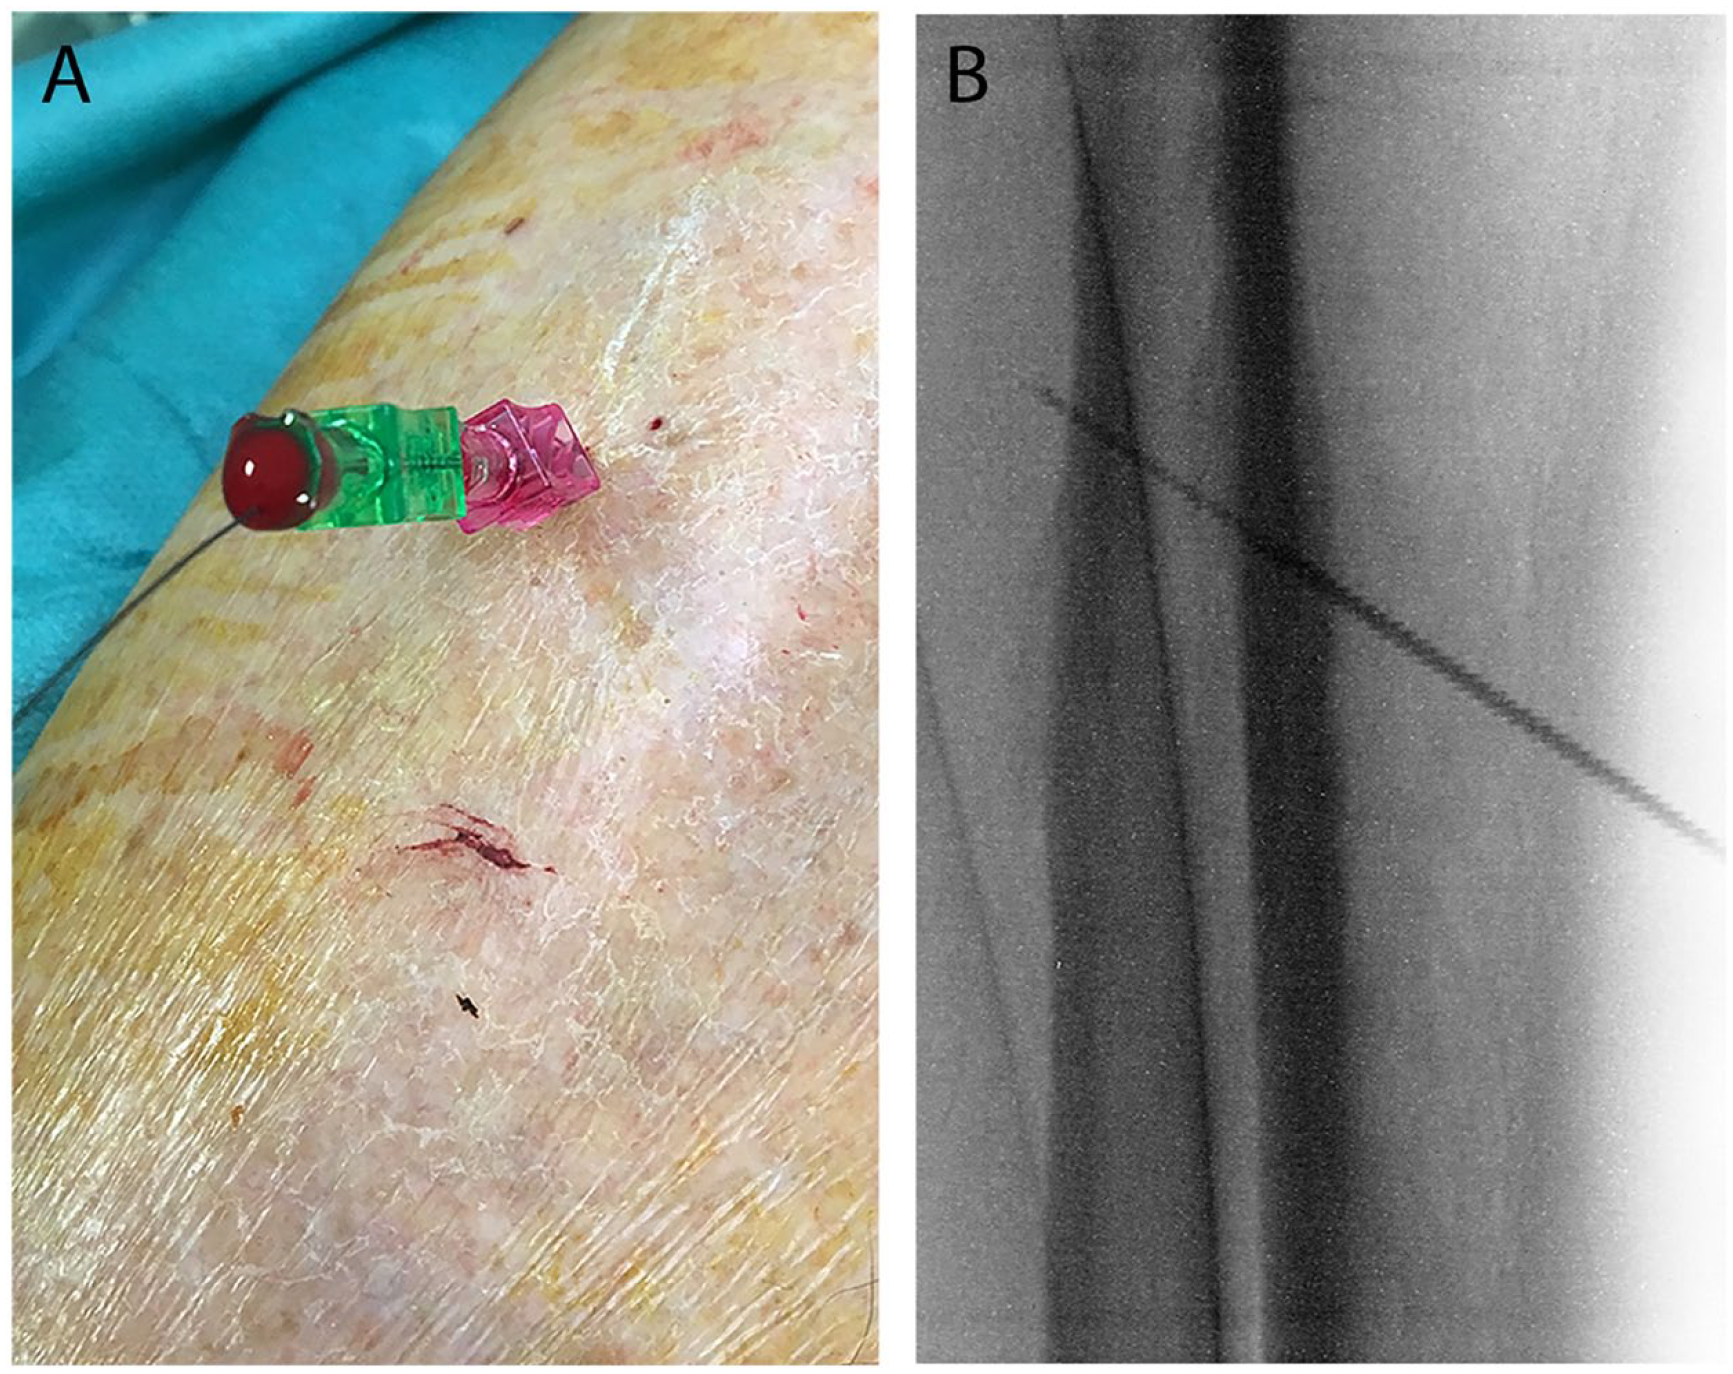
The “telescoping needle” technique. (A) Coaxial insertion of a longer 21-G needle within a short 18-G needle. (B) Radiological image.
Calcification and Absence of Bone Support
The success of any arterial access may be compromised depending on the mobility of the artery and vessel wall calcification. Heavily calcified arteries tend to refuse to be punctured, generating a “rebound effect” from the tip of the needle which usually pushes the needle to slide on the side of the vessel. In such scenarios, the “buddy needle technique” can be helpful. 7 This consists of using a second needle placed adjacent to the artery to act as support, fixing the artery between the needle and the surrounding tissues. Alternatively, if additional support is needed, 2 micropunture needles can be inserted one on either side of the target artery, crossing beneath the target vessel and hence trapping it between them (“chopsticks” variation) (Figure 3). Fixing and providing backup support to the artery enhances the chances of puncturing a calcified artery by avoiding the “rebound effect.”
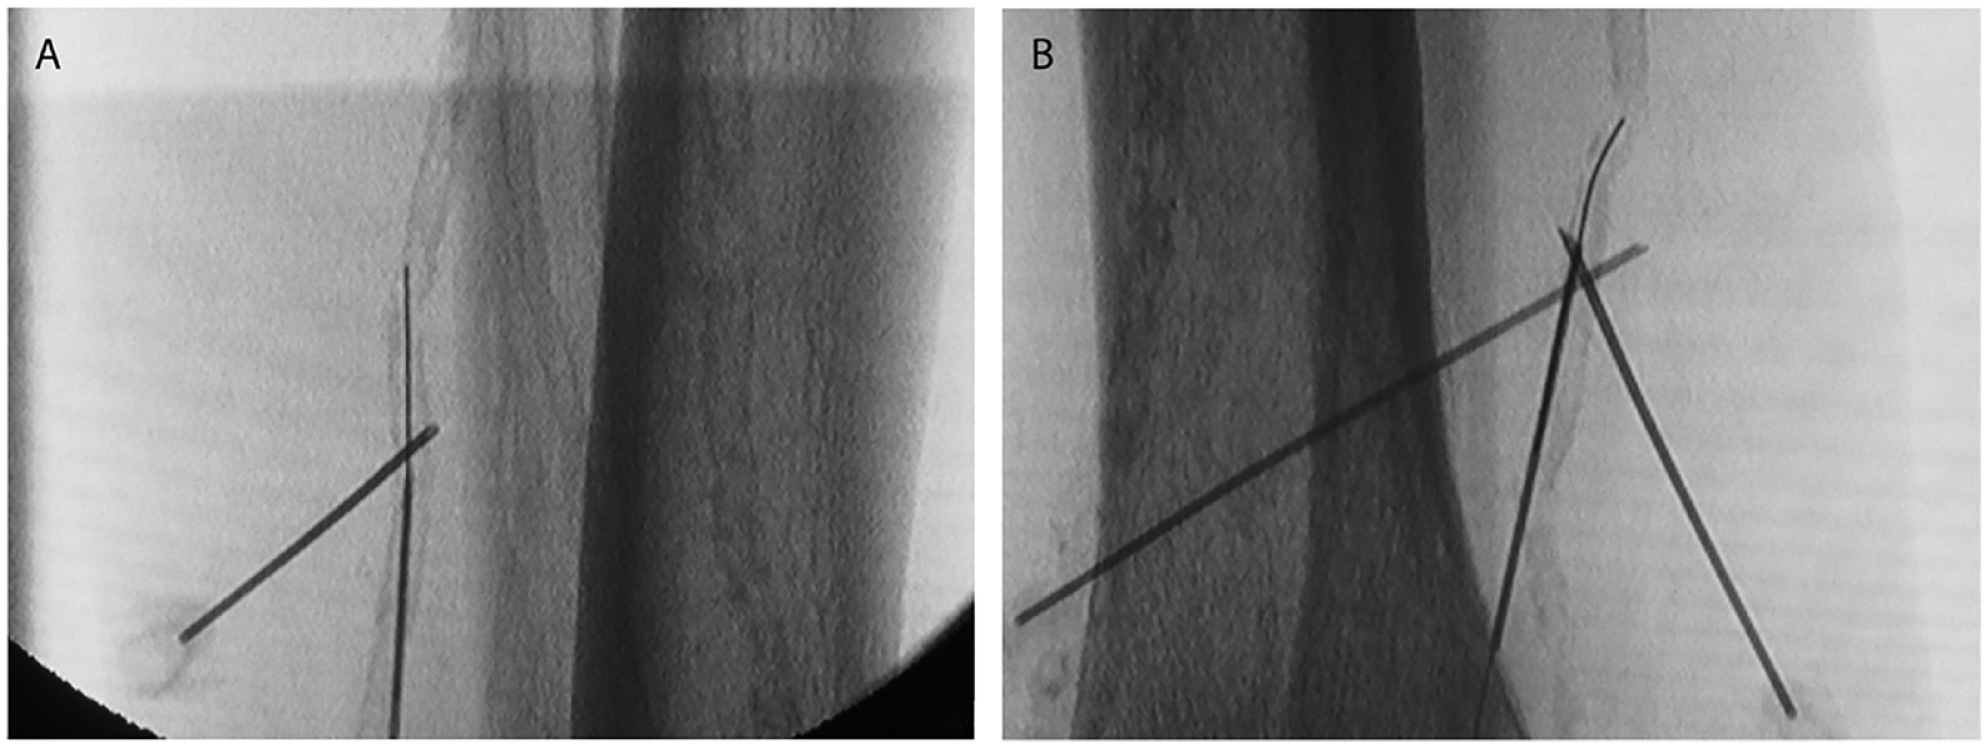
The “buddy needle” technique. (A) Single needle maneuver. (B) Chopsticks variation (two needles).
The ultrasound (US)-guided approach is, whenever possible, generally recommended to access the BTK/BTA arteries, as it is feasible and safe and reduces the operator’s radiation exposure significantly. 8
Although many physicians use a standard linear array probe, the hockey stick probe offers some advantages over it. It adapts better to the contour of the foot, reducing artifacts or any shadowing on the screen, and the reduced size of the probe makes it more manageable. The puncture is usually performed in an axis view as the “hit-the-ball” maneuver is easier in small arteries. Thereafter, the probe is turned to the longitudinal view to see the progression of the wire inside the vessel. To become familiar with the US-guided pedal access, a good recommendation is to use the US-guided approach of the radial artery as a bench-test during radial arterial line insertion or access for percutaneous coronary interventions.
Alternatively, if the physician opts for an X-ray-/roadmapping-guided approach, to use the maximum magnification and a proper projection are key points. At this point, aligning the entire needle (not just the tip of it) with the longitudinal axis of the target vessel is crucial (Figure 4). If the needle is advanced deep enough, it will eventually pierce the artery and pass through it completely (as in the dual-wall puncture of the artery described by Seldinger). 9 If one is not completely aligned with the axis of the artery, the chances of missing the artery increase (especially in very small caliber vessels).
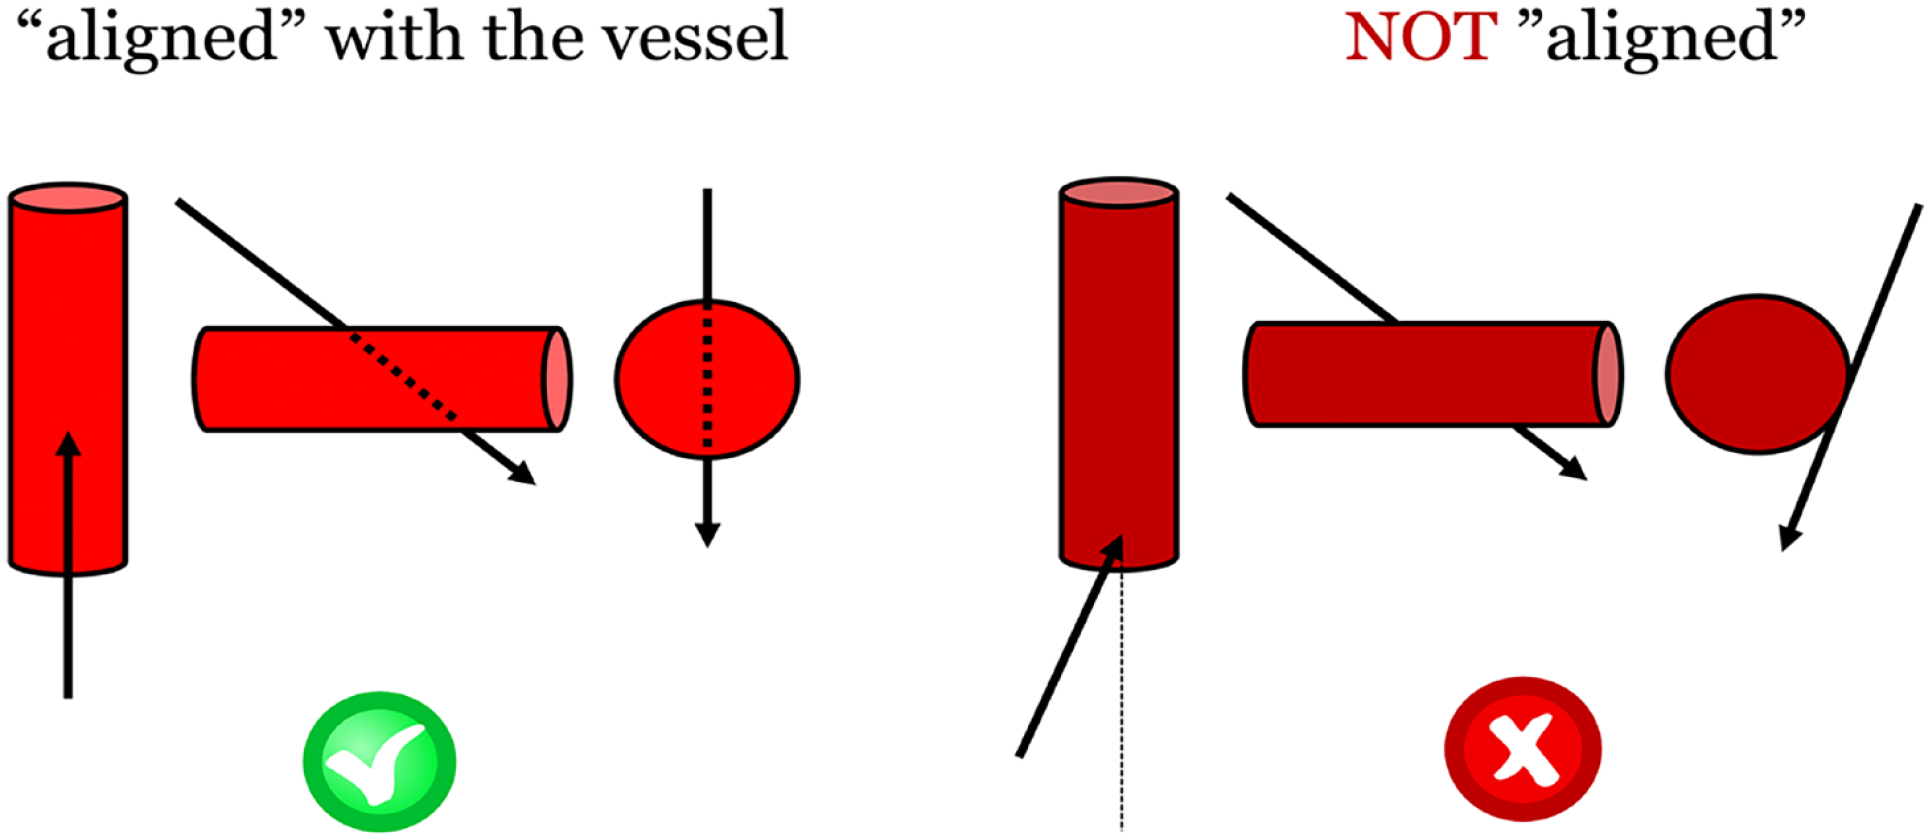
Adequate alignment of the needle with the axis of the artery under X-ray guidance.
If the BTA vessel has been dual-wall punctured, the operator only needs to gently withdraw the needle until a blood return is seen. Due to the small lumen of a 21-G needle, it is crucial to systematically purge the needle with <1 mL of saline before withdrawing it as any soft tissue over the puncture track could have blocked the needle’s lumen preventing the back bleeding. High sensitivity must be applied because, especially in small and highly calcific vessels, it is relatively easy to retract the needle completely outside the vessel.
If the operator is using X-ray-/roadmapping-guided access, a helpful maneuver is to assess the distance from the tip of the needle to the artery by performing a short run with an orthogonal view. Some operators progress the needle deep enough to achieve a dual-wall puncture and thereafter switch to the lateral projection during the retrieval maneuver to identify when the tip of the needle is within the artery, so that they can advance the wire through it.
The BTA vessels are prone to vasospasm, and therefore, the use of vasodilators is crucial to avoid this complication: Possible drugs to be used are NTG (bolus of 200 microgr), verapamil (bolus of 5 mg), or papaverine (bolus of 15 mg). Following a failed puncture attempt, it is always advisable to inject around the artery some vasodilators before withdrawing the needle. With regards to the anticoagulation regimen, an initial dose of 1 mg/kg of unfractionated heparin is suggested in the majority of BTK/BTA cases, trying to maintain the activated clotting time between 250 and 300 seconds during the procedure. 10
Reaching the artery and obtaining back bleeding within the needle is often the “less complex” side of the access maneuver. Usually, the more complex aspect of accessing these small and diseased vessels is progressing the wire after the puncture. First, one can get back bleeding from the needle regardless of whether the bevel is or not completely within the arterial lumen. Moreover, in a low-caliber artery, if the needle’s entry angle is too perpendicular, the tip of the needle usually faces the posterior wall of the artery preventing an adequate guidewire progression or even guiding the wire in the opposite direction. Hence, when the wire is not entering easily following the puncture, the first maneuver to recommend is to slightly lie down the back end of the needle to flatten its entry angle. Thereafter, it is also helpful to gently rotate the tip of the needle clockwise to allow the bevel to face an adequate direction for guidewire progression. The operator always needs to be intraluminal with the needle tip as small movements while trying to insert the guidewire could often end up in needle dislodgement. As a result, the subsequent guidewire insertion attempt could provoke vessel wall damage/dissection, thereby making it impossible to cannulate the vessel at that level.
If the operator still cannot progress the wire following the modification of the needle-entry angle or the smooth rotation of the bevel, a “toc-toc” movement can be applied. This entails gently progressing the floppy end of the wire (1–2 mm from the tip of the needle) in a to-and-fro movement. If the wire does not engage the lumen of the artery, one carefully withdraws the needle 1 mm and re-performs the toc-toc movement of the wire. The maneuver is repeated as long as necessary until the wire finally engages the arterial lumen and progresses smoothly within it. It can take some time to grasp the tactile feedback of the tip of the wire during this maneuver.
If the tip of the wire is inadvertently progressed too far and it finally loops outside the vessel lumen, the risk of peeling off the coating or snapping the wire during withdrawal is concrete. In this scenario, rotating the needle to retract the guidewire completely and safely can be useful. After a difficult withdrawal of a tangled guidewire, the integrity of its tip needs to be carefully assessed, and the use of a new guidewire is mandatory if any damage is noticed.
Although it might seem paradoxical, for a workhorse wire to access these small vessels, most physicians do not use a 0.014″ wire but a 0.018″ one. Specifically, the V-18 guidewire (Boston Scientific, Malborough, USA) presents a short tip which provides a good balance between profile and support. These are crucial features when there is little space from the access point to the occlusion as if the operator wants to support the wire with a catheter or a balloon; the longer less-supported tip of a 0.014″ wire will usually end up dislodged and the access lost.
It is also relevant to note that following the wire insertion, the surrounding tissues over the track from the skin to the artery should be gently dissected by a mosquito forceps to avoid any friction during the catheter/microsheath insertion that may lead to wire kinking or dislodgement.
Sometimes, regardless of a stable position of the wire, due to the arterial calcification, traversing the vessel wall access site with a support catheter could prove impossible. In such cases, the use of an ultra-low-profile balloon can help; another option is to try to enlarge the access point with a sort of inner piercing technique.
The inner piercing technique described by Nakama et al 11 involves advancing a percutaneous needle from a retrograde access into a severely calcified plaque using a rotational motion. This maneuver is used to enlarge the channel created by the wire to allow the crossing of devices that were not previously able to pass through the lesion.
Specific Features
Zone 1
The DP artery is one of the easiest and most-often-punctured vessels as it has a reasonable caliber, is superficial, straight, and lies above the bone mark all over its track. When the access is not carried out under US guidance, the X-ray-/roadmapping-guided puncture is usually performed using an anterior-posterior (AP) approach. However, if the artery is not clearly visualized under fluoroscopy in the AP view, one useful alternative is the lateral approach (Figure 5).
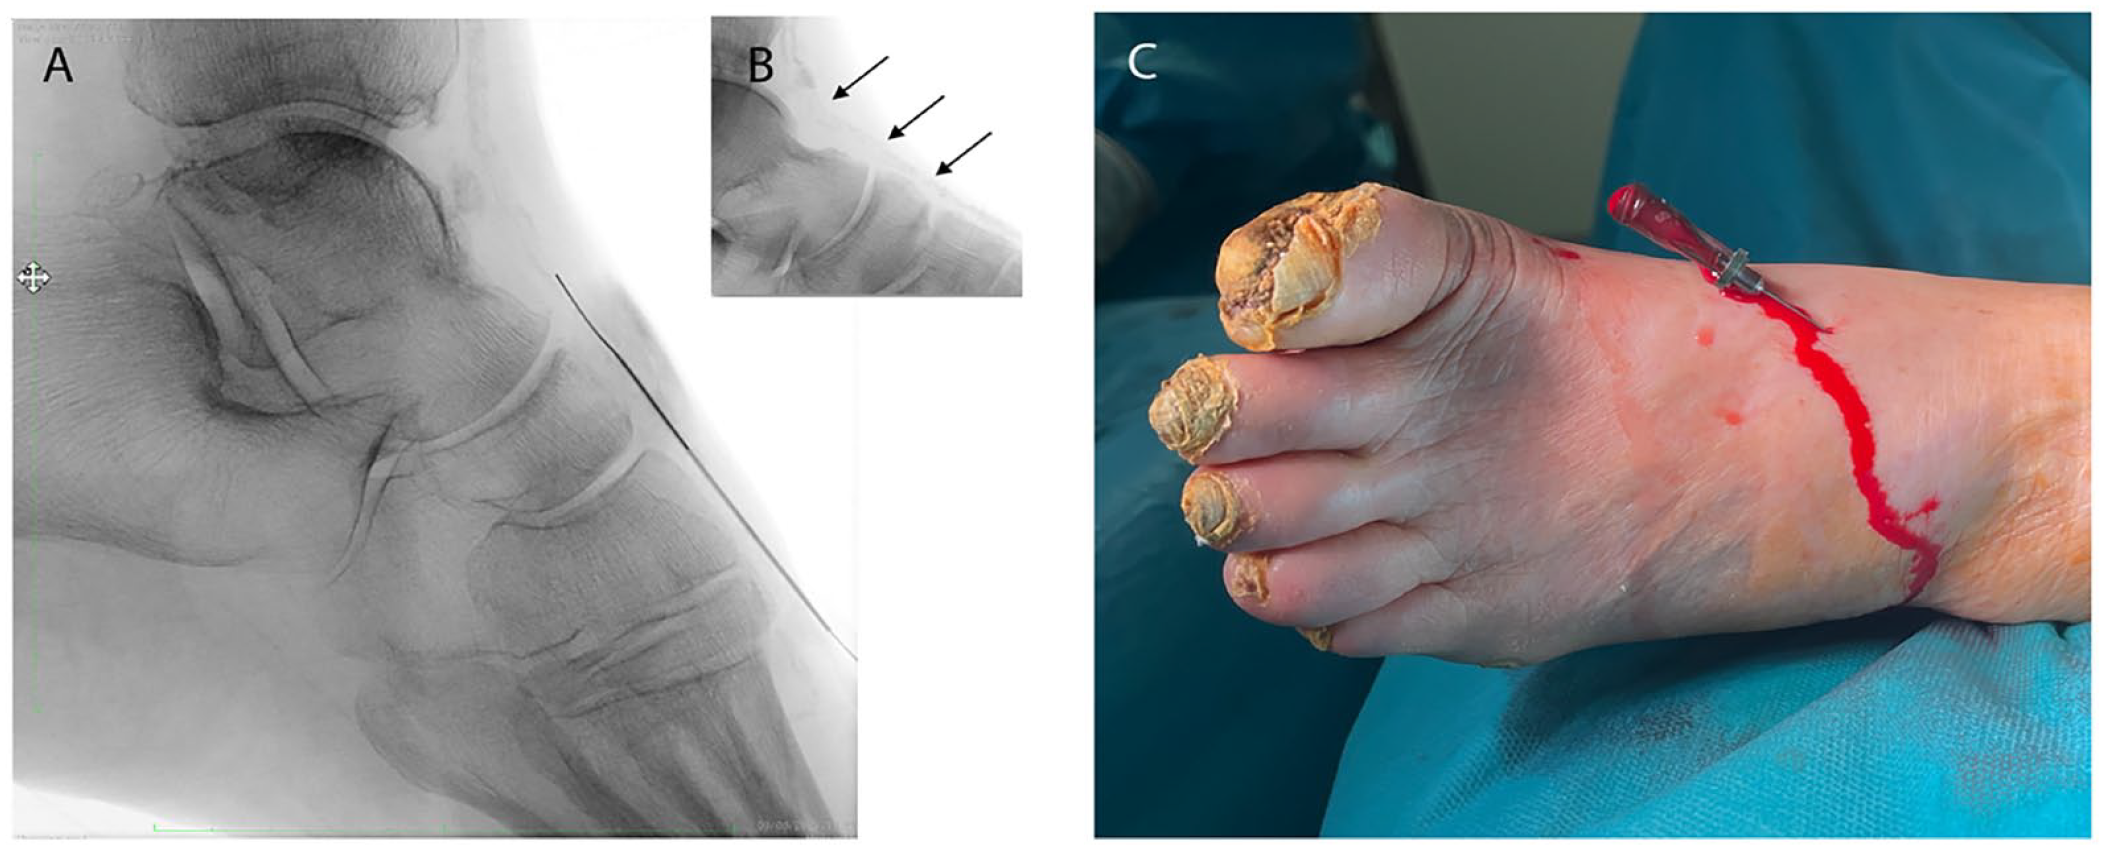
Lateral puncture of the dorsalis pedis artery. (A) Radiological image. (B) Arterial calcification. (C) Clinical image.
Since the arterial calcification is usually better seen in the lateral view than in the AP view, this permits to perform the puncture under plain X-ray using the calcification itself as a landmark, thereby avoiding a complex puncture under roadmap imaging (especially in non-cooperative patients under local anesthesia).
However, one must keep in mind that the lateral puncture of the artery entails to lose the bone as a backup support, and therefore, adjuvant maneuvers such as the “buddy needle” technique might be useful. It may also be necessary to support the artery with the operator’s fingers while progressing a support catheter or low-profile balloon during complex recanalization procedures.
The distal PT and the common plantar arteries are also commonly used as access points. The main recommendation for these arteries is to maintain the access site around the calcaneal area. Above this level, the vessel lies deeper and without adequate bone support which could make its puncture more challenging. It is also important not to hit the artery just at the angle of the “L” shape configuration of the vessel in this area as this hinders the “in-line” alignment of the needle and the guidewire progression. If the guidewire cannot progress through the tortuous segment in heavily calcified arteries, a useful tool is to “straighten” the vessel by holding the foot in dorsal flexion. 12
Zone 2
As mentioned earlier, the US-guided access is usually desirable for any arterial access. However, the absence of appropriate equipment/probe, skills, or experience makes the US-guided approach in zones 2 and 3 more uncommon.
In many centers, it is common practice not to use a dedicated sheath for retrograde punctures (sheathless approach). Due to the low caliber of the vessels, the sheathless approach is highly recommended in zones 2 or 3 to minimize wall vessel trauma.
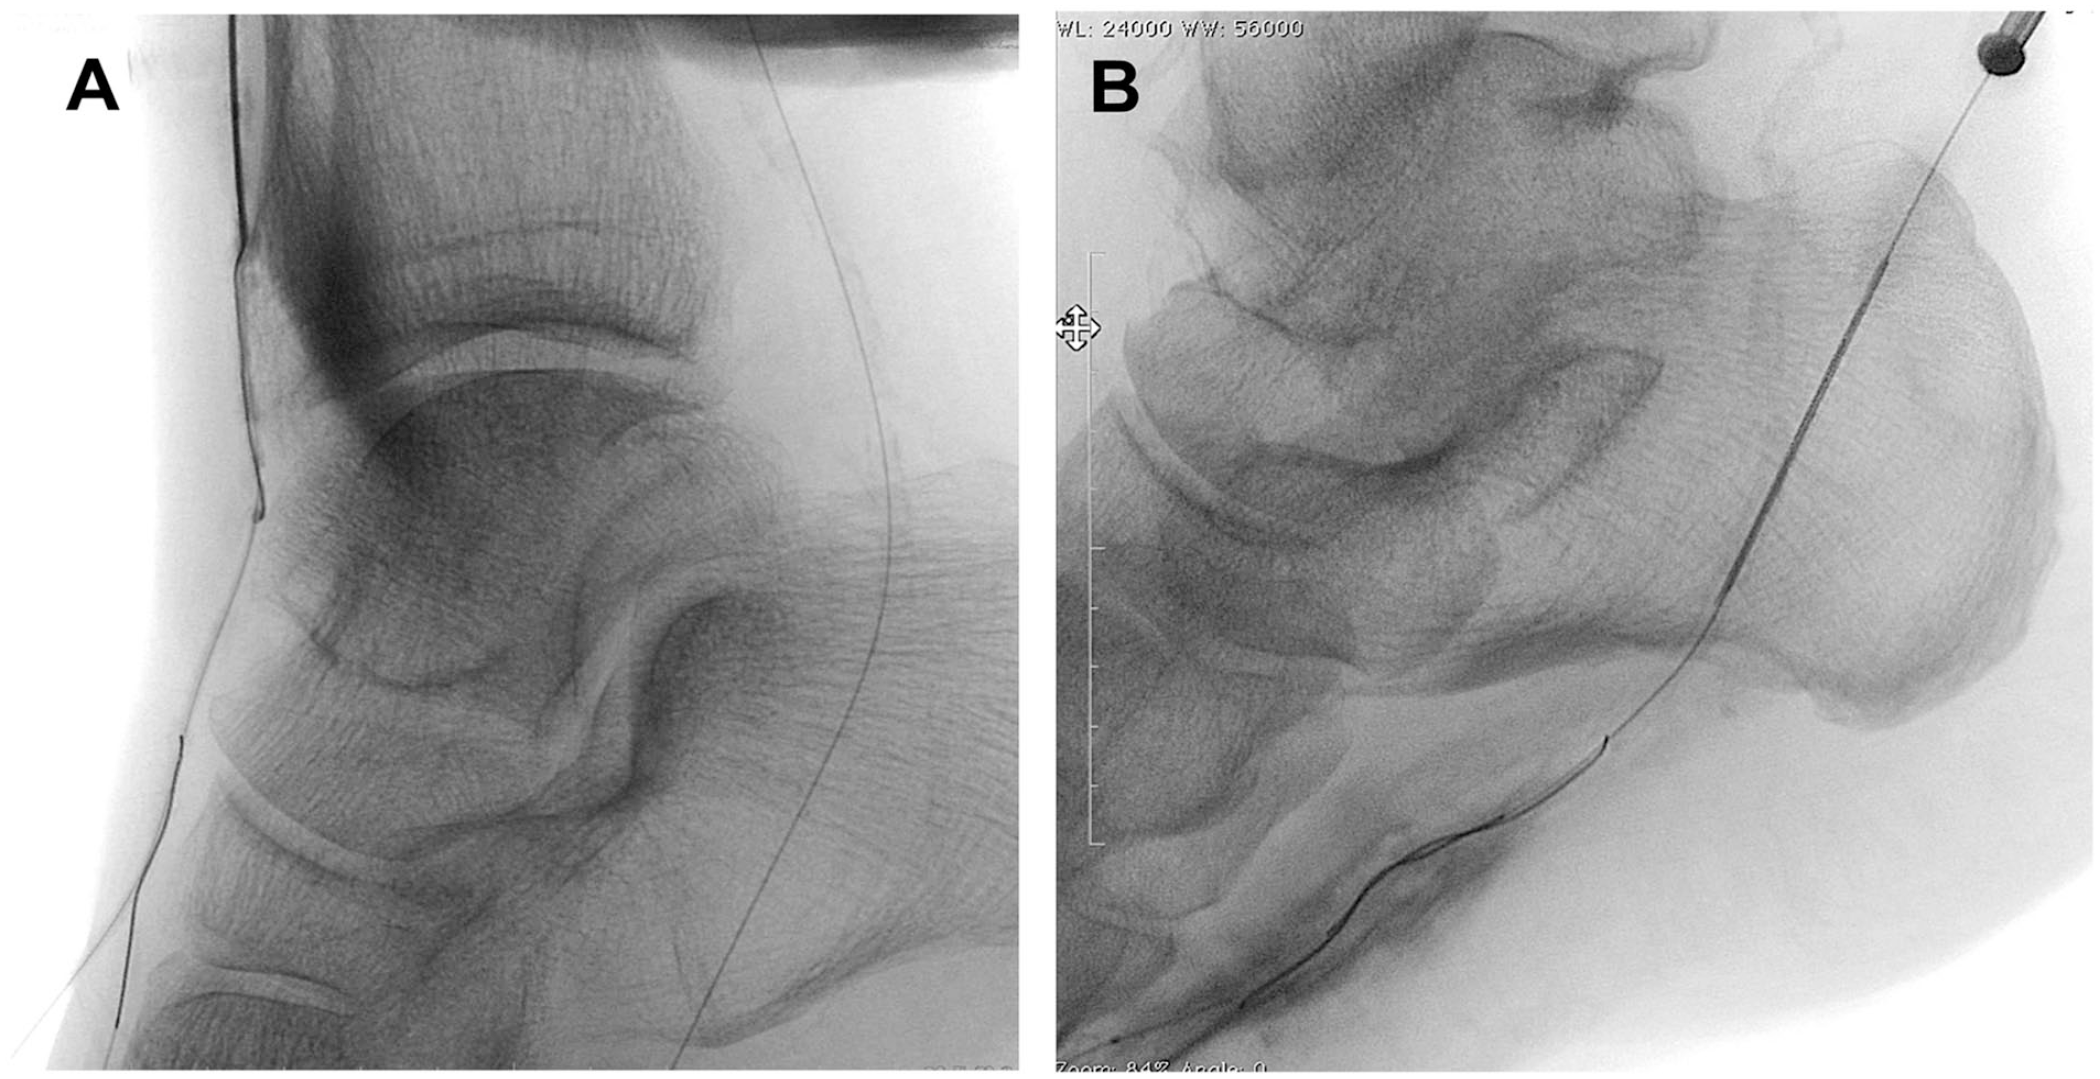
The puncture of the distal DP and the tarsal arteries under X-ray does not differ significantly from the puncture of the proximal DP artery apart from facing smaller caliber arteries. Both the tarsal and the distal DP arteries can be punctured using the lateral approach, and indeed, we have found that for this location, this approach is usually easier than the AP one.
With regard to the lateral and medial plantar arteries, the recommended radiological projection is obtained by tilting the X-ray tube laterally until the base of the fifth metatarsal bone is clearly visualized. The proximal aspect of both arteries is located superficially overlying the calcaneum bone. This makes puncturing this segment of the vessels easier than to puncture more distally. The mid and distal lateral plantar artery is located deeper than the medial plantar artery. The puncture of these vessels is complex due to its caliber and mobility (Figure 6). Moreover, the presence of Monckeberg calcification is relatively frequent at that level, especially in end-stage renal disease and diabetic patients. 13 Hence, techniques such as the “buddy needle” or the “telescoping needle” are frequently used in the authors’ institutions to access these vessels. Moreover, due to the low caliber of the arteries (the needle bevel is usually as big as the lumen of the artery), decreasing the profile of the needle up to 22-G may help. One important aspect of the puncture is the needle’s incidence angle which can often result in being too perpendicular to the artery, thereby hindering the guidewire progression into the lumen or repeatedly steering the wire toward the hole of the dual-wall puncture. To achieve a flattened angle, using a 7-cm-long needle instead of a 4-cm one, could be more advantageous, even in this superficial location.
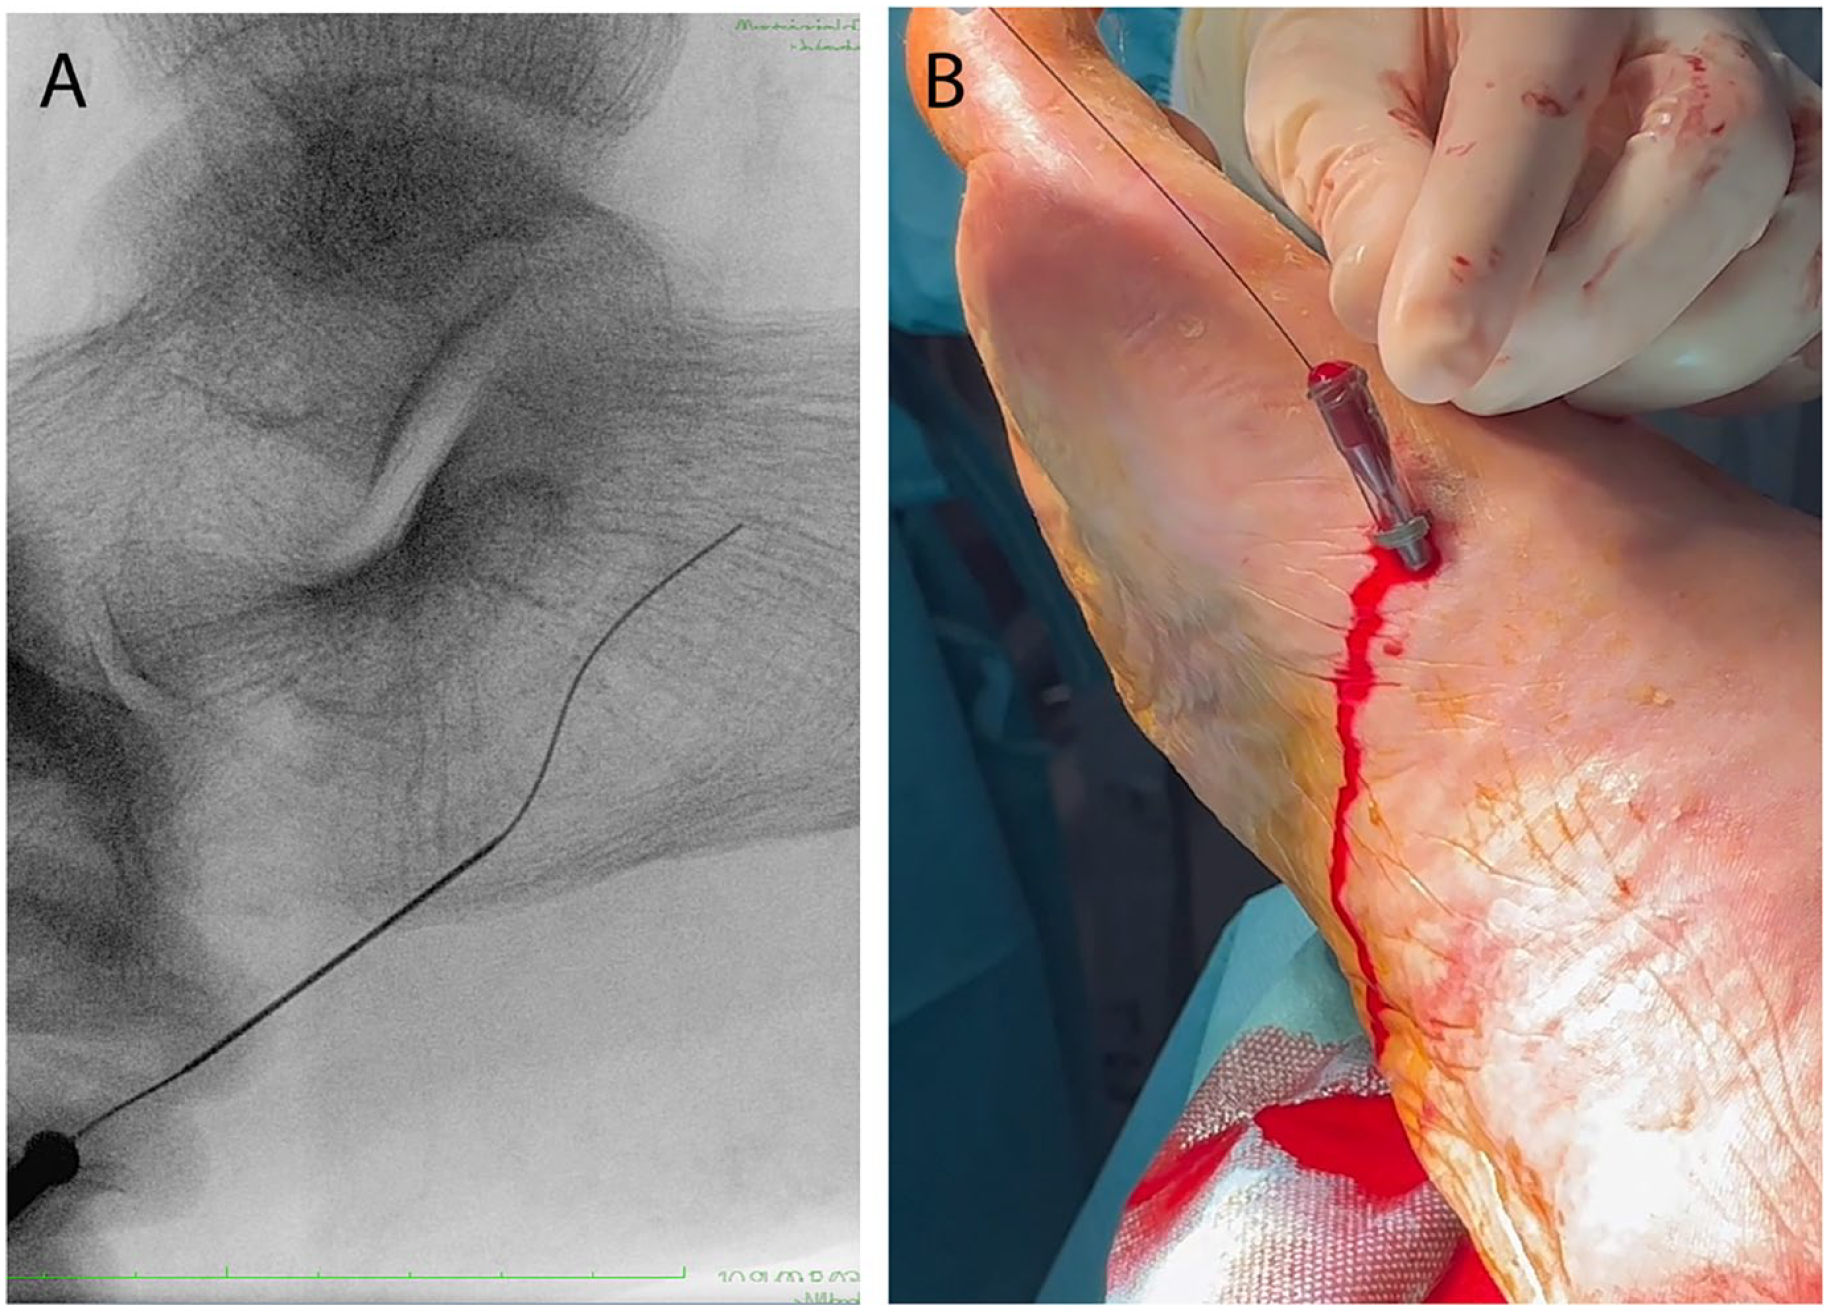
Puncture of the medial plantar artery. (A) Radiological image. (B) Clinical image.
In most of the standard retrograde approaches performed in the lower limbs, the longitudinal axis of the punctured vessel points to the 12 o’clock position, and hence, the operator movements are automated to this configuration. Due to the anatomical disposition of the vessels in zone 2 (the longitudinal axis of the arteries usually does not point to the 12 o’clock position), sometimes trying to align the needle or to follow the configuration of the artery is not so intuitive.
In such circumstances, the operator may find it helpful to use the “rotate the screen” function of the monitor to place the longitudinal axis of the target vessel and the tip of the needle pointing to the 12 o’clock position (Figure 7). This basic modification facilitates to maintain the standard disposition we are familiar with and therefore makes our spatial orientation movements more efficient when dealing with these complex punctures.
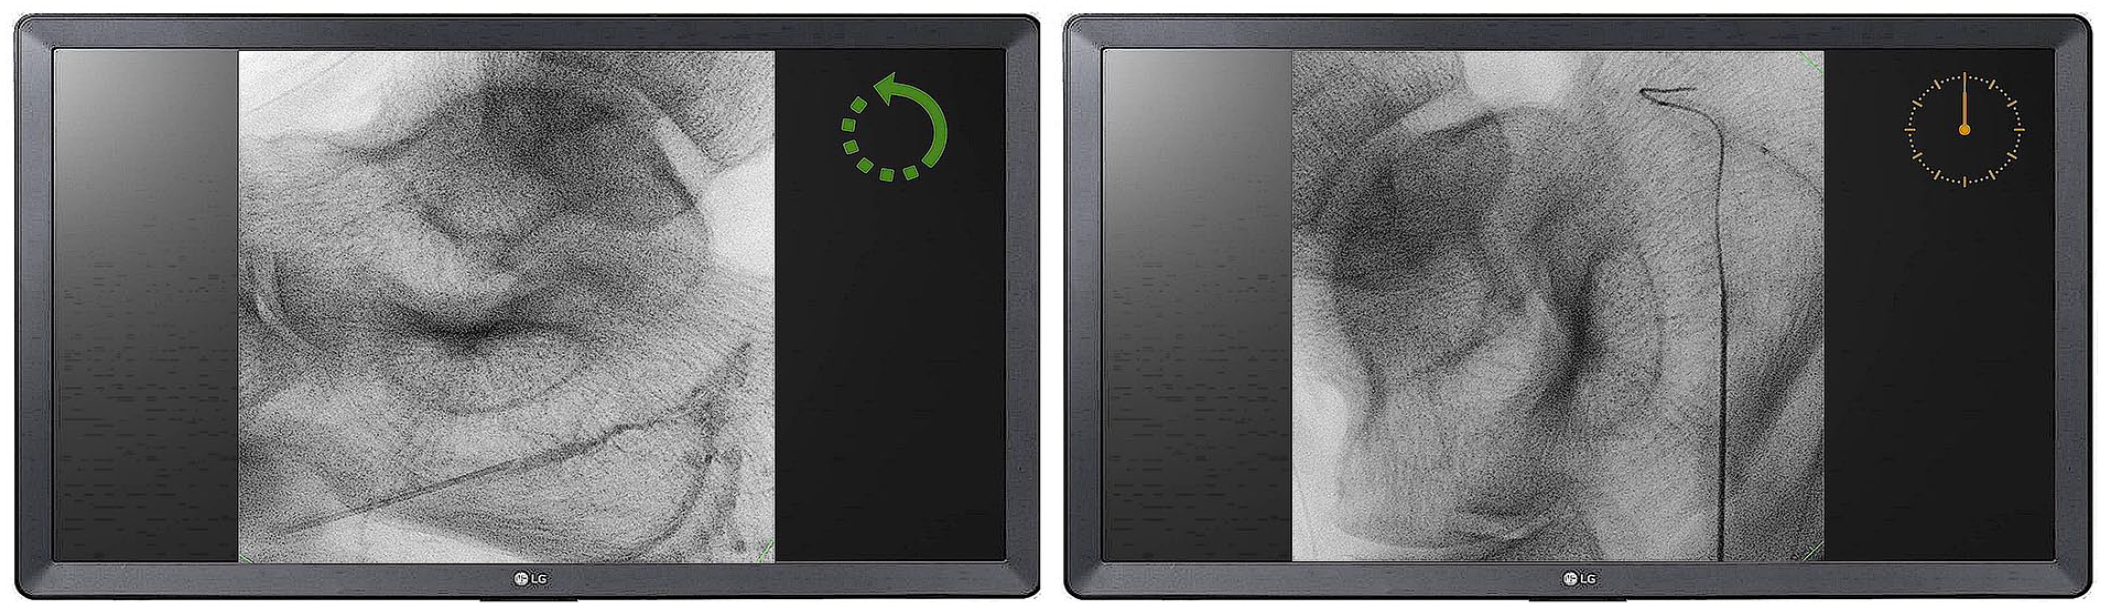
Rotation of the monitor screen orientation so that the target artery and the needle are facing the 12 o’clock position.
Zone 3
Some physicians, perhaps impressed by the published images on social media or during vascular meetings, might mistakenly think that any vessel can be easily accessed. It is utterly important to underline that “the digital arteries that can be punctured are the ones big enough to be punctured,” and the artery needs to be bigger than the needle used to gain the access. In the case of the metatarsal arteries, the first metatarsal artery is usually the best option for a retrograde access as it is the largest and the most accessible one (Figure 8).

Puncture of the first metatarsal artery. (A) Radiological image. (B) Clinical image.
If the operator does not master the US examination of the plantar arch or the digital arteries, it is challenging to perform this puncture under US guidance.
The best X-ray projection for this approach is the AP view obtained with the craniocaudal tilt of the tube; this allows a proper visualization of the first intermetatarsal space in full extension.
Even with the patient under general anesthesia or nerve blockage, the puncture under roadmapping imaging can be challenging, as the needle’s incidence angle usually requires plantar flexing of the toes, which can potentially spoil the roadmap image. Alternatively, the operator can perform a live contrast injection and try to puncture the vessel as the contrast fills it up. However, in such small vessels, this can be challenging as the operator needs to be fast enough to coordinate with contrast passage.
Moreover, if this approach fails, the surgical field often ends up obscured by the extravasated contrast, preventing further attempts. In these occasions, paradoxically the arterial calcification is frequently a good ally, as it permits the operator to perform the puncture under plain X-ray while the foot is placed in the most advantageous position with the other hand.
Although the venous plantar arch is usually approached from the plantar side (eg, while performing a DVA deep venous arterialization), 14 this is highly unusual for accessing the arterial plantar arch, where the best site to perform the puncture is the dorsum of the foot (Figure 9).
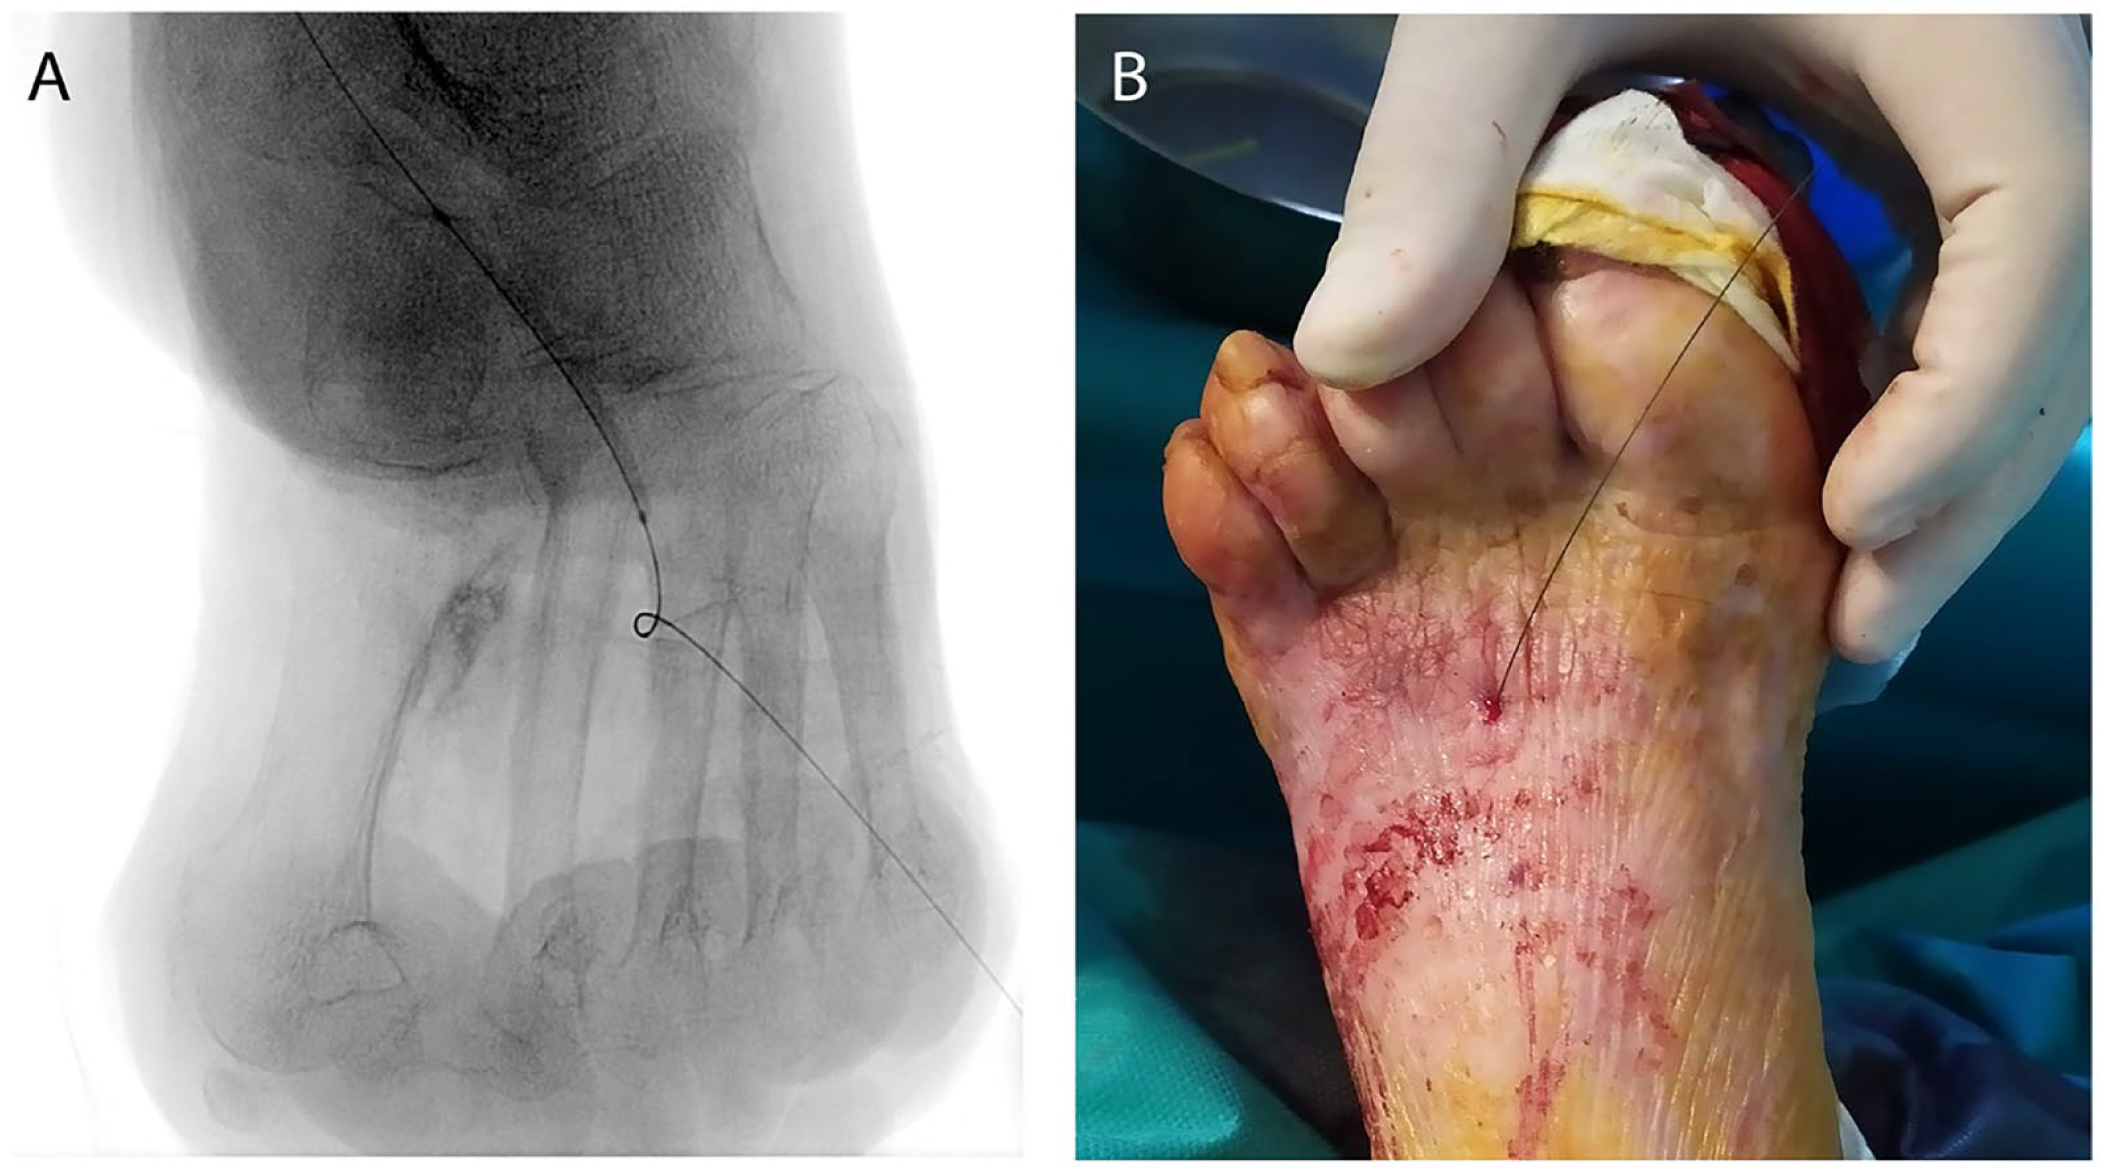
Puncture of the plantar arch. (A) Radiological image. (B) Clinical image.
A specific feature of the plantar arch access is the position of the needle. To achieve an adequate “in-line” alignment with the plantar arch, the puncture is almost perpendicular to the longitudinal axis of the foot, reaching the artery by sneaking through the gaps between the metatarsal bones. Following the puncture of the arch, the V-18 guidewire (Boston Scientific) is still our workhorse wire to consolidate the access, whereas when we puncture the metatarsal artery (due to its low caliber), we tend to switch to a 0.014″ platform.
In these tiny vessels, the toc-toc approach is, in our opinion, essential to avoid vessel injury during guidewire progression. It is also crucial to underline that if the operator is facing a situation where the feasibility of puncturing both the plantar arch and a metatarsal artery is similar, we would strongly favor the latter. This is because the potential damage on a metatarsal artery (occlusion, dissection, and so on) might threaten the viability of just one toe while the consequences related to a plantar arch injury usually involve the entire foot.
The BTA Antegrade Approach
Palena and Manzi 15 described the antegrade approach as a bailout strategy for recanalizing BTA chronic total occlusions (CTOs) in the opposite circulatory pathway when the foot vessels of the same circulatory pathway were occluded preventing a retrograde puncture (Figure 10). These vessels are mainly punctured in zone 1, and the technique used is the same as the standard retrograde one, gaining the access under US guidance.
Antegrade puncture of the BTA vessels. (A) Dorsalis pedis. (B) Plantar artery.
The lateral approach of the DP can be particularly useful in case of antegrade puncture of this artery as there is often not enough space for an effective positioning of the US probe on the dorsum of the foot when puncturing the vessel in such fashion. If the X-ray-/roadmapping-guided access is used, the operator can find it helpful (as mentioned earlier) to flip the monitor screen orientation so that the target artery and the needle are facing the 12 o’clock position.
Balloon-Assisted Puncture
This technique was described by the author group 16 to approach BTK CTOs after a failed recanalization attempt using the plantar loop maneuver in patients who are poor candidates for a conventional transpedal approach due to the absence of a feasible vessel to be targeted. The maneuver involves using a low-profile angioplasty balloon passed through the plantar arch as a landmark for the transpedal puncture (Figure 11), such that it turns a plantar loop “indirect” approach of the opposite artery into a “direct” transpedal access where there is not a feasible vessel to be retrogradely punctured.
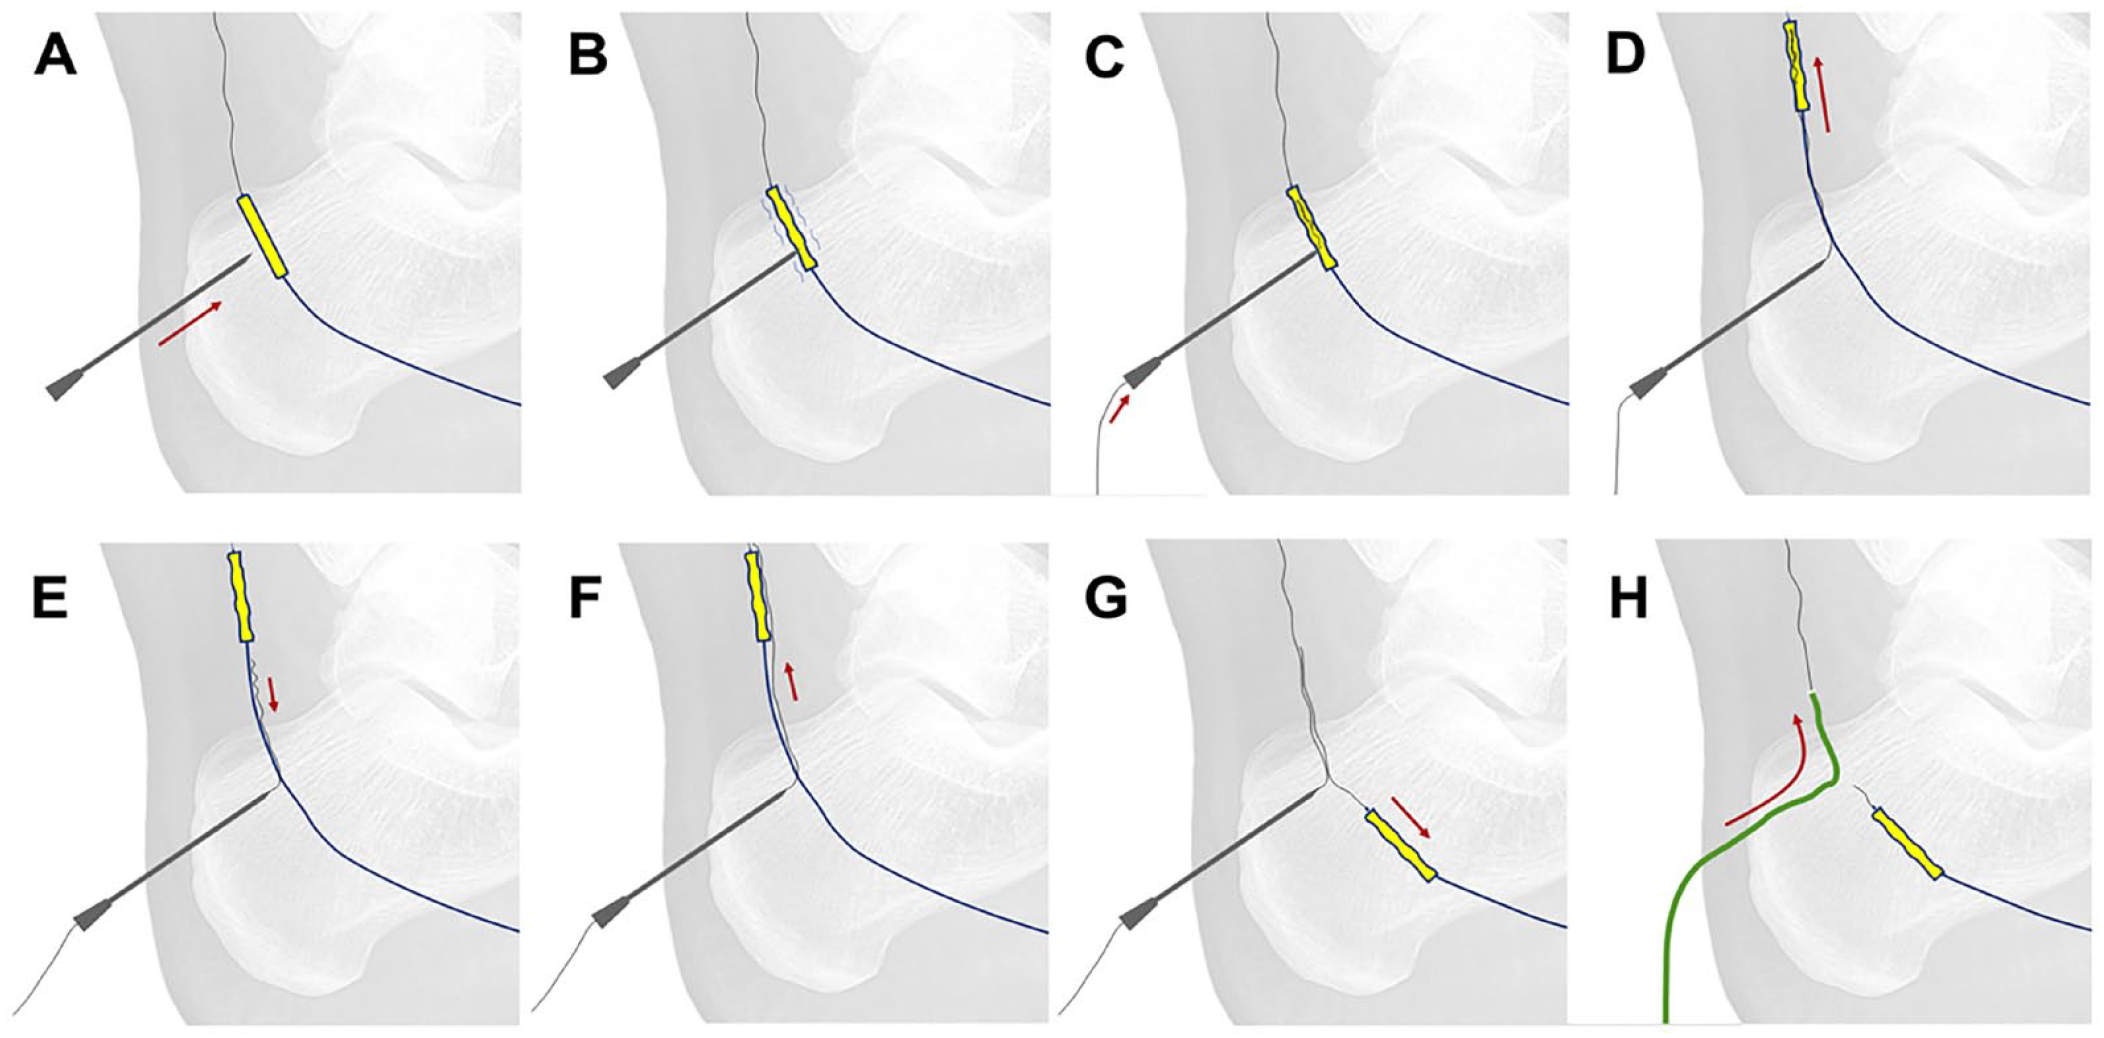
The “balloon-assisted retrograde puncture” technique. (A) A 22-G needle facing the inflated low-profile balloon catheter. (B) Balloon puncture. (C) An 0.014 wire is lodged within the punctured balloon. (D) Simultaneous advancement of the balloon and the wire. (E) The wire is gently withdrawn and dislodged from the balloon. (F) The wire is progressed parallel and beyond the balloon. (G) The balloon catheter is withdrawn. (H) Advancement of the support catheter while withdrawing the wire from the plantar loop.
In all the aforementioned punctures, hemostasis is achieved by manual compression or by endoclamping (inflating a 1:1-sized balloon advanced from the antegrade access for 3–5 minutes). The latter usually needs to be considered the only way to achieve a satisfactory hemostasis in zones 2 and 3, where the depth of the vessels does not allow a safe manual compression.
Discussion
Up to 20% of the CTO lesions cannot be crossed with the traditional antegrade techniques. 2 To overcome this issue, several bidirectional maneuvers have been described (retrograde puncture of BTK vessels, plantar loop technique, or the transcollateral approach) with increasing success rates. 4 However, when the disease progresses into the foot or the plantar arch cannot be crossed from a bidirectional approach, the necessity for mastering extreme distal punctures increases. There are few publications with regard to this issue, and most of them come from the same institution.17 –19
These maneuvers can improve both technical and clinical results for nonsurgical candidates in whom all other percutaneous accesses have failed or are unavailable.
The value of being able to achieve a rescue “back door” through a very distal access relies not only on providing an alternative way to cross the lesion but also on avoiding the progression of a dissection plane into the plantar arch while performing an antegrade subintimal recanalization.
Similar to the complications of any conventional retrograde access, the potential risks of these alternative approaches are related to spasm and/or dissection during puncture or guidewire navigation that can eventually lead to acute arterial occlusion or plantar arch injury. 15
To advance the guidewire only if a convincing arterial back bleeding is present from the needle is mandatory to avoid dissecting the vessel and damaging the guidewire. Moreover, puncturing any BTA artery at least 2 to 3 cm distally to the diseased/occluded arterial tract which need to be crossed is also utterly important as this allows the operator to achieve the necessary stability to let a support catheter follow the guidewire.
Less-experienced operators are recommended to start performing their first distal punctures at the level of zone 1 and only later begin to explore more distal accesses.
The reported failure rates in centers of excellence for transmetatarsal or transplantar arch retrograde access are up to 1:6 attempts. 4 Hence, the most complex punctures (located in distal zone 2 or zone 3) should not be systematically used in conventional procedures but kept as extreme bailouts in case of high risk of amputation.
In all these procedures, when performed under X-ray guidance, there is a noticeable increase in screening time and radiation dose due to the manipulation of the needles under fluoroscopy control. The operator should take care to avoid as much radiation as possible by using pulsed flow, short exposure times, and all appropriate available shielding.
Conclusion
When facing extremely challenging cases (where the standard endovascular crossing maneuvers have failed and the distal BTK/proximal BTA retrograde access is not possible due to chronic occlusion of the vessels), mastering the more distal and complex retrograde BTA punctures provides additional tools to achieve better technical outcomes.
Footnotes
Acknowledgements
To M. Manzi and M. Palena, true pioneers in the development of theses extreme techniques and a major inspiration for us over these years.
Declaration of Conflicting Interests
The author(s) declared no potential conflicts of interest with respect to the research, authorship, and/or publication of this article.
Funding
The author(s) received no financial support for the research, authorship, and/or publication of this article.