
Abstract
In the current context of the coronavirus disease 2019 pandemic, the deployment of telemedicine has accelerated considerably. Like telemedicine, teledentistry involves the use of telecommunication technologies to provide medical information and services. Teledentistry can contribute to remote assessment (teletriage) and continuity of care (telemonitoring). This evaluation at a distance can be done by sending photos taken by the patient with a smartphone. Providing patients with a simple and reproducible protocol and explaining how to take a photo is important for sufficient image quality. The aim of this technical note is to help clinicians advise their patients on how to take photographs of their oral cavity simply and with sufficient quality to be reproducible.
Introduction
Telemedicine has quickly become ubiquitous as the medical profession adapts its practice to provide optimal patient care in the context of the coronavirus disease 2019 (COVID-19) pandemic. While it is necessary to limit face-to-face consultations to reduce the risk of infection, dental surgeons must ensure continuity of care and “oral telemedicine” or “teledentistry” is a solution of choice.1,2 The COVID-19 epidemic could be at the origin of a lasting transformation of medicine with the progress of telemedicine. 3 Like telemedicine, teledentistry involves the use of telecommunication technologies to provide medical information and services. 1 The American Dental Association policy statement describes teledentistry as “the use of telehealth systems and methodologies in dentistry.” 4 As described by Smith et al. 1 for patients with COVID-19 or those who think they may be infected, teledentistry can assist in remote assessment (teletriage) and continuity of care (telemonitoring). More generally, regardless of the reason for an inability to travel, teledentistry is of particular interest in the context of remote assessment (teletriage, remote triage) and telemonitoring (remote continuity of care). Recognizing that the diagnosis of oral pathology must be based on a clinical examination, teledentistry does not presume to provide a precise telediagnosis.5,6
Communication technologies, such as smartphones, tablets, and laptops, have supported the rapid development of teledentistry as a new health care concept that allows the delivery of care at a distance. 7 Certainly, high-quality images are the most common means of communication in teledentistry, showing clinical, radiological, and investigative reports or simple photos of lesions. 8 Smartphones can also be easily connected to Internet networks and constitute a great facility for the patient in communicating with the dentist. This applies both for first visits in an emergency context (e.g. dental trauma, dental abscess, and third molar pericoronitis) and for follow-up assessments (e.g. postoperative surgical follow-up and follow-up of oral mucosal lesions). Notably, oral cancer is often preceded by visible lesions called potentially malignant oral conditions,9–11 which can be detected during routine screening by an oral clinical examination. 12 In particular, oral lesions may be directly observable, so photography can be a valuable diagnostic tool that should not be underestimated. In a recent systematic review of the literature, Flores et al. 11 conclude that there is a high level of concordance between teledentistry and clinical consultation and that the use of this resource for diagnostic purposes can reduce costs and travel time to personally consult a specialist. Notably, two studies found that the concordance of clinical diagnosis was moderate to high and that smartphone photos can be a useful tool in oral medicine, especially to facilitate early detection of oral mucosal lesions.12,13
Teledentistry has emerged as a promising tool in the remote management of patients followed for precancerous lesions or in post-operative follow-ups, especially to reduce costs and waiting times.14,15
Despite the limitations of the analysis of photos taken by laypersons, teledentistry has shown that it is possible to maintain a remote link with patients requiring periodic consultations.1,14
In the context of monitoring an oral lesion or a dental problem that may evolve over time, remote monitoring has proved to be of considerable interest. To be effective, this telemonitoring must be associated with the reception of clinical photographs of sufficient quality to enable the evolution of the lesion to be compared over time. These photographs are taken with the patient's smartphone.16–19 Nevertheless, the effectiveness of this new system remains dependent on the quality of the images sent.
Offering the patient a simple and reproducible protocol for taking the photographs is essential to ensure the highest possible quality of follow-up, which is integrated into the traditional patient follow-up. It is indeed important to remember that this remote monitoring is not intended to replace face-to-face monitoring, but to be able to:
provide more regular follow-up, communicate with the patient in case of inability to move around, improve patient autonomy, and involvement in the follow-up of their pathology, improve management delays.
The objective of this technical note is to help clinicians to advise their patients on how to take photos of their oral cavity simply, but with sufficient quality to be reproducible.
Protocol
Smartphone settings: recommendations
The mobile phones used should be wiped down with wet wipes before use to ensure that the mobile screen is clear. 12
For smartphone photography with or without a caregiver, the camera should be set up to make it easy to take pictures and to obtain the best possible image quality. The settings are generally accessible from the camera.
The main steps for setting up the smartphone are shown in Figures 1 and 2.
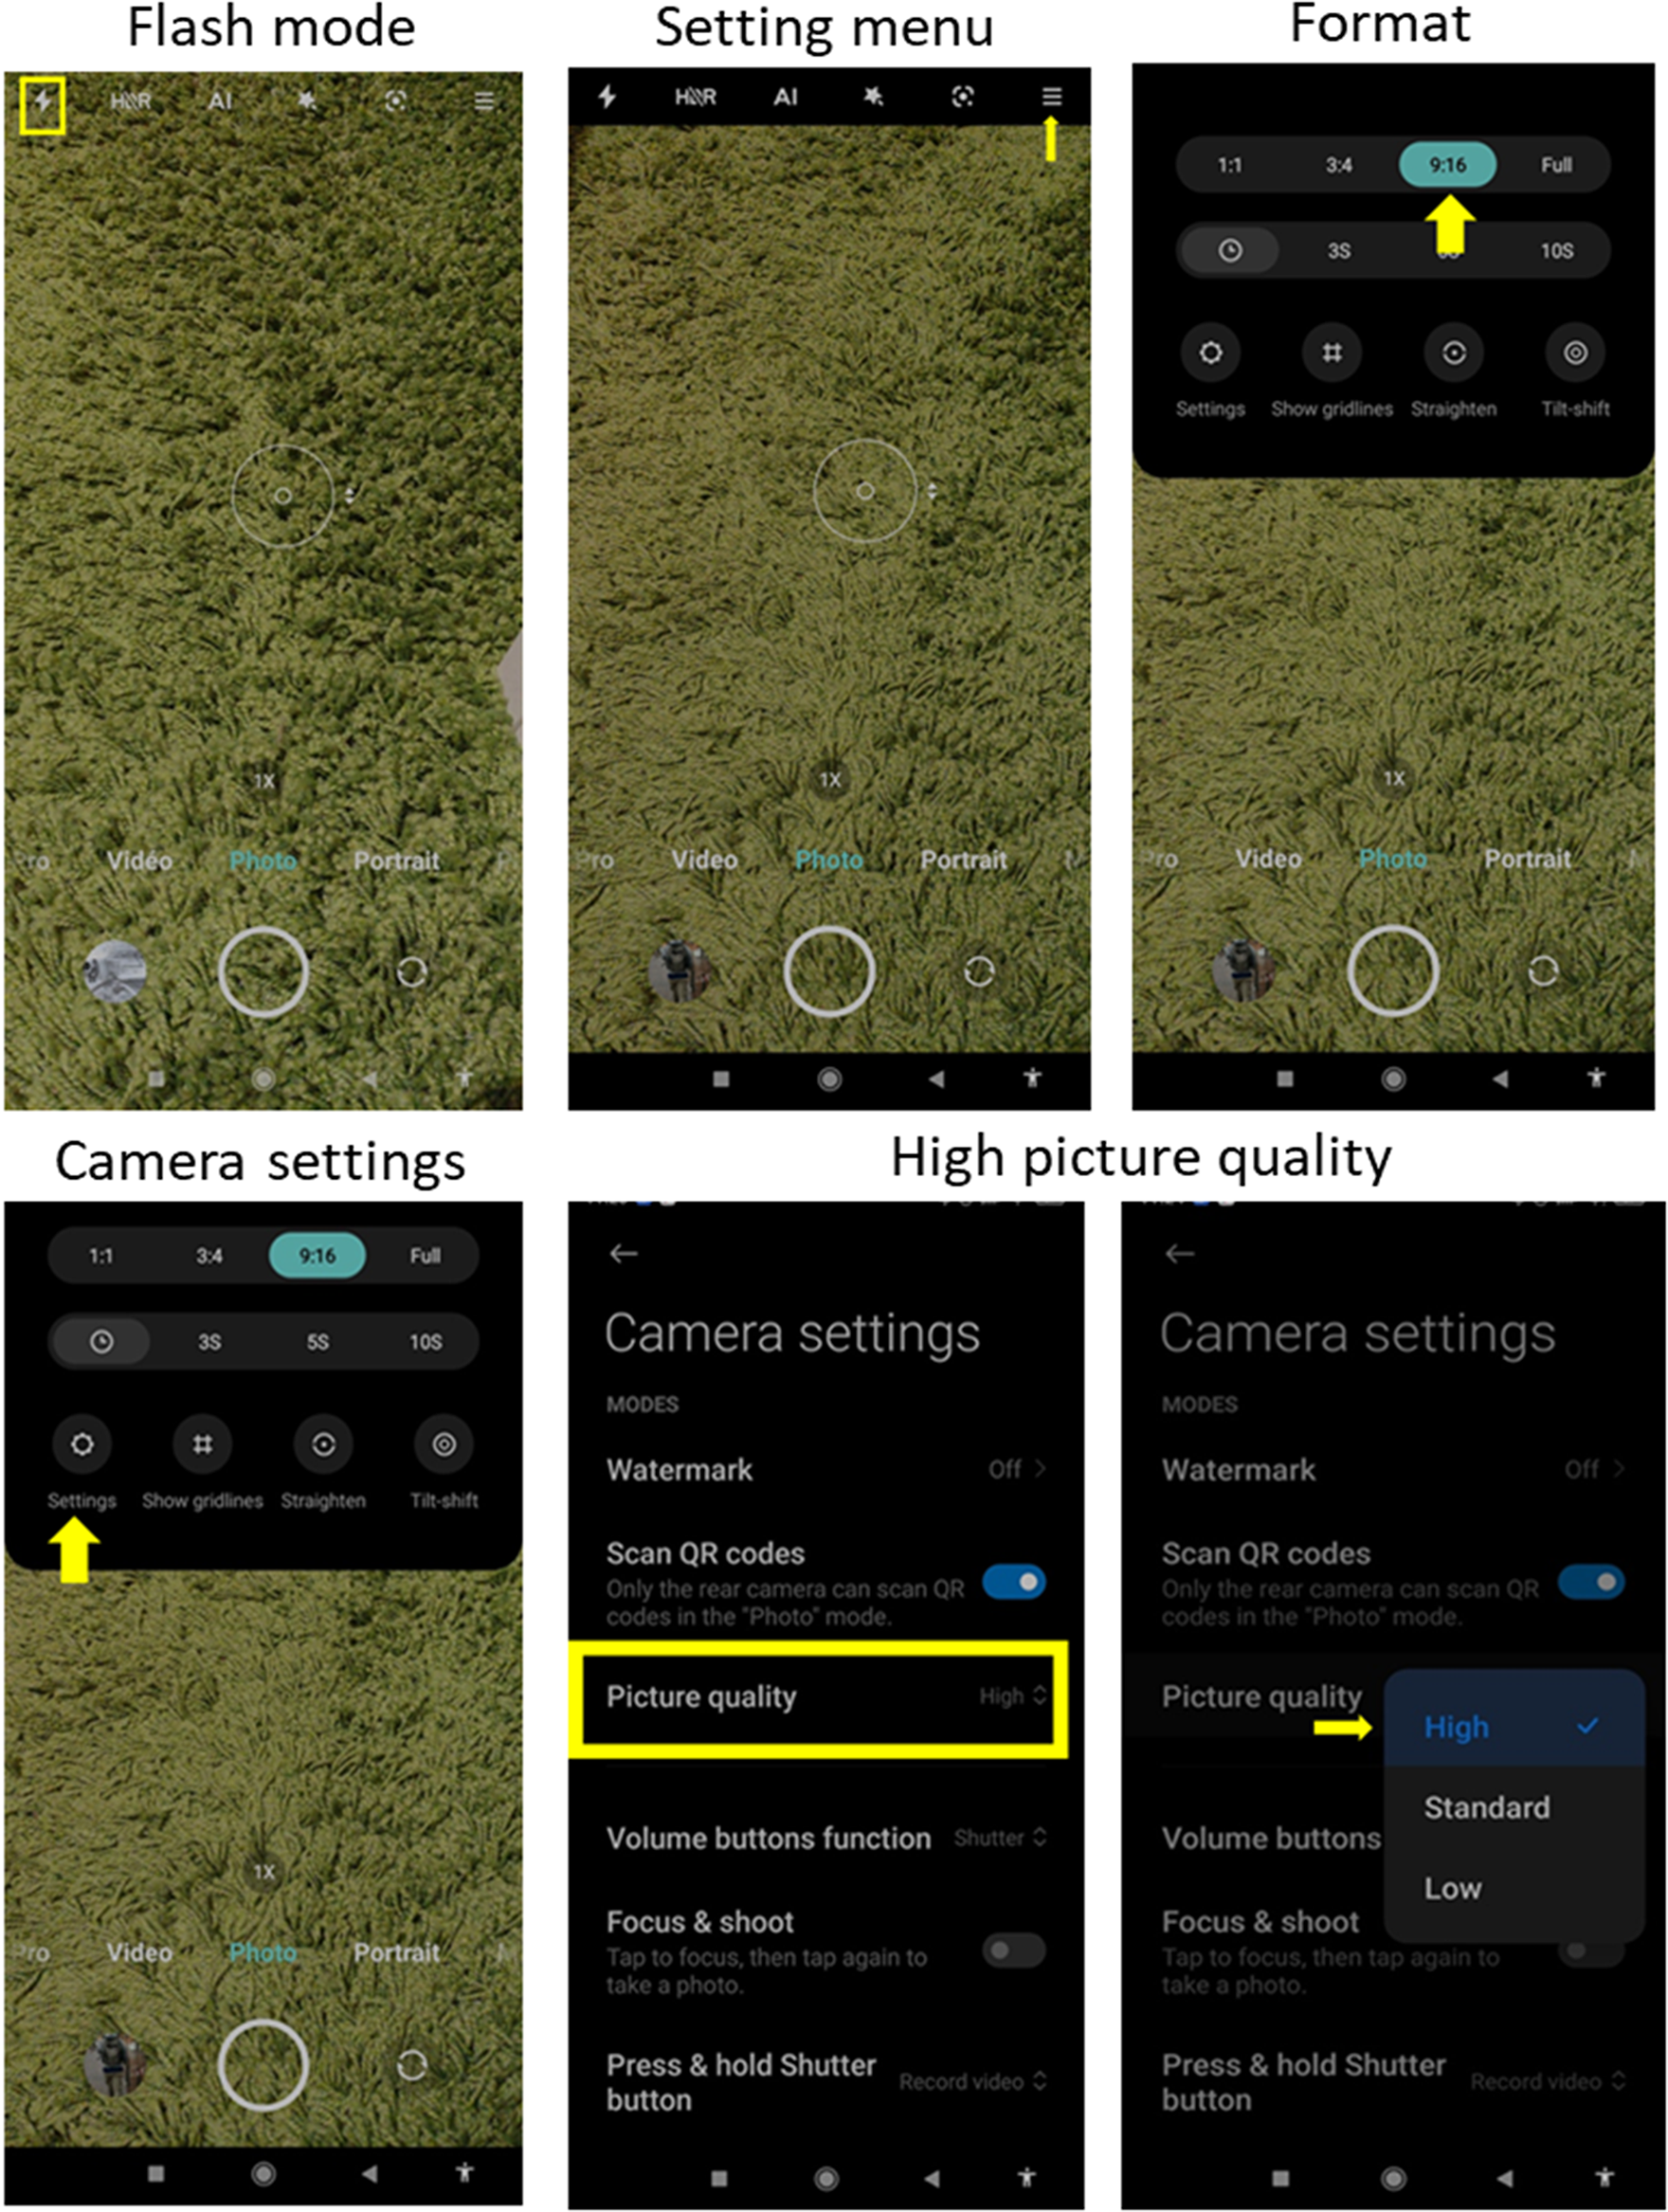
Example of smartphone settings (Xiaomi Mi mix 2s).
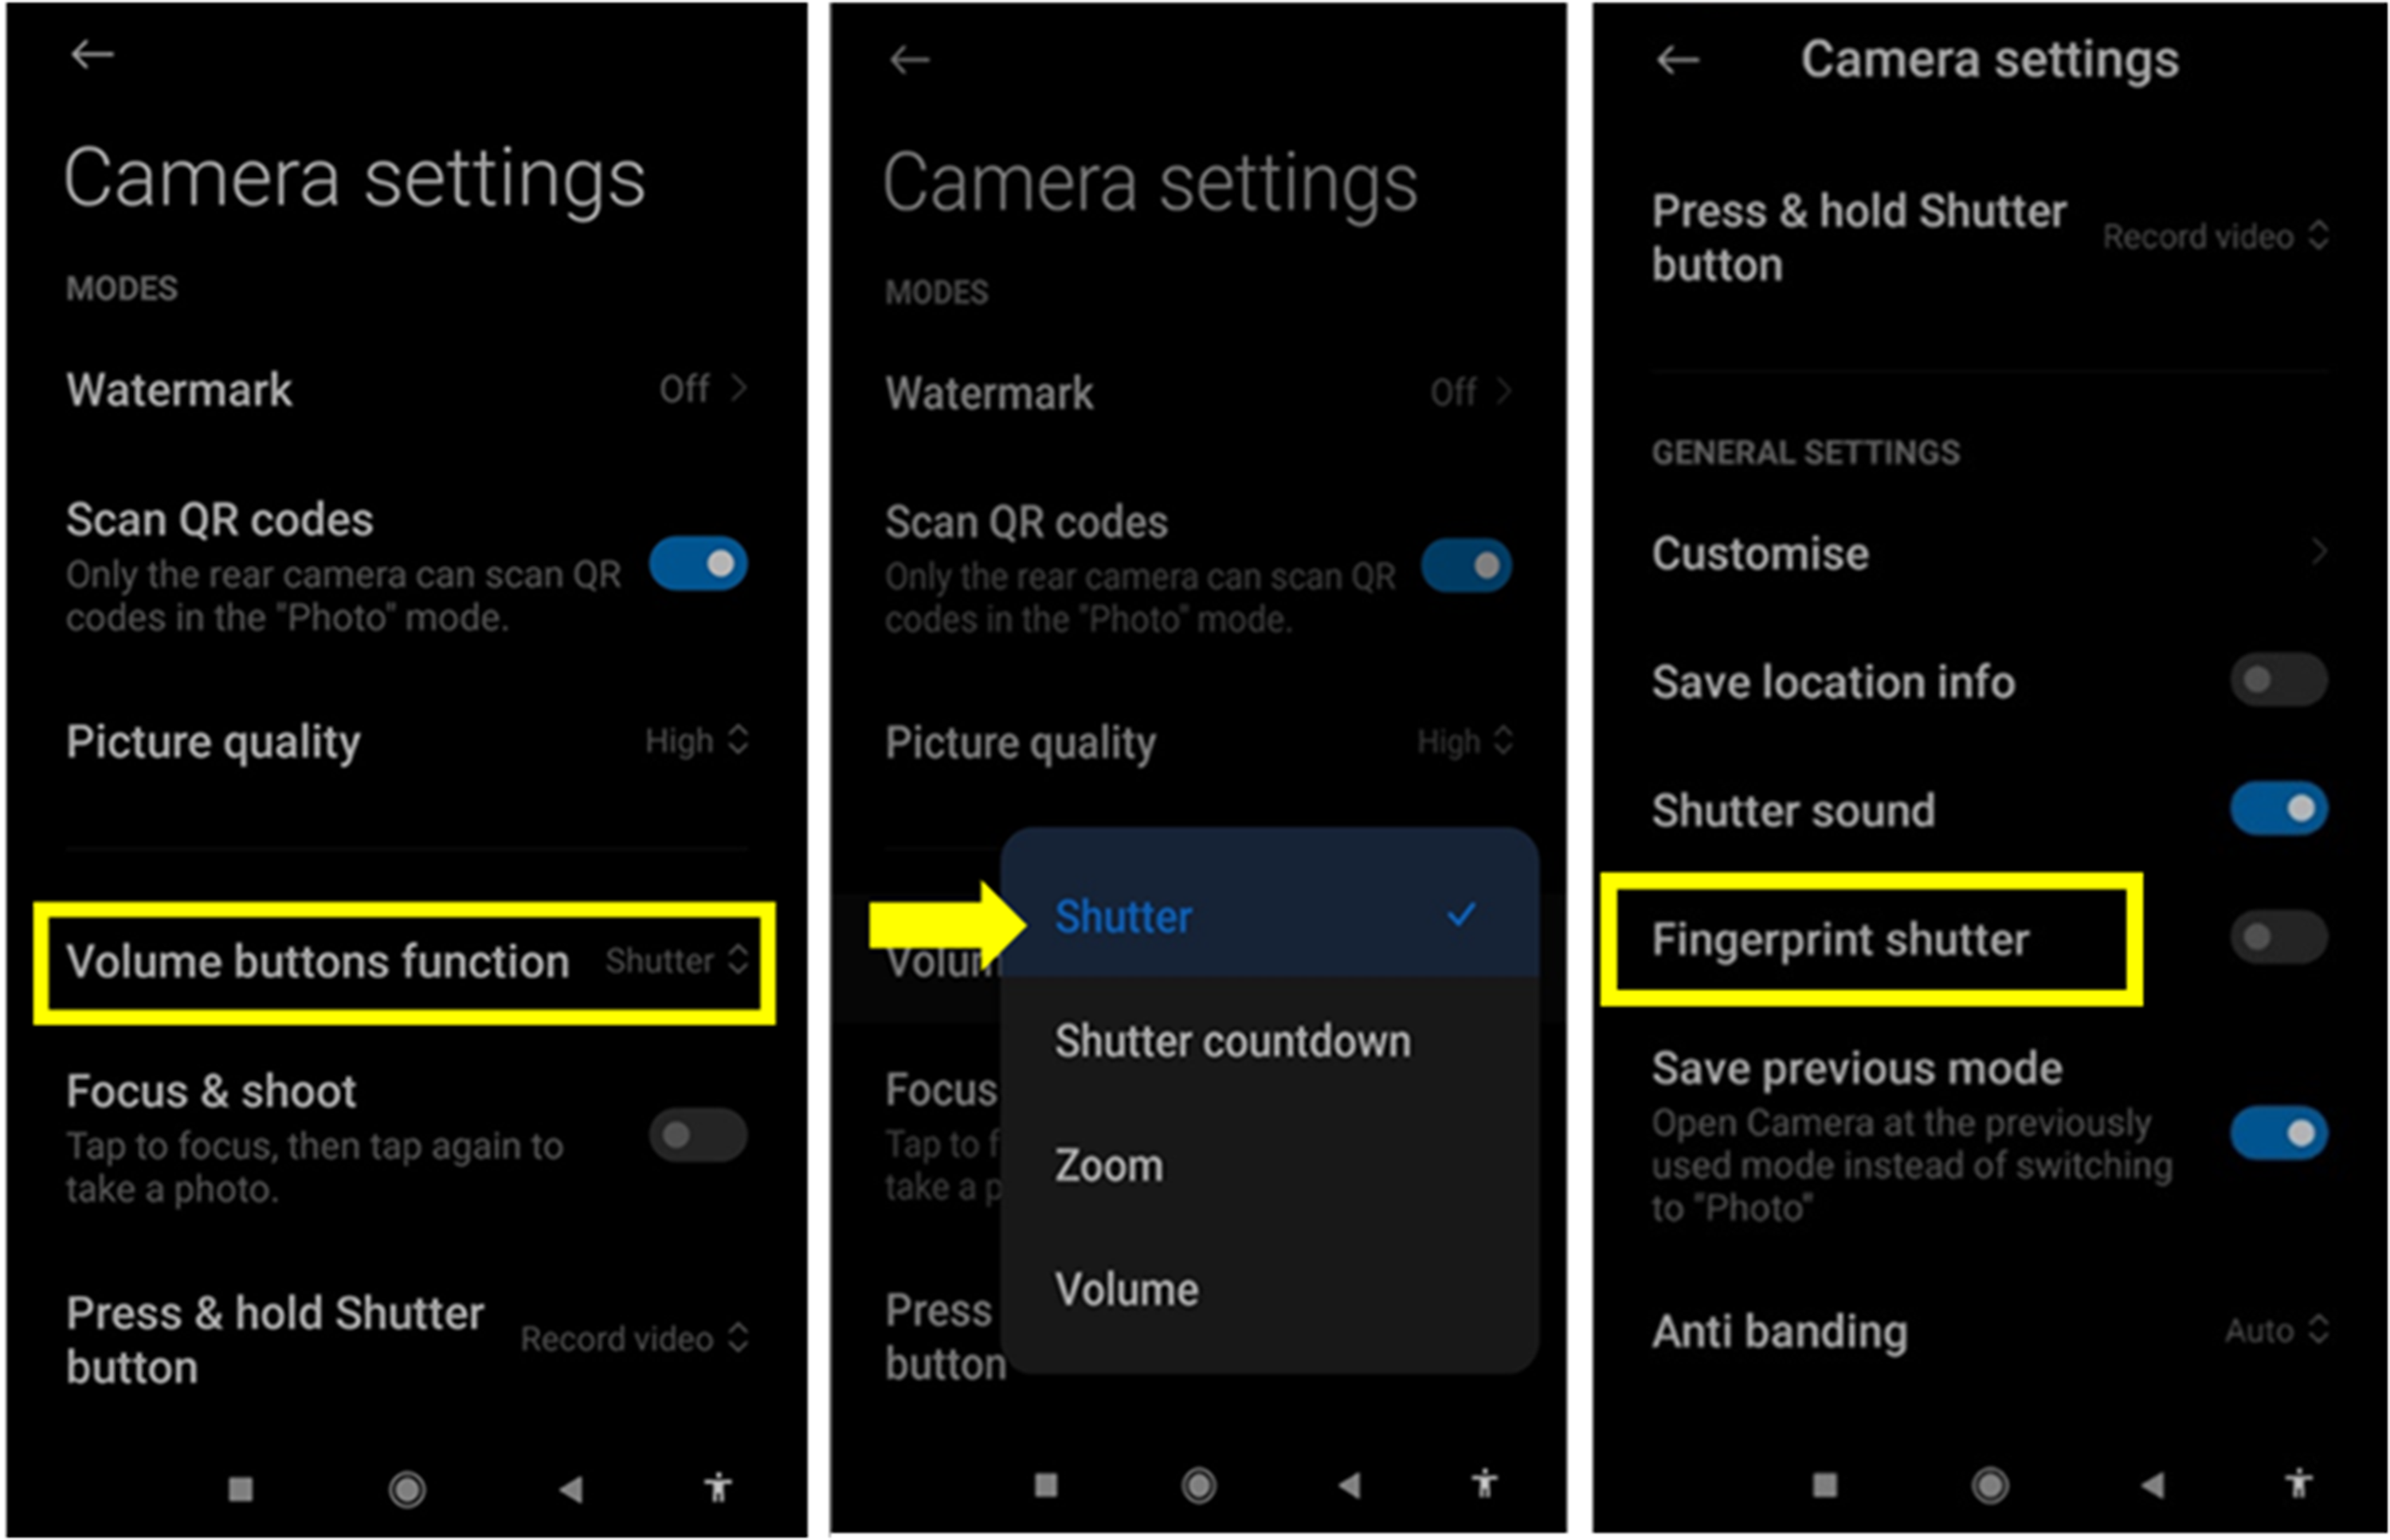
Example of assigning a button for shooting (Xiaomi Mi mix 2s).
Setting the flash mode (Figure 1)
Whether for photos from the exterior of the mouth or the interior, set the flash to forced mode. The flash will always be triggered, but the camera will calculate the best exposure to use. The flash is therefore focused directly on the mouth and the visual discomfort should be minimal or even non-existent.
Access the camera setting menus (setting menu) represented by three horizontal bars or three vertical dots.
Format and image quality (Figure 1)
Set the aspect ratio of the image to 16:9. Often (depending on phone brands and models) 4:3 or square (1:1) is the default format for the camera. Be sure to choose the 16:9 format, especially if the patient is taking the pictures alone. This will make framing easier because the image will be wider and therefore require less precision to frame. According to the brand, you will find the format written in the following ways: 16:9, 9:16, or 16/9.
If the smartphone allows it, also adjust the quality or resolution of the photo. To do this, go to the settings.
Choose the highest resolution offered by the smartphone's camera. The name changes from one brand to another. The following terms can be found: “Image quality,” “Resolution,” “Image quality,” and so on. The resolution can be indicated as “High,” “Normal,” “Low,” or by the size of the file. Then, select Picture quality and select “High.” It may happen that the dimensions and weight of the photo are combined in the same menu: 5 M 2560 × 1920 (4:3), 3.7 M 2560 × 1440 (16:9), and so on. In this case, find the 16:9 format and then the largest dimensions (or the highest weight).
Assigning a button for shooting (Figure 2)
If the patient is alone to take the photos, assign the “shutter release” or “take picture” function to the sound buttons on the phone. This will avoid the patient having to fumble around on the screen to find the shutter release and risk losing focus and framing.
Audible indicator (sound when triggered) (Figure 2)
Having a sound indicator at the time of shooting will also be very useful, especially with the “forced flash” mode. In this mode, the camera will systematically refocus with a brightness test to take a good picture. This can last 1–2 s. The sound will help to avoid moving the camera before the picture has been taken.
To find out when the picture has actually been taken, it is useful to activate the sound at the shutter release or to disable the mute mode (mute). Prefer the landscape (horizontal) format. Our natural vision is wider than it is high. The horizontal format (landscape) is therefore better suited to our eyes. In addition, this orientation is the most suitable to focus attention on the width—and more particularly on the lower part—of the face. The portrait format (vertical) will generate a lot of unnecessary information on the photo: the nose, eyes, forehead, and so on.
Use only the back camera of the phone
A minimum number of 3 megapixels is required. The front camera, dedicated to selfies, has several drawbacks: the image is always of poorer quality because it is highly compressed to save space on the memory card. Currently, we recommend using the back camera, even if the front cameras increase in megapixels, because the quality of the photo can be degraded when enlarging it.
Magnification/zoom or not?
More and more smartphones offer a zoom function to magnify the subject of the photo. The term is often used in a marketing way and does not always correspond to reality. It is often a digital magnification of the photo. This degrades the quality of the image.
To keep it simple, stay on the ×1 (1×) zoom. This is the magnification selected by default when the camera application is opened. If the ×2 (2×) zoom is used, it will be necessary to move the camera away from the mouth to get a sharp image, which would cause the interest of the zoom to be lost for this type of photo.
Sending photos
Once the photos have been taken, the patient can send them according to the secure procedure that the practitioner will have indicated (email address, telemedicine platform, etc.)
Instant messaging (IM) platforms are currently enjoying high subscriber numbers; applications such as WhatsApp and other IM services have become common methods of communication between dentists and patients as well as between health professionals.20–22 It is possible to transmit high-quality clinical images by email or via these IM platforms. Regarding the impact on the photo between emailing and file sharing platforms, the quality of the photo may be worse from IM. If the practitioner needs to enlarge the image or prefers to view it on their computer screen, email is the preferred method to retain high-quality images.
For patients having a mobile plan with little data, it is strongly recommended that they use the Wi-Fi of their home or the place where they are. This will avoid additional charges on their subscription. If the patient has a package with a lot of data, Wi-Fi is also recommended in case the signal quality of his/her operator is not at the maximum. This will allow photos to be sent faster.
Recommendations for patients taking photos themselves
The following are recommendations that the practitioner can explain to the patient.
If you are alone when you photograph yourself, the main difficulty is to see what you are photographing. The solution that comes immediately to mind is to use the front camera of the smartphone—the one used to take selfies. As we mentioned at the beginning of this guide, the quality of the photo generated by this camera is strongly degraded.
To make framing easier and to see what you are going to photograph, a mirror remains your best ally.
Important note: You will use the mirror to control the framing, not to see if the image is sharp or if the details are clearly visible. Normally, with the camera's automatisms, the result is almost guaranteed. If you are not satisfied, redo the picture. It will only take a few seconds.
Position yourself in front of a mirror
First of all, position yourself in front of a mirror.
Stand upright about 1 m from the mirror. Too close to, or too far from, the mirror would not be at all comfortable for shooting. In a bathroom, for example, the wash basin will define the ideal distance between you and the mirror (Figure 3).
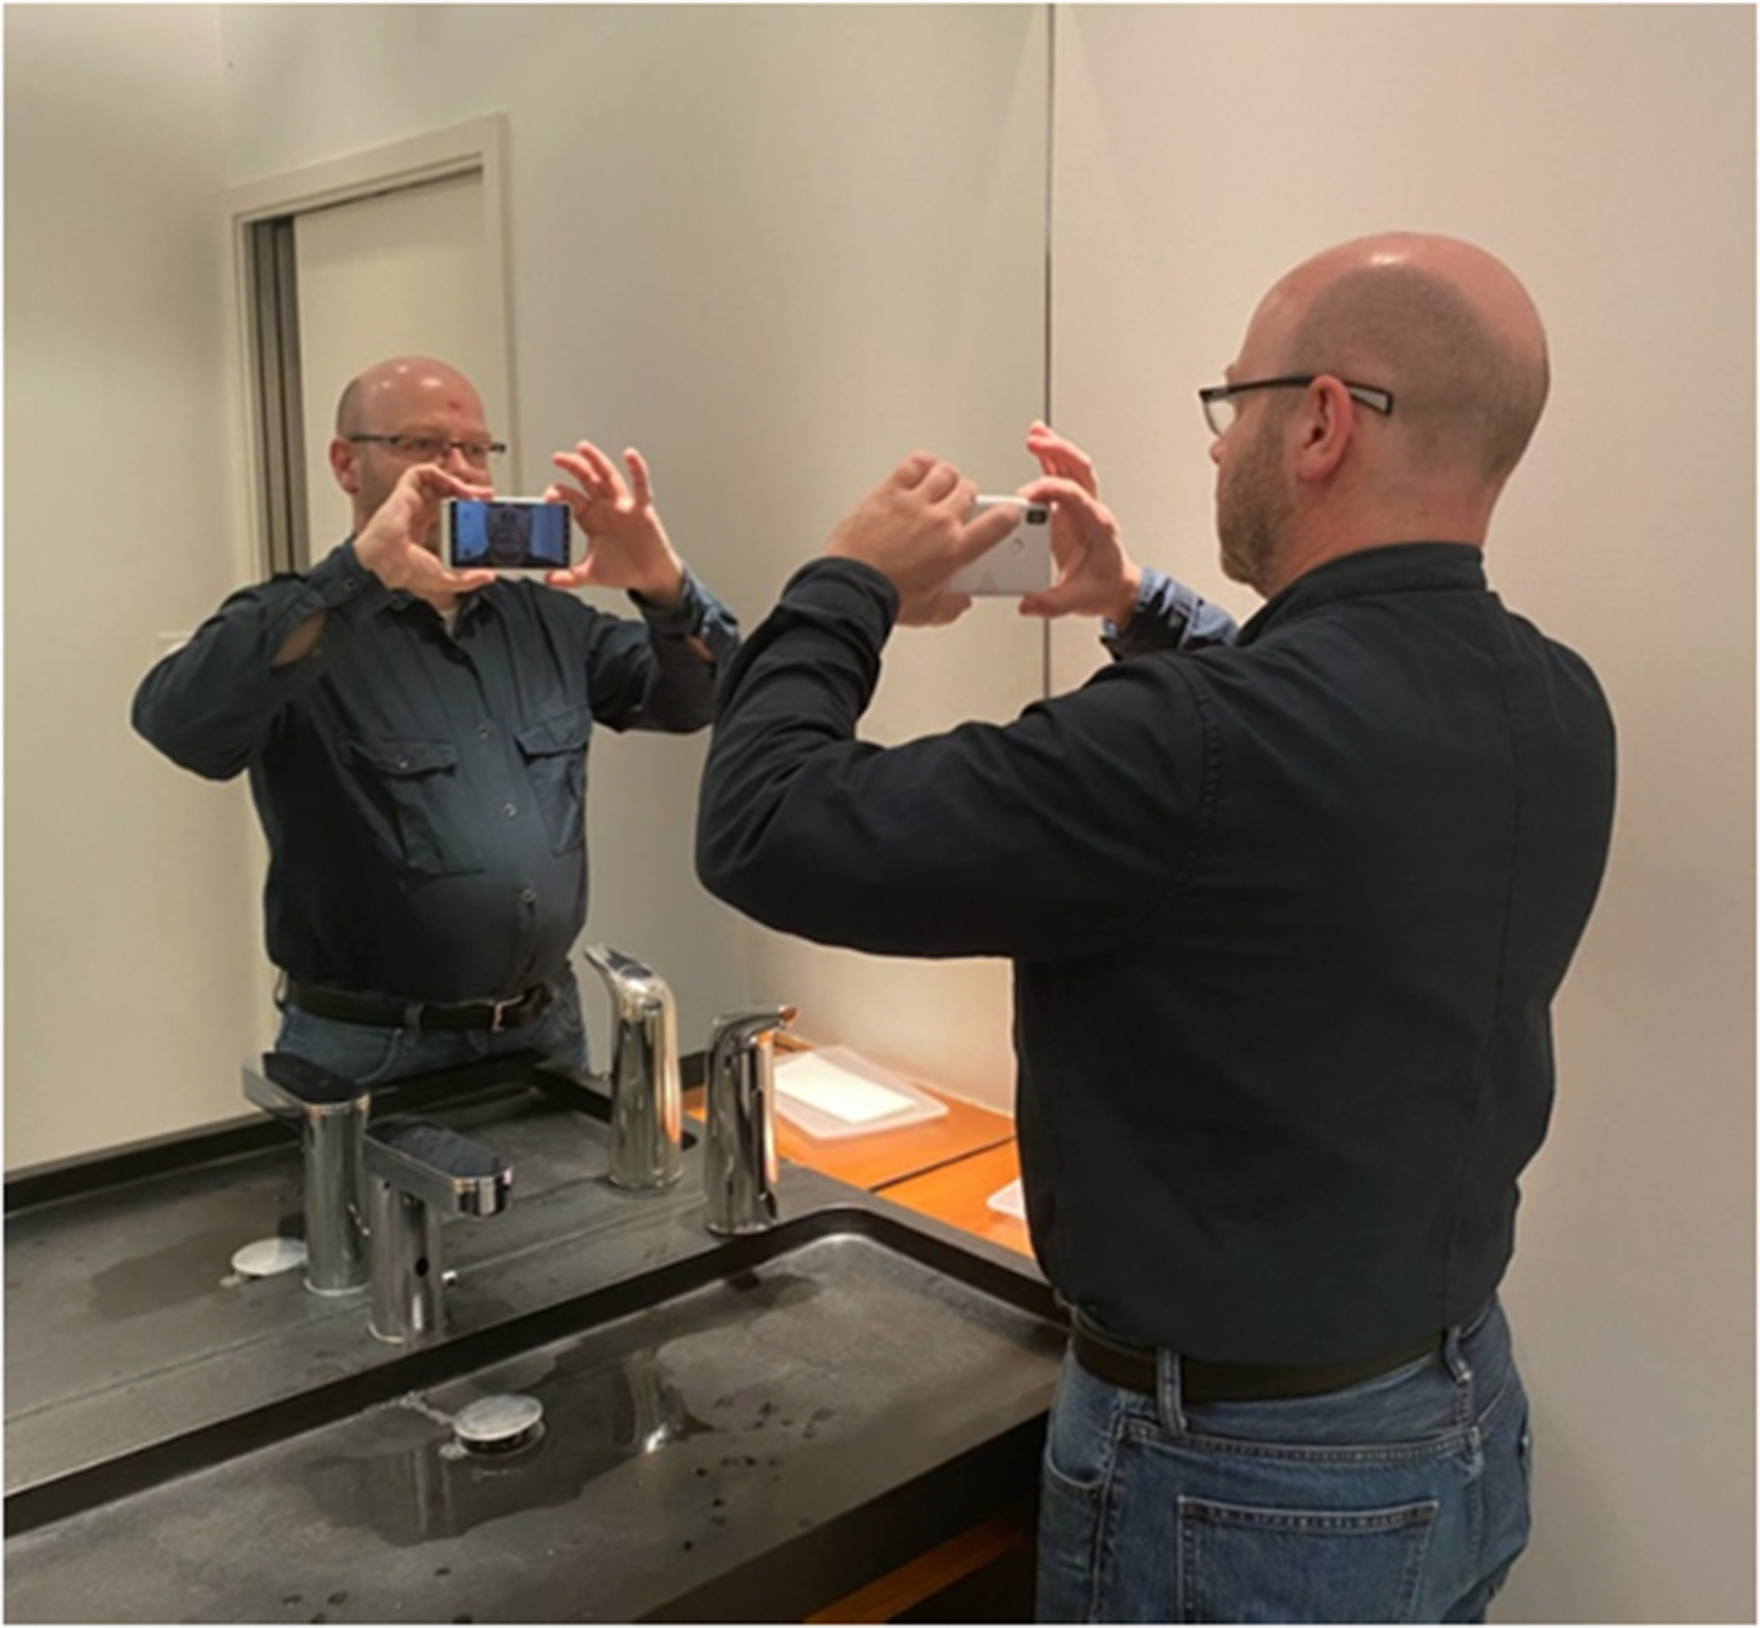
Example of a photo taken in the bathroom, where the wash basin can define the ideal distance between you and the mirror.
If the piece of furniture that separates you from the mirror moves you more than 1–1.5 m away from the mirror, it doesn't matter. Keep in mind that the mirror only serves to see what you are framing. It serves as an indicator. In any case, stand up straight. Don't lean forward to get closer to the mirror or backward to move away from it.
Concerning the optimal room lighting, in principle, with the flash illuminating the oral cavity, the ambient lighting hasn't impact on the exposure of the photo.
If the patient takes the photo alone, the optimal room lighting will be the one that best suits him/her to be able to visualize the framing area in the mirror. On the other hand, if the flash is not in forced mode, artificial lighting should be used. The lighting of the room is also an element to take into account to improve the quality of the photo. A photo that is too dark highlights an under-exposure and therefore a lack of light, while a photo that is “whitish” reflects an over-exposure to light. In order to maintain the same general lighting conditions, particularly if the photos are taken at different times (e.g. remote monitoring of lesions), it is preferable to use artificial lighting in a room.
Position the phone
Two types of photos are usually requested: external photos of your jaw and photos of the inside of your mouth or part of it (Figures 4 and 5).
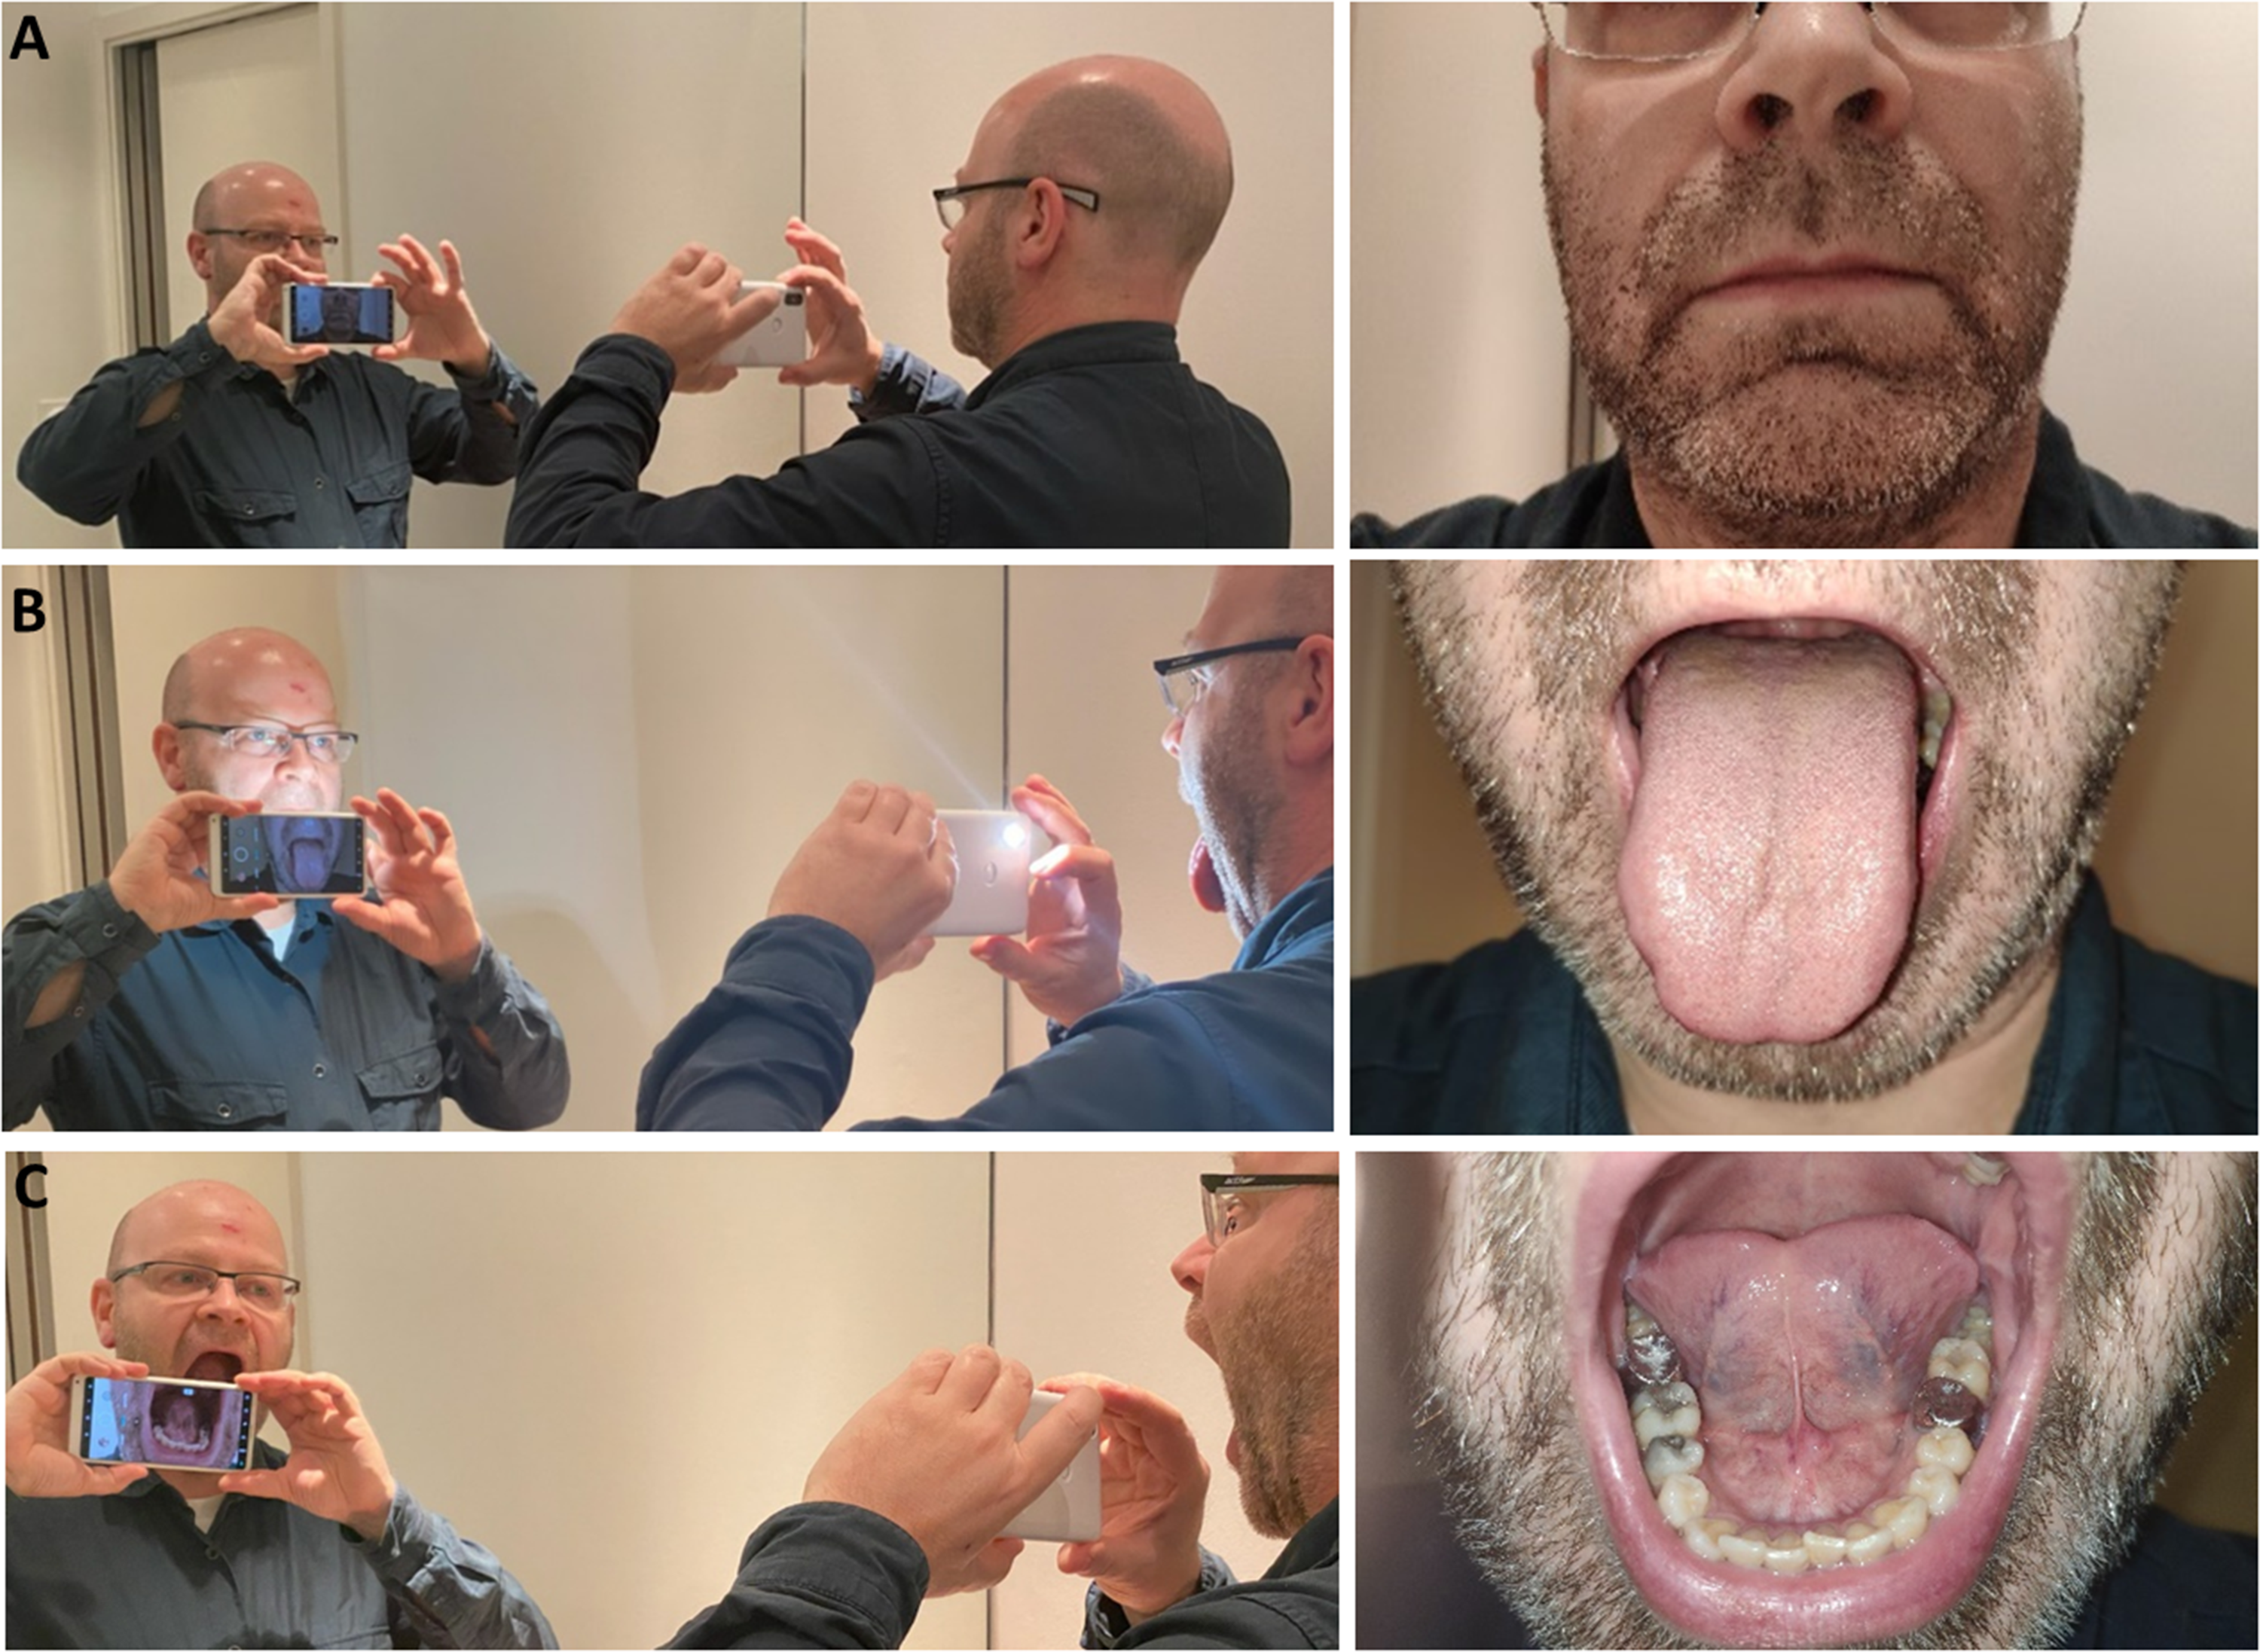
Photographing different parts of the oral cavity and the results obtained. (A) outside jaw. (B) tongue out. (C) mouth floor (under the tongue).
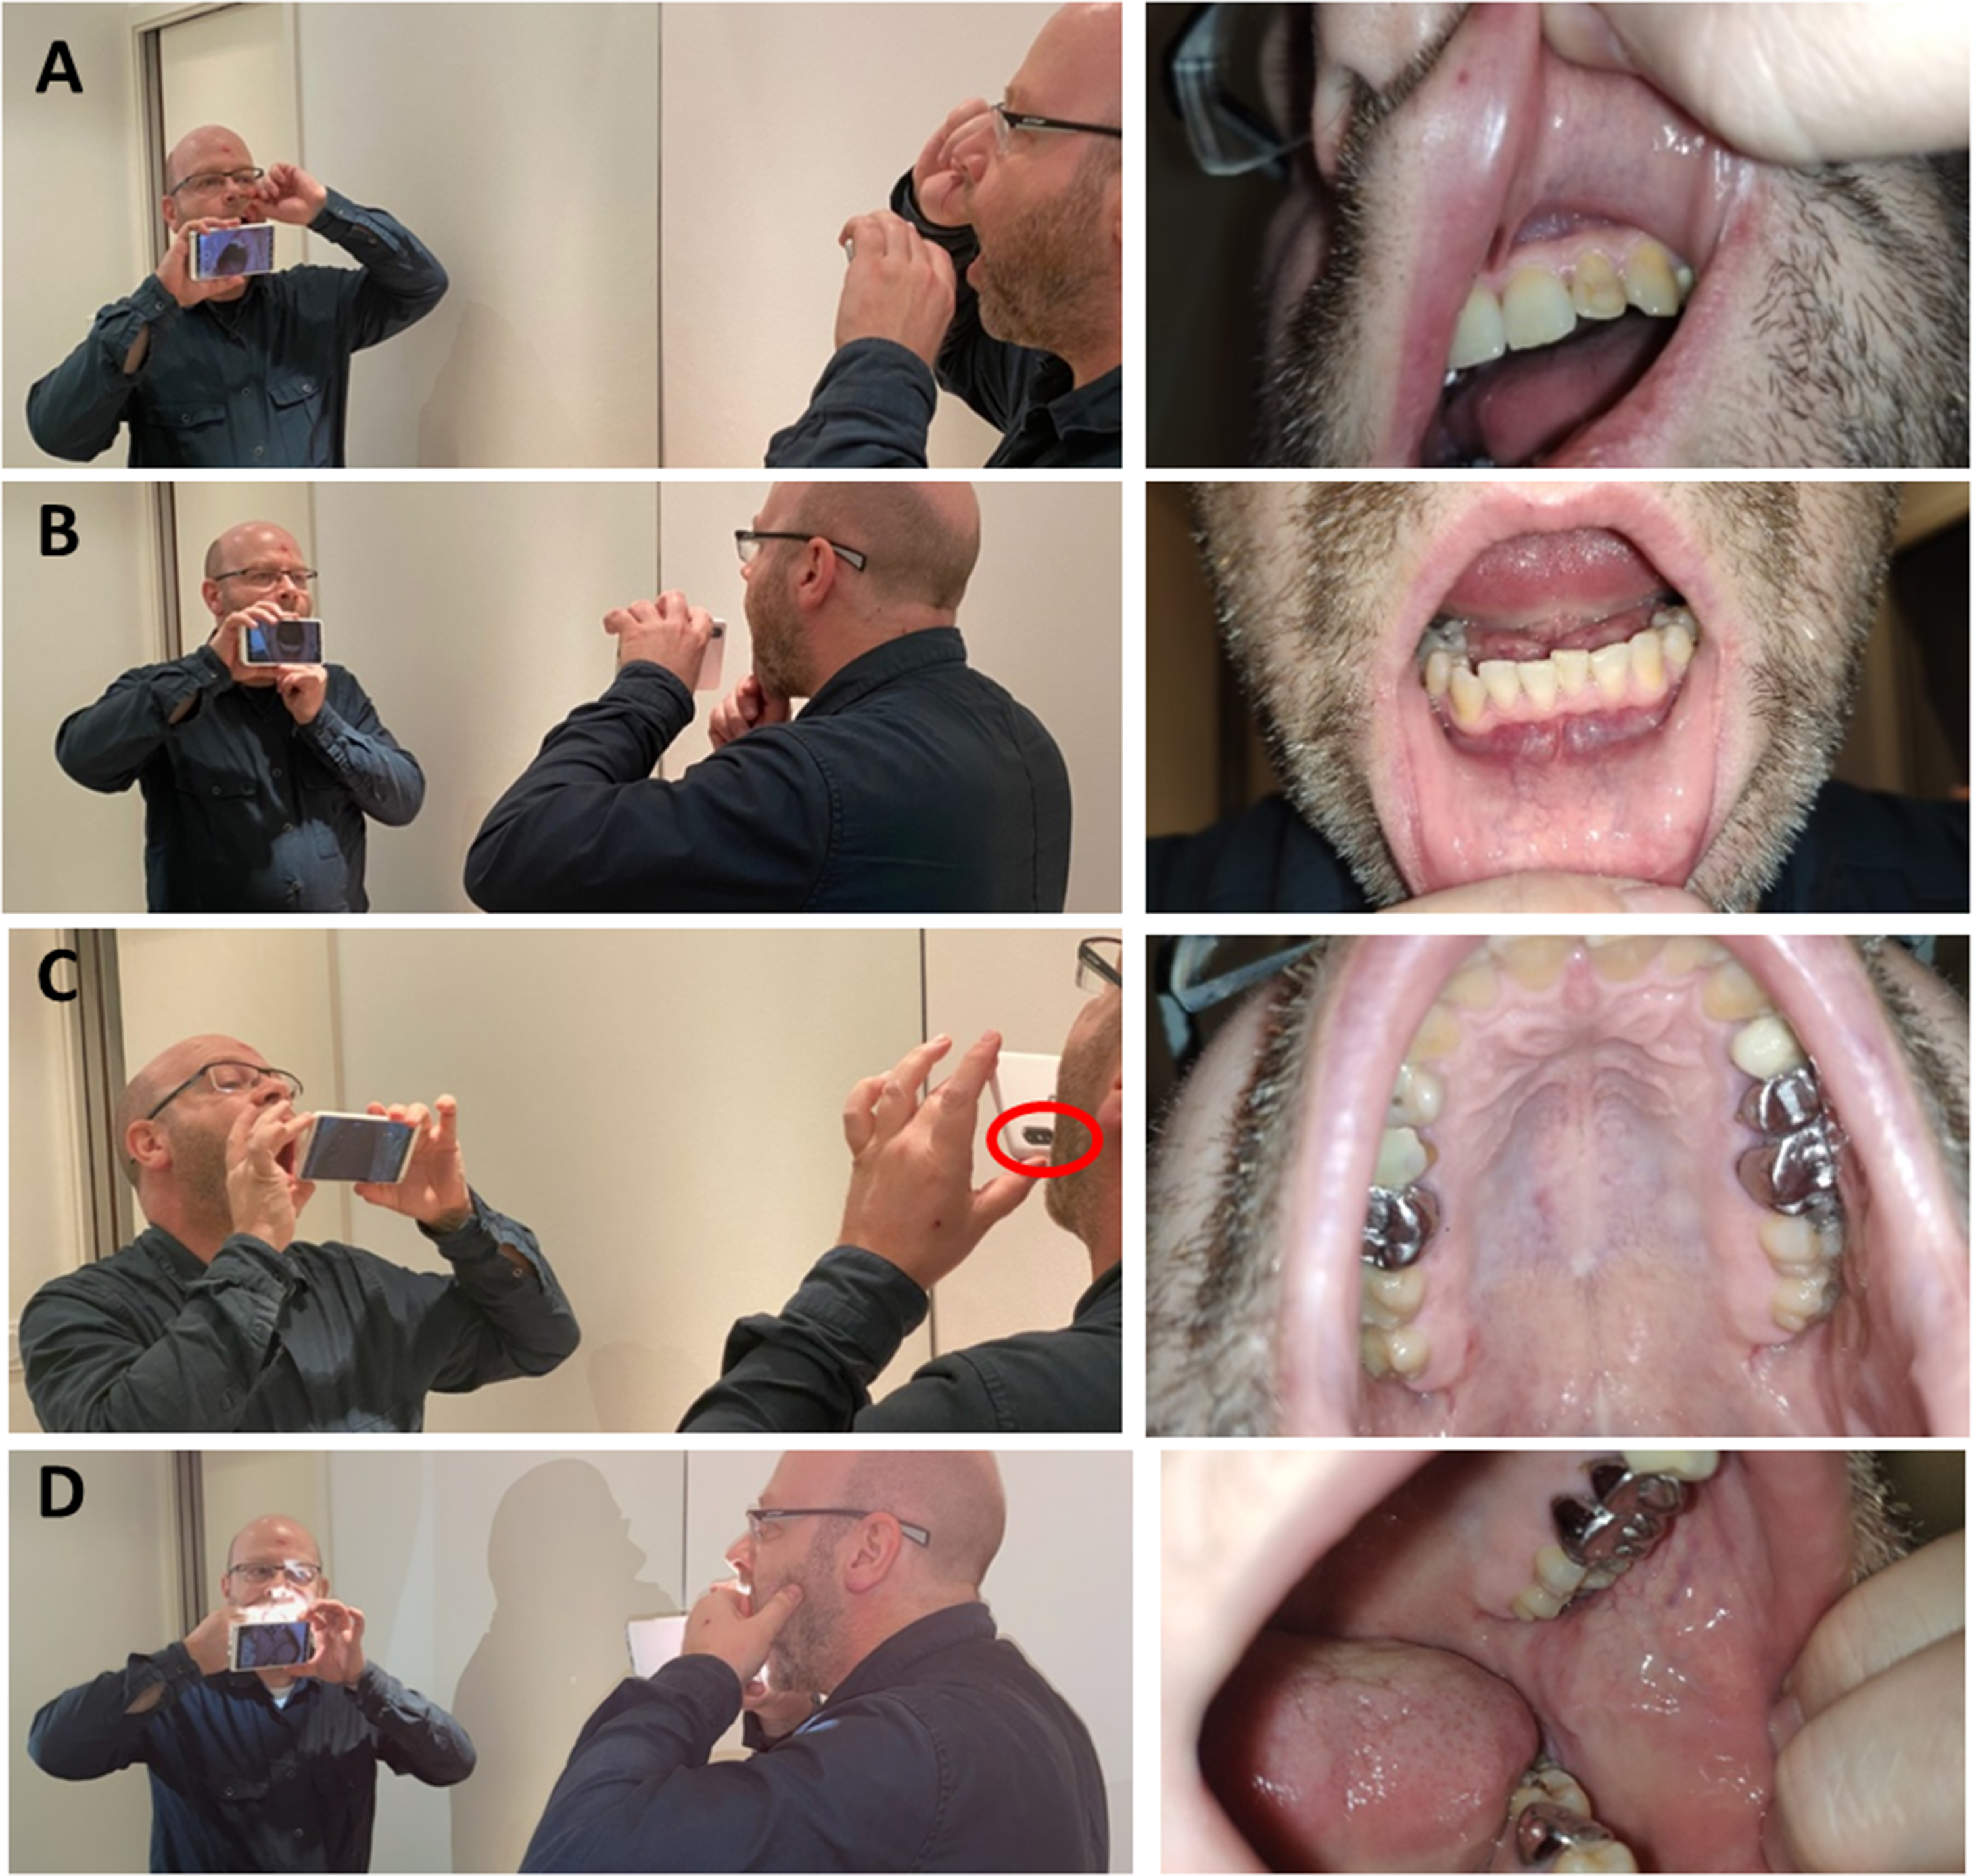
Photograghing the inside of your mouth or part of it and the results obtained. (A) Shooting upper lip. If you need to show both sides, photograph one side then the other. (B) Shooting lower lip. (C) Shooting palate. Put the lens at the bottom, and then rotate the top of the camera forward so that the lens is facing up (red circle). (D) Shooting jugal mucosa. Turn the lens slightly to the left and turn the head slightly to the left too, so that the inside of the cheek is oriented towards the lens as much as possible.
Depending on whether you want to take one type of photo or the other, your camera will not be positioned in the same place.
For a picture of the outside of the jaw, hold the camera far enough away from your mouth to frame the entire jaw, as shown in Figure 4(A) and (B). For a picture of the inside of your jaw, bring the camera closer to your mouth, which should be wide open (Figures 4(C) and 5). For a picture of the mouth floor, tilt your head forward very slightly so that the inside of the mandible is oriented towards the lens. Remember to lift your tongue (Figure 4(C)).
For a picture of the palate, put the lens at the bottom, and then rotate the top of the camera forward so that the lens is facing up. Then tilt your head back (but not too far, so that you can still see the frame in the mirror) (Figure 5(C)).
For a picture of the jugal mucosa, turn the lens slightly to the left and turn the head slightly to the left too, so that the inside of the cheek is oriented towards the lens as much as possible. The difficulty in this shot comes from the need to spread the cheek with one hand and hold the camera with the other. It is in this case that assigning a volume button to the shutter release makes sense (Figure 5(D)).
Focus on dental views
For lateral and frontal views, the patient can use the handle of a teaspoon to spread the cheek to create a space between the teeth and the jugal mucosa (Figure 6).
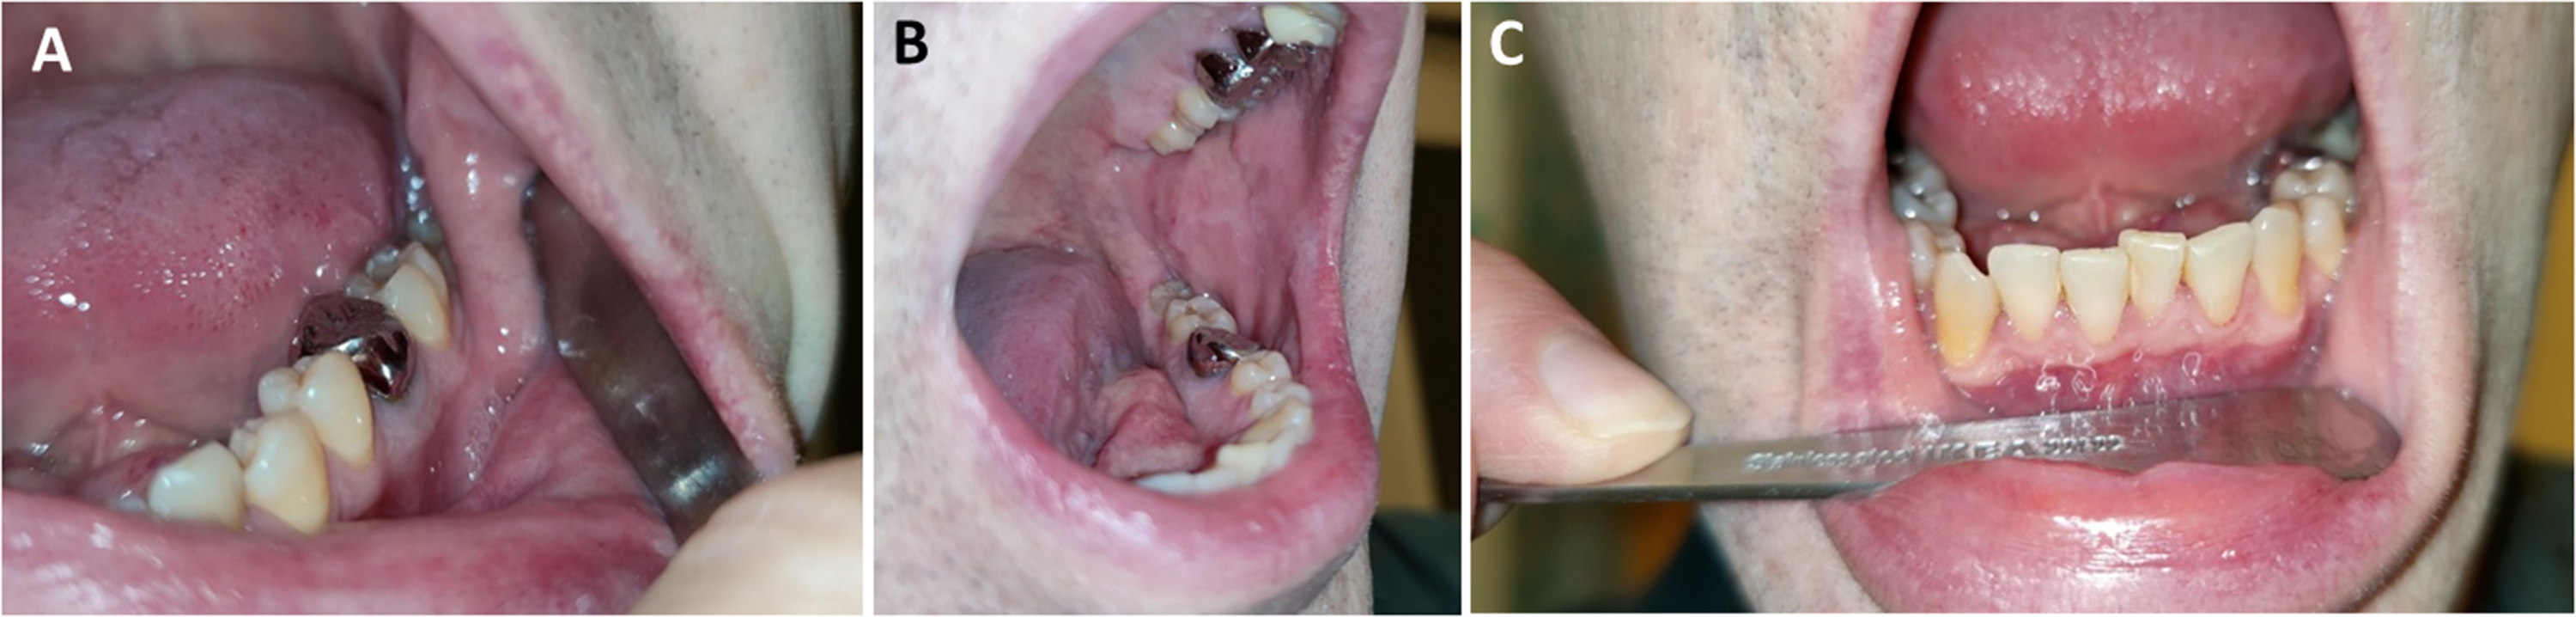
Examples of lateral (A, B) and frontal (C) views of the teeth. The patient can use the handle of a teaspoon to spread the cheek to create a space between the teeth and the jugal mucosa.
For the occlusal view (Figure 7(A)), in the mandibular area, the patient places the upper part of the smartphone, in portrait format, on the tip of the nose. This increases the stability and thus the sharpness of the picture.
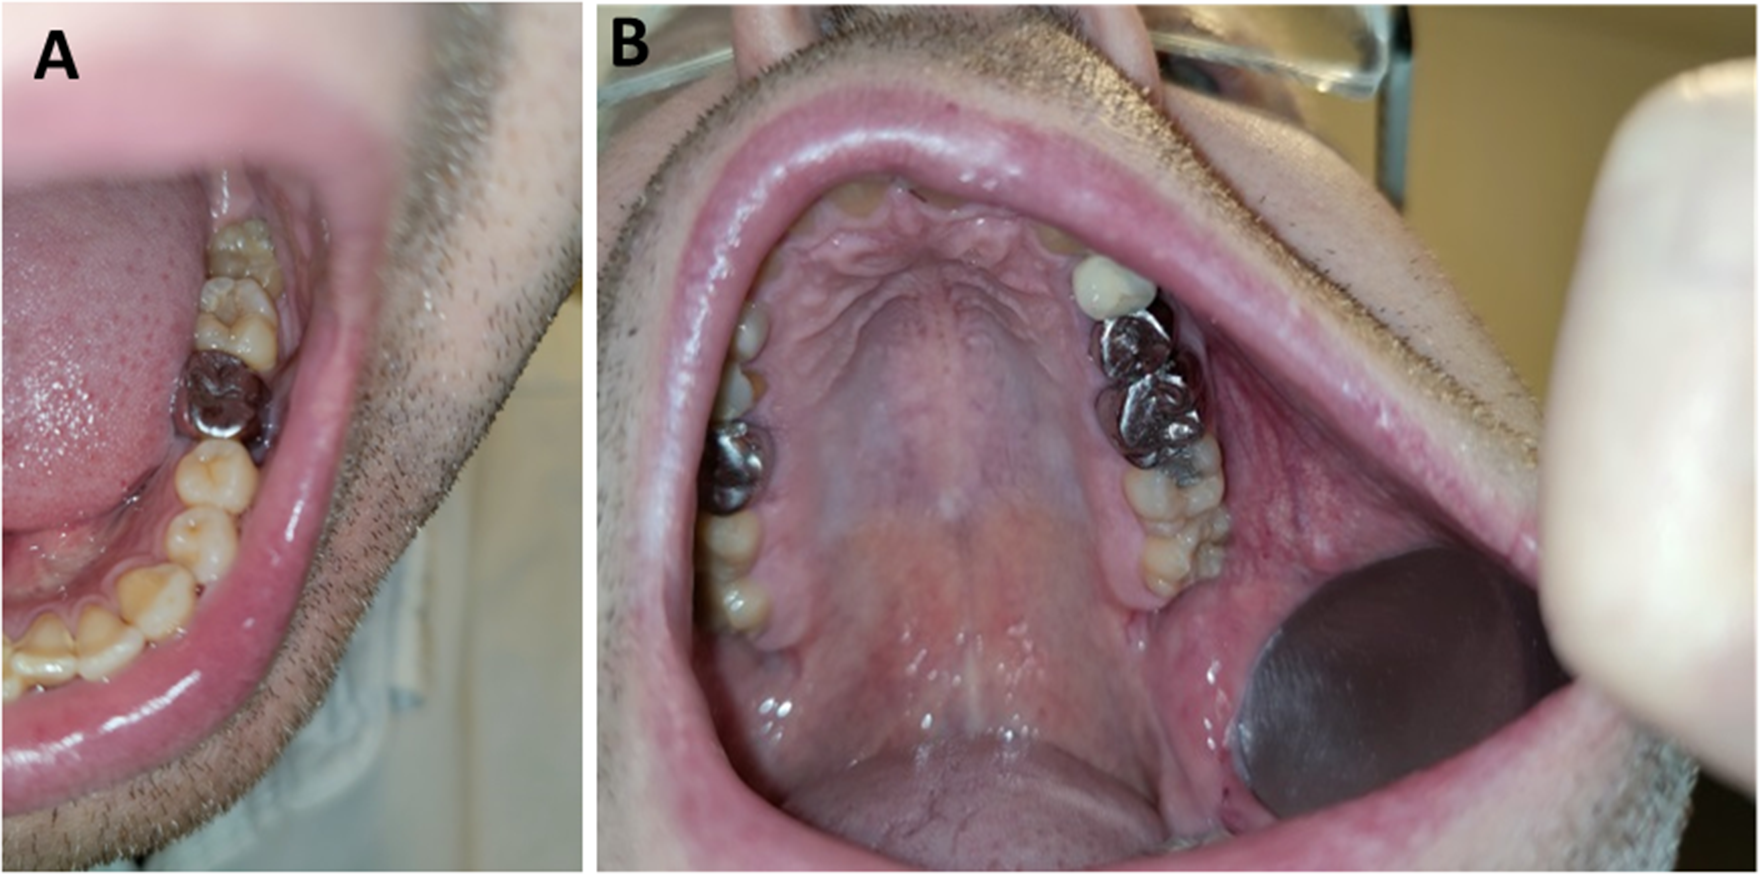
Example of occlusal view of teeth. (A) Mandibular view: the patient places the upper part of the smartphone, in portrait format, on the tip of the nose. This increases the stability and thus the sharpness of the picture. (B) Maxillar view: the picture is facilitated by placing a teaspoon with the back of the spoon against the oral mucosa. The hollow part of the spoon exposes the toothed area and keeps the mucosa as far away from the teeth as possible. Take a picture of the entire half-arch while holding the smartphone in landscape format and as far away as possible so that it can be focused.
In the maxillary region (Figure 7(B)), the picture is facilitated by placing a teaspoon with the back of the spoon against the oral mucosa. The concave part of the spoon exposes the toothed area and keeps the mucosa as far away from the teeth as possible. The easiest way to do this is to take a picture of the whole half-arch while holding the smartphone in landscape format and as far away as possible so that the camera can focus.
Position yourself when taking pictures
Think that the lens should be at the level (height) of your mouth and well in front of it. We instinctively tend to “imagine” that the lens is in the center of the camera whereas, very often, the lens is located on one of its sides.
For easy framing, do not move your head to face the lens, move the camera (up and down and/or left and right) so that the lens is facing your mouth. However, you may need to move your head as well. In this case, first move the camera, and then orient your head so that the framing corresponds to what you want to show. In any case, do not move the appliance and your head at the same time. First move the camera for general framing, and then move your head to refine the framing.
When taking the picture, look at the screen in the mirror. Not the lens. If you look at the lens, you won't be able to frame your picture correctly.
For photos of the inside of the lower jaw (gums), remember to move your tongue to the side opposite the area to be photographed.
Concerning the focus, remember that we prefer to use the automatic mode for reasons of simplicity. To focus, you have two solutions: either touch the area to be photographed on the screen or let the camera focus automatically.
The first solution can be impractical in some situations. This is why we recommend that you let the camera focus itself. In order to focus on the area to be photographed, always keep in mind that the camera will focus on the center of the image. It will be up to you to frame the area to be photographed in the center of the image so that it is in focus.
When a helper is present to take photos of the patient's oral cavity
Whether the photo is taken by the patient himself or by another person, the recommendations for setting up the smartphone remain the same.
However, if the patient does not take the picture himself, he will not need the mirror for the framing area. Taking the picture will then be very easy, knowing that the helper can:
have the patient sit facing him/her for more comfort and less fatigue if several photos are needed; will use the screen of their smartphone to frame the photo and in this context, sharpness and the right framing area will be the most important elements to have a qualitative photo.
If a patient does not take the picture themselves, the carer may ask them to tilt their head to the right or left, forwards or backwards as the carer controls the area to be photographed visually on the smartphone. With a helper present, the patient may also spread their cheeks, lips to properly frame the area to be photographed. The helper can ask the patient to turn his head and spread his lower lip to visualize the vestibular faces of the teeth for example. He can ask him to tilt the head up or down and place the tongue on the opposite side to visualize the lingual faces for example.
The taking of a photo by a carer is particularly important for the oral cavity of a child. Indeed, the use of teledentistry in children is particularly relevant to emergency situations such as trauma or orthodontics.23–25
Conclusion
The objective of our technical note is to help clinicians to advise their patients on how to take photos of their oral cavity simply but with sufficient, reproducible quality.
We do not recommend that the patient is first advised to take a video with the smartphone as it is difficult to freeze frame the image clearly enough to visualize an oral or dental lesion by magnifying the area.
Although photography is an interesting tool for communication between patient and dentist, it is important to advise patients on the way to take photos themselves. Without replacing the face-to-face clinical examination, a quality photo is a useful diagnostic aid in the context of tele-regulation and tele-monitoring in the distant interaction between patient and dentist. 14
These photos can also be used as a means of exchange between health professionals in the context of tele-expertise and requests for expert opinions. An extension of the practice of teledentistry is the use of dedicated, secure platforms to discuss cases between healthcare professionals. 25
The evolution of the mobile camera has had a huge impact on the accessibility of digital photography and it is now possible to take high-quality pictures relatively easily. 26
Smartphones can easily be connected to Internet networks and constitute a great facility for the patient to communicate with the dentist.
Once photos have been taken, their transmission and storage must be secure and respect patient confidentiality, which is a major issue for telemedicine. The transmission flow must be secure. Clinicians must be aware of the legal and professional obligations to transfer and upload photos of their patients to the patient's file. Confidentiality and privacy requirements must also be respected.
At the present time, the first important step is staff awareness, which can take the form of education of staff receiving telemedicine material (simulated cyber attacks and fake phishing emails) in order to install a culture of telemedicine data security.26,27 Ethical issues regarding confidentiality and security of patient data arise during clinical photography. Future priorities for the widespread use of teledentistry include the explicit clarification of the sending and storage of patient photographs.
Footnotes
Acknowledgements
We would like to thank Susan Becker for her assistance in translating and Stéphane Tondu for helping us with the photo protocol and for agreeing to be the model.
Authors contributions
All authors contributed to the concept, design, and drafting of this communication. DM, OP, and EV contributed to the conception and the drafting of the work and critical revisions. JPA and FS contributed to the conception of the work and critical revisions.
Declaration of conflicting interests
The authors declared no potential conflicts of interest with respect to the research, authorship, and/or publication of this article.
Funding
The authors received no financial support for the research, authorship, and/or publication of this article.