
Abstract
Practical relevance:
Feline gastrointestinal (GI) endoscopy is in high demand, particularly by cat owners already aware of the clinical benefits and availability of this procedure within the human healthcare system. This article will provide a basic introduction to GI flexible endoscopy, covering important aspects of endoscope selection, clinical indications, and basic techniques required to perform a thorough and diagnostically meaningful examination in the cat.
Clinical challenges:
Challenges associated with implementing endoscopy in GI tract investigations can include lack of appropriate/suitable-sized equipment to perform a thorough examination in the cat, insufficient operator training/understanding in how to ‘drive the scope’ through the GI tract, and/or lack of confidence in differentiating normal from abnormal.
Audience:
This article is intended to familiarize and motivate the feline practitioner to develop basic endoscopic skills. Clinical proficiency can only be obtained through use of appropriate equipment, formal training and hours of practice indistinguishing normal from abnormal.
Evidence base:
The guidance contained in this article is based on a combination of the published literature, the authors’ personal experience and the experience of colleagues.

GI endoscopy – principles and prerequisites
Endoscopy is an integral part of the evaluation of gastrointestinal (GI) disease in companion animals, and is commonly used when non-invasive investigations and trial therapy have failed to provide a diagnosis and resolution of clinical signs. GI endoscopy includes examination of the mouth, oesophagus, stomach, proximal small intestine, ileum, colon and rectum. The mouth, oesophagus and also the rectum and descending colon may be examined with either a rigid or flexible endoscope. The preferred instrument is a flexible endoscope, which becomes essential for complete visualisation of the stomach and intubation of the small and proximal large intestine.
Endoscopy rarely has therapeutic intent, except for foreign body retrieval, polyp removal, stricture dilation or feeding tube placement (percutaneous endoscopic gastrostomy [PEG] or jejunostomy tube). The main reason to perform endoscopy is to obtain biopsies for histopathological investigation.
Endoscopy should be performed only when indicated – and not because the equipment is available and has to be used. A thorough medical investigation involving less invasive tests, including laboratory examinations (eg, haematology, biochemistry, faecal examination, urinalysis, total T4), radiography and, in particular, abdominal ultrasound, needs to be performed prior to endoscopy. 1 In most patients, trial therapy (anthelmintics, antibiotics, diet) should also be undertaken prior to endoscopic evaluation.
The risks and possible benefits to the patient in gaining a diagnosis must be balanced against the anaesthetic risk as well as the risks posed by the procedure itself. Part of the process of minimising procedure-related risks is to use adequate and fully functioning equipment. The endoscopist should also have a high level of proficiency, as GI endoscopy in cats is more demanding in skill than in dogs, due to the small size of the animal and the decreased tolerance to anaesthesia. It takes patience and much practice to perform upper and lower GI endoscopy effectively and training should start with a comprehensive endoscopy course, with both lectures and wet labs, before attempting this procedure in sick patients.
GI endoscopy in cats can only safely and adequately be performed under general anaesthesia. Therefore, an assistant competent in maintaining and supervising anaesthesia needs to be present throughout the entire procedure, as the endoscopist may be too engrossed in his/her task to also supervise the animal. The assistant should understand endoscopy and the inherent risks in order to anticipate possible complications (ie, over-inflation of the stomach, stretching of colon).
Equipment for GI endoscopy
Flexible endoscopes
The imaging chain in endoscopy includes the endoscope, imaging system (camera, camera head and monitor) and illumination system (light source and cable). Cost factors and, in turn, the versatility of application of an endoscope, its durability and ease of guidance are often the key determinants in the selection of endoscopic equipment in veterinary practice. One single flexible endoscope might be used for a variety of procedures in the GI tract (and also respiratory tract in dogs). The versatility of an endoscope depends on its length, diameter of the insertion tube, diameter of the working channel and tip deflection capabilities; its ease of guidance only depends on length and outer diameter. Another important factor to be considered before purchase of endoscopic equipment is the optical and imaging system.

In simple terms, the ideal endoscope is thin but has a large instrumentation channel (see box). The latest models of endoscope specially designed for use in veterinary companion animals include a video endoscope, 140 cm long, with a 7.9 mm outer diameter and an instrumentation channel of 2.8 mm, and a feline-specific video endoscope, 110 cm in length with a 5.9 mm insertion tube (Figure 1) (both endoscopes Karl Storz, Germany).
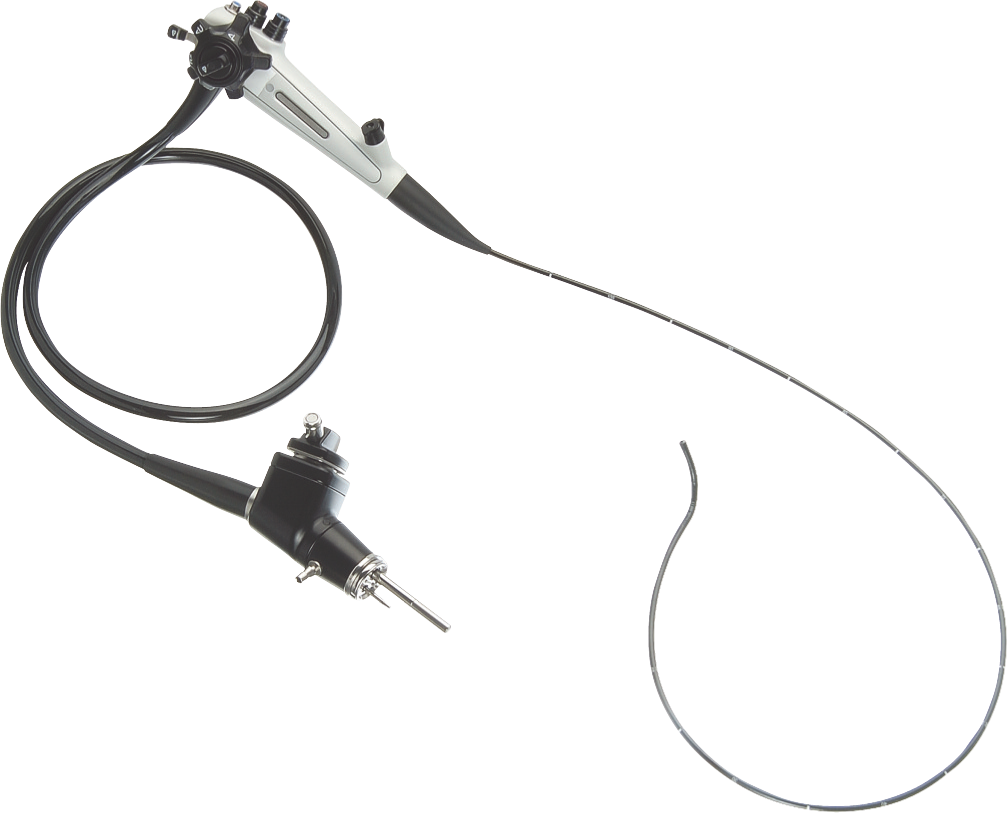
A veterinary-specific feline video gastroscope (outer diameter 5.9 mm, working channel 2.0 mm, length 110 cm). ©2013 Courtesy of KARL STORZ GmbH & Co KG
The video endoscope is one of two basic types of flexible endoscopes used in veterinary medicine; the other is the fibreoptic endoscope. They differ in the method of sensing and transmitting the image. In the fibrescope the image is carried from the insertion tube tip to the eyepiece via bundles of coherent optical glass fibres, resulting in a pixelated image. The image can then be viewed directly through the eyepiece or indirectly by attaching an endoscopic charge-coupled device (CCD) video camera to the eyepiece. The picture is then transferred via the imaging system onto a monitor. 2 In the video endoscope, the image is sensed by a CCD chip located in the distal tip of the insertion tube (Figure 2) and transmitted electronically to a video monitor. As there is no eyepiece these endoscopes need to be connected to a monitor. The image quality of the video endoscope is far superior to that of the fibrescope, but the equipment is also more expensive. If a good quality fibrescope is combined with a high intensity light source and a good quality video camera, the resulting image is in most instances sufficient for adequate visualisation.

Distal tip of video endoscope; note the working channel (a), fibreoptic light guide (b), lens (c) and air/water nozzle (d). ©2013 Courtesy of KARL STORZ GmbH & Co KG
For both types of endoscope an imaging system offers distinct advantages, not only in improved visualisation and comfort for the operator but also in terms of documentation, client information and teaching purposes. Taking and recording images and video sequences helps the owner to understand the procedure and possibly the disease affecting her/his animal.
Flexible endoscopes consist of three major parts: the insertion tube, handpiece and umbilical cord. The insertion tube is the most complex part because it contains fibreoptic bundles for light transmission and image transmission (fibrescope), channels for insufflation, irrigation and suction/instrumentation, deflection cables (two or four) and several layers of protective sheathing along its entire length. 3 The last several centimetres of the endoscopic tip make up the bending section. In this portion the insertion tube can be deflected in one or two planes (up and down, left and right). This movement is controlled by deflection cables which are connected to deflection knobs on the handpiece of the endoscope. Smaller diameter endoscopes can only deflect the tip in one plane (one- or two-way tip deflection: up and down); however, endoscopes designed for GI use (gastro-, duodeno-, colonoscopes) are equipped with four-way tip deflection (Figure 3). In most endoscopes the up-deflection is ≥180°, while the deflection in the other three directions is about 90°. The tip deflection enables the endoscopist to guide the endoscope in almost any forward direction by coordinated movement of up/down, right/left and twisting of the whole insertion tube and handpiece about its longitudinal axis.

Four-way tip deflection
The fibreoptic light transmission bundles end at the distal tip in one or two light guide lenses close to the objective lens (Figure 2). In order to adequately illuminate the GI tract, especially the stomach, GI endoscopes usually contain two light guide lenses located on either side of the objective lens in the tip. The objective lens is either connected to the fibreoptic image transmission bundles or to the CCD chip.
The irrigation channel ends at the irrigation nozzle, which is located on the tip close to the objective lens. The water jet exiting this nozzle is directed over the objective lens to remove mucus or debris which might obstruct the view by sticking to the lens. Through the insufflation channel room air can be blown into the lumen to distend the GI tract, thereby enabling a clear view of the mucosa for complete and thorough examination. The instrumentation/suction or accessory/working channel is used for passage of accessory flexible instruments into the patient and for suction of fluids and air.
The handpiece also contains the deflection knobs with the deflection locks, the opening of the instrumentation channel and the valves for insufflation/irrigation and suction (Figure 4). In the fibrescope, the handpiece ends with the eyepiece and it also contains a dioptre adjustment ring to manually focus the objective lens. The handpiece of some video endoscopes has programmable buttons for control of various functions (ie, light gain, magnification, image freeze).

Handpiece
The light guide connector connects the umbilical cord to the light source and includes fittings for insufflation and irrigation. Most light sources used for GI endoscopy contain an integrated air pump for insufflation, which also provides the positive pressure that forces the irrigation water from an attached bottle though the irrigation channel. A separate suction pump can be attached to the suction connector on the light guide connector. Also located on the light guide connector is the pressure compensation port, which is used for leakage testing with a manometer-type pressure tester and to prevent damage from external pressure changes (gas sterilisation, shipping by air) by attaching a pressure compensation cap to the valve. In video endoscopes the connection for the video cable is also on the light guide connector, together with an air- and water-tight fitting cap, which is left in place when the equipment is not in use.

Accessory instrumentation
A large selection of accessory instrumentation is available for use with endoscopes (Figure 5). The instruments most widely used in feline endoscopy are biopsy forceps and foreign body grasping instruments. Other potentially useful instruments include injection/aspiration needles and polypectomy snares. A detailed overview of instrumentation for flexible endoscopy is available in the first article in this Special Issue of JFMS.

Commonly used accessory instruments for flexible GI endoscopy: (a) four-wire basket retrieval instrument, (b) snare, (c) injection needle, (d) alligator grasper, (e) non-fenestrated biopsy forceps without central spike. ©2013 Courtesy of KARL STORZ GmbH & Co KG
To obtain tissue samples from the GI mucosa the most widely used instruments are pinch biopsy forceps. These are small flexible forceps with opposing cups at the end. The cups come in different configurations: smooth or serrated edge, closed or fenestrated cup, with or without a central needle (Figure 6). Fenestrated cups are reported to produce larger biopsy specimens with less crush artefacts. 5 The central needle in some biopsy instruments aids in stabilising the forceps in the mucosa but can lead to artefacts in the tissue sample. Oval cups give a larger biopsy sample than round cups for the same diameter of instrument.
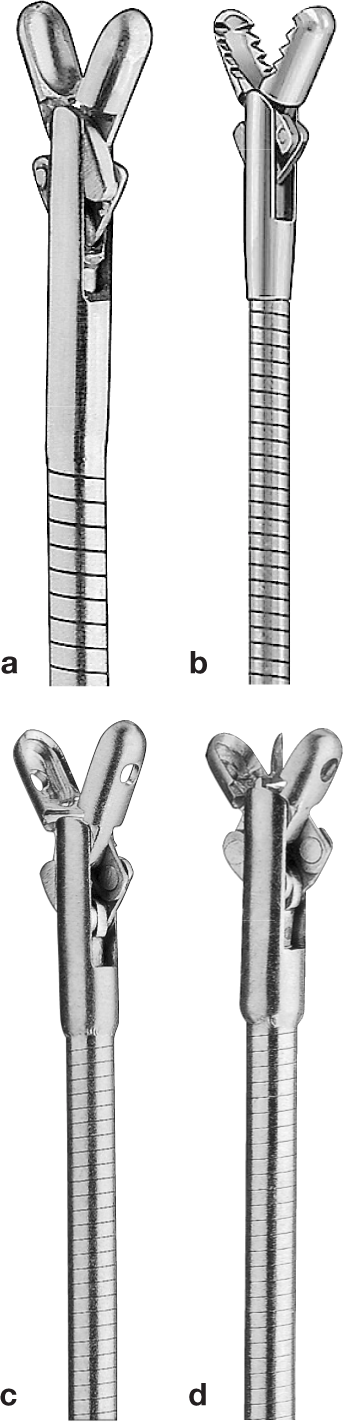
Different types of biopsy forceps: (a) smooth-edged, nonfenestrated; (b) serratededged, non-fenestrated; (c) smooth-edged, fenestrated without central spike; (d) smooth-edged, fenestrated with central spike. ©2013 Courtesy of KARL STORZ GmbH & Co KG
The most important feature of endoscope instruments is their size and handling. The diameter should never exceed the instrument diameter recommended by the manufacturer of the endoscope to avoid damage to the instrumentation channel and the endoscope itself. Furthermore, instruments should never be forced through the instrumentation channel, and only be passed with the bending section in an almost straight position.
Rigid endoscopes
Rigid endoscopes can be used for evaluation of the oral cavity, oesophagus and distal large intestine (descending colon and rectum). These endoscopes are composed of a telescope, which is used in conjunction with an operating sheath or cannula. The telescope is a metal tube containing high-quality optical glass lenses (rod lens system) and light bundles. The outer diameter of a rod lens telescope ranges from 1.9–10 mm, the length from 10–40 cm and viewing angle from 0° to 30°. More detailed information on rigid endoscopes can be found in the first article in this Special Issue.
For GI endoscopy an operating sheath is locked onto the telescope. It serves to protect the telescope and the patient, but also facilitates the ingress/egress of fluids or gases through the two side ports and the introduction of diagnostic and surgical accessory instrumentation through the port of the working channel.
Rigid endoscopes used for oesophagoscopy and proctoscopy in humans use a blunt-tip obturator that fits inside the endoscope to facilitate insertion of the instrument into the oesophageal or rectal lumen. These endoscopes also come with an attachable light source and an air insufflation mechanism, mostly in the form of a bulb insufflator. The diameter varies between adult (18–25 mm) and paediatric (9–12 mm); the length is usually about 25 cm. The paediatric size is most suited to feline patients.
In oesophagoscopy rigid endoscopes are mostly used for foreign body removal or balloon dilation of strictures. Examination of the large intestine with rigid endoscopes is limited to the rectum and descending colon (ileum, caecum, ascending and transverse colon cannot be visualised). However, most inflammatory disorders involve the whole colon diffusely and biopsies obtained from the distal part are mainly diagnostic. Large intestinal tumours and polyps are most often located in the distal colon and rectum and can therefore be adequately evaluated, biopsied or removed with rigid instruments. Biopsy forceps with an angulated tip might be used in parallel with the endoscope in rigid oesophagoscopy and colonoscopy, enabling the endoscopist to place the cups perpendicular to the mucosa. However, visualisation of mucosal detail and use and control of biopsy forceps is superior with flexible endoscopes.
Equipment handling
Endoscope
Flexible endoscopy is performed in a standing position, as sitting constrains the movement of the endoscopist’s arm and upper body. The endoscopist always stands in front of the patient. The handpiece of the flexible gastroscope is designed to be held in the left hand. The thumb of the left hand controls the larger inner deflection knob (up/down), while the index finger controls the suction valve (upper valve) by depressing it (Figure 7). The insufflation/irrigation valve (lower valve) is controlled either with the index finger as well, or with the middle finger. When the hole in the middle of this valve is closed with the fingertip without depressing the valve, air is diverted through the air channel. Irrigation is activated by depressing this valve completely. The left hand also provides rotational torque of the insertion tube by bending the wrist out and in (supination/ pronation) (see video 1). Twisting the whole insertion tube around its longitudinal axis (so-called ‘torquing’) avoids damaging it through trying to twist it around itself.

Illustration showing the handpiece in the endoscopist’s left hand
The right hand advances and retracts the insertion tube in and out of the patient and inserts the accessory instruments. The left/right (smaller, outer) deflection knob is worked either by the thumb of the left hand or by the right hand.
When rigid endoscopy is performed, the endoscopist sits in front of the patient, with the endoscope in either the right or left hand. The light guide cable and the cable of the camera head hang downwards. The hand holding the endoscope advances and retracts the rigid part of the endoscope and also rotates the endoscope around its axis as needed. The index or middle finger of the hand holding the endoscope controls the opening and closing of the side ports. The other hand is used to hold the patient in the correct position while the endoscope is advanced; in colonoscopy this hand pinches the anus closed to prevent air from leaking out. This hand also introduces and retracts any accessory instrumentation through the working port of the sheath. The air insufflation line is attached to one side port and the assistant insufflates air into the lumen of the examined organ with a bulb insufflator or another device (ie, pressure bag, syringe).
Accessory instrumentation
Accessory instruments are advanced through the instrumentation channel by the endoscopist. The upper opening of the channel is covered by a rubber instrumentation channel cap, which closes the channel to prevent leaking of insufflated air or enables suction to be applied through the channel. The lid of this cap can either be opened to introduce the accessory instrument or the instrument is passed through a minute opening in the rubber lid which seals around the instrument. Force should never be used when pushing an instrument through the channel, especially when resistance is met.
When the instrument is passed through the deflectable part of the tip, it is advisable to straighten the tip, advance the instrument until it can be seen in the field of view and then deflect the tip again as needed. It is mandatory never to retrieve foreign bodies into or through the instrumentation channel. Instead, the foreign body is grasped tightly, pulled close up to the tip of the endoscope and the entire endoscope, together with foreign body grasper and foreign body is removed from the patient. The only materials that it is permissible to retrieve through the instrumentation channel are endoscopic biopsies inside the biopsy forceps.
Sometimes, and especially when a foreign object is retrieved from the oesophagus or stomach, a separate rigid foreign body grasper is used parallel to the endoscope. In cats this foreign body grasping device has to be small enough to fit into the oesophagus together with the endoscope. Some rigid endoscopes can be used in conjunction with a sheath that has an integrated foreign body forceps, which is bigger than an accessory instrument used through the working channel of a flexible endoscope (Figure 8).

Distal tip of a rigid endoscope with foreign body grasper

Histopathology of two endoscopically taken duodenal biopsies. Sample (a) shows nicely orientated villi and has adequate depth to make a meaningful diagnosis; sample (b) was too superficial and lacks normal villous orientation, precluding a diagnosis. Courtesy of Dr M Henrich, Institute of Veterinary Pathology, University of Giessen, Germany


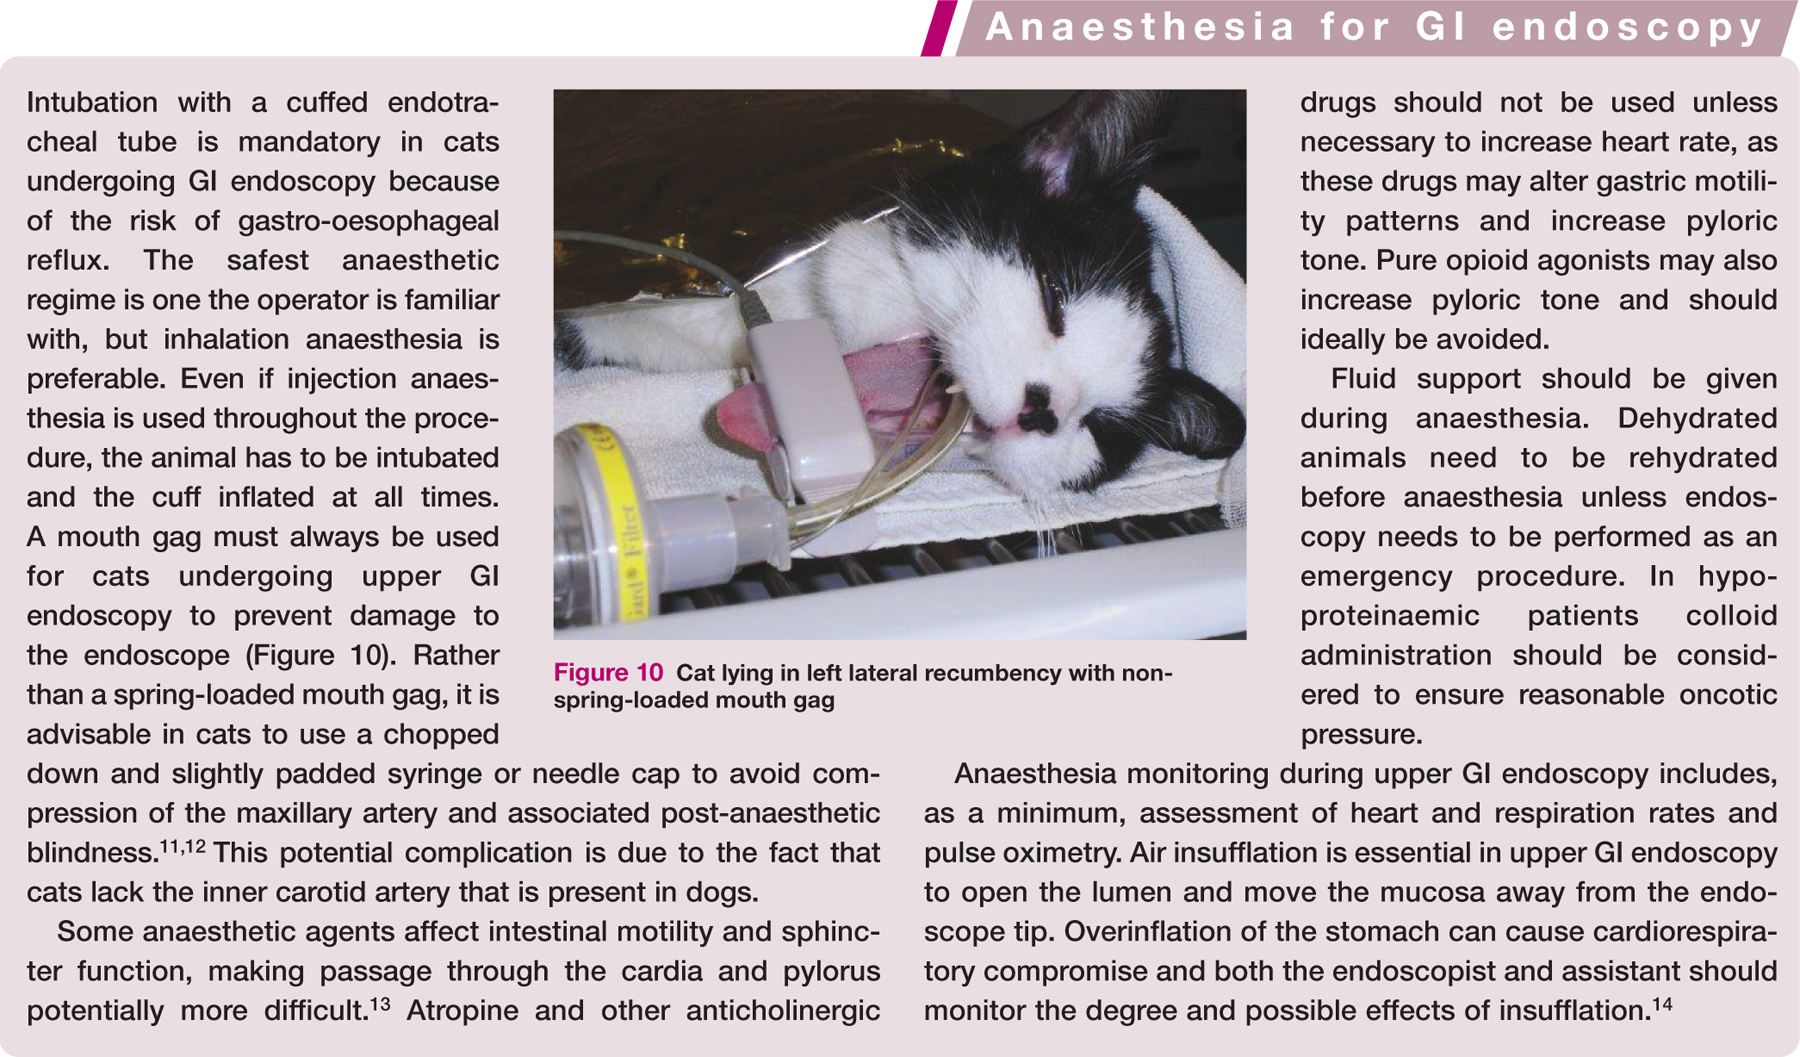
Cat lying in left lateral recumbency with nonspring- loaded mouth gag
Preparing the patient for GI endoscopy
General anaesthesia is required for GI endoscopy (see box). Food should be withheld for 12–18 h before endoscopy of the upper GI tract, while water can still be provided up to 2 h before the procedure. For lower GI tract endoscopy food should be withheld for at least 24 h to ensure no further passage of ingesta from the small into the large intestine. If the owner is unable to withhold food (ie, multiple cat household, cat complaining severely, outdoor cat) it is advisable to hospitalise the patient prior to the procedure to ensure proper fasting.
Normally the feline stomach empties within 12 h. 15 Therefore, finding retained food in the stomach of a properly fasted animal may give useful information about a possible anatomical or mechanical outflow obstruction or gastric motility disorder. In these cases a significant amount of gastric or duodenal ingesta may compromise the examination since the entire mucosa cannot be visualised (Figure 11). Lesions or even foreign bodies might be missed. If necessary, fluid can be aspirated through the working channel; or, if too much food is present, fluid can be aspirated through a separate gastric tube alongside the endoscope. In some instances it is sufficient to gently turn the animal around the endoscope to visualise the entire mucosa.
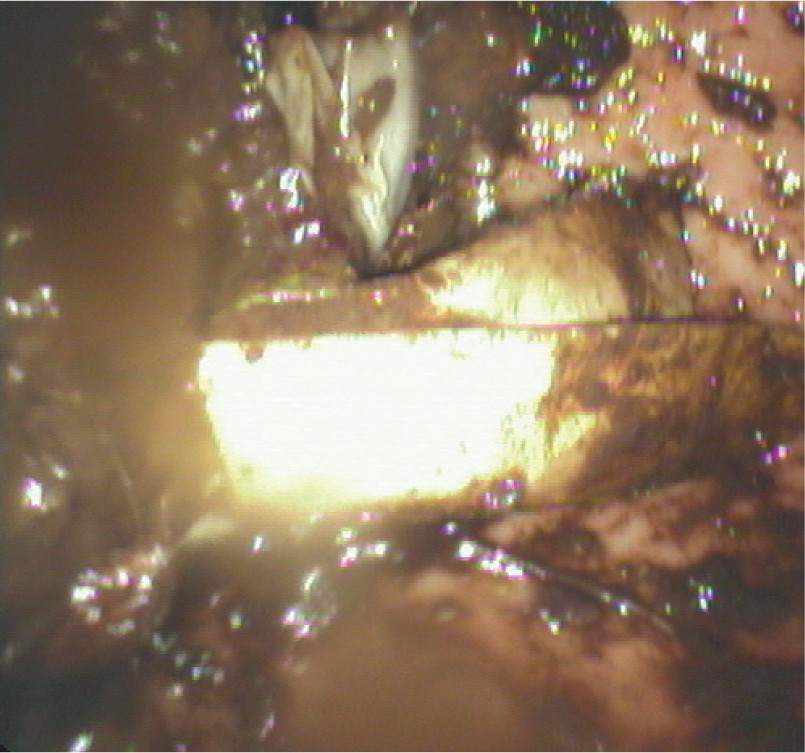
Endoscopic view of food-filled stomach
If a barium contrast study has been performed, upper GI endoscopy should be postponed for at least 24 h to allow complete clearance of the barium from the mucosal surface. Any residual barium should never be aspirated through the instrumentation channel as this might adhere to the channel’s inner lining and clog the lumen.
For lower GI endoscopy removal of all faeces from the descending colon is required. Fasting and administration of enemas is usually sufficient to evacuate almost all faecal material. GI lavage solutions (ie, Klean-Prep; Norgine GmbH, GoLytely; Braintree Laboratories) can be administered to cats the day before colonoscopy via a naso-oesophageal tube. While two doses of about 30 ml/kg, 2–4 h apart, has been recommended, 16 cats (and possibly dogs) may vomit during administration of these lavage solutions and aspiration can lead to severe complications. 17 Therefore, some authors state that the use of oral lavage solution is not appropriate in cats. 18 Warm water enemas, administered every 1–2 h until the water is clear, can be effective in cleaning out the colon. A well lubricated rubber tube is passed gently into the colon no further than the pre-measured length from the anus to the last rib, and warm water is slowly infused into the colonic lumen under gravitational feed. Extreme care should be taken not to overdistend the colon as this might lead to vomiting in cats. The last enema is applied no later than 2 h before the procedure.
For flexible GI endoscopy the patient should always be placed in left lateral recumbency. This positions the gastric antrum and pylorus uppermost (Figure 12), which significantly improves the opening of these structures by the insufflated air, allowing any fluid to fall into the fundus. Evaluation of the mucosa and passage of the stomach and pylorus is then possible. In an animal lying in right lateral recumbency it is much more difficult to clearly identify all parts of the stomach or pass into the antrum. The only exception to this positioning is for the placement of a PEG feeding tube, which is inserted through the left flank in an animal lying in right lateral recumbency. For flexible colonoscopy the patient is also placed in left lateral recumbency, so the descending colon lies downward while the transverse and ascending colon are facing up. This position is helpful to adequately open the lumen of the proximal colon by air insufflation and reduces fluid accumulation around the ileocaecocolic junction.
For rigid endoscopy, the patient is positioned in sternal recumbency for oesophagoscopy and in sternal or right lateral recumbency for proctoscopy and colonoscopy.

Cat in left lateral recumbency during gastroscopy, depicting the correct location of the endoscope entering the antrum
Before the patient is anaesthetised the endoscopic equipment is checked and set up. Once ready, the tip of the insertion tube can be lubricated with water-soluble gel or with oral secretion along its passage through the oral cavity, taking care to avoid the objective lens.

Oesophagoscopy
After carefully extending the head and neck (hyperextension must be avoided), the insertion tube is passed carefully along the midline of the hard palate through the oropharynx and guided dorsal to the endotracheal tube until the upper oesophageal sphincter (UOS) comes into view (see video 4). The UOS appears as a star-shaped area of folded mucosa dorsal to the larynx (Figure 13). This is a low-resistance sphincter and the tip of the endoscope can easily be passed by applying insufflation and very gentle pressure. The introduction of the endoscope through the oral cavity and into the upper oesophagus can be performed blindly, but visual guidance is preferred. If a rigid endoscope is used it is passed through the oral cavity under strict visual supervision as rigid instruments can all too easily damage the mucosa.
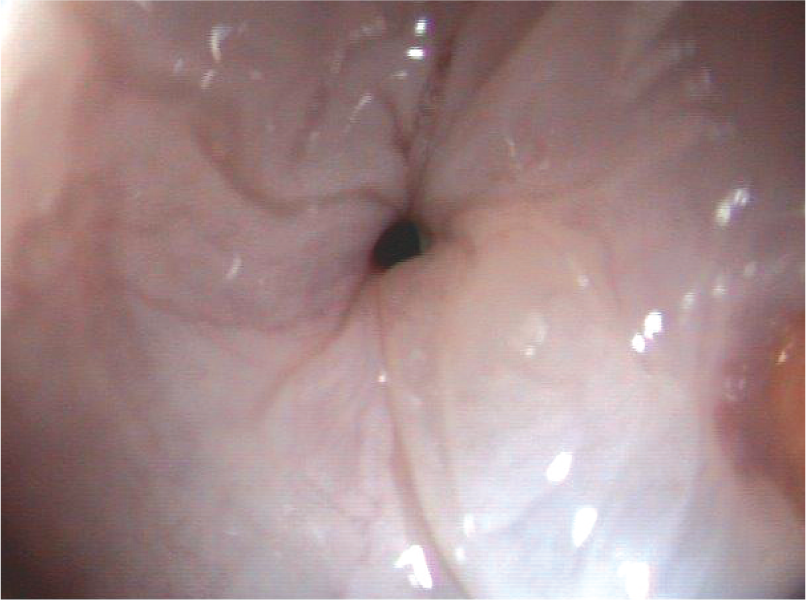
Endoscopic view of the upper oesophageal sphincter
The cervical oesophagus is normally collapsed so a red-out obscures visibility briefly. Insufflation is continued once the UOS is passed, but forward motion is halted until the oesophageal lumen is visible as a straight tube with a slight bend at the thoracic inlet. The tip is adjusted into the centre of the lumen and the endoscope is advanced through the oesophagus in a slow continuous movement (there should be no or very little resistance). To keep the lumen from collapsing, intermittent or continuous air flow is applied as required. Over-insufflation should be avoided. Occasionally, slight manual compression of the upper oesophagus is needed to prevent escape of the insufflated air. Generally, mild insufflation is needed to extend the lumen of the thoracic oesophagus.
While passing the endoscope along the length of the oesophagus the entire mucosal circumference is inspected for mucosal colour, texture and possible pathological lesions, so as not to confuse these with iatrogenic changes when withdrawing the endoscope. A fuller investigation is performed on the way back out of the patient.

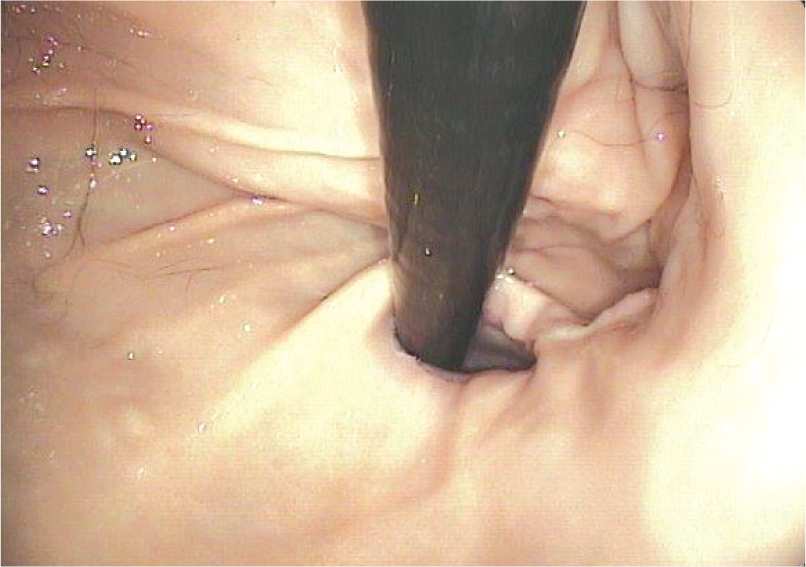
Endoscopic view of the lower third of the oesophagus, showing typical circular wave-like ripples
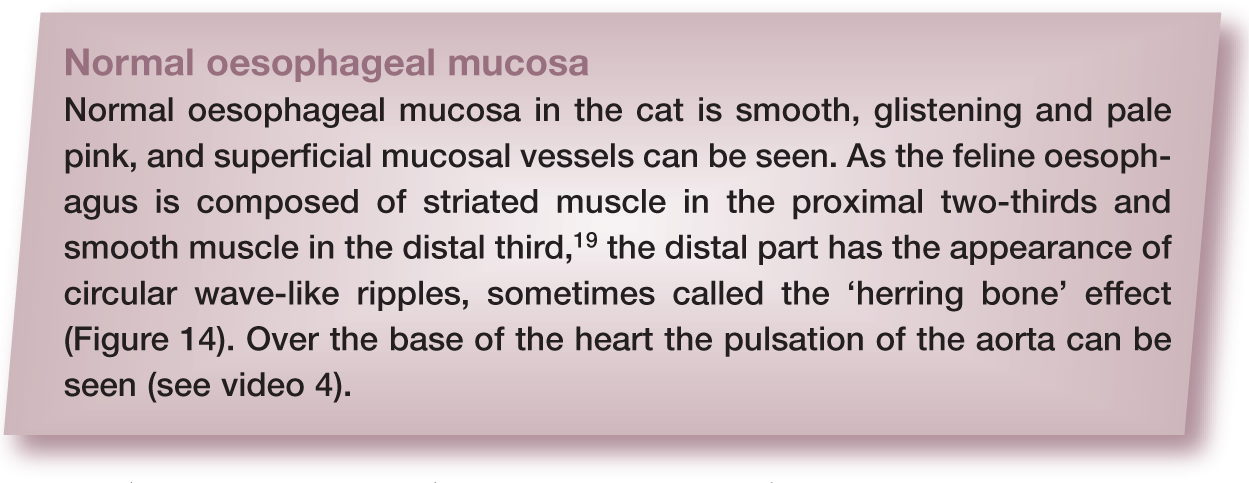
At the gastro-oesophageal junction the oesophagus appears as a slit-like opening that passes obliquely at about a 30° angle through the diaphragm into the stomach. The lower (or gastro-) oesophageal sphincter (LOS) is a high-pressure zone that keeps the stomach closed between swallows. During endoscopy it may be closed or open. To pass the endoscope into the stomach the tip is deflected slightly left and upward and the endoscope is advanced under direct visual inspection with slight pressure and variable air insufflation until the gastric lumen is reached. A short red-out can be seen when passing. Little resistance should be encountered. If forward motion is impeded when entering the stomach it is usually because the tip has missed the LOS. The endoscope should be withdrawn and redirected prior to repeat intubation.
Biopsies are rarely taken of the oesophagus because the mucosa is very thin and relatively tough. Masses, however, should always be biopsied.
Gastroscopy
A full examination of all areas of the stomach should be performed in every patient and all landmarks have to be identified properly. The endoscopist needs to be familiar with the luminal gastric anatomy to successfully manoeuvre the endoscope through the stomach, obtain a retroflexed view of the fundus and cardia, advance around the lesser curvature/incisura angularis into the antrum and traverse the pyloric canal into the duodenum. The stomach is only briefly examined on the way in so as to note the gross appearance; a full examination and taking of biopsies is performed after duodenoscopy as prolonged insufflation and examination of the stomach stimulates pyloric closure and makes intubation more difficult.
Initial examination
The initial view on entering the stomach is of rugal folds of the stomach’s greater curvature (Figure 15a). During this preliminary examination of the stomach it is important to note the gross appearance of the rugal folds, the ease with which the gastric wall distends during insufflation and if fluid or ingesta is present.

(a) Clearly visible rugal folds in the stomach when only little air is present. (b) Rugal folds are flattened when air fills the gastric lumen

In cats the stomach is usually already air filled and the mucosa visible after insufflating the oesophagus. If the stomach is still completely or partially collapsed the mucosa lies close to the tip and the view is quite limited. Before attempting to advance the endoscope further, air is insufflated until the lumen is visible.
The degree of gastric distension is judged by increased flattening of the folds (Figure 15b) – at maximal insufflation, a completely smooth mucosa is seen. Generally, the least distension necessary to pass the endoscope through the stomach is when the rugal folds are separated and begin to stretch. This allows orientation and identification of gross lesions (ulcers, foreign bodies, masses) while avoiding overdistension, which hinders movement of the diaphragm and potentially risks serious cardiopulmonary compromise. Minimal distension of the stomach at this stage also reduces the likelihood of pyloric contraction, making passage through to the duodenum considerably easier. It furthermore reduces the occurrence of paradoxical movement, whereby a loop of insertion tube pushes the greater curvature away and results in the tip of the insertion tube moving further away from the pylorus as the endoscope is inserted.
If the cat has been properly fasted, the stomach in most cases will be completely empty. A small amount of liquid is not considered abnormal. Large amounts of liquid, especially bilious fluids, may suggest reflux of intestinal fluid into the stomach; this may occur in cats that have been treated with enemas, or that have a gastric motility disorder, duodenogastric reflux disorder or an intestinal obstruction. As bile is irritating to the gastric mucosa, the mucosa may appear reddened if there is significant gastric biliary retention. Small amounts of fluid do not need to be removed for proper evaluation of the stomach, but if a larger amount of fluid obscures the view of the mucosa, this needs to aspirated. Alternatively, the cat can be gently turned on its back to move the fluid to another position while inspecting the hitherto concealed part of the mucosa. The patient is then returned to left lateral recumbency.
In cats, insufflation can be achieved in mere seconds. If the stomach does not distend the cause might be a blocked air/water channel port, reflux of air through the oesophagus or gastric wall disease that prevents mucosal distension.
Once correct orientation is achieved the endoscope is advanced along the greater curvature by lifting the tip upward and pushing it gently forward using rotational torque if necessary. With the patient in left lateral recumbency and the endoscope held in the conventional manner, the view is predictable. In order to reach the antrum an important landmark is the incisura angularis (Figure 16). By lifting the tip and advancing the endoscope the incisura comes into view almost automatically. Sometimes the tip has to be deflected down again slightly. The antrum is below the incisura, while the cardia is above it and can be viewed by increased retroflexion of the tip. Once this landmark is reached the endoscope is advanced through the antrum and pylorus into the duodenum.

Endoscopic view of the incisura
Full examination
A complete examination of the stomach is performed following examination and biopsy of the duodenum (see later). First the greater curvature up to the incisura is inspected, then the cardia and fundus, before going into the antrum (see video 5).
To examine the cardia and fundus of the stomach the endoscope needs to be retroflexed (Figure 17). This so-called ‘J-manoeuvre’ provides a view of the inside of the cardia and the fundus. In cats the J-manoeuvre is started when the endoscope is at the middle part of the gastric body, opposite the incisura angularis. The tip is lifted up (counter-clockwise deflection of inner control knob) and the endoscope is advanced further. First the incisura is visualised directly. This can sometimes not be achieved in cats due to their small size and reduced working space.

Retroflexed endoscope in the stomach
By deflecting the tip up almost completely the cardia comes into view. In this retroflexed view the endoscope can be seen entering the stomach (Figure 18). Sometimes this manoeuvre extends the LOS and air will leak into the oesophagus, necessitating further air insufflation to provide adequate distension. For close-up viewing of the cardia the endoscopist’s right hand retracts the insertion tube, thereby pulling the tip towards the mucosa. By applying rotational movement to the insertion tube and turning the outer deflection knob for a lateral view, a circumferential examination of the proximal stomach can be accomplished. While the endoscope is retroflexed slowly the mucosa is further inspected. Leaving the tip in the proximal stomach and turning the deflection controls into a neutral position the body of the stomach is viewed. Alternatively, by advancing the endoscope while the tip is still deflected an additional view of the proximal stomach is provided. When the incisura is reached the tip is straightened until the antrum can be seen.
View of the cardia and fundus provided by a retroflexed (J-manoeuvre) endoscope
In cats, the angle of the lesser curvature can be very acute and a slide-by technique might be necessary to pass into the antrum. This slide-by technique can be used to advance around tight flexures in the stomach or intestine. Using this technique the endoscope tip is deflected in the direction required to follow the lumen. As the deflected tip impinges on the outer radius of the gastric/intestinal bend a red-out is seen. If this red-out seems to be moving it is generally safe to advance until the next straight part, in this case the antrum, can be visualised. With this manoeuvre mucosal damage can occur, leading to linear streaks of hyperaemia or mucosal haemorrhage (Figure 19). Another method to avoid such artefacts is to pre-deflect the tip within the body of the stomach and then advance into the antrum.
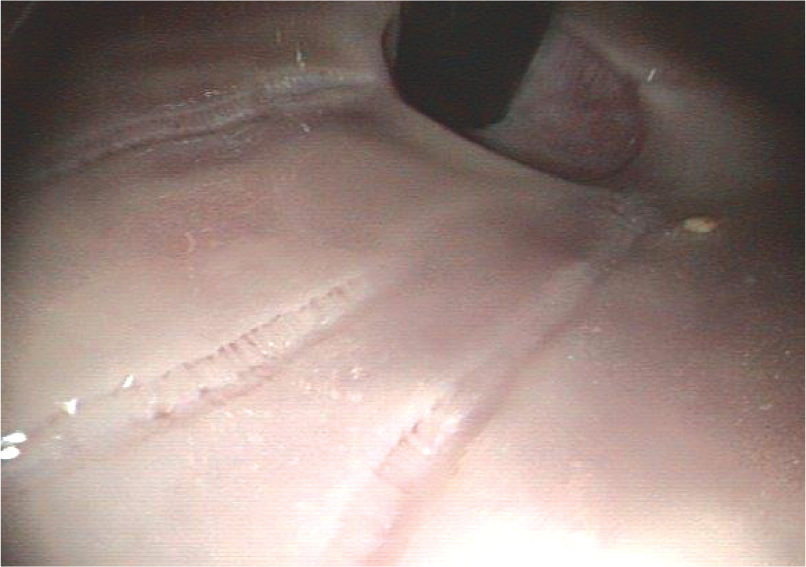
Endoscopic view of the stomach, showing endoscopic artefacts
The pylorus can generally be readily identified at the antral end of the stomach and has a variety of appearances (Figure 20). The pylorus may be persistently closed or can exhibit a variable degree of dilation; sometimes reflux from the duodenum can be observed. Occasionally the location can be difficult to identify because of peristaltic waves, antral masses or fluid obscuring the view. Pyloric folds are extremely rare in cats.

(a,b) Different endoscopic appearances of the feline pylorus
The biggest mistake when trying to advance into the antrum and intubate the pylorus (see box on page 987) is overdistension. With increased intraluminal pressure the stomach assumes a round shape, the antral opening is flattened and antral contractions are stimulated. It then becomes difficult to enter the antrum and find the pylorus. In this case air must be aspirated and the manoeuvre to advance into the antrum repeated with a less inflated stomach.
In those cases in which the pylorus is open, passage can be achieved quite easily. However, the pylorus can be closed tight and offer significant resistance. It is, therefore, imperative to carefully monitor the cat’s heart and respiratory rate, especially during difficult passages in which the pyloroduodenal junction and proximal duodenum might be stretched and distorted. Transient bradycardia secondary to an increase in vagal tone and/or respiratory depression may occur. 18 If the endoscopic procedure results in significant cardiopulmonary compromise, the endoscope should be withdrawn, the stomach emptied of air and the patient stabilised, before another attempt is made.
Duodenoscopy
Once the junction of the pylorus to the duodenum is reached the mucosal colour changes from pale pink to pinkish red (Figure 21). If the lumen is not clearly visible at this point insufflation might be necessary to distend the intestinal lumen. Further gentle advancement usually provides a view into the descending duodenum, seen as a straight tunnel. In some cases minor forward or backward adjustments are needed to free the tip from the mucosa. If these manoeuvres do not provide a clear view of the intestinal lumen, the endoscope is retracted under constant insufflation until the view can be obtained. No forward movement should be attempted without clear visualisation and no force should be used.

Endoscopic view of normal feline duodenum
The endoscope can usually be advanced easily through the descending duodenum to the caudal duodenal flexure and almost always up the ascending duodenum and into the proximal jejunum.
Variable degrees of insufflation are required to maintain luminal distension and a clear view of the mucosa. As there is already a bend in the endoscope’s insertion tube in the stomach, forward movement in the descending duodenum can in some cases be facilitated by withdrawing the endoscope slightly, thereby reducing the loop in the stomach. Forward movement is sometimes accelerated at this point and great care must be taken not to move the tip against the mucosal surface. While the insertion tube is slowly advanced the intestine is closely examined to assess the appearance of the mucosal surface and to observe for lesions. To obtain circumferential views the insertion tube can be rotated around its longitudinal axis.
After reaching the pelvic flexure of the duodenum, the duodenum ascends a short distance before reaching a ventrally directed bend. This bend is the juncture between the duodenum and jejunum. Gradual advancement of the endoscope can be continued as long as the lumen can be viewed clearly and no resistance is met. Because the curves of the intestine move easily only minor adjustments in tip deflection are required. In some cats the loop in the stomach cannot be straightened and pyloric resistance remains high, preventing further advancement past the pelvic flexure of the duodenum. Sometimes massaging the intestinal loops transabdominally relaxes the intestinal musculature and may help to facilitate further examination. As soon as resistance is met the endoscope should be retracted.
The mucosa continues to be closely examined and biopsies are taken along the way.

The major duodenal papilla, which represents the combined opening of the pancreatic and the biliary ducts, is located close to the convex curve formed by the antrum, pylorus and proximal duodenum. It is a round to oval disc, 1.5–2 mm in diameter, and appears almost white against the surrounding reddish mucosa (Figure 22). As the endoscope is retracted through the proximal duodenum and pyloric canal this area is closely inspected as it will not have been viewed on the way in. Pyloric ulcers or tumours can be detected during this examination.
Endoscopic view of the duodenal papilla
After completion of the upper GI endoscopy procedure, the stomach is completely deflated using suction. If there is gastric content (bile, liquid, food) in the oesophagus this needs to be aspirated or lavaged to prevent aspiration during recovery from anaesthesia and to prevent oesophagitis and possible stricture formation at a later date. The cat has to be supervised closely during recovery and the endotracheal tube is removed as late as possible.
Colonoscopy and proctoscopy
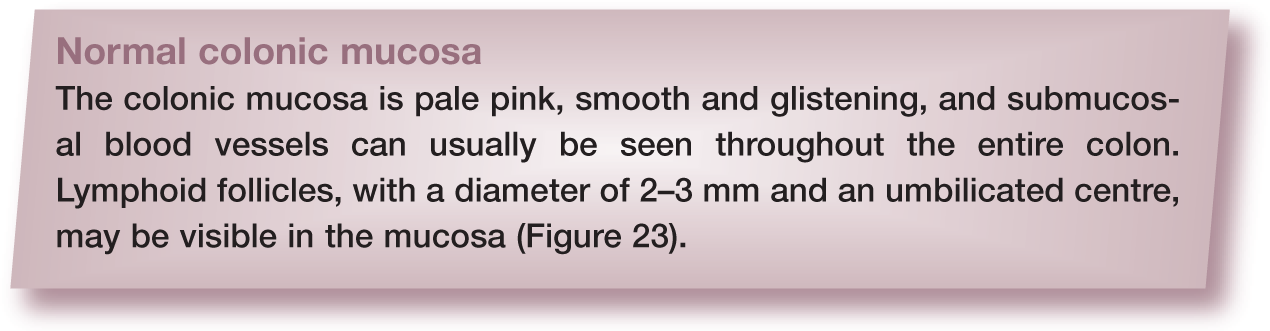
First a digital rectal examination is performed to ensure that a rectal mass or stricture is not missed. The endoscope is well lubricated up to a length of about 20 cm and inserted 1–2 cm into the rectum. Air insufflation is started while an assistant closes the perianal tissue tightly around the insertion tube to prevent air leakage. Enough air is insufflated to distend the rectal and colonic lumen so that the colon is seen as a ‘tunnel’ and the colonic mucosal folds straighten. A partial fold separates the rectum from the descending colon but straightens almost completely with air insufflation. An inability to distend the colonic lumen may indicate severe fibrosis with chronic inflammation, the presence of a stricture or inadequate closure of the anal canal.

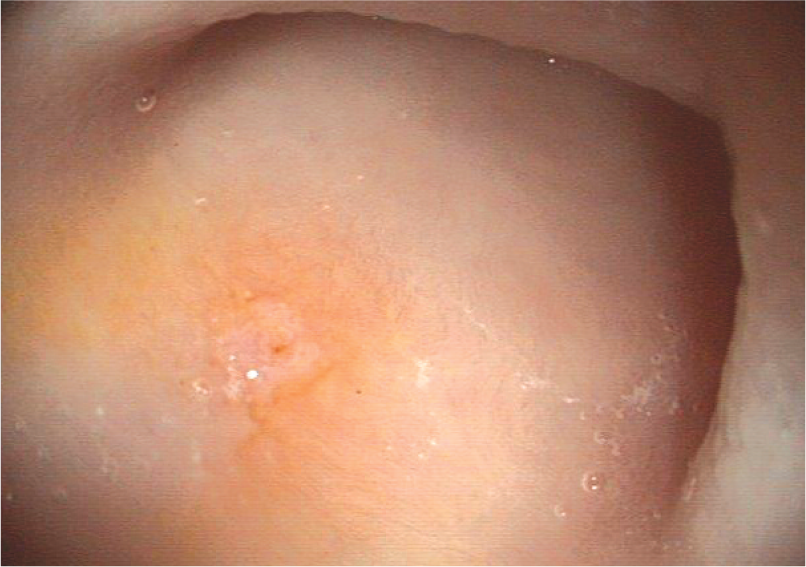
Lymphoid follicule (arrow) in the mucosa of the colon; faecal material is visible towards the 5 o’clock position
With intermittent or constant air insufflation (as needed) the endoscope is slowly advanced as far as possible up the colon. The tip of the endoscope is kept in the centre of the lumen by turning the inner angulation knob and by rotational torque of the endoscope. No, or only minor, resistance should be encountered. If the centre of the lumen cannot be seen the endoscope is slowly withdrawn while more air is insufflated until the mucosa is visible again.
As the endoscope is advanced through the descending colon the mucosa is inspected and lesions noted.
Hyperaemia should be carefully interpreted. While it may indicate mucosal inflammation, it can also occur secondarily to warm water enema, and trauma from the rubber tube or endoscope.
The flexure at the junction of the descending colon and transverse colon represents an approximate 90° change in direction upward (from left to right), but may also be less distinct and less than 90° in cats. To enter the transverse colon the tip of the insertion tube is advanced almost against the mucosa of the flexure’s outer curve. Air is insufflated and the tip deflected gradually up while the endoscope is advanced until the 90° bend is achieved. Visualisation might be lost for a brief moment until the transverse colon is entered and distended by insufflation.
In most cats, insufflation of the descending colon leads to distension of the complete large intestine. Once the endoscope is in the transverse colon the tip is straightened and centred in the middle of the lumen. If the lumen of the transverse colon is not visible, slight rotational torque and angulation of the outer deflection knob will often help to obtain ‘tunnel vision’. The endoscope is then advanced slowly up to the flexure marking the beginning of the ascending colon. The endoscope should slide easily along the mucosa. However, as the feline intestinal tract is very pliant, manual support of the endoscope’s insertion tube from the outside might be needed in some instances. The transverse colon of the cat is very short (2–4 cm) and the flexure to the ascending colon again may be less distinct than in the dog. Advancement around this flexure is achieved by a similar technique to that used to navigate into the transverse colon, but the tip must now be deflected caudally.
The feline ascending colon is equally short (about 1–2 cm) and at the end the ileocolic sphincter enters in a slit-like opening (Figure 24) adjacent to the caecocolic junction. Due to the small ileal diameter, ileal intubation is rarely possible in cats, unless using a paediatric gastroscope (<5.5 mm insertion tube diameter). If it is attempted, extreme caution is warranted to prevent colonic rupture. If necessary, blind biopsies can be collected from the ileum. The caecocolic junction is usually completely or partially open in cats and, as the caecum is short (1–3 cm), it can be inspected fully without entering its lumen.
Biopsies are taken on the way out. A perpendicular orientation of the forceps to the mucosa can only be achieved at the flexures, in the caecum and from luminal masses. Care has to be taken not to cause a caecal inversion when biopsies are taken. Most areas of the feline colon must be sampled tangentially to the mucosa. The risk of biopsy-related colonic perforation is increased with rigid colonoscopy and the use of angulated tip forceps parallel to the endoscope.

Ileocolic junction with a view of the entrance into the ileum. The opening to the caecum is at the 12 o’clock
At the end of the lower GI endoscopy procedure, the endoscope is completely withdrawn; evacuation of the air in the colon is achieved by cessation of anal compression. Insufflation of the large intestine can result in distension of the small intestine and ultimately of the stomach, leading to potential respiratory distress. If overdistension of the stomach has occurred, it can be relieved by passing a tube into the stomach and evacuating passively or by attaching the tube to a suction pump. During recovery from anaesthesia the cat is supervised closely and extubated as late as possible, as some animals tend to vomit. Gastric evacuation makes vomiting much less likely.

Key Points
Endoscopy is an integral part of the evaluation of the gastrointestinal (GI) system in feline patients
It is minimally invasive and almost atraumatic with a low risk of procedure-related morbidity and mortality in the hands of an experienced clinician
It should only be performed if less invasive procedures (eg, laboratory testing and diagnostic imaging) have been non-diagnostic, including trial therapy (diet, anthelmintics, antibiotics)
Obtaining biopsies is an integral part of GI endoscopy and should be undertaken in every cat, regardless of macroscopic appearance
It is vital for the clinician to understand the difference between normal and abnormal findings
Footnotes
Funding
The authors received no specific grant from any funding agency in the public, commercial or not-for-profit sectors for the preparation of this article.
Conflict of interest
The authors do not have any potential conflicts of interest to declare.
References
Supplementary Material
Please find the following supplemental material available below.
For Open Access articles published under a Creative Commons License, all supplemental material carries the same license as the article it is associated with.
For non-Open Access articles published, all supplemental material carries a non-exclusive license, and permission requests for re-use of supplemental material or any part of supplemental material shall be sent directly to the copyright owner as specified in the copyright notice associated with the article.