
Abstract
Gifted and talented students with an interest in technology can use their advanced cognitive abilities to create webinars and workshops, research presentations, artistic showcases, literary discussions in a variety of languages, digital portfolios, and community and club activities. With YouTube evolving into a primary source of information among teens, this article describes how students can create a four scene broadcast using Open Broadcaster Software Studio (OBS) and how to set up streaming on YouTube. The author concludes that OBS Studio can serve as a powerful medium for gifted and talented students to not only express their creativity and expertise but also to foster collaborative learning, engage with a wider audience, and make meaningful contributions to their educational community.
Gifted students in the arts can stream live performances, whether it’s music, drama, dance, or visual arts.”
YouTube stands as the preeminent online platform among teens, with a Pew Research Center survey revealing 95% of teen respondents having used the site or app (Vogels et al., 2022). Furthermore, 84% of these young individuals identify YouTube as their primary medium for video content consumption, and 40% spend up to 2 hours daily on the platform. Without a doubt, YouTube has evolved into the primary source for information and instructional guides.
However, merely relegating students to consumers on YouTube overlooks the ethos of gifted education. Renzulli argued that gifted education ought to empower students to evolve into creative producers. His Enrichment Triad Model was created to support students in cultivating a creative and investigative mindset. The model focuses on individual student strengths, the application of knowledge and skills to students’ self-selected interests, and motivation to pursue interests at high levels of academic and creative productivity. For Renzulli, gifted education and talent development are about striving to provide avenues for students to express their talents through heightened creative productivity (Renzulli, 2011, 2012).
With parental consent, teens aged 13 and above can embark on the journey of launching their own channel on the popular YouTube platform and assume the role of a creative producer that Renzulli recommends. Many educational professionals and college admissions representatives suggest that high school students should consider crafting a constructive online footprint (“13 Tips for Success Building a Student YouTube Channel,” 2021). Creating a YouTube channel is one option. Educators and guardians can encourage students to reflect upon their interests, extracurricular involvements, voluntary endeavors, or internships, and decide which facets they wish to showcase in their YouTube channel.
In order to equip students with the means to operate at a practicing professional level that Renzulli suggests, it is imperative to grant them access to advanced software for creating professional-grade products. Today’s students anticipate a level of live streaming and engagement that mirrors that of experts in the field. However, securing applications capable of producing high-quality video products at a professional standard can pose financial challenges for schools and parents. Fortunately, Open Broadcaster Software (OBS) Studio is a no-cost solution with its robust platform where students can develop high-quality content without monetary constraints.
Creating a Four Scene Broadcast with OBS Studio
Open Broadcaster Software Studio, which stands for OBS Studio, is a widely-used, free open-source platform available at obsproject.com/download. It is primarily used for live streaming and video recording. The software enables users to capture content from multiple sources, arranging it creatively for streaming or recording. Given its popularity among YouTubers, a plethora of instructional videos on how to utilize OBS Studio can be found on YouTube. Here, I’ll outline some fundamental steps to help newcomers start.
Upon installation, OBS Studio initializes to a blank, black screen. Users can seamlessly switch between two studio viewing modes: the standard single-panel view and the dual-panel view (featuring both a preview and program (broadcast) screen). Changing screens can be achieved by selecting the “Studio Mode” button situated midway among the stacked gray buttons at the lower right corner of the interface (see Figure 1). Two Screen Studio Mode.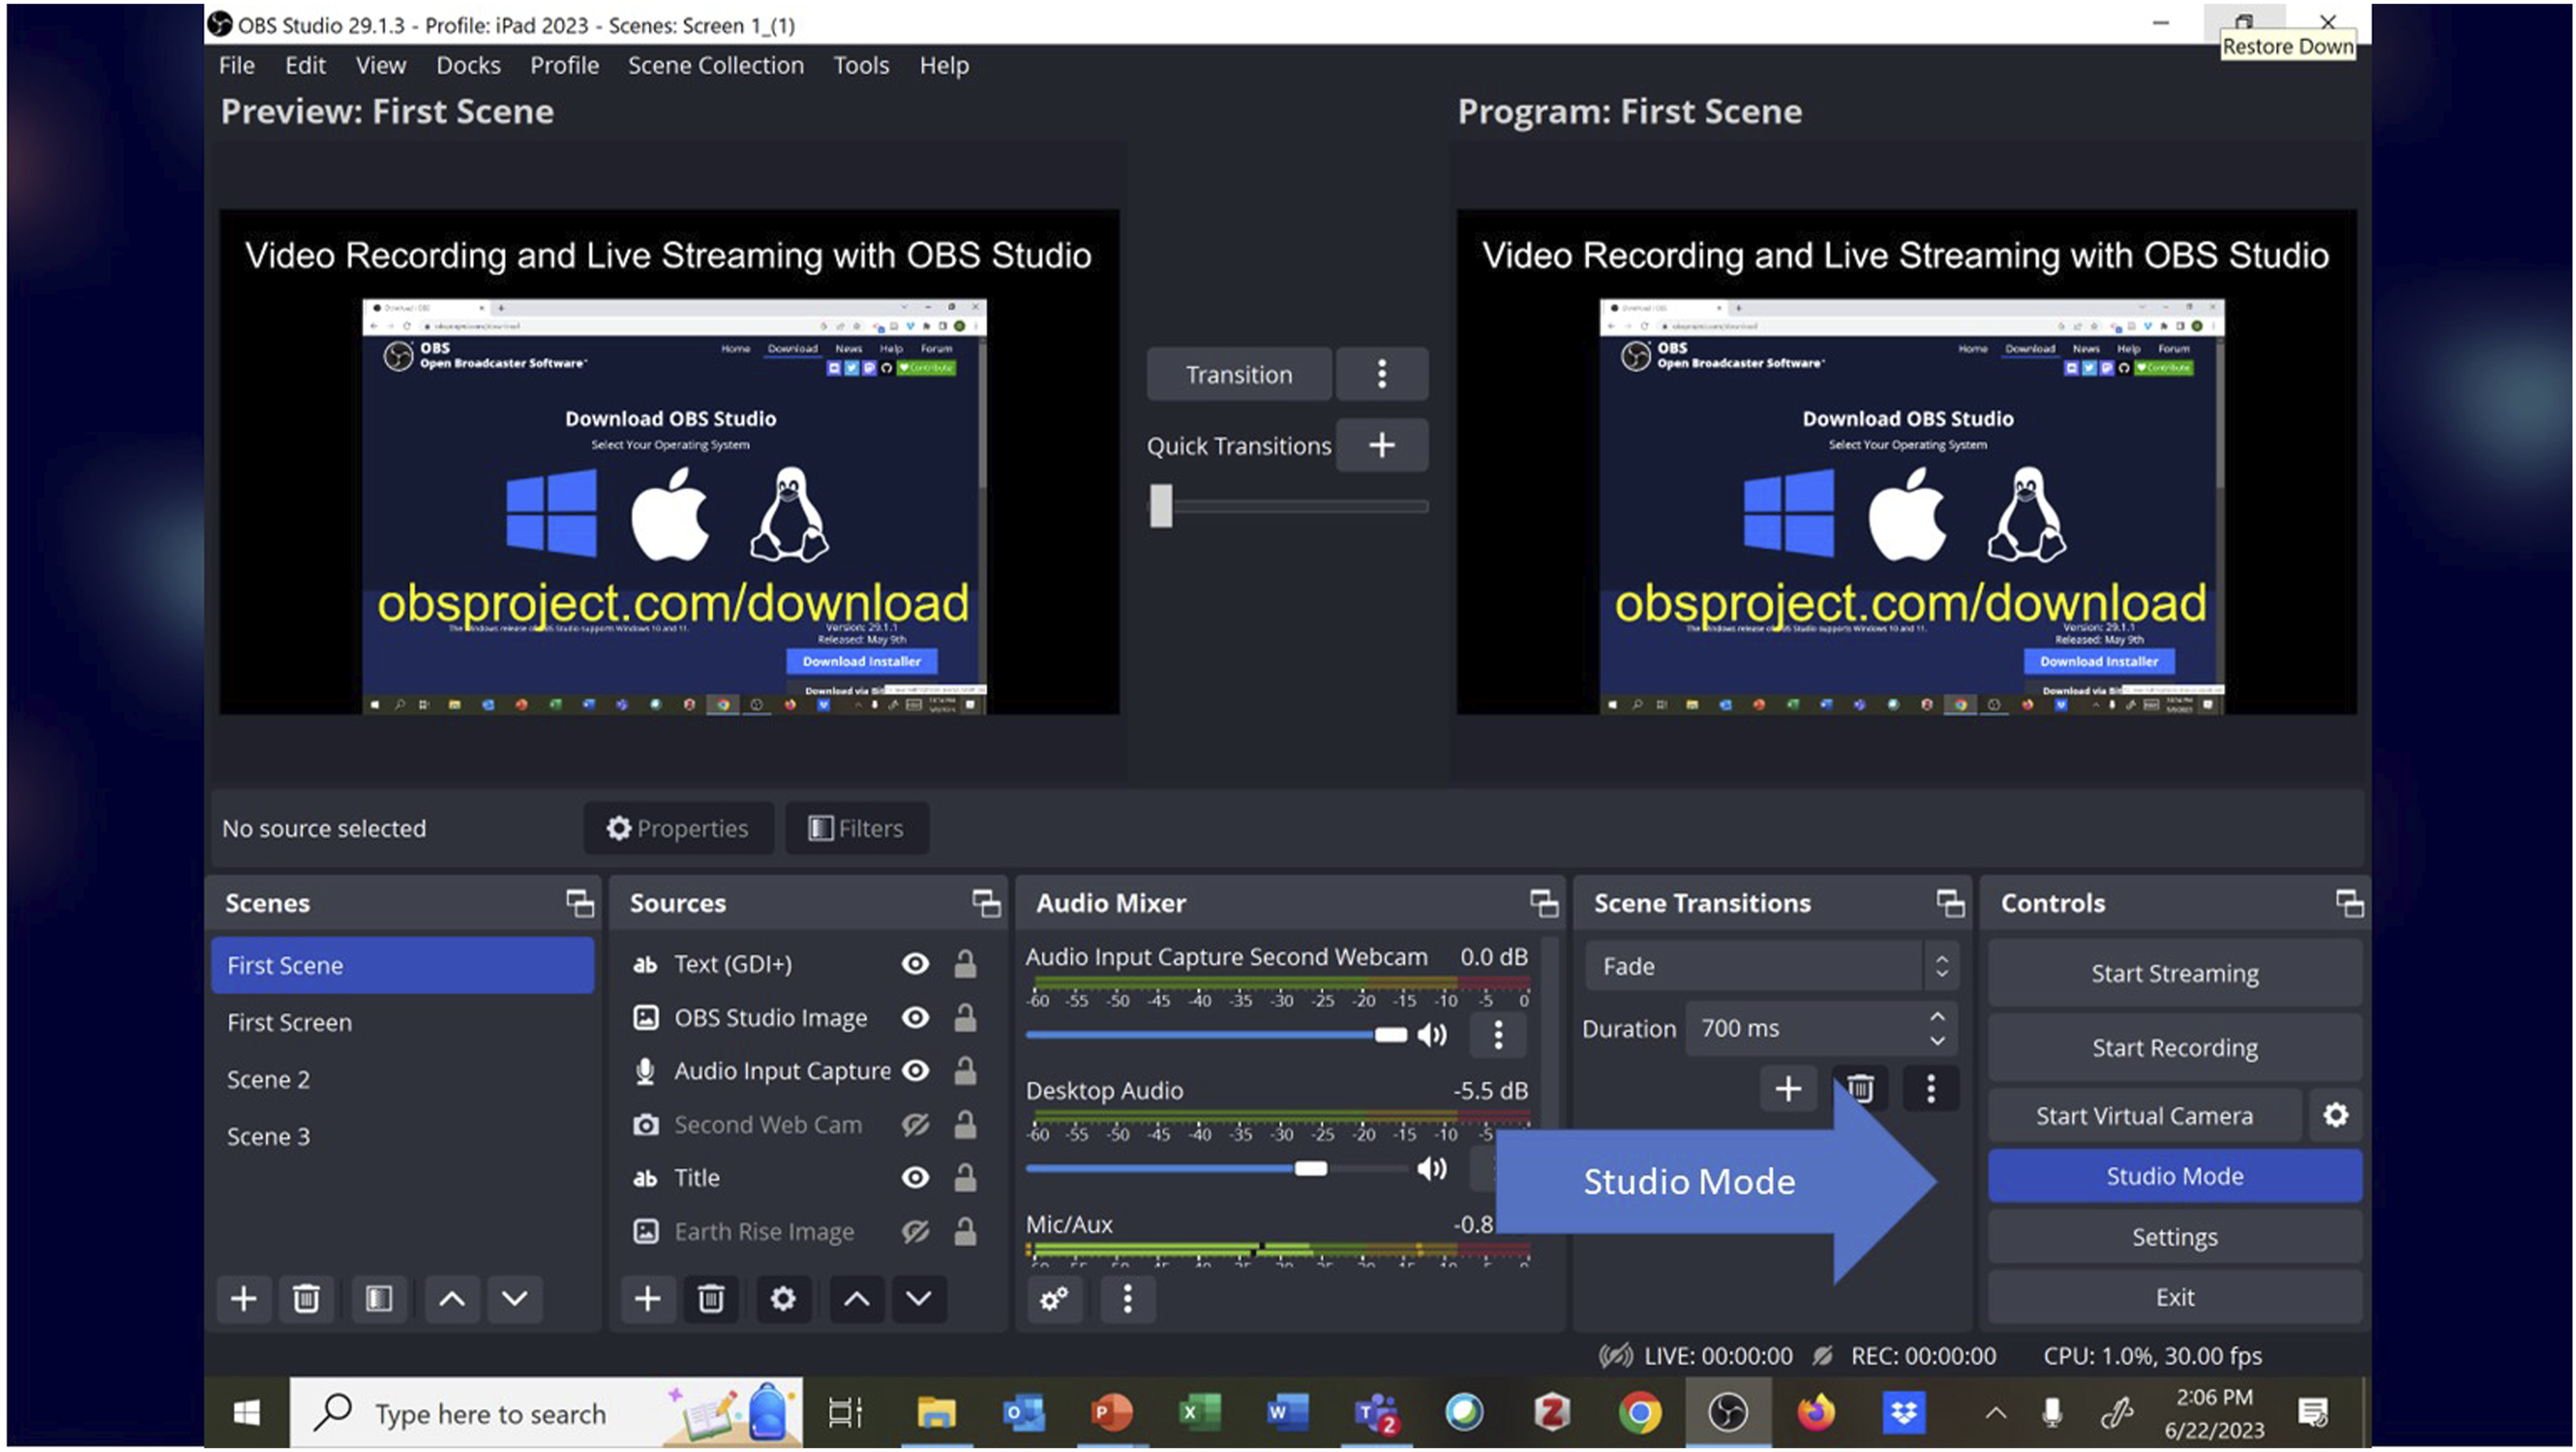
Common OBS Source Types.
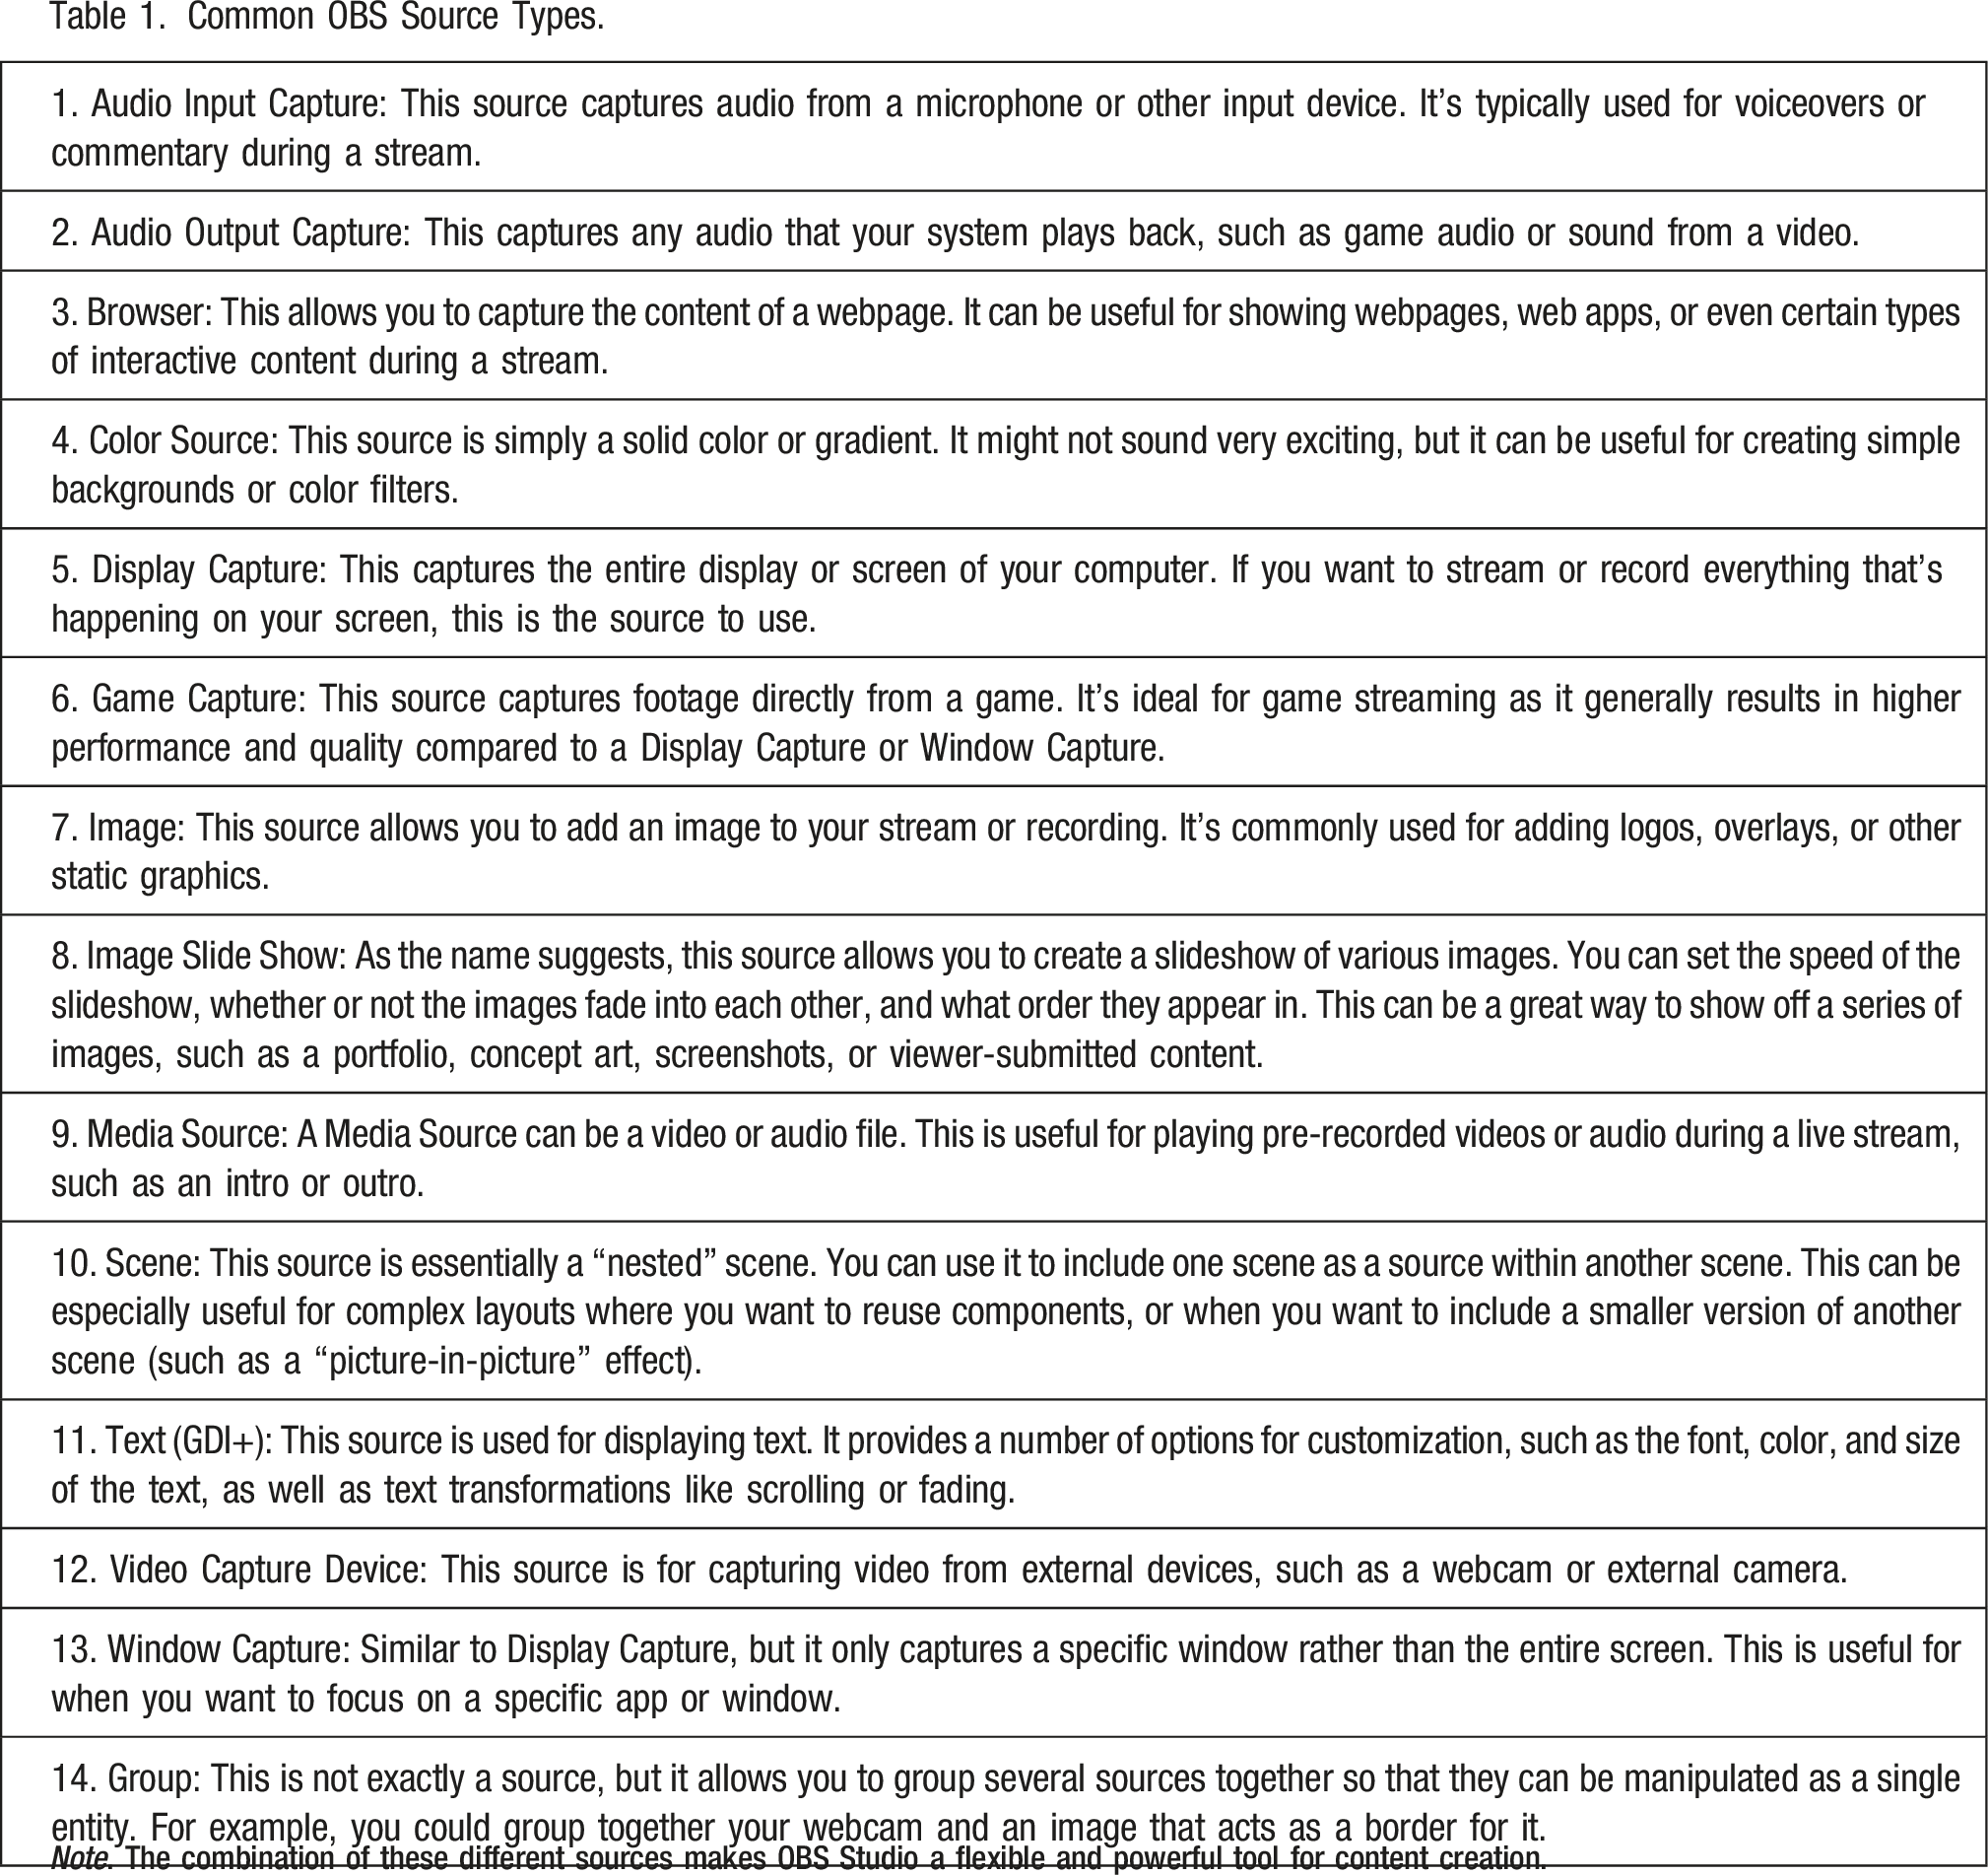
Note. The combination of these different sources makes OBS Studio a flexible and powerful tool for content creation.
Some scenes might share similar sources. For instance, both the first, second, and third scenes described above encompass a video and audio feed, while the second and fourth scenes both display the website being showcased. As an example of how to use OBS Studio, we will design four distinct scenes, each incorporating a mix of four source types.
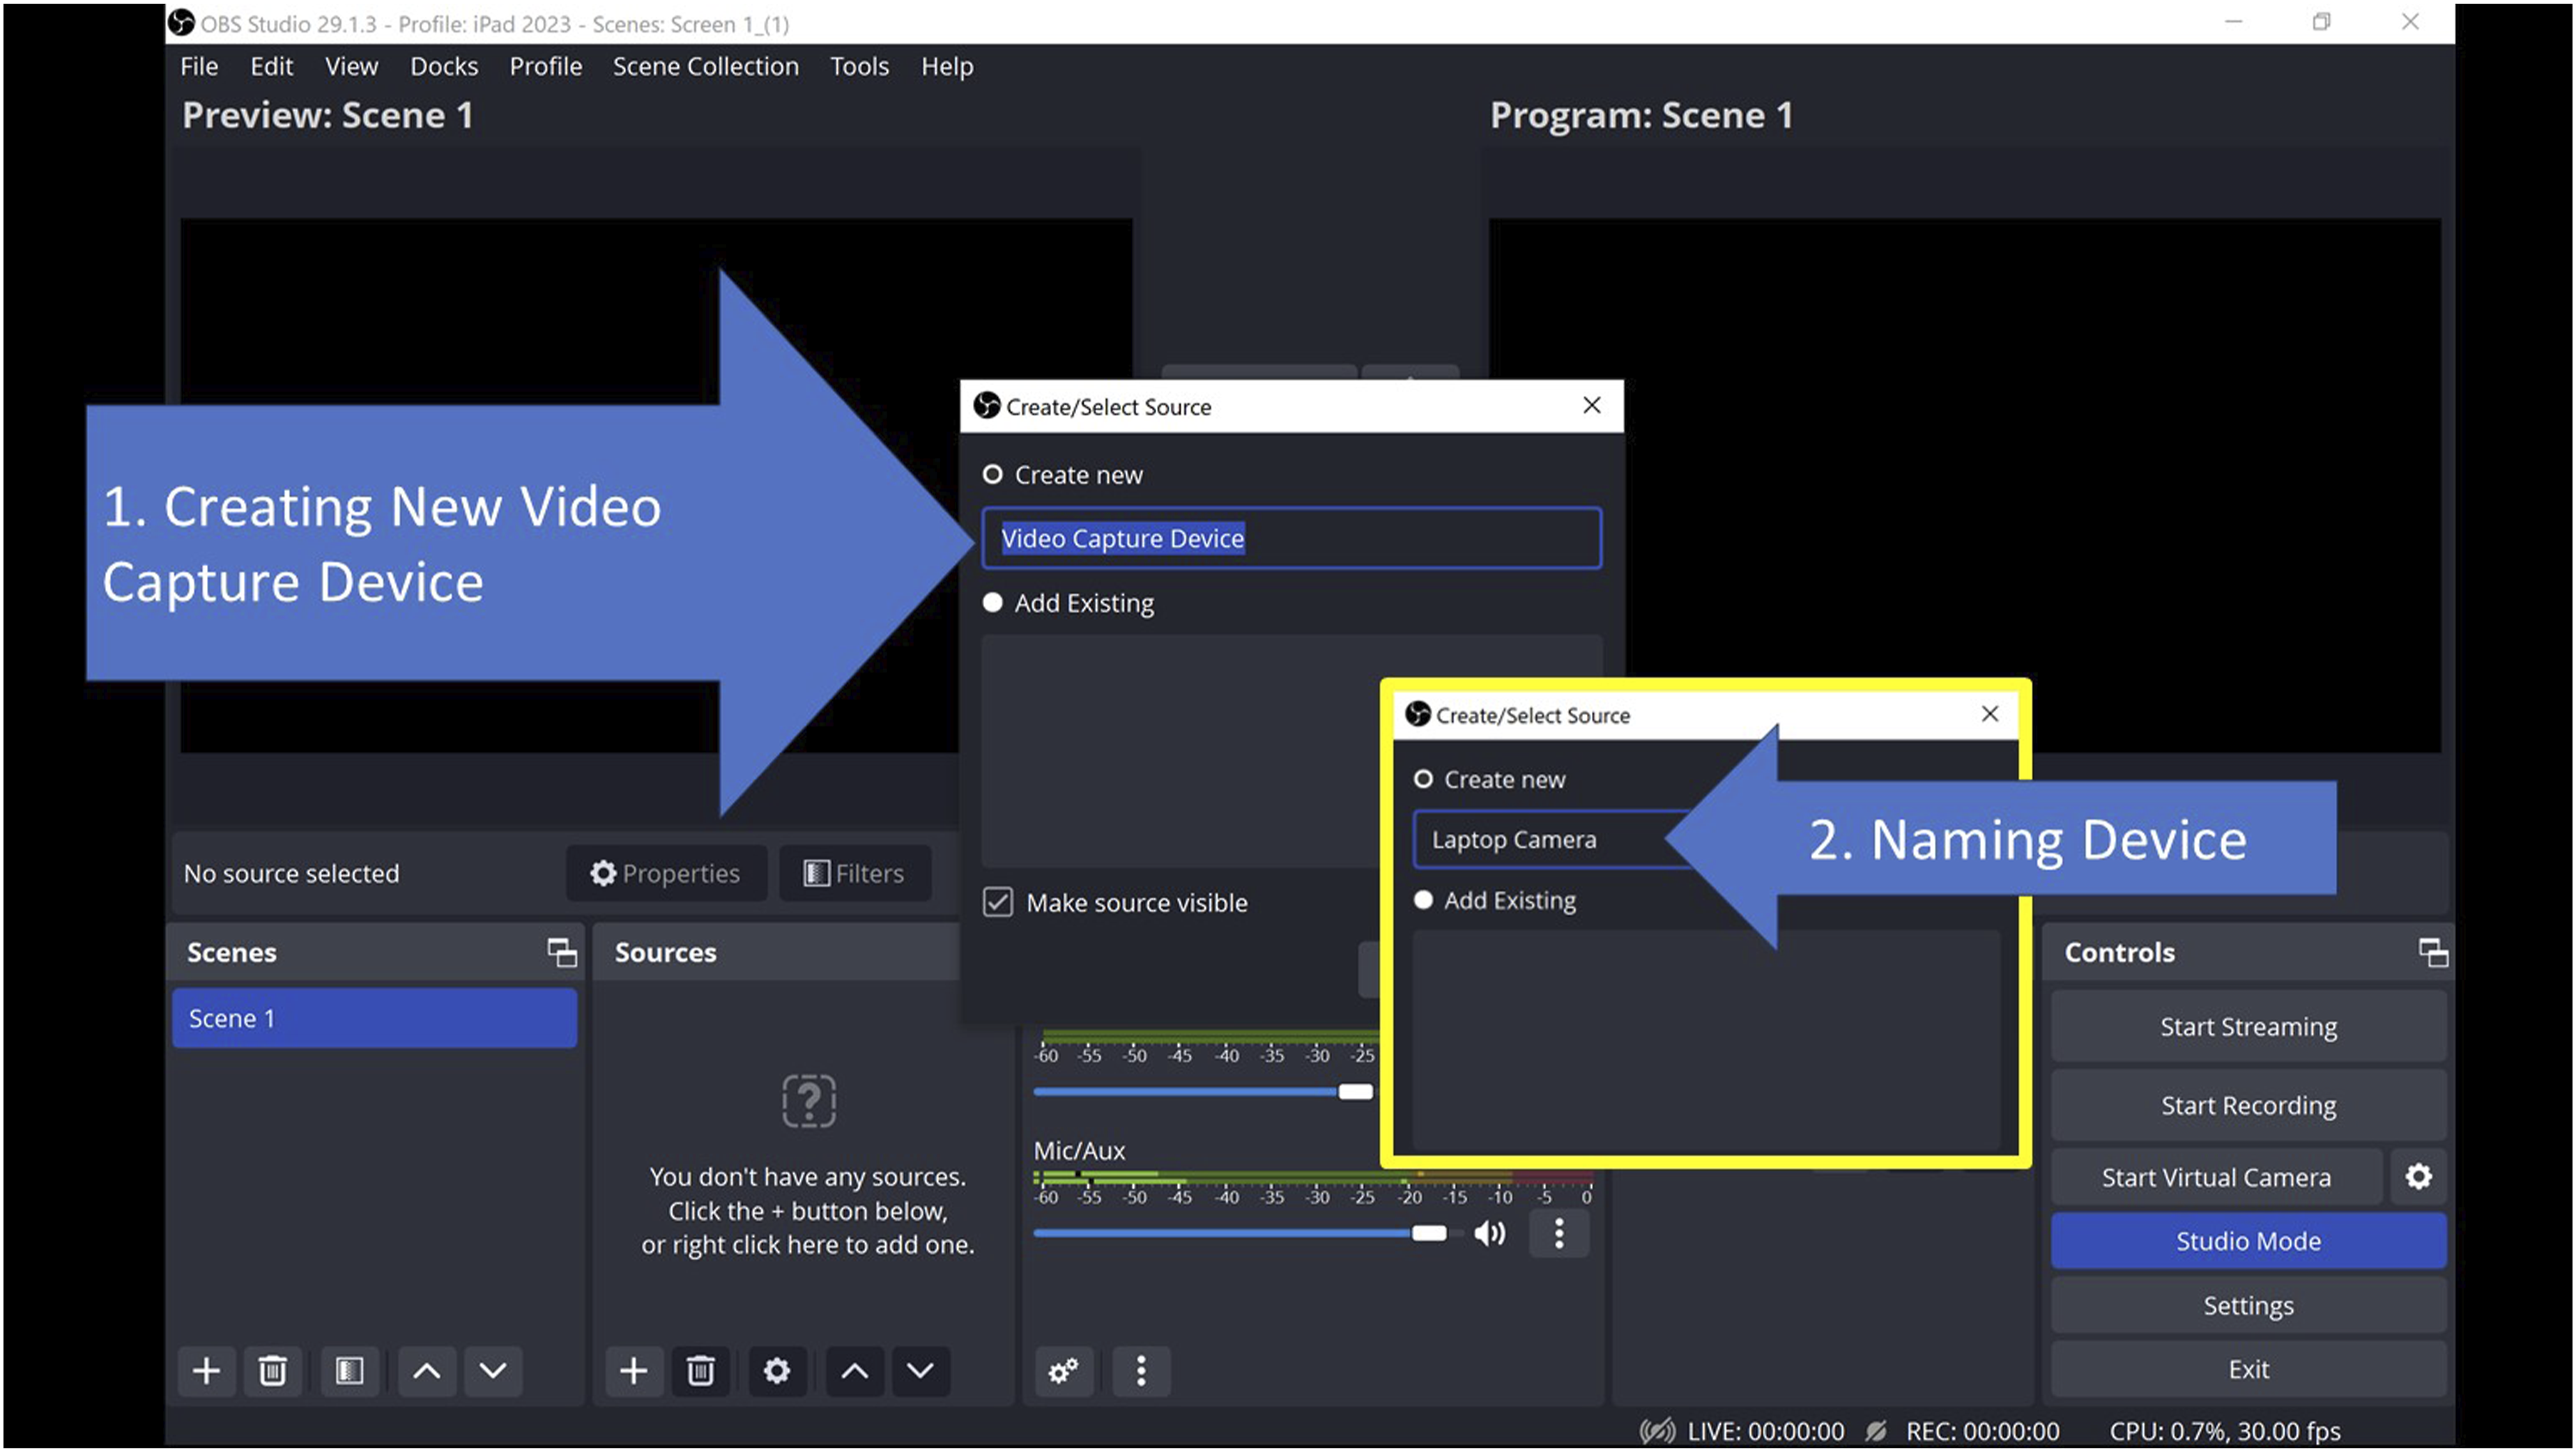
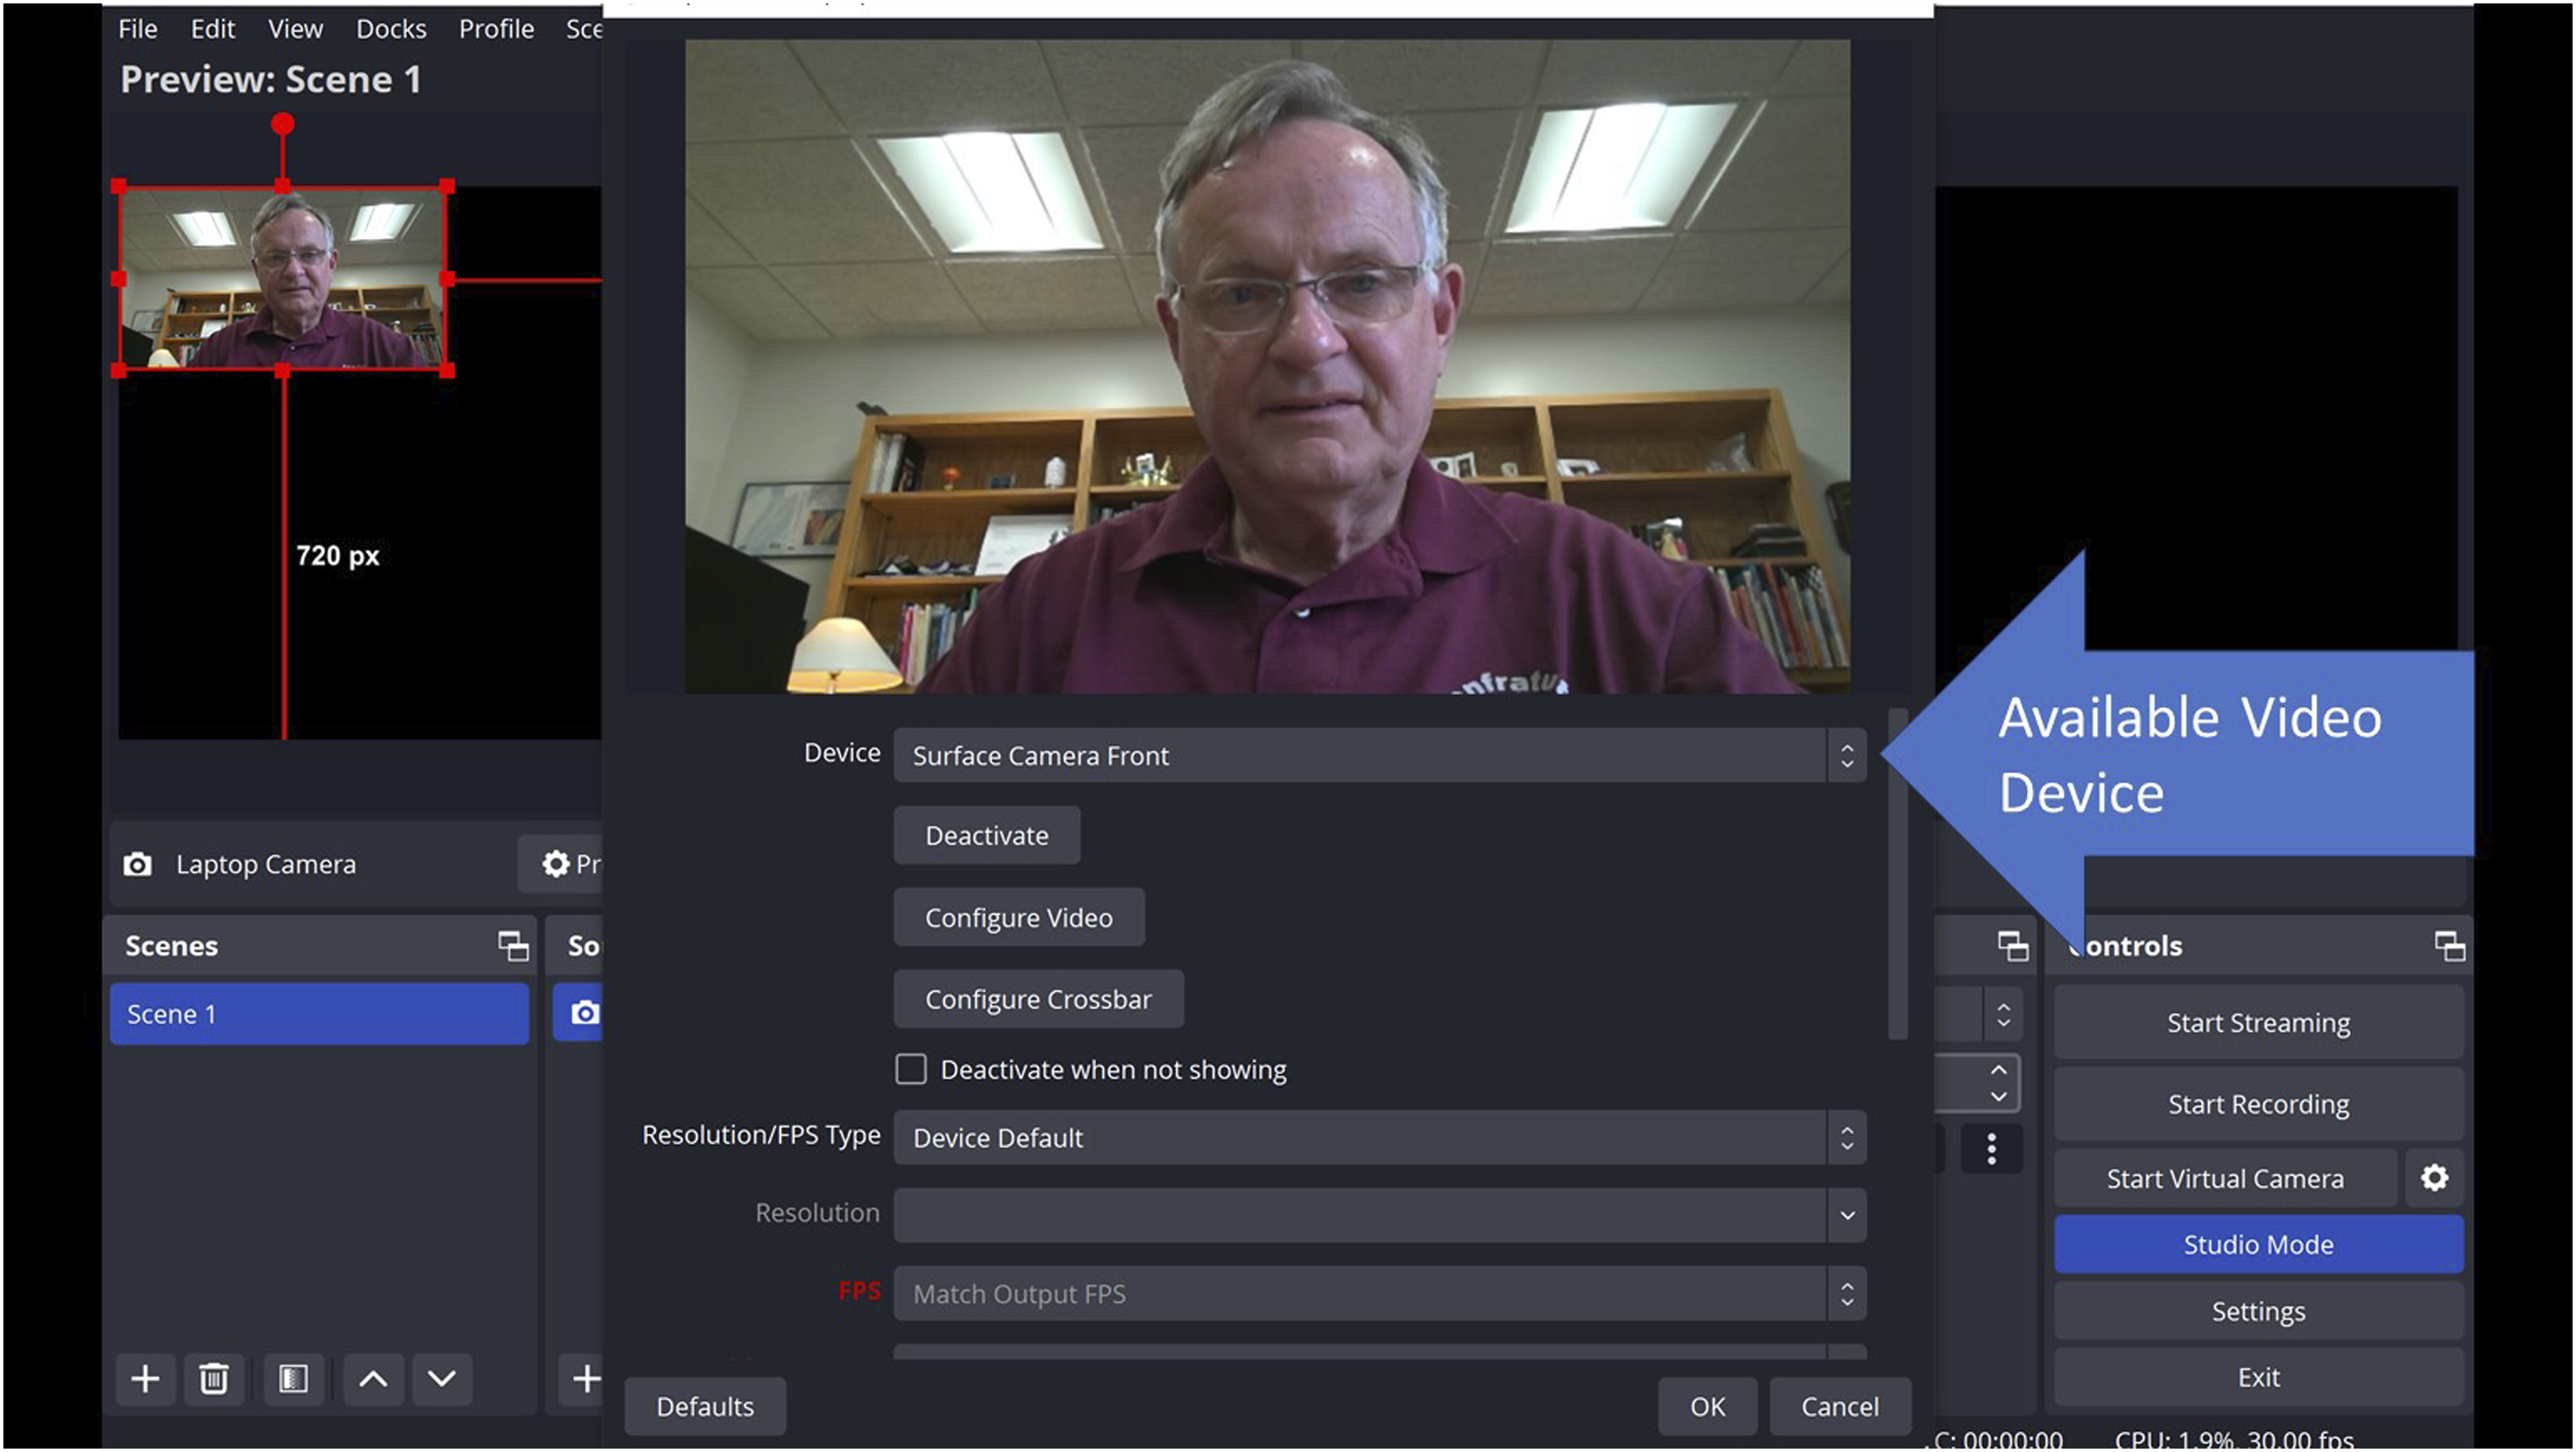
By default, Scene 1 is a blank slate without any sources. To initiate, let’s infuse it with our webcam’s video and audio along with a scrolling title. By clicking the “+” icon at the bottom left of the “Source” pane, we can add a new source to Scene 1. From the ensuing list, we choose “Video Capture Device” (see Figure 2). A dialog box prompts us to select and name the desired Video Capture Device (see Figure 3). For this tutorial, we’re naming it “Laptop Camera” and selecting “Surface Camera Front” (the front camera on the laptop being used to demonstrate OBS Studio; see Figure 4). Upon confirming, the video feed from the Surface camera materializes in the scene. To modify its position or scale, simply drag the webcam image or adjust its corners. Adding a “Video Capture Device” Source to a Scene. Naming a “Video Capture Device” Source. Selecting a Video Capture Device.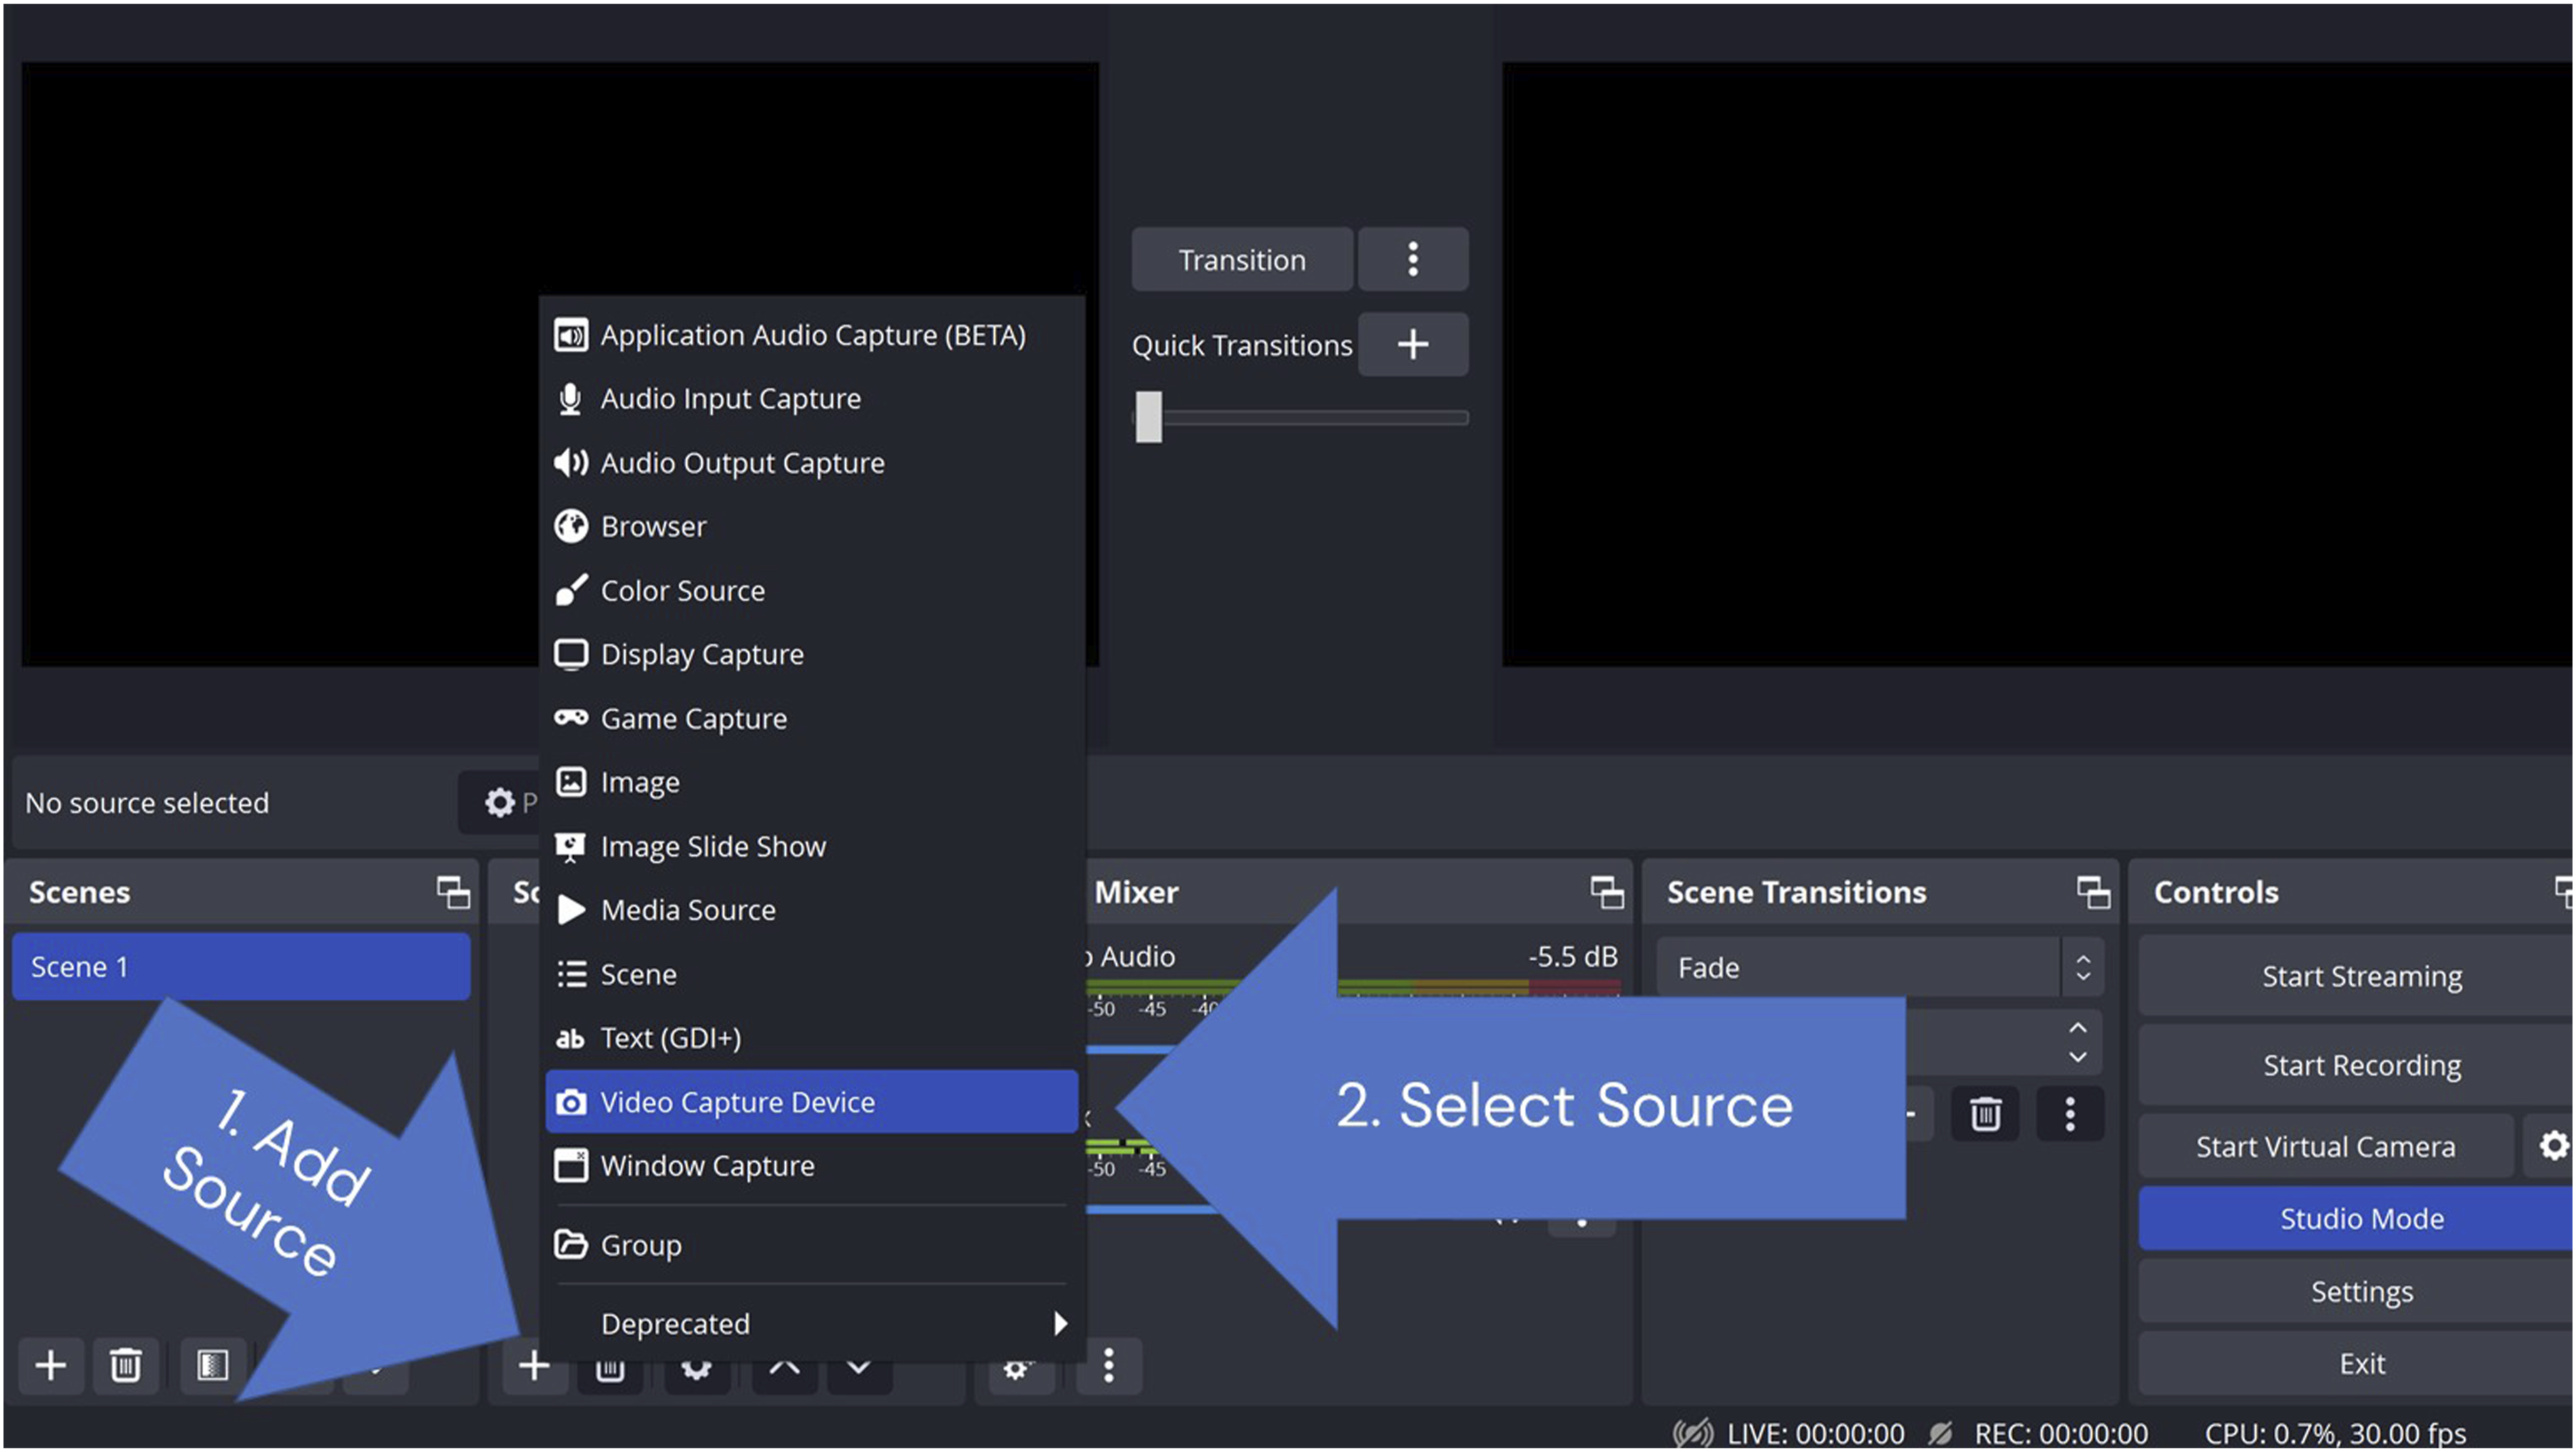
Each source comes with its customizable properties. For example, under “Configure Video” in the properties section, users can tweak video aspects like zooming and exposure. Adding a “Color Correction” from the “Filter” option creates an opportunity to adjust the color balance of a webcam image. When using multiple webcam images of the same scene, it is essential that they share a consistent color balance.
In OBS Studio, audio and video are separate sources. Users might select video feed from a webcam but want audio from a distinct USB microphone. The procedure to embed audio mirrors that of video. Click the “+” icon at the bottom left of the “Source” box and select “Audio Input Capture.” Name the device, approve, and pick the desired audio input from the available list. For simplicity, users often use the audio from their webcam.
Once video and audio are set, we wish to add a title to Scene 1. To superimpose text onto our scene, we hit the “+” button at the bottom of the source window, choose “Text (GDI+),” label the textbox, and press OK. Within the text properties dialog, we can input the desired text, modify font attributes, or apply gradient effects. If we wish for the text to have a scrolling motion, we simply add a scroll filter. To do so, access “Filters,” click on “+,” and choose “Scroll.” The text’s scroll speed can be adjusted to our preference.
For our second scene, we plan to showcase our video host demonstrating a website. This will require three sources in Scene 2. From our previous setup, we’ll incorporate the existing Video Capture Device (Laptop Camera) and Audio Input Capture from Scene 1, and we’ll introduce a new Browser source.
To integrate an existing Video Capture Device, click on the “+” icon located at the lower left of the Source window and choose “Video Capture Device.” Instead of initiating a new source, select the radio button labeled “Add Existing” and pick the “Laptop Camera” we set up earlier (see Figure 5). We apply a parallel procedure of “Add Existing” to select and include our existing Audio Input Capture. Adding an Existing Source to a Scene.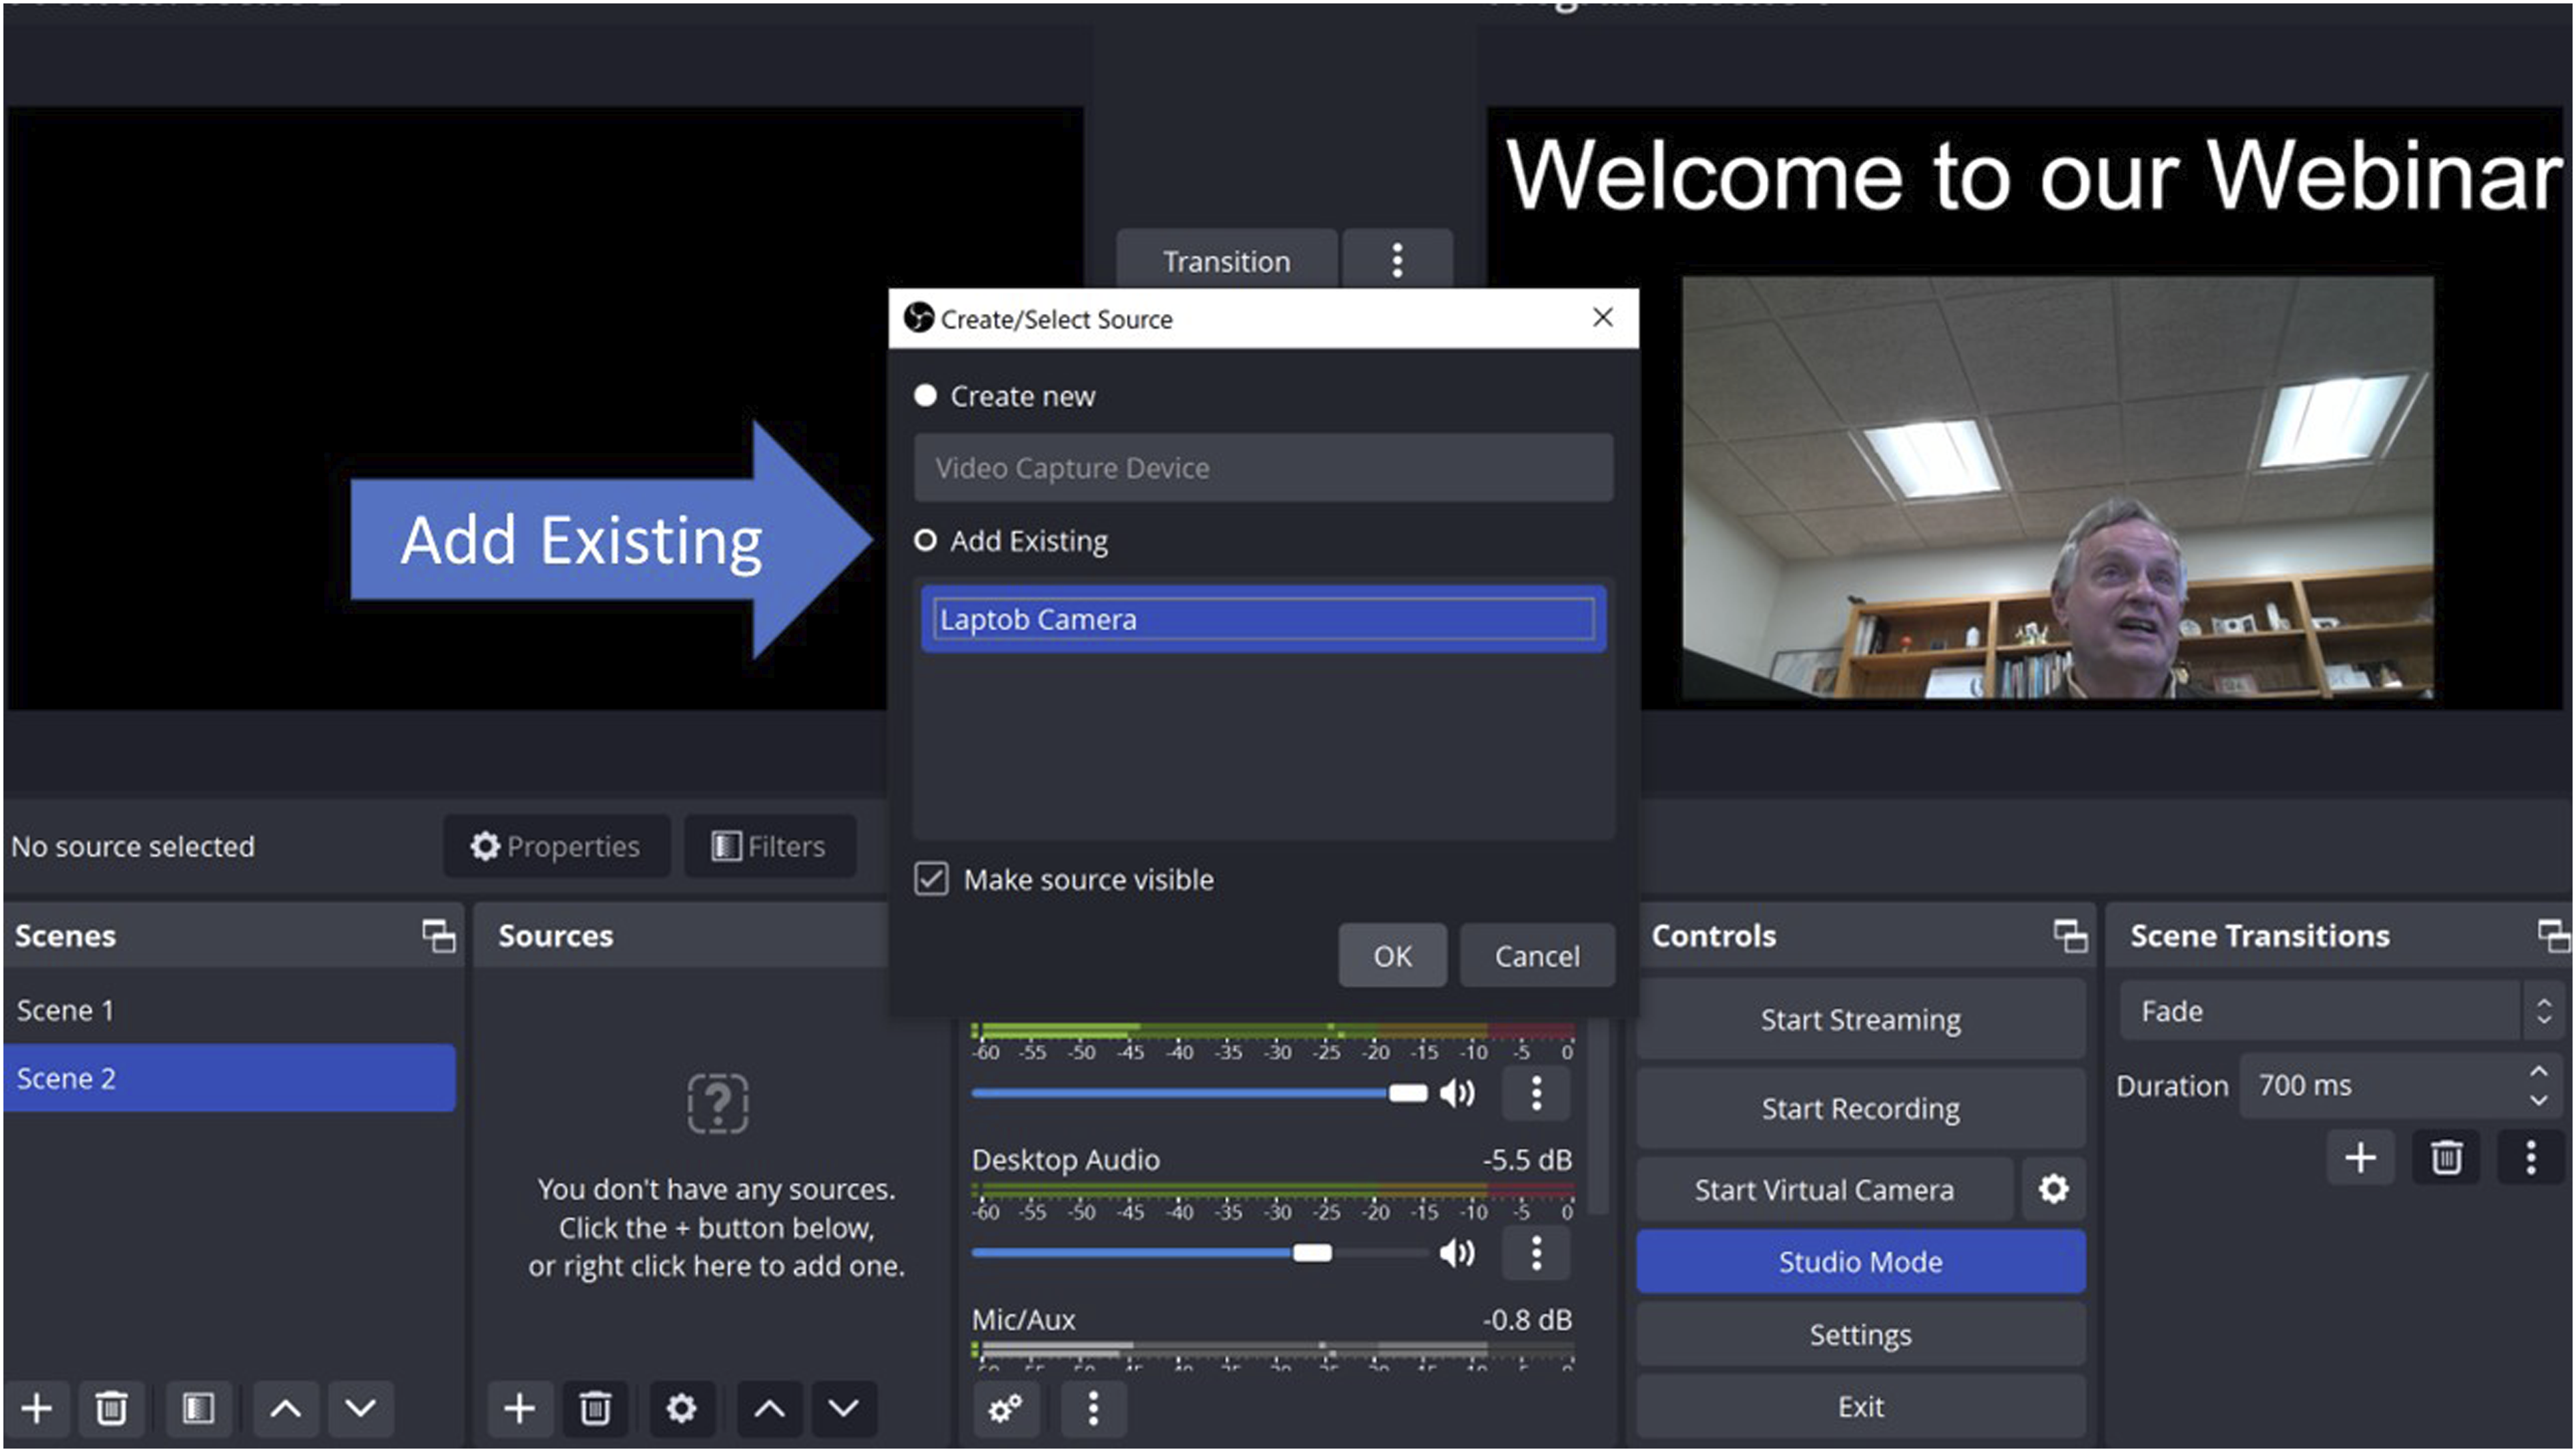
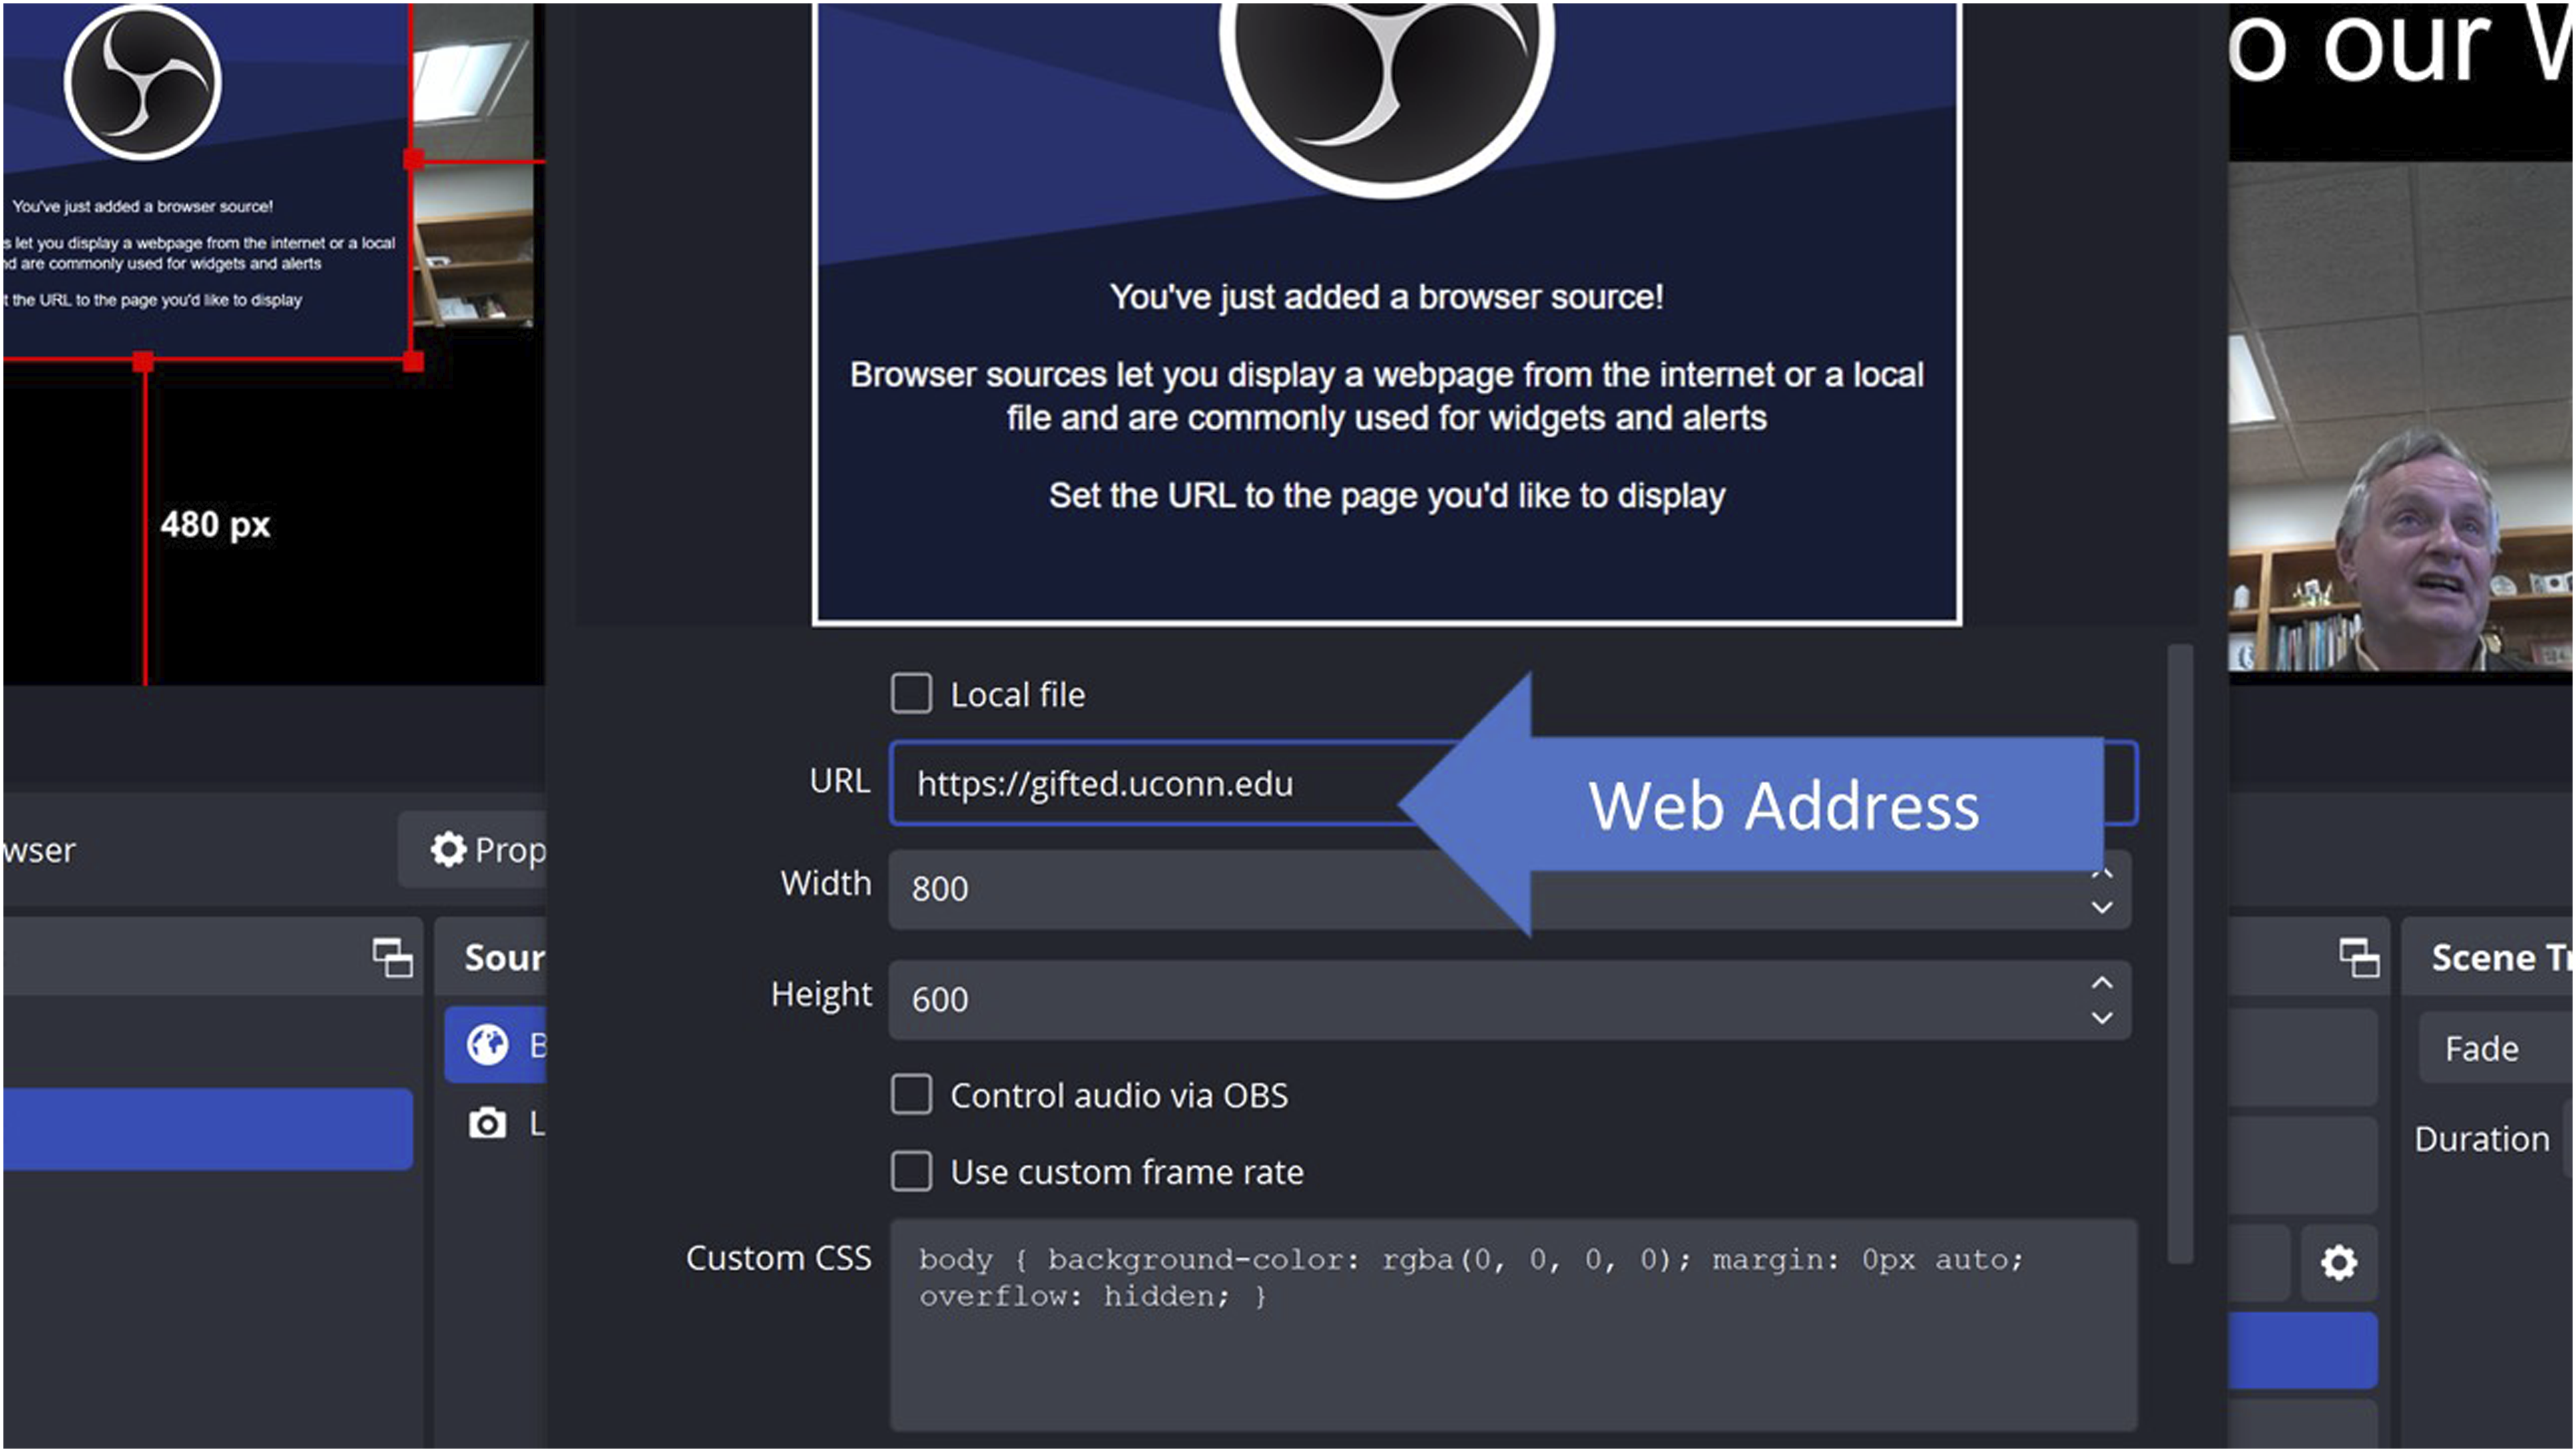
For the new browser source, we click on the “+” sign at the bottom left of the Source window and opt for “Browser” (see Figure 6). After confirming with “OK,” we can input the URL of the website intended for demonstration. We will need to change the address from the default web address provided, which is OBS Studio (see Figure 7). Adding a ‘Browser’ Source to a Scene. Changing the Browser Web Address.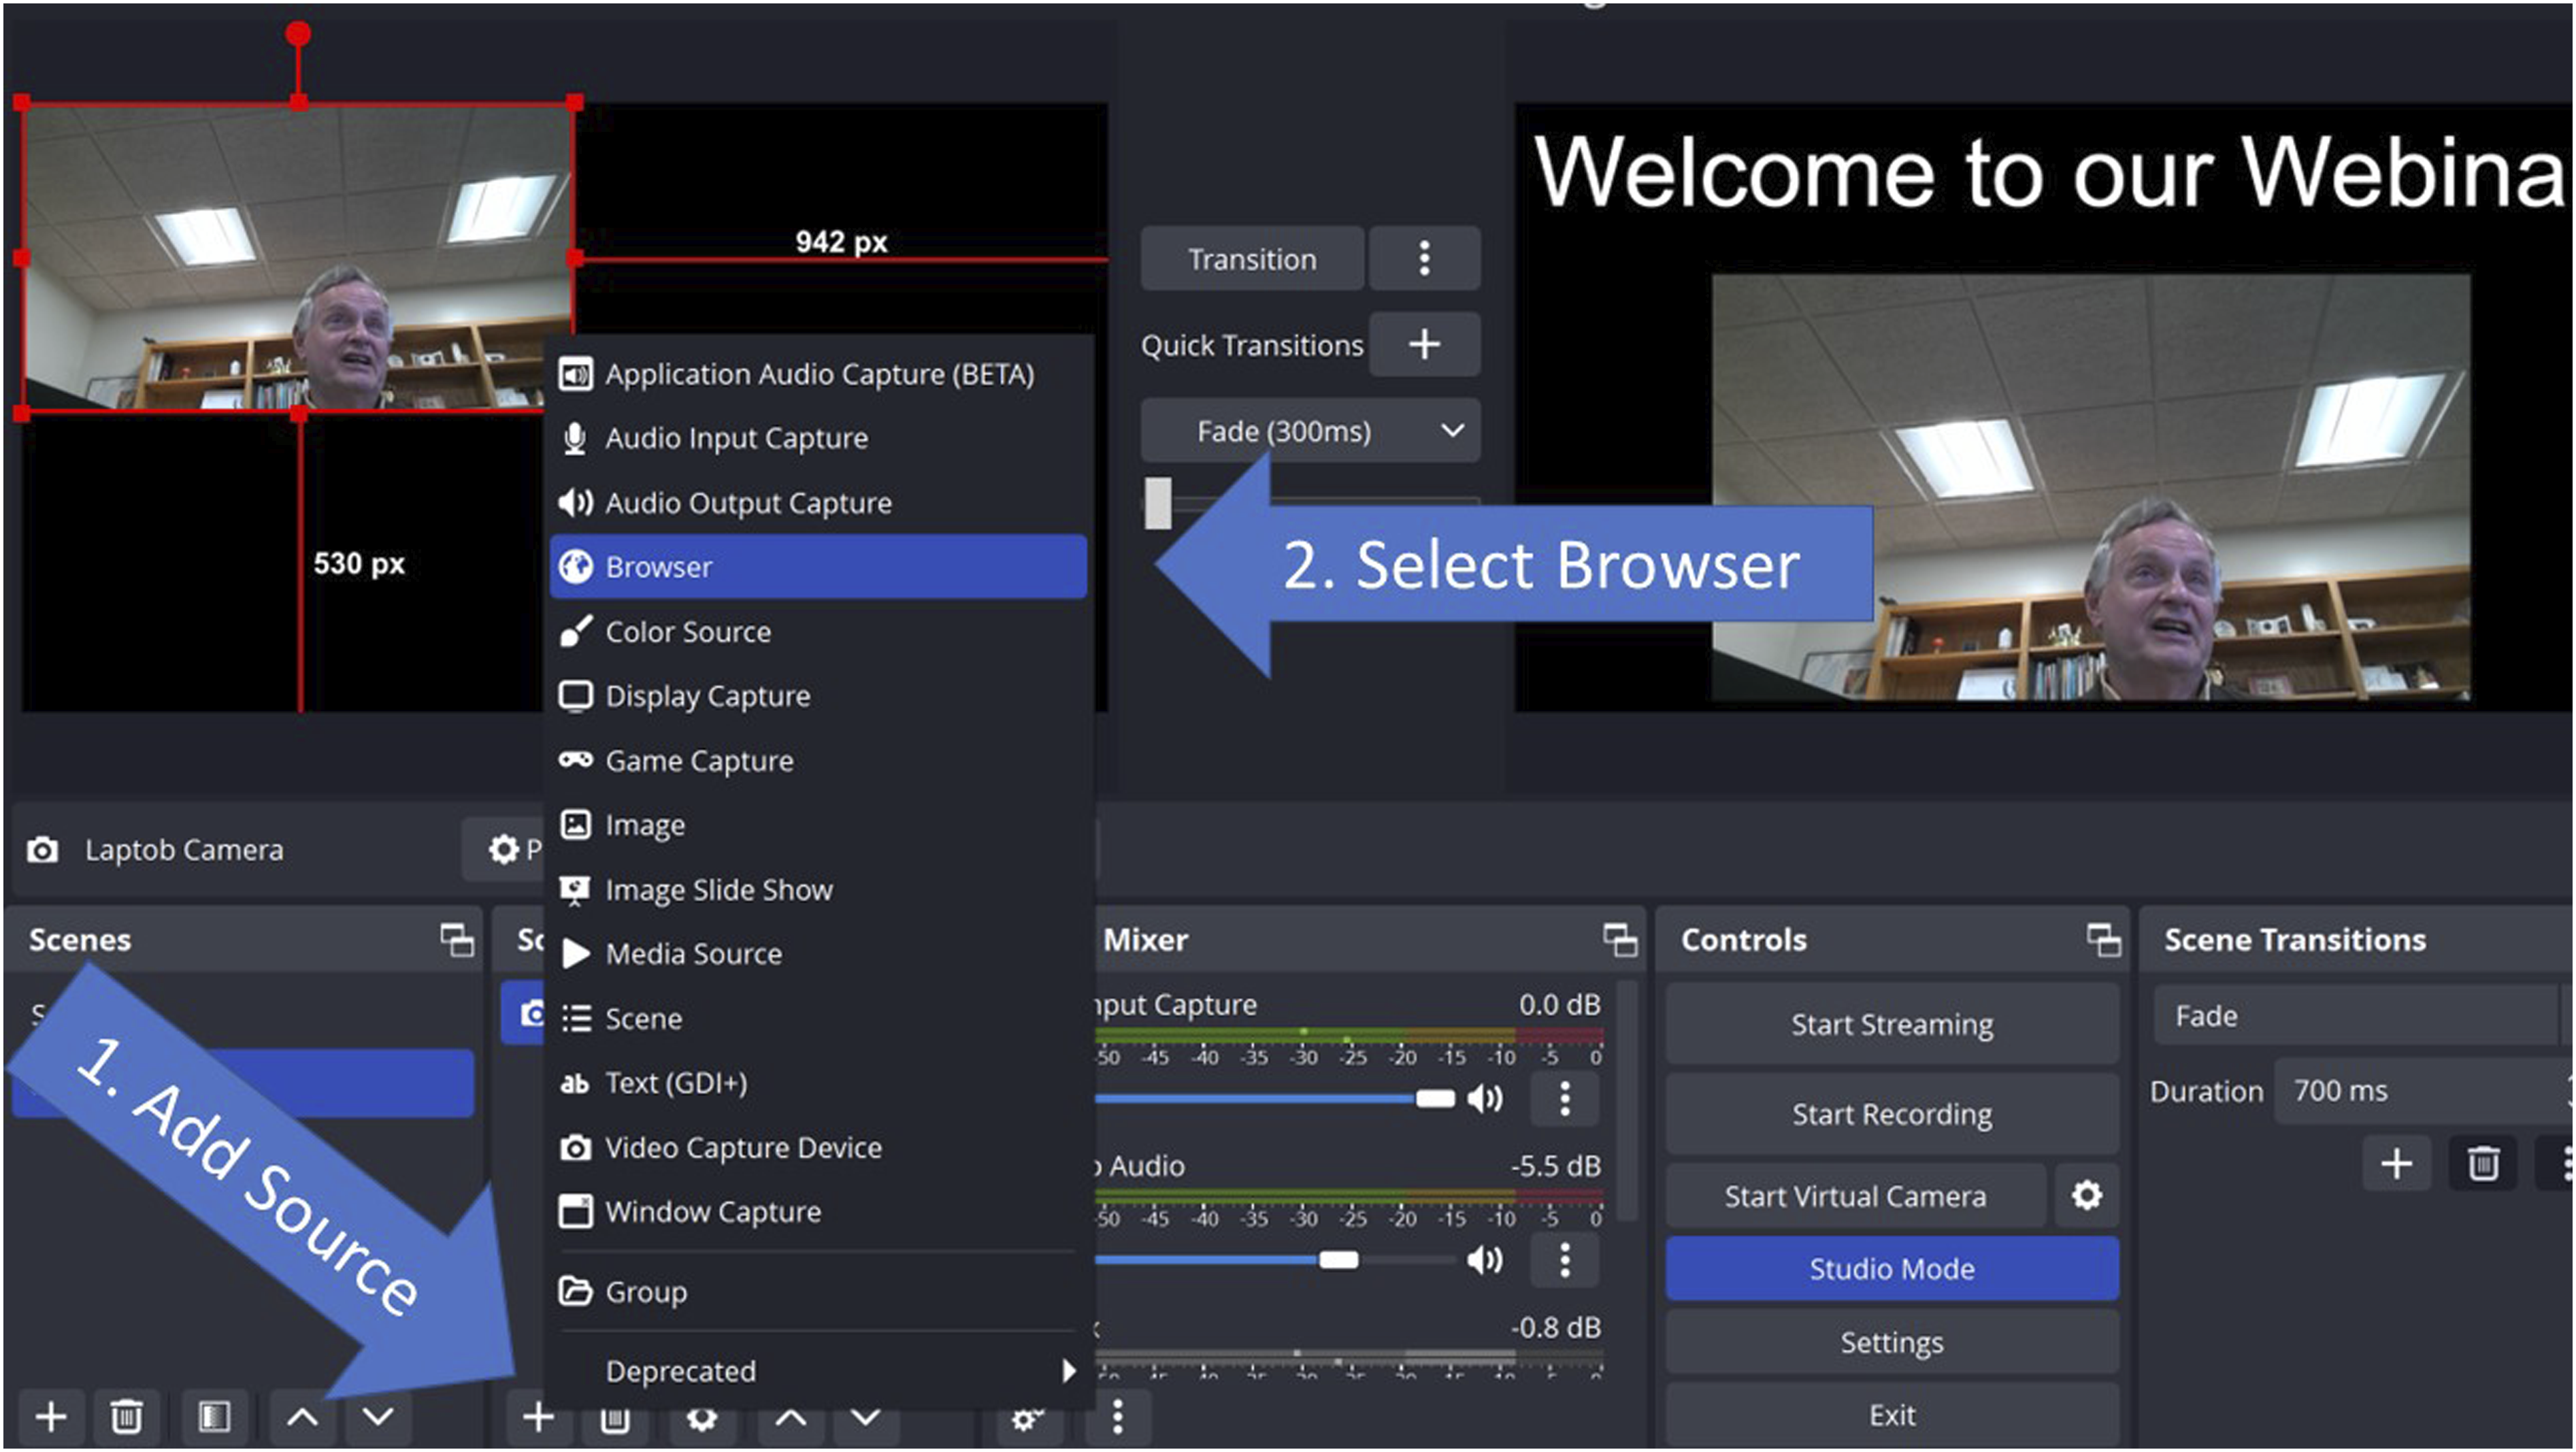
Transitioning to our subsequent setups, Scene 3 entails adding the previously established Video Capture Device (Laptop Camera) and Audio Input Capture, both of which were utilized in Scenes 1 and 2. For Scene 4, we simply integrate the existing browser source from Scene 2.
We now have four scenes we can alternate between during our broadcast. Each source on our scenes has its own properties and settings that can be adjusted, allowing for a great deal of customization in our OBS Studio setup. The combination of these different sources and their properties and filters make OBS Studio a flexible and powerful tool for content creation.
Setting Up a YouTube Feed
In this section, the process of creating a YouTube account, obtaining permission to stream, and setting up OBS Studio with a stream key is detailed. Even for individuals not focused on live streaming, OBS Studio is still an invaluable tool for producing high-quality recorded videos.
OBS Studio offers two primary output modes: video recording and live streaming via a specific stream key. When using the streaming function, there’s also the option to simultaneously record the video. For the streaming capability to work, an affiliated streaming service is required, which then allows OBS Studio to provide streaming content to the service using the stream key. YouTube provides account holders with a complimentary streaming service. Here is a step-by-step guide to setting up streaming on YouTube:
Creating a YouTube Account
Visit youtube.com and select “Sign In.” Follow the prompts to establish an account with Google credentials.
Enabling Streaming for Accounts with Fewer than 1000 Subscribers
The following steps can be used to enable a YouTube account to stream if the user does not have 1000 subscribers: (a) Navigate to YouTube Studio at studio.youtube.com and select “Settings,” (b) Choose “Channel,” followed by “Status and features,” (c) Locate “Live streaming” and select “Enable” if currently deactivated, and (d) Follow the on-screen instructions to verify the account and accept the terms of service. The verification process may take up to a day.
Obtaining a Streaming Key
Once the streaming capability is activated: (a) Access youtube.com and log into the account, (b) Navigate to the create icon (camera with a +) near the top right of the screen, and (c) Select “Go live” (see Figure 8). To obtain the streaming key for OBS Studio, select “Copy” from the “Default stream key (RTMP, Variable).” It is crucial to maintain the confidentiality of the stream key to ensure the security of the broadcasts. Sharing it could compromise the integrity of the streams. Locating a YouTube Stream Key.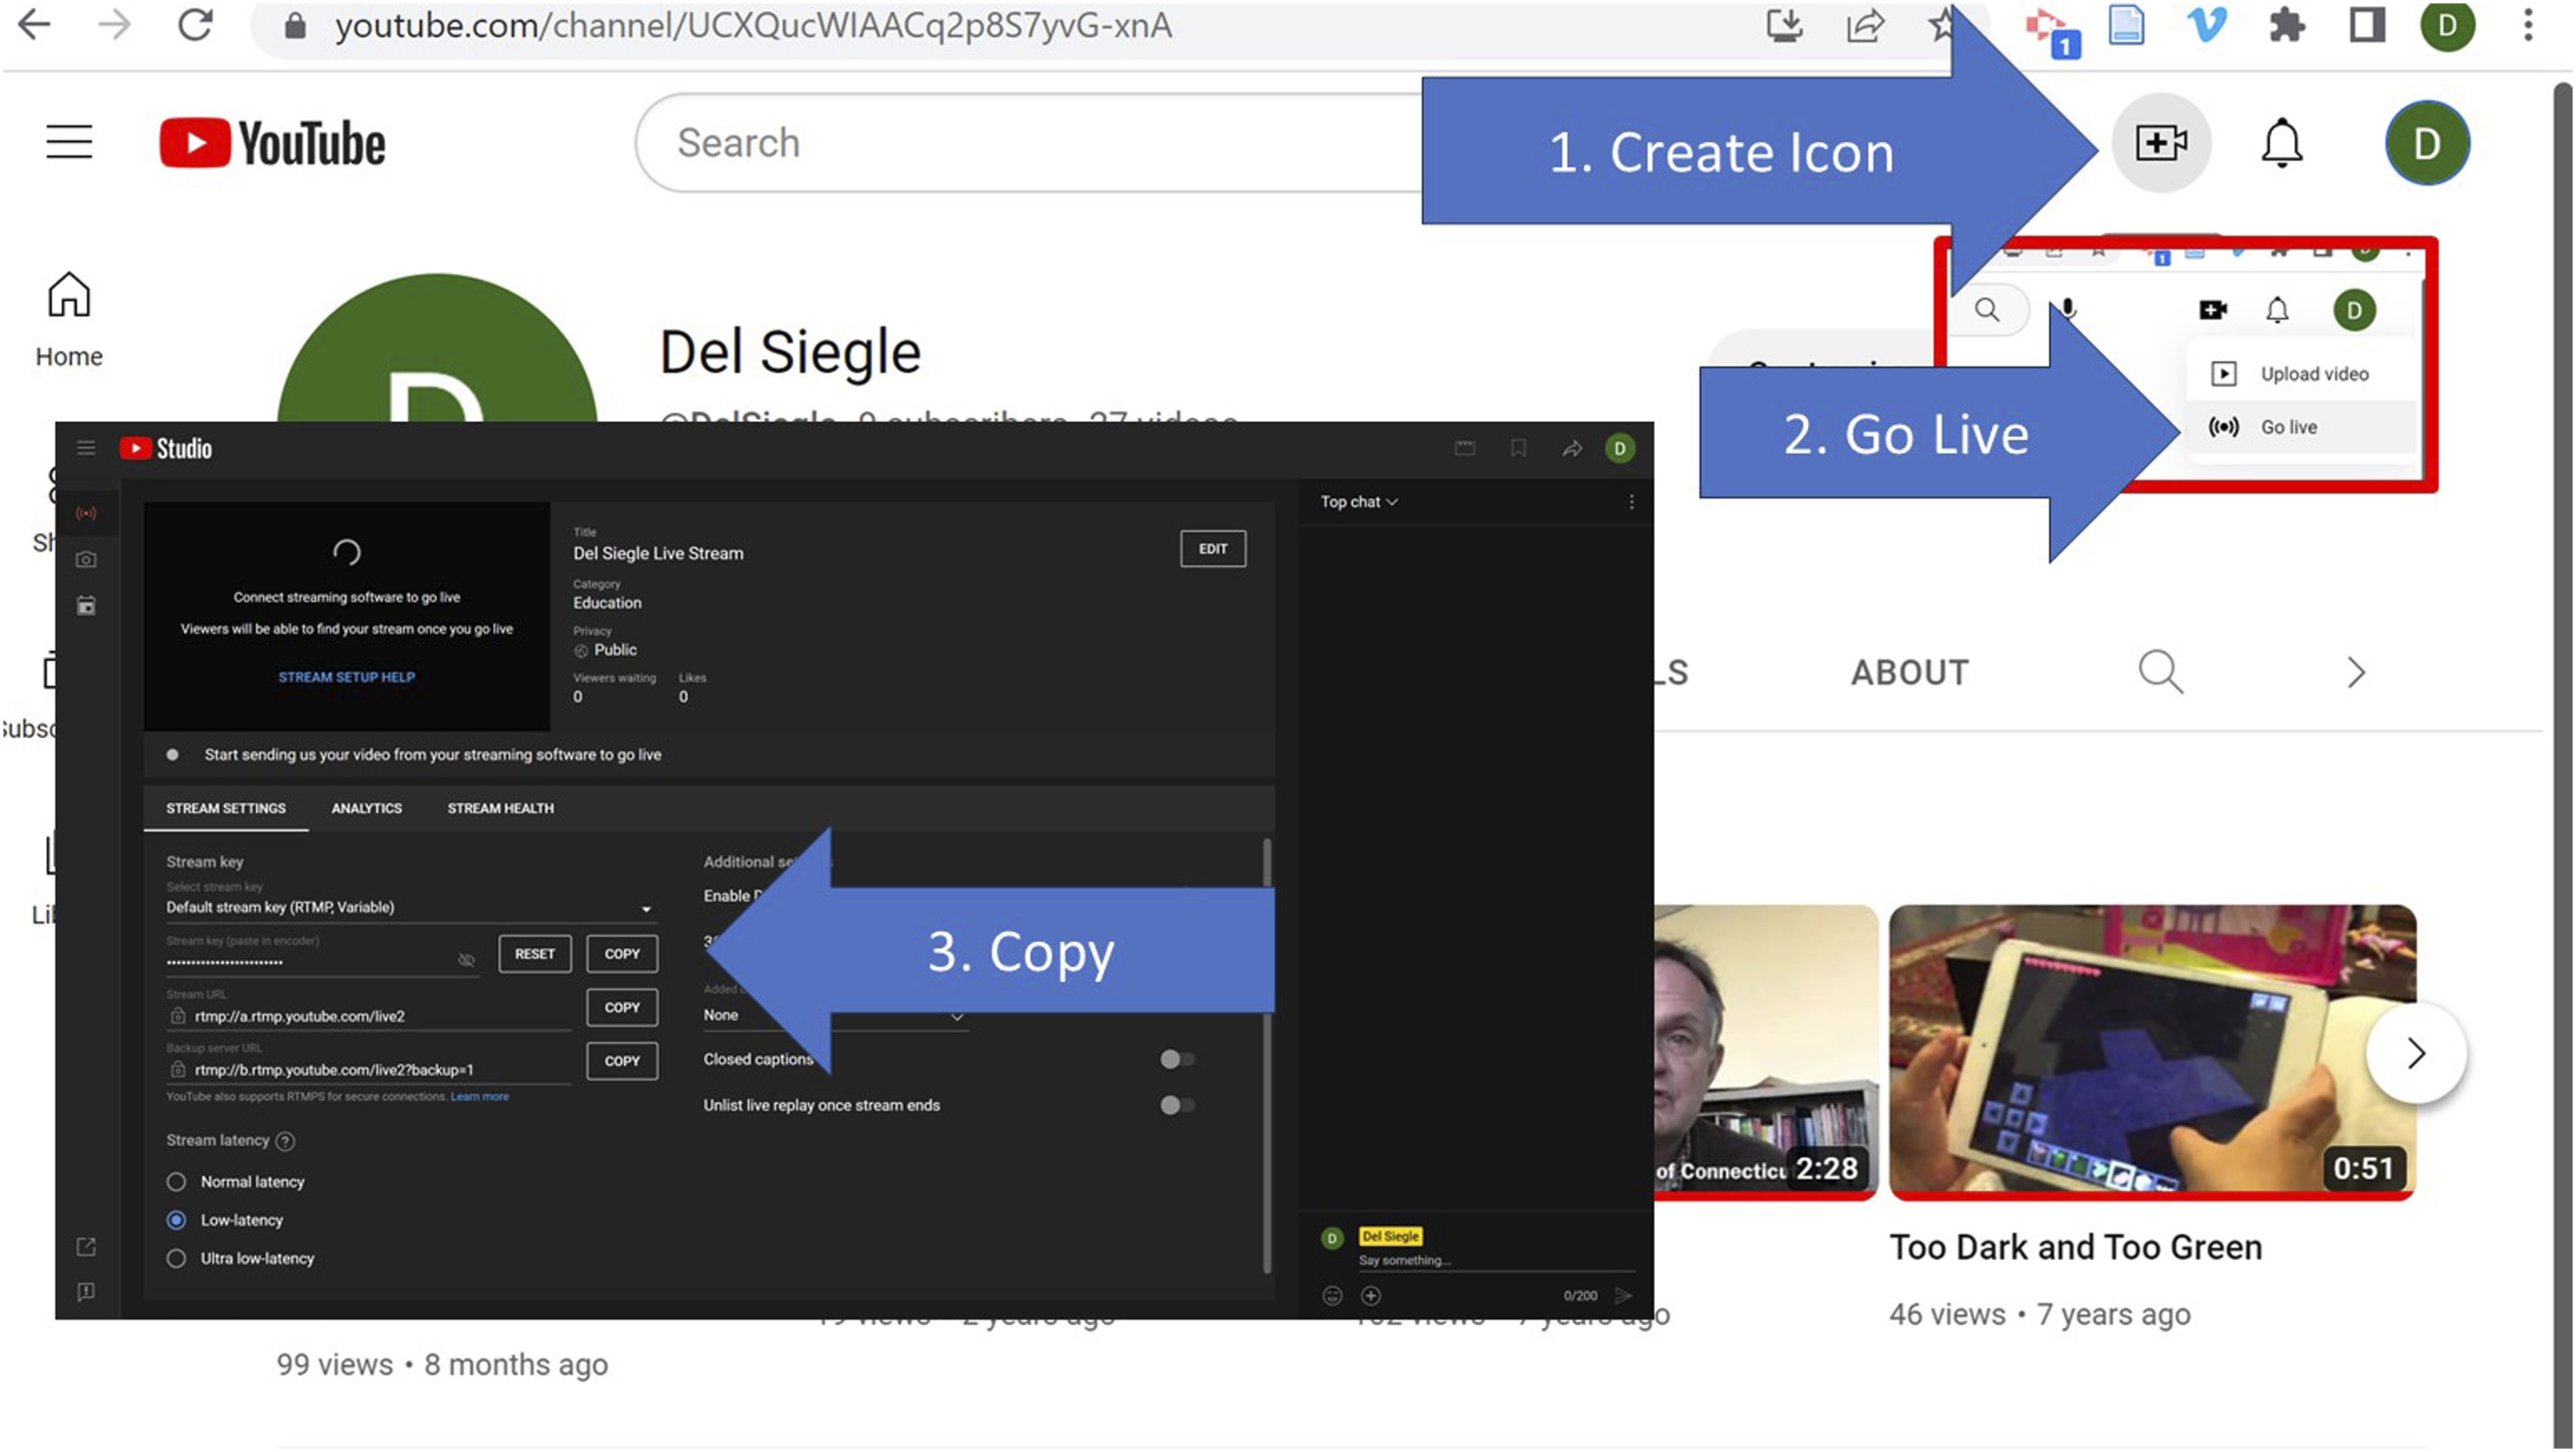
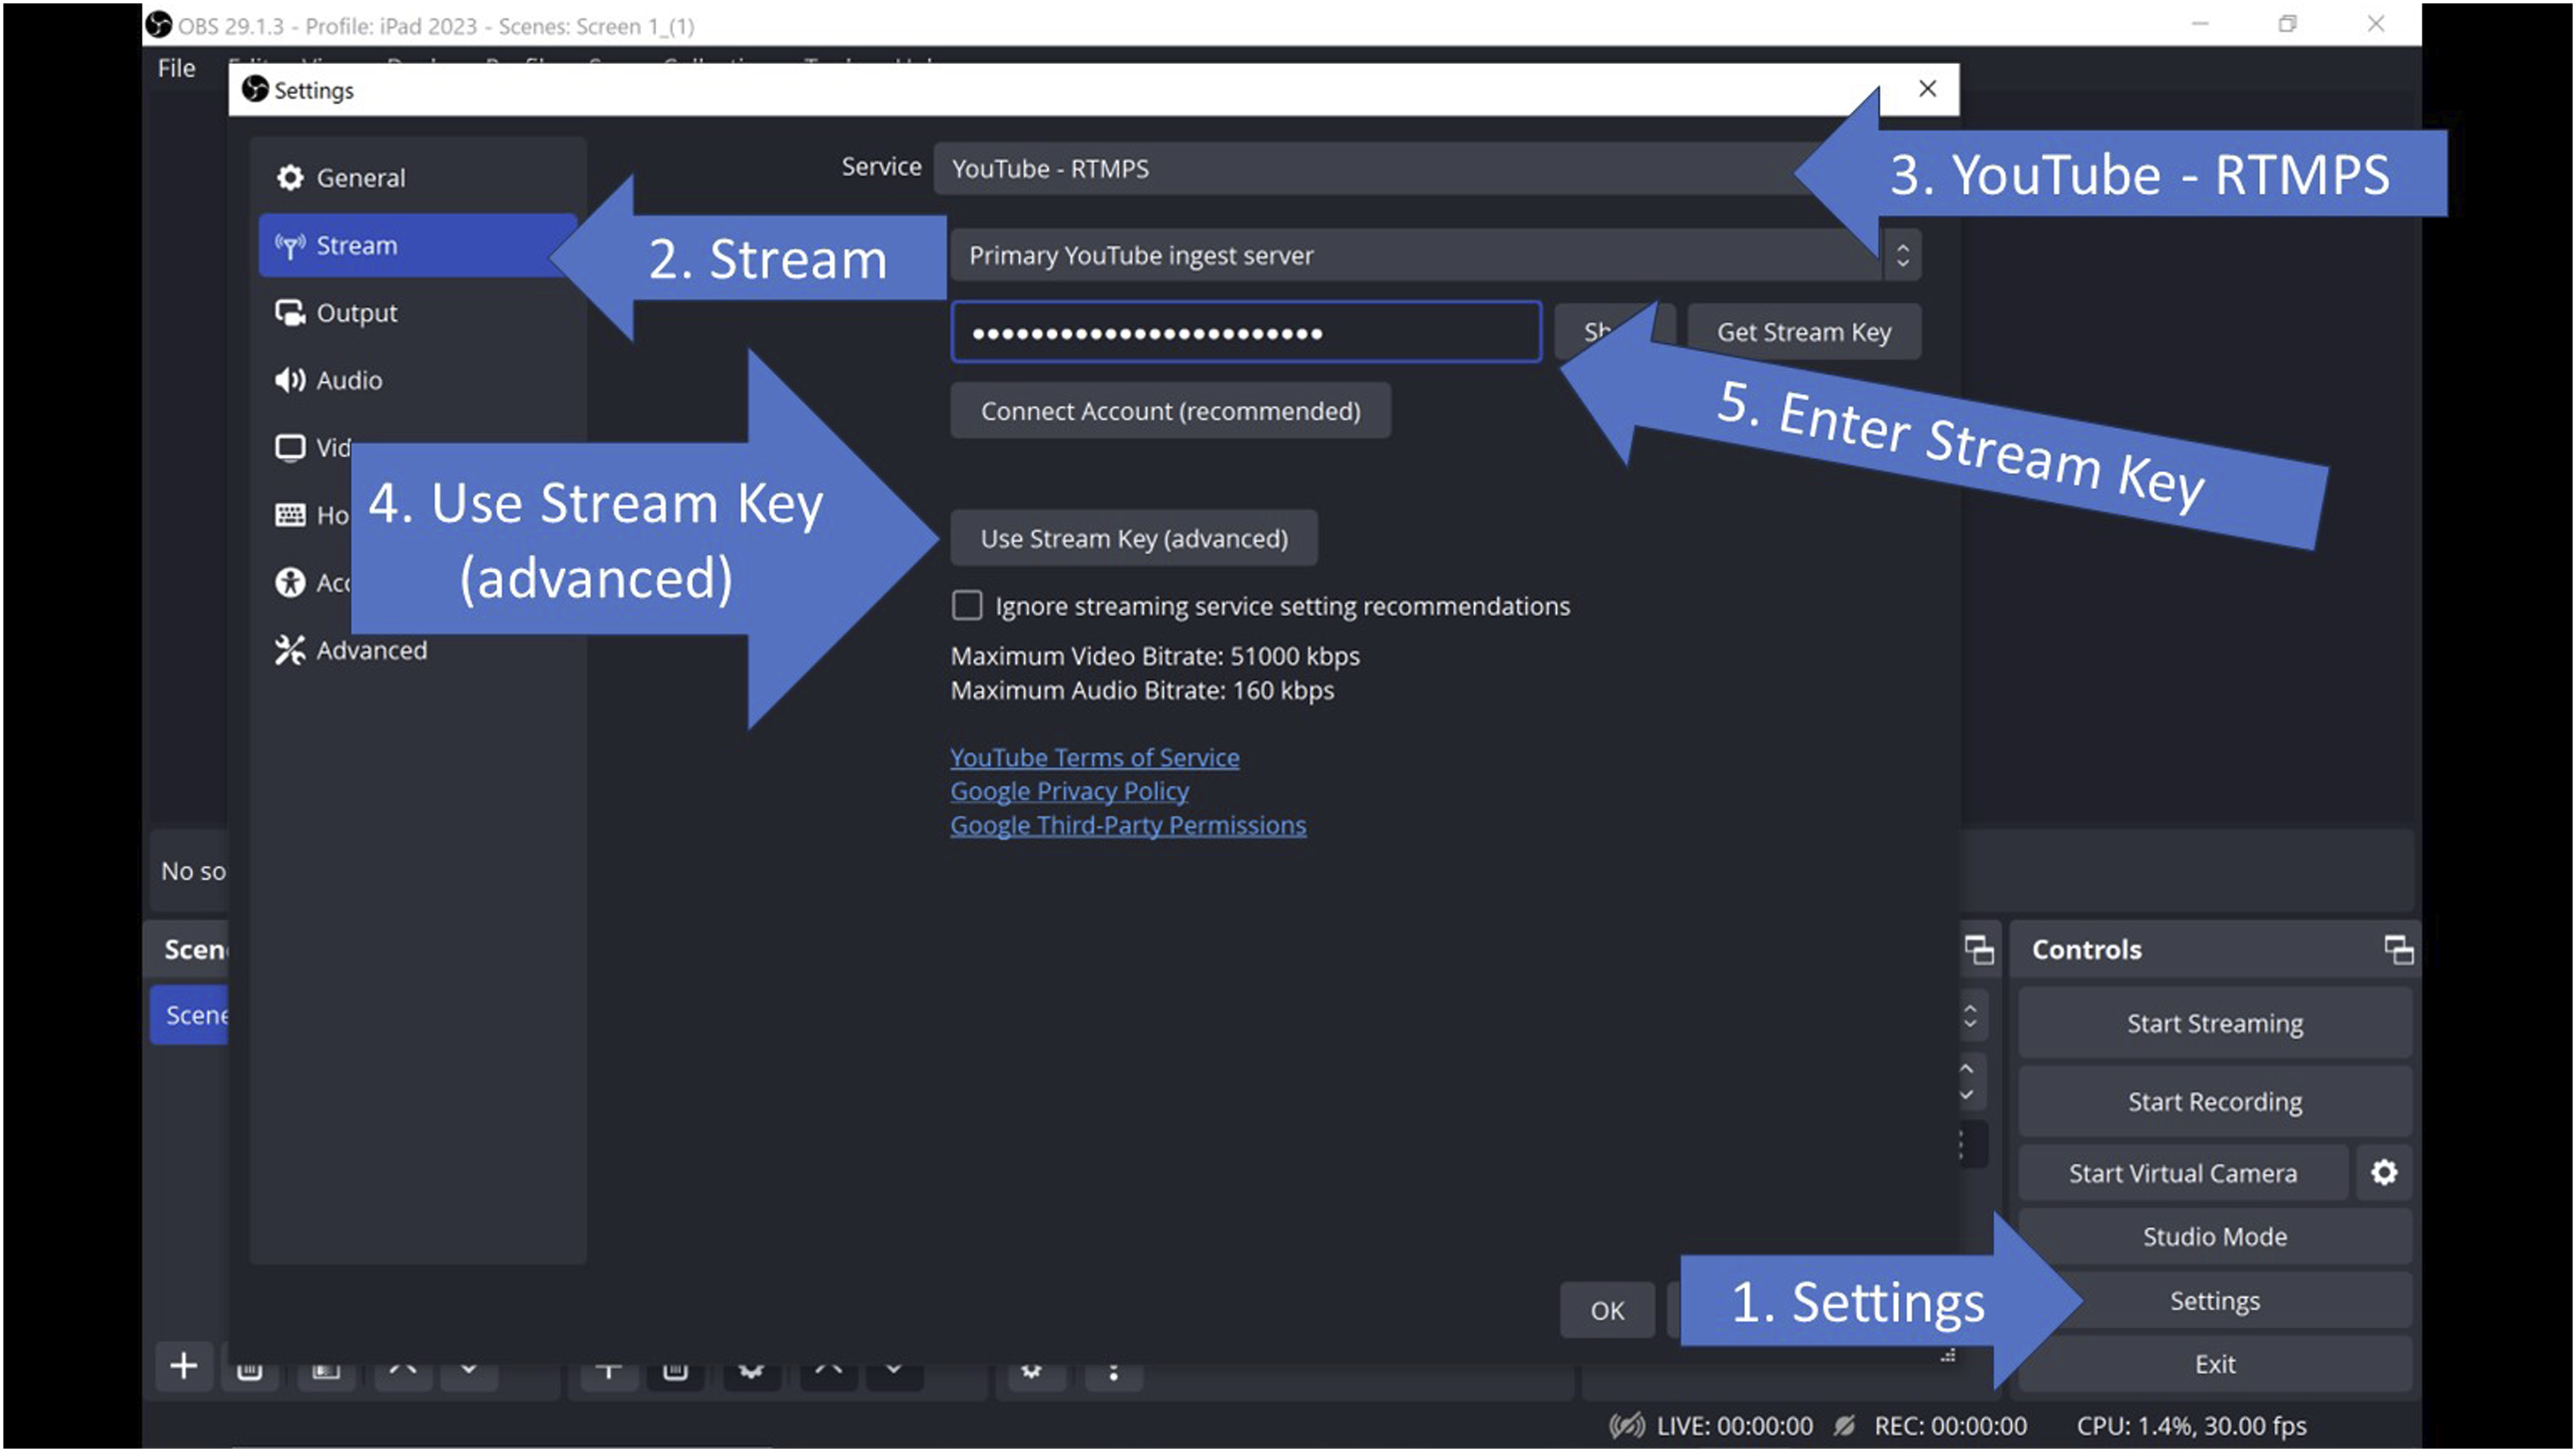
Once the streaming key is copied from YouTube or another streaming service, it’s possible to link OBS Studio to this key. To do so, one should: 1. Click the “Settings” icon located on the far right bottom corner of OBS Studio. 2. Select “Stream” from the dialog box that emerges. 3. Choose “YouTube -RTMPS.” 4. Opt for “Use Stream Key (advanced)” and input the Stream Key obtained from YouTube or whatever streaming service is being used (see Figure 9). Entering a Stream Key into OBS Studio Settings.
Broadcasting and Recording with OBS Studio
Within the dual screen Studio Mode, the left “Preview” window showcases the intended broadcast or recording. The right “Program” window displays the ongoing broadcast once either the “Start Streaming” or “Start Recording” controls are activated. Selecting different scenes allows for a preview in the left window of each scene before broadcasting. Pressing the “Transition” button located between the two screens shifts the scene from the preview window to the program window, initiating the broadcast or recording of the selected scene.
With a user-friendly interface and a comprehensive set of tools, OBS Studio offers a platform that allows for capturing on-screen activities, incorporating various media sources, and broadcasting live feeds. For students, OBS Studio proves invaluable in myriad ways. It facilitates the creation of presentations and digital projects, enabling students to merge visuals and audio in cohesive formats. Gifted and talented students with an interest in technology can use their advanced cognitive abilities and heightened capacity for creativity to leverage OBS Studio in diverse and innovative ways. Some examples include:
Webinars and Workshops
Students can host in-depth webinars or workshops on subjects of their interest, showcasing their expertise and helping peers grasp complex topics.
Research Presentations
For research projects or in-depth studies, OBS Studio can be used to create compelling video presentations, blending slides with live demonstrations.
Artistic Showcases
Gifted students in the arts can stream live performances, whether it’s music, drama, dance, or visual arts.
Language and Literature
Those with a knack for languages can host multilingual streams, poetry readings, or literary discussions.
Digital Portfolios
Students can curate and present their best work, be it academic, artistic, or extracurricular, in the form of a digital portfolio using OBS Studio.
Community and Club Activities
Leadership or community service projects, club meetings, or any extracurricular activity can be streamed or recorded, promoting school or community initiatives.
In essence, OBS Studio can serve as a powerful medium for gifted and talented students to not only express their creativity and expertise but also foster collaborative learning, engage with a wider audience, and make meaningful contributions to their educational community.
Footnotes
Declaration of Conflicting Interests
The author(s) declared no potential conflicts of interest with respect to the research, authorship, and/or publication of this article.
Funding
The author(s) received no financial support for the research, authorship, and/or publication of this article.