
Abstract
The acquisition of skills to perform an ovariohysterectomy (OVH) is crucial for veterinary medicine students. It has been demonstrated that the most effective way to develop these skills is through repetitive training on simulators. Unfortunately, commercial simulators are expensive, limiting their use and highlighting the need for the development of more cost-effective alternatives. This study aimed to assess the effectiveness of a low-cost, easily constructed textile-based simulator for the canine ovaries and uterus in training veterinary students on the OVH technique. The impact of tutor guidance on student learning was also assessed. Participants were divided into two groups: simulator and tutor guidance (SG) and simulator only (SO). Each student performed 20 repetitions of the three-clamp OVH technique, and the number of errors and execution time were quantified. The SG group reached the learning curve plateau in terms of minimum errors on the 7th repetition and attained the fastest time on the 6th repetition. The SO group reached the learning curve plateau in terms of minimum errors and attained the fastest time both on the 15th repetition. From individuals in the SG group, there were no requests for tutor guidance from the 11th attempt. This low-cost simulator is ideal for training veterinary students in the early stages of surgical learning, as it effectively facilitates learning the OVH procedure without the use of live animals.
Keywords
Introduction
The primary method of canine population control involves the surgical technique of canine ovariohysterectomy (OVH). 1 However, recent graduates in veterinary medicine lack the skill and confidence to perform this procedure without expert assistance. 2 Therefore, veterinary surgical training at university should include classes to enable students to acquire the psychomotor skills and confidence necessary for executing this technique. It has been demonstrated that the most efficient methodology for learning this type of technique involves repetitive practice to achieve a learning curve plateau, as mentioned in Ericsson’s theory of ‘deliberate practice’. 3 However, the use of live animals for this purpose is not compatible with the principles of the Three Rs (replacement, reduction and refinement). 4
Despite surgical training simulators being an available alternative to the use of animals for learning and developing psychomotor skills, cost remains the main barrier to their widespread implementation in university education. Commercially available options for training in the OVH technique include: — the SynDaver Surgical Canine® and SynDaver CopyCat® models,
5
sold by SynDaver (https://syndaver.com) and distributed in Mexico by TAQ Medical Systems (www.taq.com.mx), at a cost of US$44,000 and US$6463, respectively; — the K9 ovariohysterectomy (Spay) model (https://rescuecritters.com/product/canine-ovariohysterectomy-spay-model/), which costs US$138 plus export-related costs to the country of interest; — available in Canada only, Veterinary Simulators Inc. (https://www.vetsimulators.com/products) offer the OVH model designed by the UCVM (University of Calgary, Faculty of Veterinary Medicine)
6
at a cost of US$776; — available in Canada only, the ROSSie model
6
(https://www.dasiesurgery.ca/DASIE/DASIE.html) is available at a cost of US$77; — the MOOSE model was designed in Pomona (CA, USA), but there is no information available about its cost.
7
It is worth further highlighting that the last three commercially available models listed above (i.e. the UCVM, DASIE and MOOSE models) are not available in Mexico.
Finally, although there is no information available with regard to its distribution or cost, it is important to mention the LMU (Lincoln Memorial University) model, since it represents an important precedent for the design of a rubric for the validation of a simulator. 8
Simulators are classified based on their anatomical realism and level of functionality, resulting in high, medium and low fidelity simulators. 9 Despite this, any category is considered effective for learning the OVH surgical technique, if the simulator replicates all the steps of the technique and allows for multiple repetitions. It is also preferred that the simulator does not incur significant downstream costs associated with its day-to-day use. 6 In this regard, the SynDaver Surgical Canine®, SynDaver CopyCat® and the UCVM models are in the high-fidelity category due to their faithful representation of the organs (and a functional vasculature in the SynDaver model). 5 However, these models permit only a single repetition of the OVH technique and are expensive to reset. If additional repetitions are required, each replacement of the reproductive apparatus costs approximately US$600 (for the SynDaver CopyCat) or US$1700 (for the UCVM model 6 ).
The medium-fidelity category, in which organs are represented anatomically without functional vasculature, includes the K9 Spay (silicone) and the MOOSE 7 (plastic, neoprene and foam) models, which need to be entirely replaced for subsequent repetitions.
In the low-fidelity category are the ROSSie model 6 (made of fabric and foam), which incurs an additional cost of US$50 for each repetition, and the LMU model 8 (made with fabric and a PVC tube to represent the abdominal wall, and Penrose drain tubing to represent the uterus and ovaries).
For these reasons, several universities have sought to develop ‘in-house’ their own cost-effective low to medium fidelity simulators as alternatives to animal use for training purposes. For most of these simulators, only limited information is available on the costs, materials, fabrication methods and recommended use. Additionally, despite the implementation of user satisfaction and confidence surveys, few studies have evaluated the efficiency of these simulators in establishing an effective learning curve. 10
Finally, supervision and guidance by an expert when performing surgical techniques are important requirements of simulator-based medical education, to assess student performance and adapt learning objectives to meet individual needs. 6 Although students normally receive tutor guidance during the use of the OVH models, to our knowledge, the impact of such guidance has not been assessed.8,10–12
The low-cost simulator evaluated in the current study was constructed by the students from templates and detailed instructions; accompanying instructional videos were also supplied. For these reasons, the simulator is defined as ‘standardised’, since all students tend to build a practically identical model and use it for practising the same surgical procedure. This textile-based canine uterine simulator was used as a didactic tool for training a group of veterinary medicine students in the OVH technique. Additionally, the effect of tutor guidance on the students’ learning was also assessed.
Materials and methods
Textile-based canine uterus simulator
A low-fidelity ‘textile-based canine uterus simulator’, previously developed by our research group, was employed to enhance veterinary students’ training in the OVH technique.
This simulator was primarily constructed from textiles and disposable surgical drapes used as an assembly-base. This enabled the representation of the uterus and ovaries (constructed from felt), the uterine and ovarian arteries (wool yarn), and the key surgically relevant ligaments associated with the female reproductive system (cotton thread and disposable surgical drapes). The uterus and ovary models were assembled inside a cardboard box, which represented the abdominal cavity. The top surface of the abdominal cavity ‘box’ was covered with one layer of latex sheets, which simulated the ventral muscular wall for incision purposes. The simulator did not have functional vasculature and did not reproduce the subcutaneous tissue and skin (which are important steps for a celiotomy surgical approach). However, it did enable the execution of the steps of the OVH technique that are described as essential
7
for the psychomotor development of the students (Figure 1). The OVH procedure, as performed on the textile-based simulator. (A) Representation of the abdominal wall incision. (B) Localisation of (a) the ovary and (b) the suspensory ligament under tension; representation of (c) the right ovarian artery and (d) the uterine artery. (C) Placement of the three clamps according to the OVH surgical technique, i.e. the proximal clamp (e), with the placement of a circumferential ligature (f) below it, the medial clamp-2 (g), and the distal clamp-3 (h), allowing isolation of the ovary for complete removal. The representation of the suspensory ligament is shown as (i).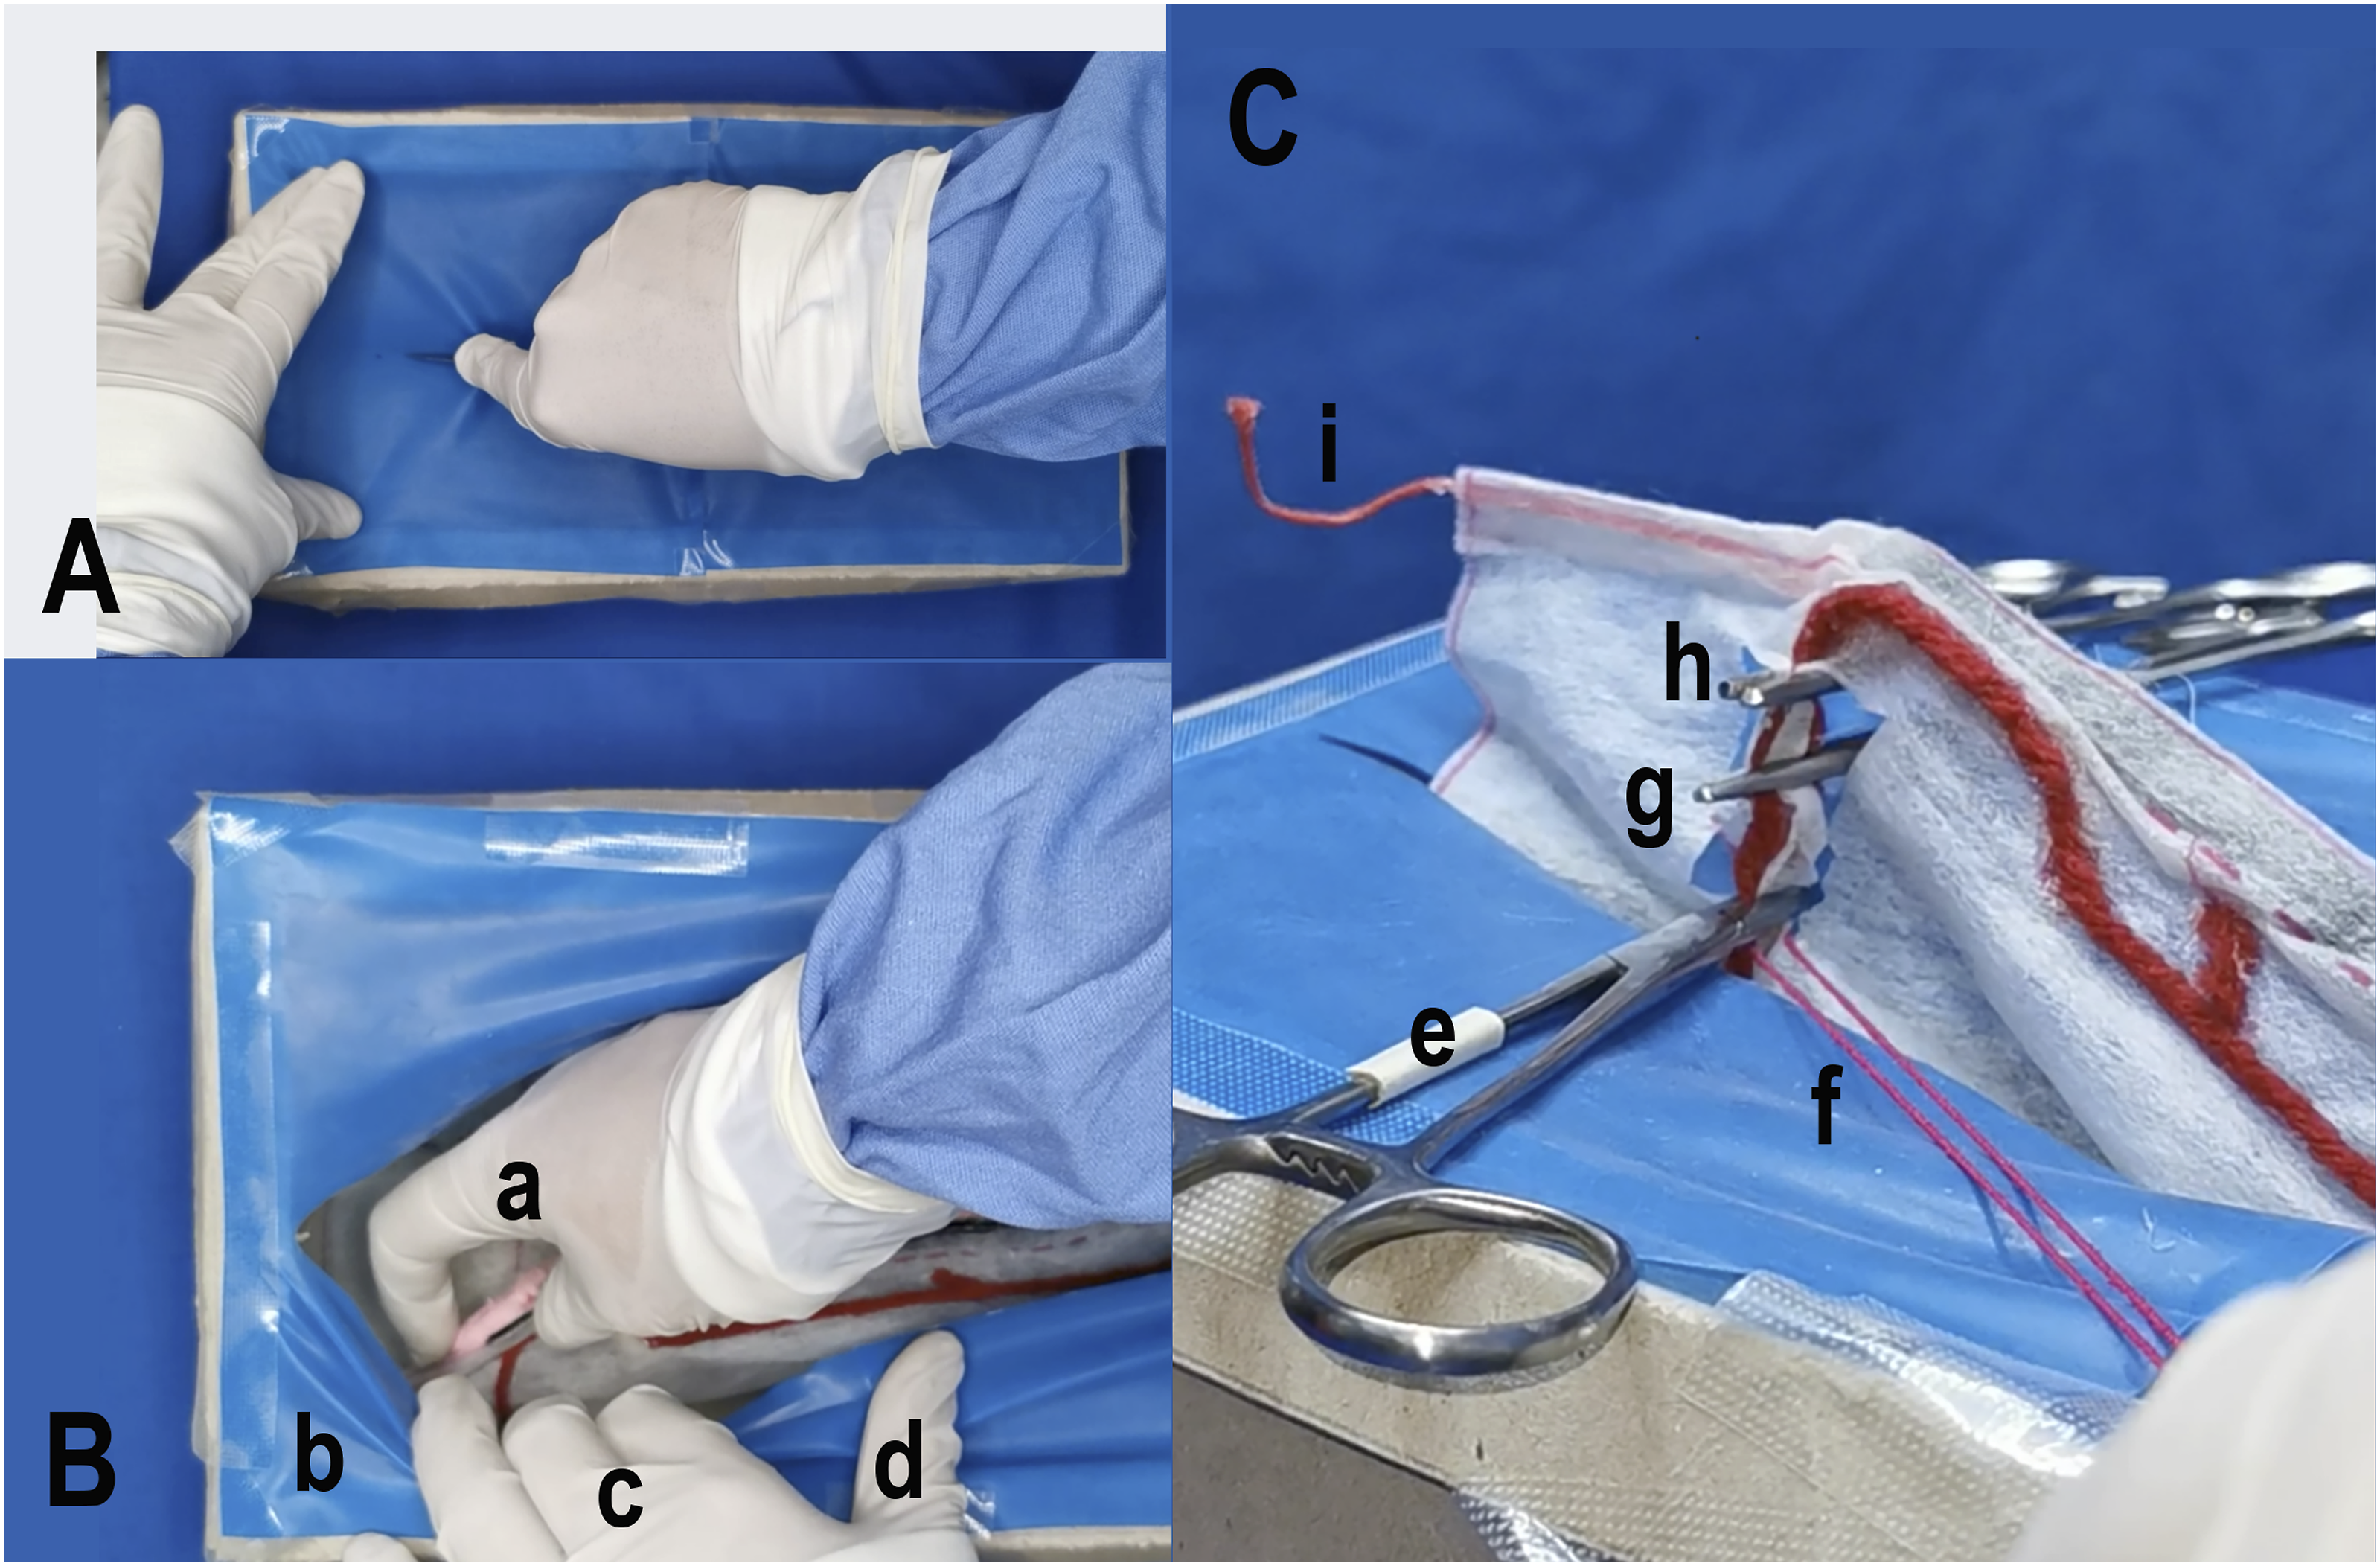
Importantly, it has been proposed that the repetitive use of a simulator can help a student reach a learning curve plateau — i.e. when the technique is performed in the fastest time, with minimum errors — before performing the procedure on a live animal.
5
To help standardise the teaching of the OVH surgical technique through the use of the textile-based simulator, it is recommended that the model is constructed with the help of the digitally supplied assembly guide and pattern templates for each of the components (see Figure 2A), which should be used in conjunction with the instructional videos for student support during the construction process and eventual use of the model (available at: https://publicaciones.xoc.uam.mx/TablaContenidoLibro.php?id_libro=893). Construction of the textile-based simulator. (A) The pattern template guide for the construction of the textile-based simulator from its constituent parts. (B) Four simulators that were created by different students at separate geographical locations, to indicate the level of standardisation in the construction process. (C) Replacement parts for (a) the uterine body and (b) broad ligament, with their associated vasculature (uterine arteries (c) and ovarian arteries (d)), to allow repetitions to be performed.
The templates were created in a pdf format, and the file for each template is available in the corresponding section of the assembly guide (see the general link above). Without adjusting the established settings during printing, the correct size of each template is automatically generated during the pdf printing process, and the necessary scale for each component is thus obtained.
Experimental groups
To evaluate the efficacy of the textile-based simulator as a training tool for the OVH technique, 20 students were randomly selected from the Techniques and Therapeutics in Surgery module of the 5th year of the Veterinary Medicine and Zootechnics degree. None of these students had any prior experience in surgery. As part of their academic programme, the students received instruction on the fundamental principles of surgery. Before undergoing training with the simulator, they completed 50 repetitions of each of the three surgical tasks employed during an OVH (i.e. simple ligature, transfixion ligature and simple continuous suture pattern). These repetitions were part of the students’ general surgical training activities and were carried out on a piece of fabric, cut to simulate a surgical incision.
As part of the academic programme, the 20 students also received didactic instruction on the three-clamp OVH technique. They were then provided with information on how to perform the procedure on the simulator through a 90-minute audiovisual presentation, followed by a 40-minute Q&A session. After the didactic instruction and 50 repetitions of simulated surgical procedures on a piece of fabric, the students were randomly divided into two groups of 10 individuals, assigned as ‘simulator and tutor guidance’ (SG) and ‘simulator only’ (SO). The SO group performed 20 repetitions of the OVH technique on the simulator without assistance, while the SG group also completed 20 repetitions, but had the opportunity to receive personal tutor guidance during each of the 20 repetitions. The didactic and Q&A sessions were conducted by the same veterinarian (a graduate student specialised in the technique, construction and use of the simulator).
Surgical protocol for the three-clamp OVH technique
A standardised protocol for the OVH technique, modified from the report by Read et al. in 2016,
7
was employed. The procedure is divided into three phases: 1) incision of the abdominal wall; 2) performance of the OVH; and 3) closure of the abdominal wall. The second phase (i.e. performance of the OVH) was divided into four general steps, namely: — location and manipulation of the right ovarian pedicle; — location and manipulation of the left ovarian pedicle; — location of the cervix; and — manipulation of the uterine pedicle.
Each of these four general steps were further subdivided into varying numbers of sub-steps (as detailed in the protocol in Appendix Table A1).
It is important to highlight that the simulator only includes the muscular layer of the abdominal wall, making it impossible to perform the abdominal three-layer approach and closure (as it does not include subcutaneous tissue or skin).
Evaluation of surgical technique performance
The time required to complete each of the three individual phases of the surgical procedure, as well as the total time taken, were recorded. To evaluate surgical technique performance, the documented variables were: the completion time for each phase of the OVH procedure (in minutes); the number of errors; and the frequency of requests for tutor guidance during each of the three phases of the procedure (i.e. incision of the abdominal wall, performance of the OVH, and closure of the abdominal wall) (Appendix Table A2). A countable ‘error’ was defined as when a student did not perform a particular step of the surgical protocol correctly, or lacked the necessary competency to complete it.
The number of errors was quantified according to the approach described by Annandale et al.,
11
with the approach being modified in accordance with the OVH procedure. The students’ learning progress was thus evaluated throughout the three phases of the OVH procedure, with a number of assessment criteria assigned to each of the phases, based on the steps and sub-steps in the protocol described above. Thus, for evaluation purposes, there were a total of 28 assessment criteria, comprised of: — Phase 1: Incision of the abdominal wall (two criteria); — Phase 2: Location and manipulation of the right ovary (seven criteria), location and manipulation of the left ovary (seven criteria), manipulation of the broad ligament (two criteria), location of the cervix and manipulation of the uterine pedicle (seven criteria); — Phase 3: Closure of the abdominal wall (three criteria).
These are described in further detail in Appendix Table A2.
After identifying an error, the student was provided with tutor guidance and then continued with the procedure. These tutor guidance requests were also quantified as part of the student evaluation. The assessment criteria were judged, and the associated data recorded, by three observers per student, with the aim of avoiding individual bias. These observers were academics with experience in the teaching of surgical techniques (including OVH), as well as in the construction and use of the simulator. They had also undertaken specific training, to help ensure that the student assessments were standardised. This observer training included practical sessions to familiarise them with the specific assessment criteria and ensure consistency in the application of the scores. In addition, possible discrepancies in the interpretation of the criteria were discussed and resolved to improve inter-observer reliability.
Statistics
Because the data are non-parametric, the median and standard error (SE) were calculated for the total time taken (in minutes) to perform the full surgical procedure (incision, OVH and closure), as well as for the number of errors (with a possible maximum of 24 errors).
Data normality was assessed by using the Jarque–Bera test, followed by the Kruskal–Wallis test and SE calculation for each experimental group (SO and SG). Regarding the tutor guidance requests, the median was calculated for the total number of steps requiring assistance, along with the SE, and a Kruskal–Wallis test was conducted. A significance level of p < 0.01 was employed, and the statistics software PAST was used. 13 After obtaining the results of the first attempt, a Mann–Whitney U test was performed to determine the statistical difference between the results of the two experimental groups (data not shown). Since no statistical differences were found between the SO and SG groups after repetition one, it was considered that both populations were similar in their abilities. Thus, the study was continued, in order to measure the effect of training with guidance, up to repetition 20.
Results
Procedure completion times
The OVH procedure completion times and the extent of errors made, during the 20 practice sessions with the simulator.
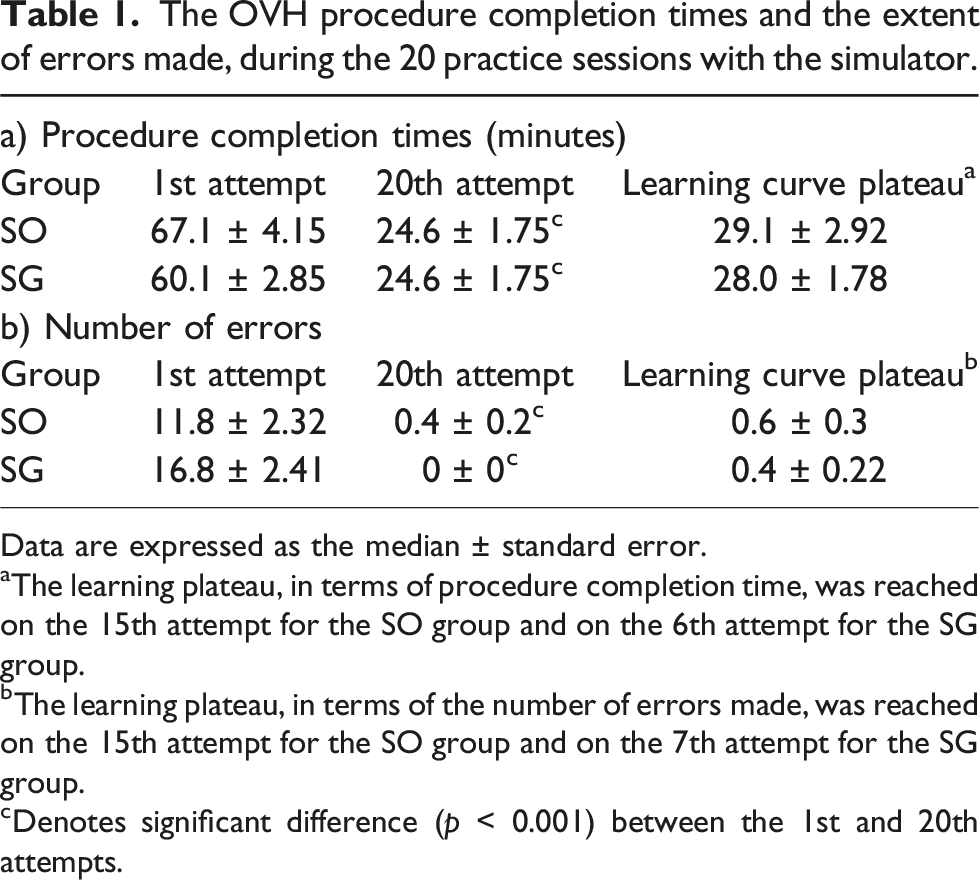
Data are expressed as the median ± standard error.
aThe learning plateau, in terms of procedure completion time, was reached on the 15th attempt for the SO group and on the 6th attempt for the SG group.
bThe learning plateau, in terms of the number of errors made, was reached on the 15th attempt for the SO group and on the 7th attempt for the SG group.
cDenotes significant difference (p < 0.001) between the 1st and 20th attempts.
The group that had access to tutor guidance (the SG group) performed the procedure in an average of 60.1 ± 2.85 minutes and 24.6 ± 1.75 minutes on the first and final attempts, respectively. However, from the sixth attempt, no statistical difference in the time taken was observed (p value = 0.001). It is considered that this group reached the learning curve plateau after six repetitions, with an average time of 28.0 ± 1.78 minutes. This corresponded to a 53% reduction in the procedure execution time, relative to that of the first attempt (Table 1a).
The extent of errors
The group without tutor guidance (the SO group) made an average of 11.8 ± 2.32 errors (median ± SE) on the first attempt, and 0.4 ± 0.2 errors on the final attempt. From the 15th repetition, no statistical difference in the number of errors was observed (p value = 0.001). Therefore, this group reached the learning curve plateau after 15 repetitions, with 0.6 ± 0.3 errors (Table 1).
The group with guidance (SG), made an average of 16.8 ± 2.41 errors during the first attempt, while in the last attempt, no errors were committed. From the seventh attempt, no statistical difference in the number of errors was observed (p value = 0.001). Therefore, this group reached the learning curve plateau by the seventh repetition, with 0.4 ± 0.22 errors (Table 1).
Requests for tutor guidance
The number of requests for guidance by the SG group, during the 20 practice sessions with the simulator.

aDenotes significant difference (p < 0.001) between the 1st and 20th attempts.
SE = standard error.
Discussion
The canine OVH simulator 12 proved effective for use in teaching the OVH surgical procedure to the veterinary medicine students who participated in the current study.
The study showed that, in order to perform the surgical procedure with minimal error (i.e. reach the learning curve plateau), students who receive tutor guidance in combination with simulator practise need to execute the procedure seven times, while those without tutor guidance reach the same level after 15 attempts.
When students practised the technique with the simulator only and no tutor guidance (i.e. the SO group), they needed 15 repetitions to attain the fastest performance time (29 minutes). In contrast, when students receive guidance (i.e. the SG group), they reach the learning curve plateau after six repetitions (with a time of 28 minutes). This represents a highly significant improvement in efficiency, attributed to the provision of additional tutor guidance to the students. The procedure performance time reported by Hunt et al. 8 was 35 minutes, which is similar to that reported in this study (29 and 28 minutes for the SO and SG groups, respectively). In this regard, it should be noted that the time taken to perform the OVH procedure on a simulator, as compared to on a live animal, may be very different. In fact, Annandale et al. 11 reported that the average time for performing the OVH procedure on a live animal (after training on a simulator) was 140 minutes.
The study showed that the students with guidance performed the procedure without errors on the seventh attempt, while those without guidance needed 15 attempts to reach the same level of competence. Therefore, we propose that students develop their psychomotor skills more rapidly when simulation training is complemented by tutor guidance. Several studies have assessed the psychomotor skills of students, trained with and without simulators, during sterilisation procedures.6,10,11 Although some studies used quantitative tools and provide compelling data in favour of the use of OVH simulators in the development of psychomotor skills, they did not analyse the specific benefit of guidance alongside simulator use in the development of an effective learning curve.6,7,10,11,14,15 Regarding training on simulators with guidance, the specific characteristics and extent of the guidance that is required to reach the learning curve plateau, have not been clearly defined.6,10,11 Badman et al. 12 mention that they included a single personalised guidance session for each student while using a simulator, but did not standardise when the guidance was provided (i.e. at which attempt number). Therefore, it may not have been equally relevant for all students. 12
In this context, the current study suggests that incorporating tutor guidance into student training with the simulator enhances their learning efficiency by reducing the number of errors to zero after a lower number of repetitions. This is consistent with the findings of Guerra et al., 15 who observed that repetitive guided practice with simulators enables students to address their doubts, fostering the development of confidence during the surgical procedure. In the current study, at the start of the simulator practice, students asked for help an average of 20 times each, and ceased to require advice by the 11th attempt. It can be inferred that by the 11th repetition, students have attained the highest level of confidence in their surgical skills (at least during the training phase). 16
Based on the results mentioned above, we suggest that the ideal training model is six repetitions alongside tutor guidance. However, when the availability of academic staff is limited, a mixed model should be considered, in which guidance is combined with independent training. Further studies are necessary to determine the appropriate combination in such a mixed modality, and each institution must propose and validate the best way to integrate such training with the simulator proposed in this work.
Regarding the construction of ‘in-house’ simulators, Langebaek et al. 10 mention that assembling the SimSpay simulator can be done in a standardised manner, by using easily accessible and low-cost materials. However, that particular simulator only permits a single procedure to be performed, requiring complete reassembly for further repetitions. In contrast, the textile-based simulator evaluated in the current study permits multiple repetitions of the OVH procedure to be performed, requiring minimal replacement of material between consecutive attempts.
In another study, Badman et al. 12 used an OVH surgical training simulator, emphasising its low cost and ‘in-house’ construction. However, they did not provide an instructional guide or a list of required materials. In contrast, the simulator described in the current study includes a free access, digitally supplied assembly guide and pattern templates for each of its components, as well as instructional videos for the construction and use of the model, which helps to standardise the training delivered by using the model (although it should be noted that the material is currently not available in the English language). Despite being made in-house, the current simulator covers all aspects of the OVH surgical technique. This is in line with the findings of Read et al., 6 who propose that training with a low-fidelity model does not lead to any significant differences in learning outcomes when compared to the use of a high-fidelity model, 6 as long as the low-fidelity model covers the essential points of the surgical technique.15,17
Regarding cost, the simulator described here has a manufacturing cost of US$22 (including initial assembly and 19 repetitions), representing a 70% lower cost than other simulators in the same category (such as the ROSSie model, 6 which costs US$48 plus import tax, and US$18.75 per repetition). It should be noted that, despite being cost-effective, one of the most common observations from students when using the textile-based simulator was the total time required to assemble the simulator (between 6–8 hours). This is due to the complexity of the initial assembly (as each piece is hand-sewn), as well as the limited durability of the box (which lasts for only 22–26 repetitions, due to the need to re-fix the latex sheets each time with adhesive tape). Thus, optimisation of the process to reduce assembly time — for example, by reducing the number of pieces required to assemble the uterus, and housing the model in a reusable rigid plastic box — would be beneficial. However, the students also expressed the opinion that the experience gained during the use of the textile-based simulator more than compensates for the time and effort invested in its assembly.
Conclusions
The textile-based simulator presented here represents an economical and standardised tool that permits the replication of all steps of the OVH technique. This model is suitable for training veterinary students in the early stages of learning, as it facilitates practise of the OVH surgical procedure with an appropriate learning curve, without the use of live animals or the need for prohibitively expensive surgical simulators.
Footnotes
Declaration of conflicting interest
The authors declare no conflict of interest with regard to the research, authorship, and/or publication of this paper.
Funding
The authors received no financial support for the research, authorship, and/or publication of this paper.
Informed consent
Verbal informed consent was obtained from the participants in this study for the research.
ORCID iDs
Data availability statement
The data supporting the findings of this study are available from the corresponding author upon reasonable request.
Appendix
The protocol for the OVH surgical technique.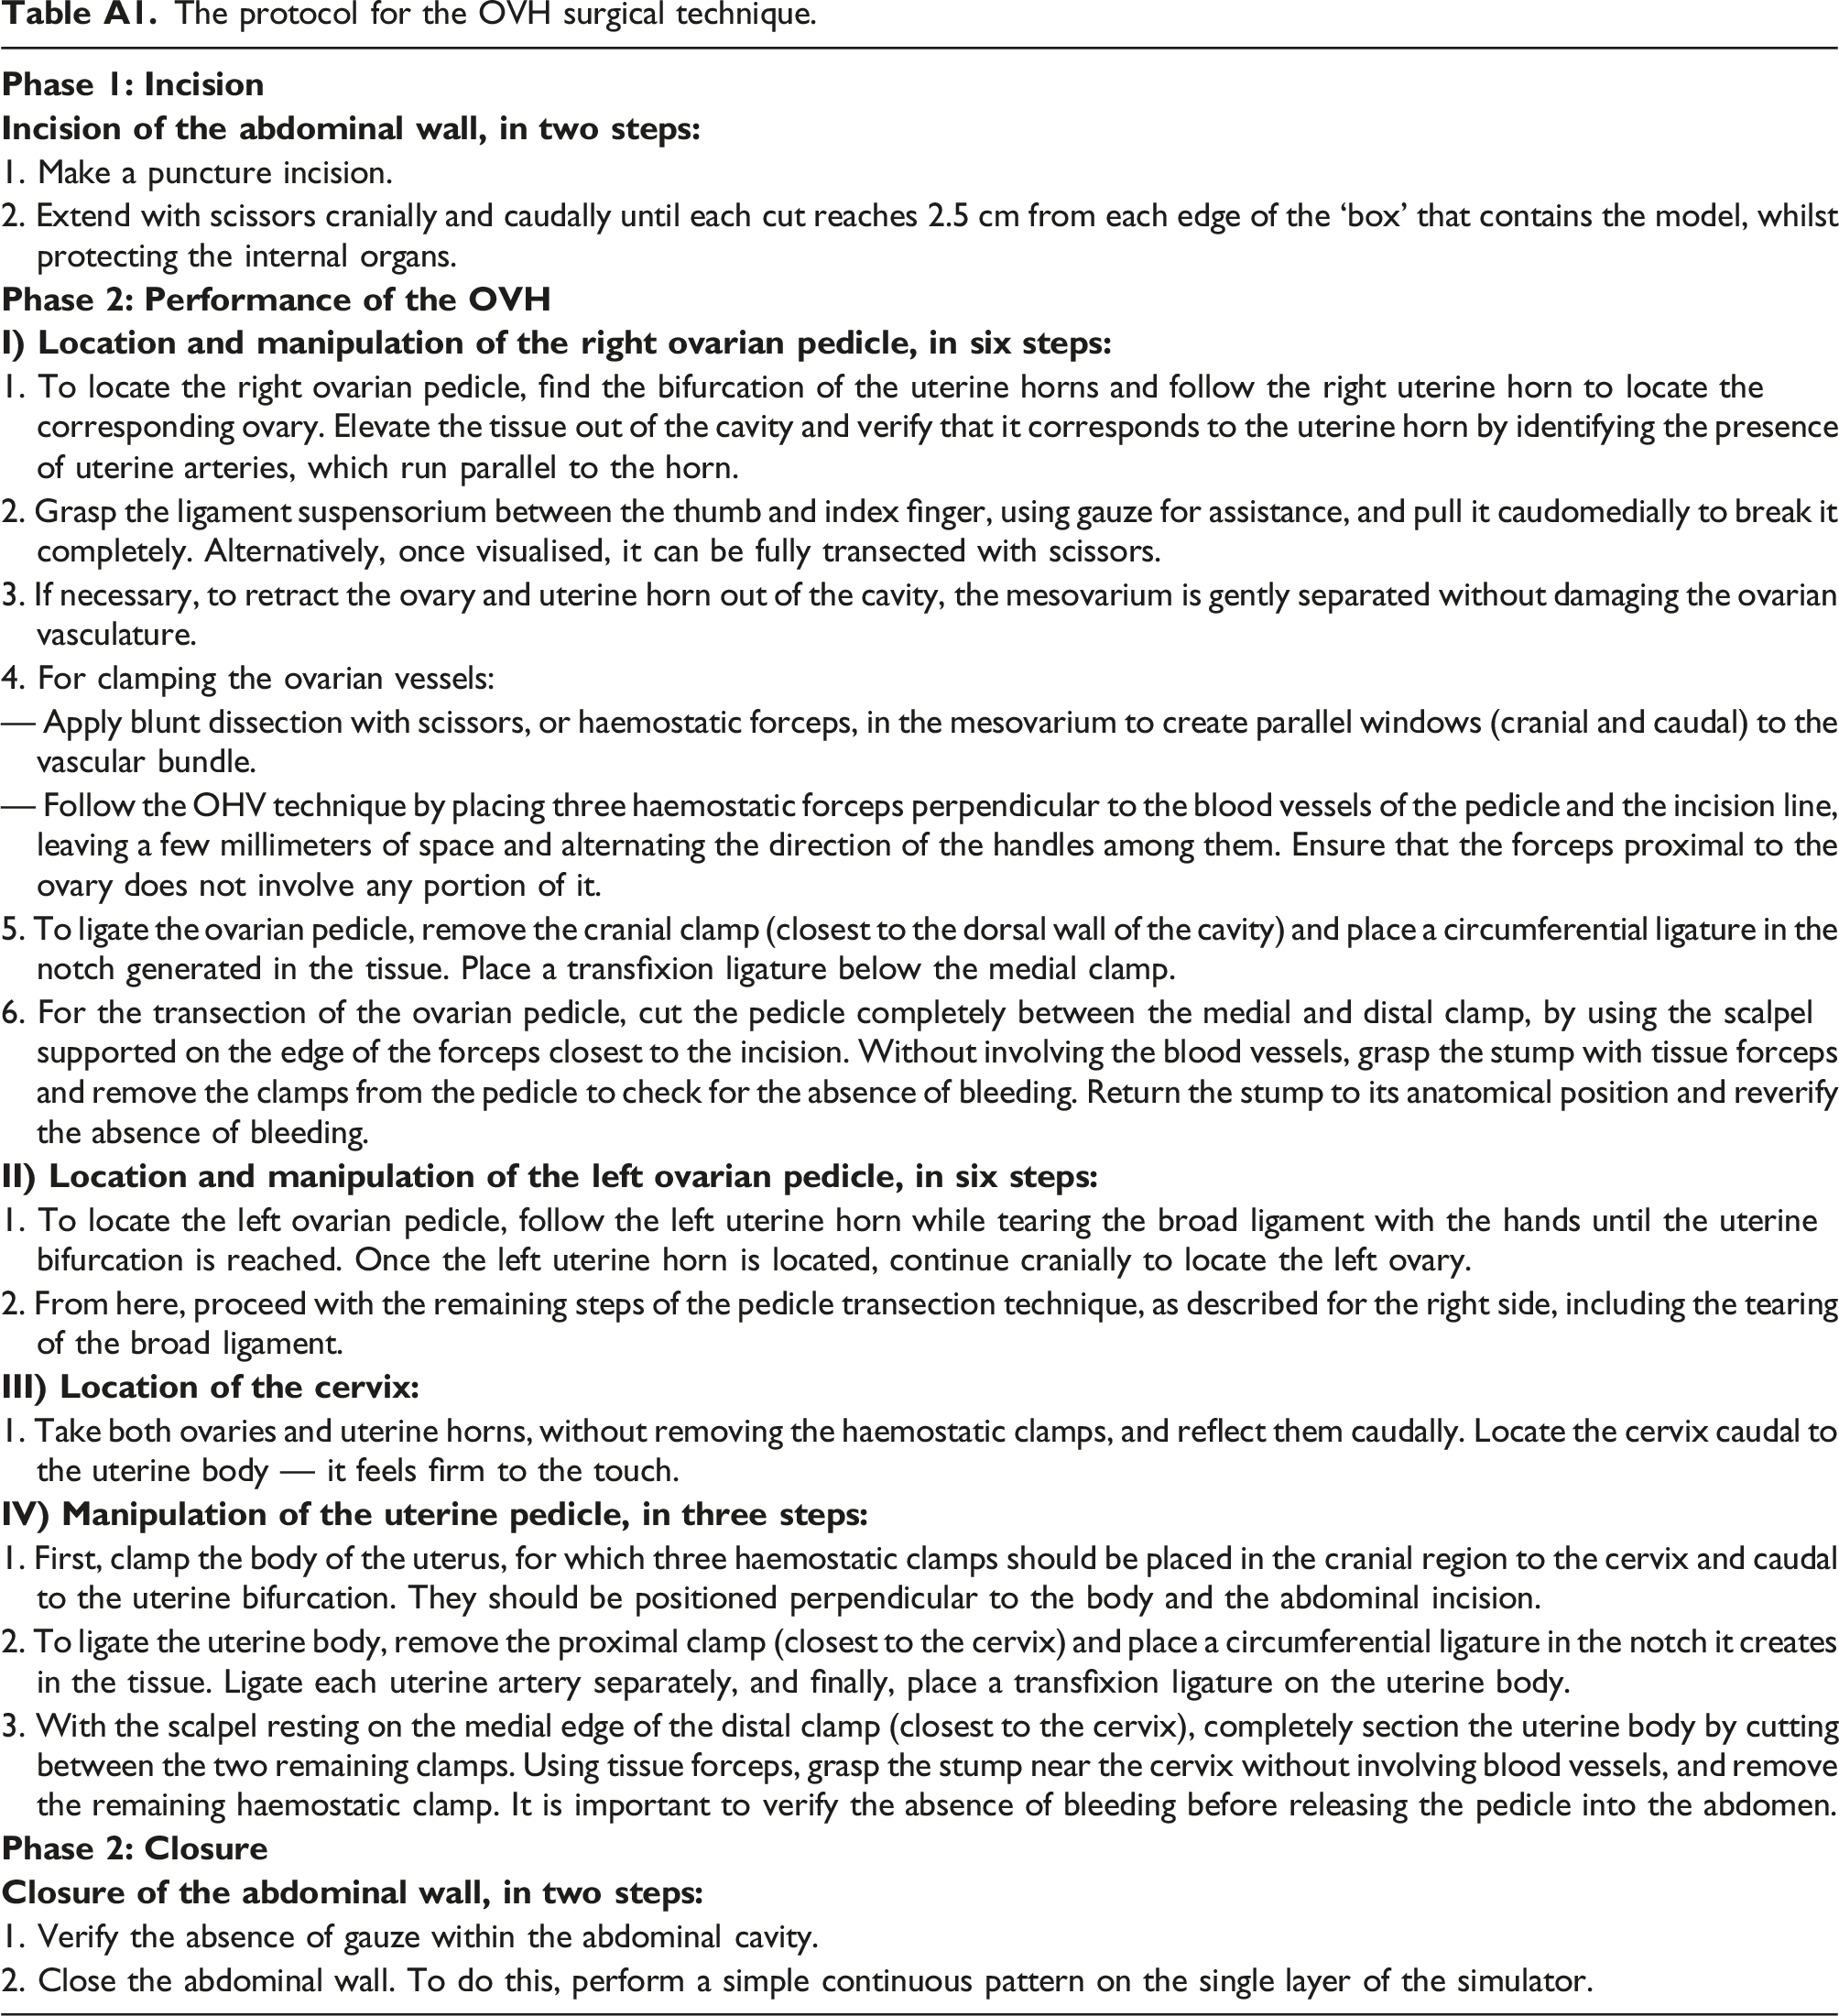
1. Make a puncture incision.
2. Extend with scissors cranially and caudally until each cut reaches 2.5 cm from each edge of the ‘box’ that contains the model, whilst protecting the internal organs.
1. To locate the right ovarian pedicle, find the bifurcation of the uterine horns and follow the right uterine horn to locate the corresponding ovary. Elevate the tissue out of the cavity and verify that it corresponds to the uterine horn by identifying the presence of uterine arteries, which run parallel to the horn.
2. Grasp the ligament suspensorium between the thumb and index finger, using gauze for assistance, and pull it caudomedially to break it completely. Alternatively, once visualised, it can be fully transected with scissors.
3. If necessary, to retract the ovary and uterine horn out of the cavity, the mesovarium is gently separated without damaging the ovarian vasculature.
4. For clamping the ovarian vessels:
— Apply blunt dissection with scissors, or haemostatic forceps, in the mesovarium to create parallel windows (cranial and caudal) to the vascular bundle.
— Follow the OHV technique by placing three haemostatic forceps perpendicular to the blood vessels of the pedicle and the incision line, leaving a few millimeters of space and alternating the direction of the handles among them. Ensure that the forceps proximal to the ovary does not involve any portion of it.
5. To ligate the ovarian pedicle, remove the cranial clamp (closest to the dorsal wall of the cavity) and place a circumferential ligature in the notch generated in the tissue. Place a transfixion ligature below the medial clamp.
6. For the transection of the ovarian pedicle, cut the pedicle completely between the medial and distal clamp, by using the scalpel supported on the edge of the forceps closest to the incision. Without involving the blood vessels, grasp the stump with tissue forceps and remove the clamps from the pedicle to check for the absence of bleeding. Return the stump to its anatomical position and reverify the absence of bleeding.
1. To locate the left ovarian pedicle, follow the left uterine horn while tearing the broad ligament with the hands until the uterine bifurcation is reached. Once the left uterine horn is located, continue cranially to locate the left ovary.
2. From here, proceed with the remaining steps of the pedicle transection technique, as described for the right side, including the tearing of the broad ligament.
1. Take both ovaries and uterine horns, without removing the haemostatic clamps, and reflect them caudally. Locate the cervix caudal to the uterine body — it feels firm to the touch.
1. First, clamp the body of the uterus, for which three haemostatic clamps should be placed in the cranial region to the cervix and caudal to the uterine bifurcation. They should be positioned perpendicular to the body and the abdominal incision.
2. To ligate the uterine body, remove the proximal clamp (closest to the cervix) and place a circumferential ligature in the notch it creates in the tissue. Ligate each uterine artery separately, and finally, place a transfixion ligature on the uterine body.
3. With the scalpel resting on the medial edge of the distal clamp (closest to the cervix), completely section the uterine body by cutting between the two remaining clamps. Using tissue forceps, grasp the stump near the cervix without involving blood vessels, and remove the remaining haemostatic clamp. It is important to verify the absence of bleeding before releasing the pedicle into the abdomen.
1. Verify the absence of gauze within the abdominal cavity.
2. Close the abdominal wall. To do this, perform a simple continuous pattern on the single layer of the simulator.
The twenty-eight assessment criteria used to evaluate the development of the OVH surgical technique. aThe observers judged whether the student was competent in the listed action, and marked it as ‘Yes’ or ‘No’ on the score sheet. Where appropriate, the times taken were measured and recorded in minutes.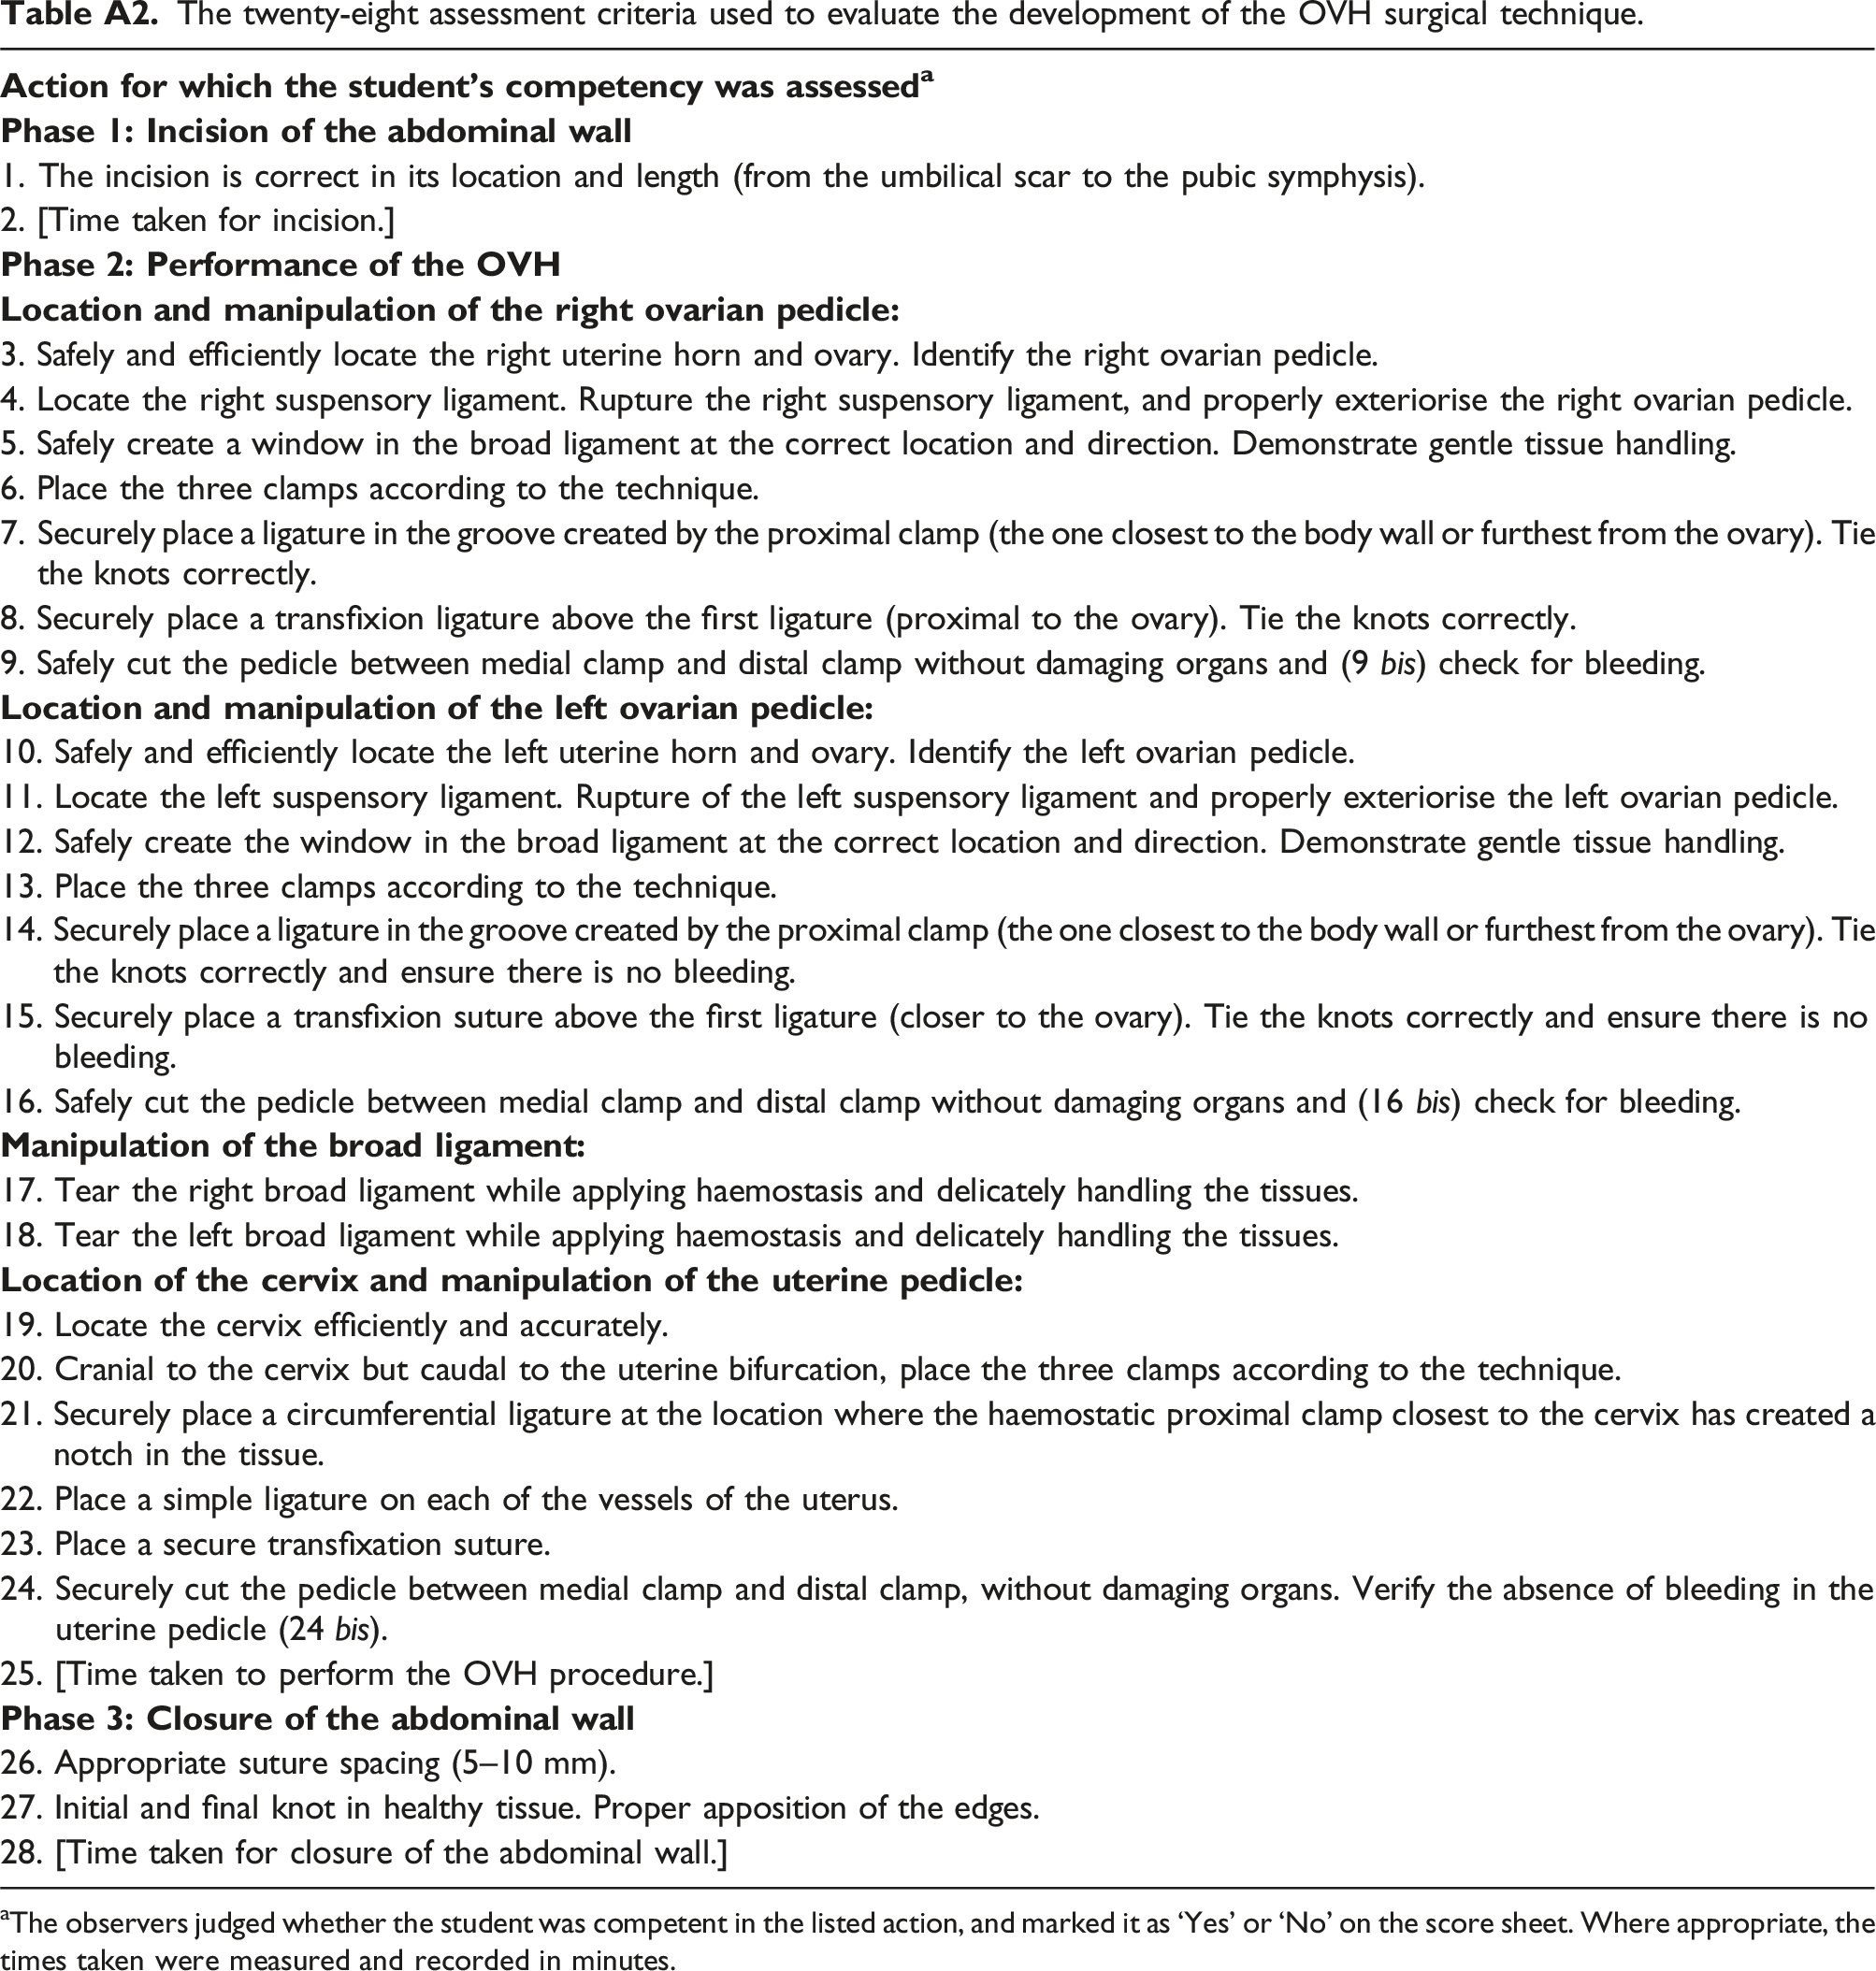
1. The incision is correct in its location and length (from the umbilical scar to the pubic symphysis).
2. [Time taken for incision.]
3. Safely and efficiently locate the right uterine horn and ovary. Identify the right ovarian pedicle.
4. Locate the right suspensory ligament. Rupture the right suspensory ligament, and properly exteriorise the right ovarian pedicle.
5. Safely create a window in the broad ligament at the correct location and direction. Demonstrate gentle tissue handling.
6. Place the three clamps according to the technique.
7. Securely place a ligature in the groove created by the proximal clamp (the one closest to the body wall or furthest from the ovary). Tie the knots correctly.
8. Securely place a transfixion ligature above the first ligature (proximal to the ovary). Tie the knots correctly.
9. Safely cut the pedicle between medial clamp and distal clamp without damaging organs and (9 bis) check for bleeding.
10. Safely and efficiently locate the left uterine horn and ovary. Identify the left ovarian pedicle.
11. Locate the left suspensory ligament. Rupture of the left suspensory ligament and properly exteriorise the left ovarian pedicle.
12. Safely create the window in the broad ligament at the correct location and direction. Demonstrate gentle tissue handling.
13. Place the three clamps according to the technique.
14. Securely place a ligature in the groove created by the proximal clamp (the one closest to the body wall or furthest from the ovary). Tie the knots correctly and ensure there is no bleeding.
15. Securely place a transfixion suture above the first ligature (closer to the ovary). Tie the knots correctly and ensure there is no bleeding.
16. Safely cut the pedicle between medial clamp and distal clamp without damaging organs and (16 bis) check for bleeding.
17. Tear the right broad ligament while applying haemostasis and delicately handling the tissues.
18. Tear the left broad ligament while applying haemostasis and delicately handling the tissues.
19. Locate the cervix efficiently and accurately.
20. Cranial to the cervix but caudal to the uterine bifurcation, place the three clamps according to the technique.
21. Securely place a circumferential ligature at the location where the haemostatic proximal clamp closest to the cervix has created a notch in the tissue.
22. Place a simple ligature on each of the vessels of the uterus.
23. Place a secure transfixation suture.
24. Securely cut the pedicle between medial clamp and distal clamp, without damaging organs. Verify the absence of bleeding in the uterine pedicle (24 bis).
25. [Time taken to perform the OVH procedure.]
26. Appropriate suture spacing (5–10 mm).
27. Initial and final knot in healthy tissue. Proper apposition of the edges.
28. [Time taken for closure of the abdominal wall.]
References
Supplementary Material
Please find the following supplemental material available below.
For Open Access articles published under a Creative Commons License, all supplemental material carries the same license as the article it is associated with.
For non-Open Access articles published, all supplemental material carries a non-exclusive license, and permission requests for re-use of supplemental material or any part of supplemental material shall be sent directly to the copyright owner as specified in the copyright notice associated with the article.