
Abstract
Pathologic evaluation is crucial to the study of medical devices and integral to the Food and Drug Administration and other regulatory entities’ assessment of device safety and efficacy. While pathologic analysis is tailored to the type of device, it generally involves at a minimum gross and microscopic evaluation of the medical device and associated tissues. Due to the complex nature of some implanted devices and specific questions posed by sponsors, pathologic evaluation inherently presents many challenges in accurately assessing medical device safety and efficacy. This laboratory’s experience in numerous collaborative projects involving veterinary pathologists, biomedical engineers, physicians, and other scientists has led to a set of interrelated assessments to determine pathologic end points as a means to address these challenges and achieve study outcomes. Thorough device evaluation is often accomplished by utilizing traditional paraffin histology, plastic embedding and microground sections, and advanced imaging modalities. Combining these advanced techniques provides an integrative, comprehensive approach to medical device pathology and enhances medical device safety and efficacy assessment.
Keywords
Comprehensive pathologic evaluation is a crucial component of medical device evaluation and assessment of device safety and efficacy. Medical device studies, particularly in the preclinical phase, are often challenged by very low animal numbers and paradoxically high interest and investment in study outcome. Device sponsors and researchers often have specific questions or concerns that need to be addressed in these studies; they rely on the medical device pathologist to ensure that these questions are answered, while simultaneously providing a complete evaluation and maintaining study integrity. Medical device pathology is technically challenging and unforgiving, and any errors may result in the loss of valuable and irretrievable data (Rousselle and Wicks 2008). As such, early communication between the pathologist and sponsor is extremely important, particularly for establishment of specific study goals and pathology end points prior to study initiation. Effective communication between sponsors and pathologists predicates a need for the pathologist to have an understanding of the regulations and developmental processes unique to medical device pathology.
In order to minimize the number of animals and associated costs during a medical device study, a major focus of medical device pathology is maximizing the utility and benefit garnered from each available specimen. Given the wide variety of medical devices and their inherently complex nature, this must be tailored to each individual device. To address these and other challenges, Rousselle and Wicks (2008) developed a comprehensive approach for preparing medical devices for pathology evaluation. In this article, we have expanded upon the techniques described by Rousselle and Wicks and present an all-encompassing approach to medical device evaluation that utilizes these methods to address specific study end points (Figure 1). Study end points are similar to study objectives, but whereas an objective is broader in scope, for example, to compare a novel replacement mitral valve with a control model, an end point is simply what you intend to measure, for example, using histomorphometry to measure and compare neointimal proliferation across the two different valves. Device pathology begins during planning and development of the study protocol and continues through implant-site dissection, fixation, imaging, trimming, and cutting (Rousselle and Wicks 2008). Emphasis is often placed on gross assessment of the device and associated tissue in situ, whether that involves necropsy of entire animals with implanted devices or a more limited evaluation of devices within specific submitted tissues, as that is typically a place of high stakes data capture and documentation. High-resolution gross digital photography and conventional paraffin histology are cornerstones of the traditional pathologic evaluation and can be supplemented with plastic microground sections in cases where devices made from metal or hard components, or implants in hard tissues such as bone, cannot be cut from paraffin-embedded blocks. Histologic analysis is not necessary in every study, and careful judgment should be exercised by an experienced pathologist to ensure unnecessary histology is not completed that may drive up study costs. Advanced imaging techniques such as microcomputed tomography (micro-CT) and scanning electron microscopy (SEM) with elemental analysis (energy-dispersive X-ray spectroscopy [EDS]) can guide and augment both paraffin and plastic histologic evaluation.
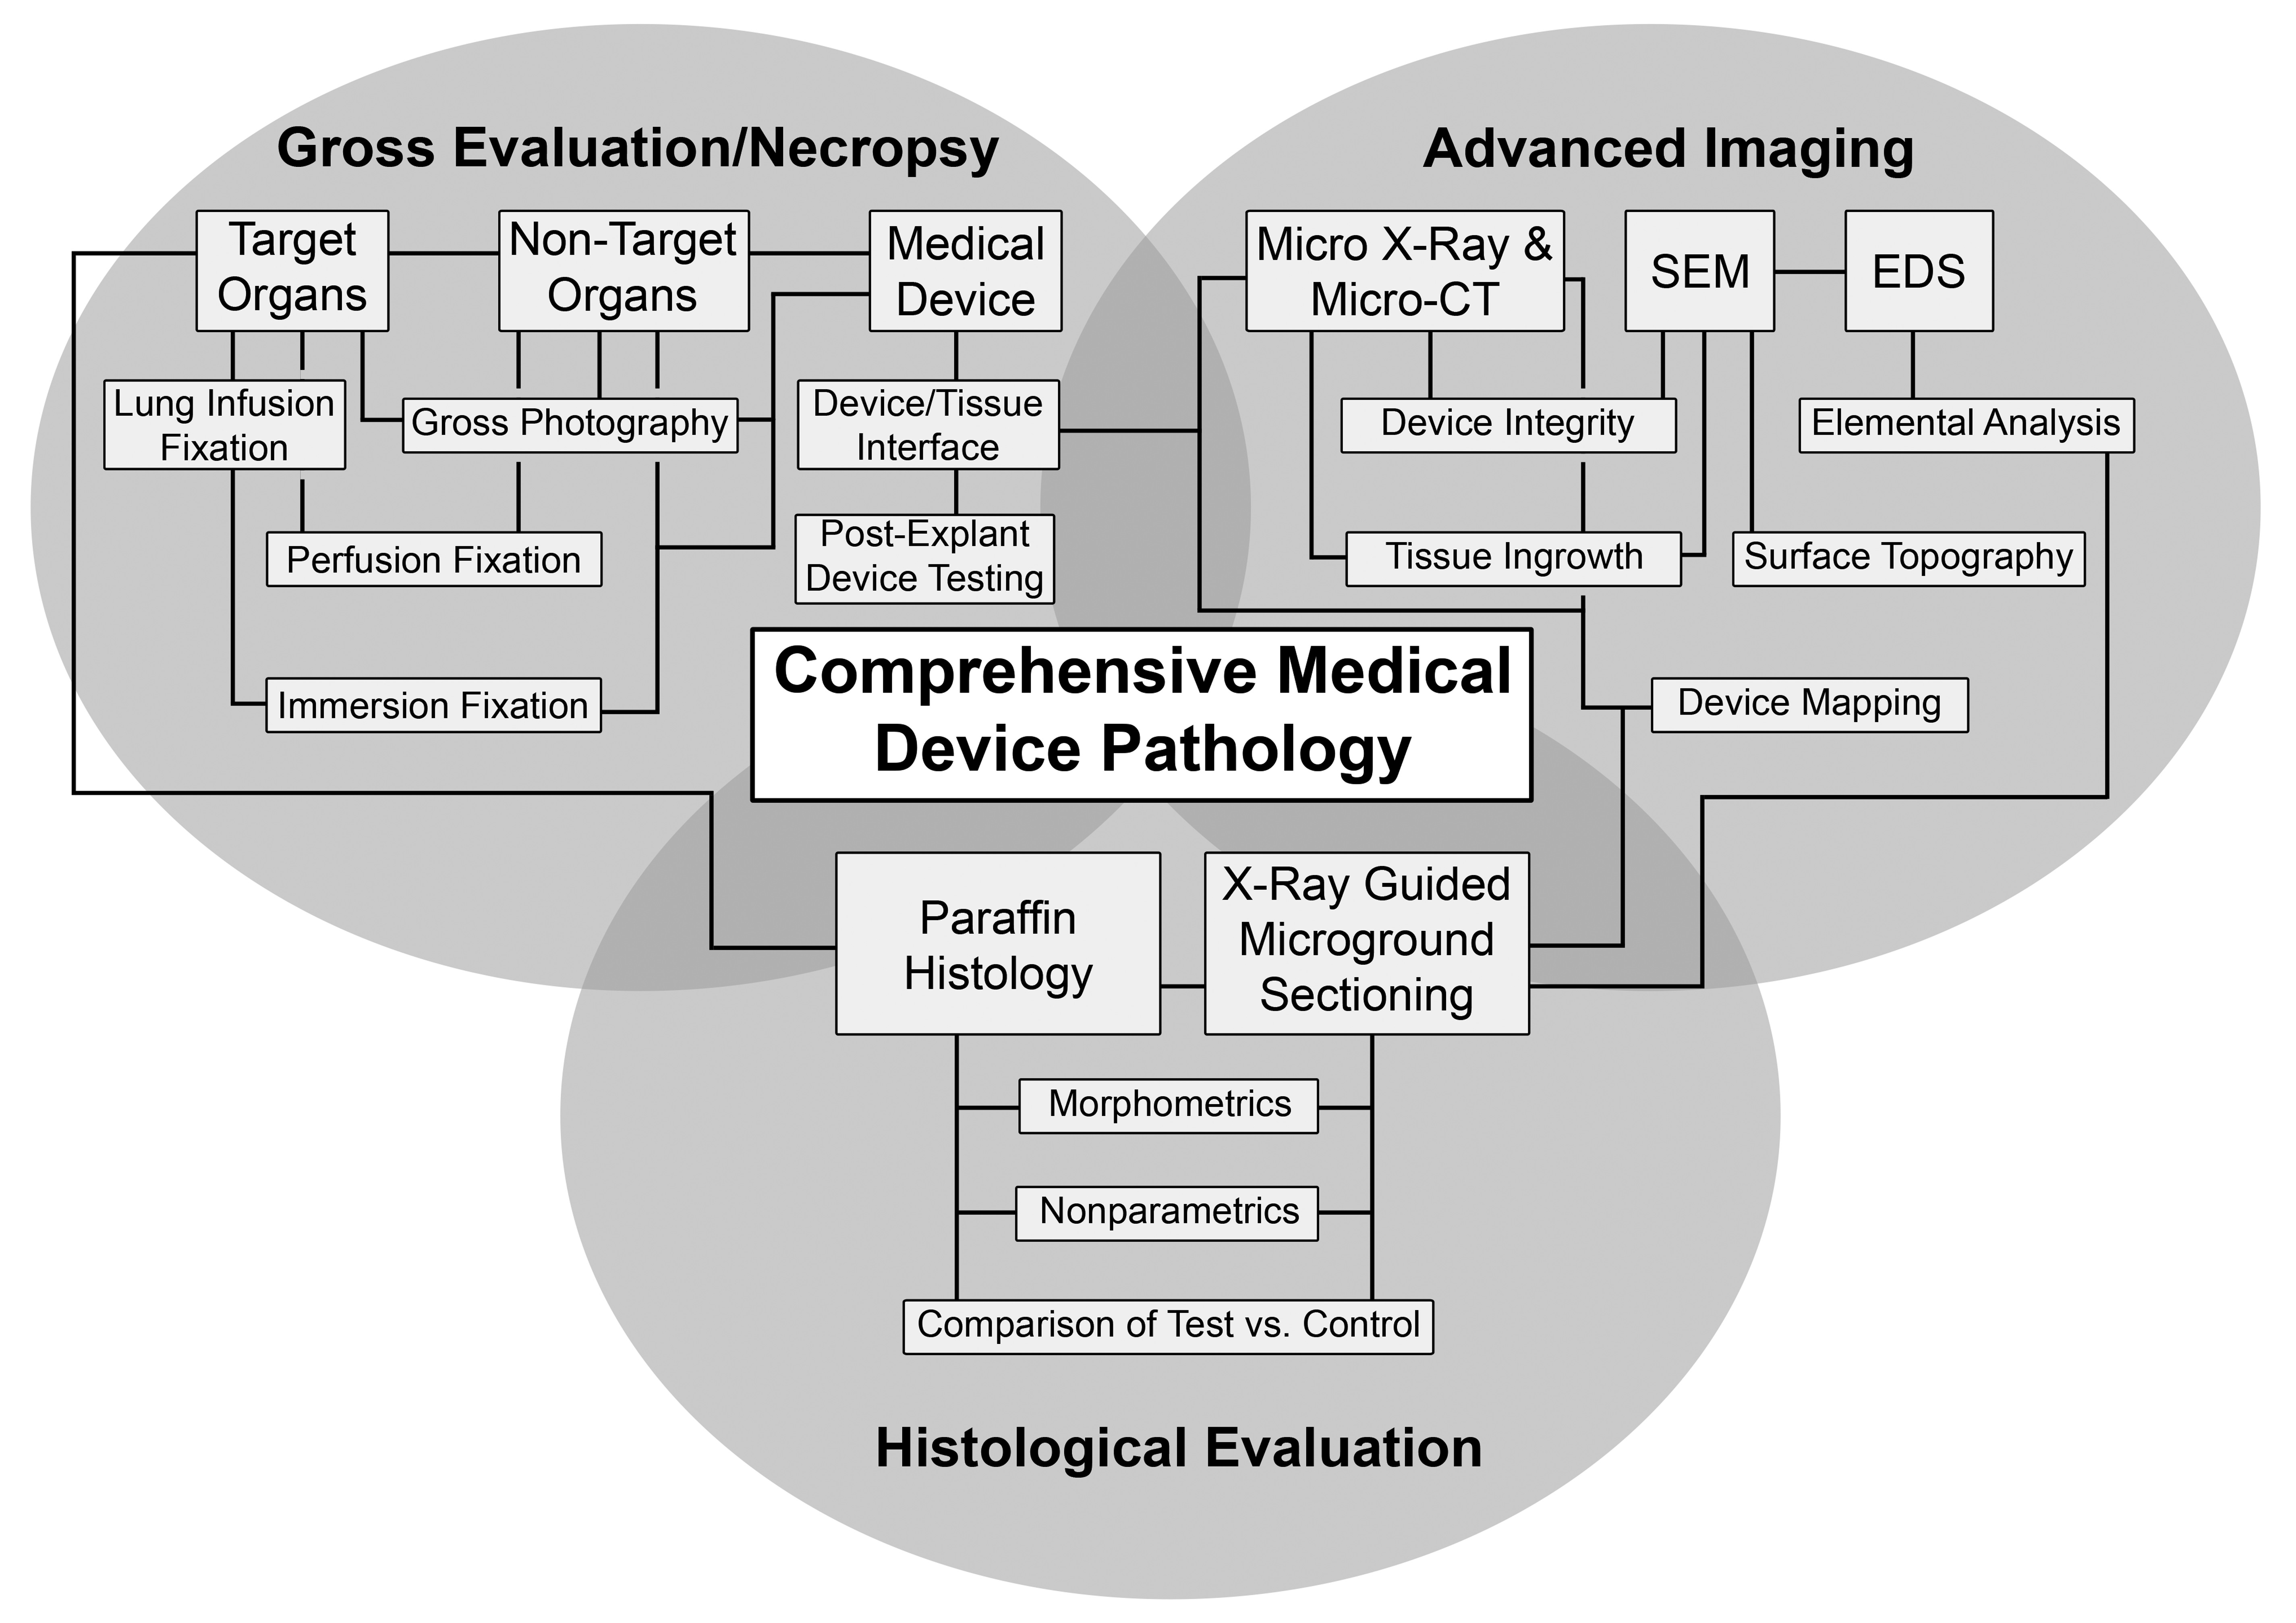
Utilization of gross evaluation, advanced imaging modalities, and histological evaluation to provide a comprehensive approach to medical device pathology.
Overall, an integrated and thorough assessment of the medical device and host tissue interaction is performed with the goal of working toward determination of pathologic objectives to provide supporting data regarding the safety of a device, data which are then submitted to regulatory bodies who will determine whether a device is ready for “first in human” and clinical trials. Here, we describe a basic approach for pathologic analysis of medical devices, providing an outline to be used for addressing various sponsor related goals in a medical device study.
Regulatory Considerations for Preclinical Studies
As a primary goal of medical device studies is to generate safety and efficacy data for submission to a regulatory agency, the regulatory aspect of data generation and collection must be considered. The stage of development, complexity, and clinical risk factors associated with a medical device each play a role in determining the appropriate regulatory processes a study must follow. As the regulation of medical devices is progressive and occurs at both institutional and federal levels, the pathologist must be knowledgeable of the various entities and regulations to which the study must adhere. At the institutional level, the Institutional Animal Care and Use Committee (IACUC) is designed to ensure that the use of each animal model in the study is maximal and humane; all aspects of every animal study, including post-euthanasia evaluations, must have IACUC approval, otherwise the study cannot be conducted. At the U.S. federal level, device companies intending to submit study data to the Center for Devices and Radiological Health subdivision of the Food and Drug Administration (FDA) are encouraged to comply with Good Laboratory Practices (GLP), which are outlined in the Code of Federal Regulations (21 CFR Part 58). Generally, GLP standards apply to manufacturers of devices associated with moderate to high risk (Schuh 2008); in fact, compliance with GLP is required for studies that support an Investigational Device Exemption application for clinical evaluation (Gad and Schuh 2018). These regulations are designed to be somewhat generic to encompass the wide range of devices but should ultimately assist device manufacturers and study personnel (including the study pathologist) in attaining and reporting consistent, repeatable, and reliable data to effectively demonstrate device safety.
The device type and stage of development governs the regulatory discussions; protocol development, in particular, varies across the types of studies performed during device investigation. Pilot preclinical studies (which can include acute and chronic feasibility studies) evaluate one or more aspect of a device’s design and often involve limited specimens; the pathology portion of protocols for pilot studies are often left more vague, leaving room for the pathologist to perform analysis at their discretion depending on the findings. A pivotal study, in contrast, is prospective in that it is less exploratory and investigates specific questions, and the pathology protocol is focused on assessing specific study end points. Because study data from pivotal studies are likely to be included in FDA regulatory submissions, adhering to GLP guidelines is highly recommended. As GLP studies are more time intensive, thus inherently increasing associated costs, it is up to the study sponsor to weigh the risks and benefits of pursuing a GLP study.
Despite the type of study, it is in the best interest of the pathologist to have standard operating procedures (SOPs) in place that govern data collection and documentation in a manner congruent with GLP standards. By always following SOPs, even during the pilot study phase, the pathologist is able to ensure that all data are of high quality and properly documented. In some cases, pilot data may be submitted to the FDA and might be considered with a higher regard if the study methods and data collection more closely follow GLP guidelines.
One important issue to address prior to study initiation that may have regulatory implications is the collection and handling of study data; this also includes defining what is considered raw data; typically, all gross observations (necropsy and sectioning notes), gross photographs, image files (e.g., radiographs, micro-CTs), and glass slides are considered raw data, and items that can be redone (e.g., photomicrographs) are not. During the analysis phase of a study, the pathologist can use a spreadsheet to capture and display raw data. To comply with GLP standards, all computerized systems for processing data must be validated (Crissman et al. 2004); however, a custom spreadsheet can be difficult to validate, especially when the spreadsheet contains cells or graphs with formulas or macros. To use a custom spreadsheet in a GLP study, the data collection process must be thoroughly described in an SOP, and specific data controls must be defined (e.g., who can use the spreadsheet, how is the spreadsheet protected from further editing once the pathologist enters the data). As an “off-the-shelf” program cannot be easily validated, proprietary data capture systems offered by some software companies can be useful for these types of analyses, as they come with a validation certificate, but many of these programs might be cost-prohibitive. In addition to generating SOPs for properly collecting data, it is considered best practice to have SOPs in place outlining proper backing up of raw data, storage of tissues, and archiving of study data, according to 21 CFR Part 11. The specific definitions and procedures may vary among study sites and among studies, depending on what pathology techniques are used (Tuomari et al. 2007).
An important distinguishing aspect of a GLP study when compared to a pilot or non-GLP study is monitoring by a Quality Assurance Unit (QAU) to ensure compliance with regulations. A QAU can only be an effective institution if it is completely separate and independent from the conduct and leadership of the study and not influenced by personnel directing or conducting the study. The QAU must inspect all critical phases of a GLP study, including a site inspection of the pathology laboratory, auditing of necropsy and tissue collection, histological processing, data analysis, and so on, for a major goal of the QAU is to ensure that the pathologist and technicians are following the study protocol and facility SOPs. The QAU also plays an important role in validating all equipment used in a GLP study. Considering the advanced imaging and histological techniques outlined in this article, interaction with the QAU prior to study initiation is essential for timely validation of the various necessary equipments. At the conclusion of a GLP study, the QAU will issue a quality assurance statement outlining whether or not the testing facility, including the pathologist, followed the appropriate regulations—this statement is expected by the FDA to accompany any and all study reports.
Gross Analysis
Considerations for Preclinical Study Development
Given the complicated nature of many medical devices and the range of anticipated complications, a meeting between the study sponsor and pathologist prior to initiation of the study is often necessary. The pathologist should provide direction in development of the study protocol, especially designation of target organs. For example, in left-sided ventricular assist devices (VADs), downstream target organs are those impacted by systemic circulation such as the kidneys, brain, and gastrointestinal tract, whereas in right-sided VADs, target organs include those that are impacted by pulmonary circulation (i.e., the lungs). These organs are evaluated for adverse events typically seen in clinical VAD patients, such as ischemic injury due to thromboembolic events (Figure 2), gastrointestinal bleeding, and infection. Downstream target organs should also include those that are affected by a device but may not have any grossly detectable lesions. For example, porcine models for femoral artery treatment with drug-coated balloons will often yield particulate embolization in downstream skeletal muscle and coronary bands; these lesions are important to assess for embolic safety characteristics but will not be visible grossly (Kolodgie et al. 2016). Similarly, devices that are used perioperatively (e.g., guidewires or catheters) may also create thromboemboli that can end up in the brain and will not be visible grossly but should still be considered for assessment via histology (Stanley et al. 2016). While the study protocol may be tailored to fit the needs of a specific device, it is generally prudent—and in studies performed under GLP standards, often necessary—to thoroughly examine all organs and retain samples for future analysis.
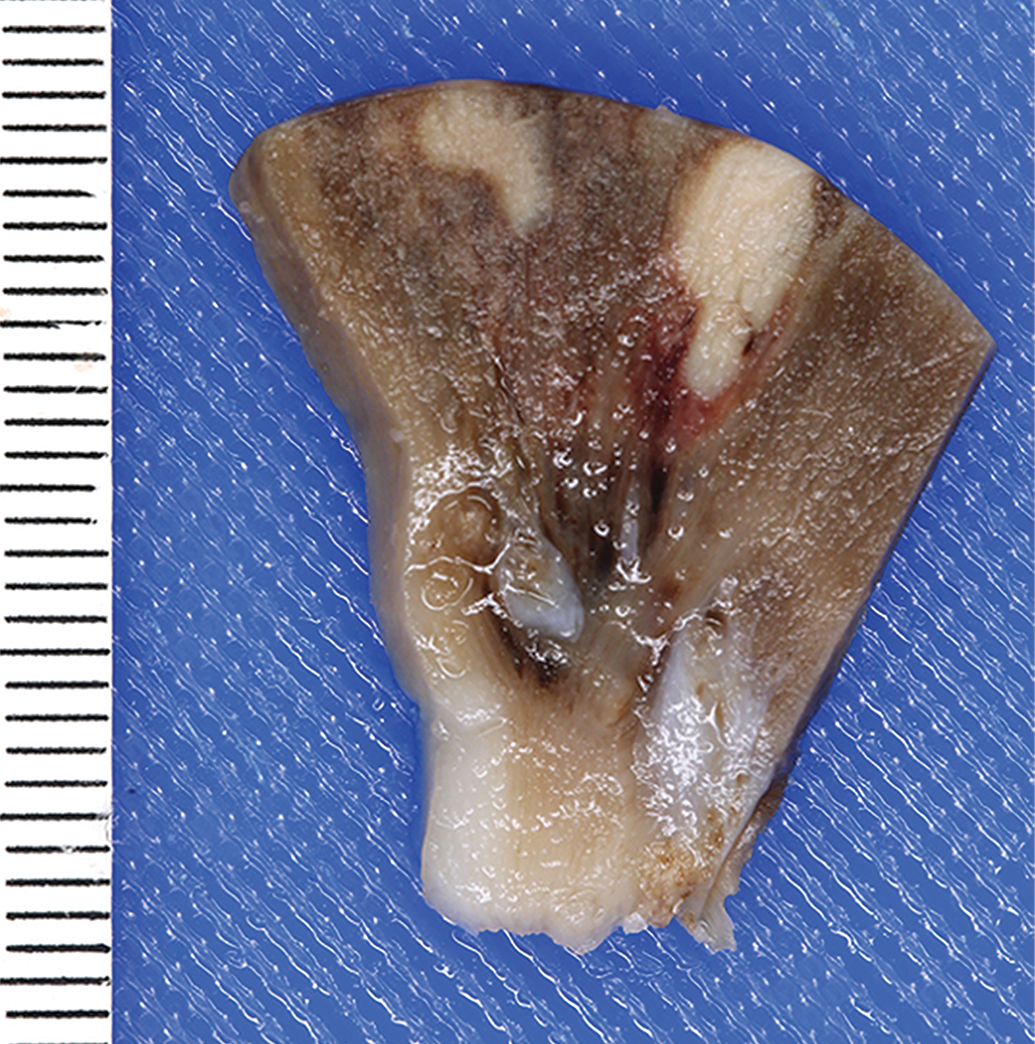
Wedge-shaped renal infarcts in animal model with a left-sided cardiovascular device.
In addition to designation of the target organs, the pathologist can provide direction for target organ collection and fixation. Depending on the type of device, perfusion fixation with formalin after a gentle saline rinse may prove useful and is made significantly easier with successful heparin administration prior to euthanasia. Directing the flow of saline/formalin by ligating appropriate vasculature will determine which areas are cleared of residual blood and then subsequently fixed. In pacemaker/defibrillator lead studies, for example, ligation of the aortic branches will direct fixative into the inferior vena cava and allow rinsing of residual postexplant blood from the lead implant sites in the myocardium (Jessen et al. 2018). This ensures adequate tissue fixation while the regions of interest remain intact and undisturbed during explantation and postexplant handling. Directing the saline/formalin toward the brain (e.g., via the carotids) will fix the brain in situ and may prove useful in neurodevice studies. If microscopic assessment of the lungs is desired (e.g., for right-sided cardiovascular devices), formalin infusion of the lungs via the trachea will indirectly also lead to clearance of residual postmortem blood from the capillary beds and will fix the lungs in a way that allows for thorough microscopic analysis of lung tissue unencumbered by postmortem artifact. Regardless of the specific technique used, perfusion fixation pressures should match the physiologic pressures of the particular test species. Perfusion/infusion rinse and fixation of target organs is not always required, and depending on the requirements of the study, organs may be collected and simply immersion fixed in formalin. In some cases where the immersion fixation technique is utilized, the organ may become distorted (i.e., flattened) as it rests against the wall of the container, which can be alleviated by suspending the organ in the container of formalin via a string or other inert material. Occasionally, additional gross immersion staining is required prior to fixation, such as with cardiac ablation. Triphenyltetrazolium chloride (TTC) is a vital stain that utilizes cell metabolism machinery to differentiate healthy from unhealthy tissues and can only be used on fresh unfixed tissue (Benedek et al. 2006). Cardiac ablation performed using cryoablation, irreversible electroporation, or radiofrequency can be detected with TTC and is useful for determination of the success of the procedure by examination of the lesions created (Schill et al. 2017). TTC staining is also useful for acute myocardial infarction quantification (Fishbein et al. 1981). For optimal results, the fixation technique should remain consistent across all animals in the study, and in a prestudy meeting, the pathologist can provide direction as to which fixation technique is most applicable to the study’s specific goals.
Gross Evaluation
Appropriate techniques for gross evaluation of a medical device are as varied as the types of devices available on the market today. The pathologist’s involvement in gross evaluation will likewise vary and may include a formal necropsy with all major organs or may be limited to the explanted device and the immediately adjacent tissue. A perioperative death at the time of implantation or an otherwise unscheduled early death may only necessitate a limited evaluation of the recovered device and the device–tissue interface. Study protocols should include a list of all devices that will be present at the time of necropsy, bearing in mind that a device may be removed during preterm procedures, and the list of devices present should be annotated to denote which will undergo pathology evaluation.
The primary pathologic objective of preclinical studies is assessment of device safety through determination of the device effect on the specimen, which will vary greatly depending on the type of medical device. A gross and microscopic examination of the tissues and organs that are directly impacted by the device (target organs), as well as secondary organs (nontarget organs), should be correlated with antemortem clinical data to provide context for a thorough device assessment. The first step in this process is gross examination, as evaluating the device and organs in situ will provide an invaluable perspective for the interpretation of overall study conclusions. High-resolution photography with verified rulers and consistent labels throughout gross evaluation, including postfixed tissue dissection and tissue trimming, is necessary to document normal and abnormal findings and serves as a reference for the context of pathological findings at a later date. Proper specimen preparation for photography includes proper lighting, wiping surfaces of blood, and a uniform neutral background. Anatomical landmark labels or arrows are often useful, and while a ruler may not be necessary in every image (particularly for close up images), it is generally prudent to include a scale and the specimen identification number whenever possible. There is a variety of digital cameras appropriate for gross photography, and while it’s undoubtedly worthwhile to purchase a quality camera, certain accessories like a Macro Lens for close ups and polarizing filters to decrease glare can also exponentially increase image quality.
A typical necropsy for a medical device preclinical study begins with an external examination in which incisions (e.g., thoracotomy sites), catheters, exit sites (for transcutaneous device aspects), and shaved areas are noted and evaluated for any remarkable features (e.g., exit site infections). Supplementary equipment associated with the medical device (flow probes, pressure sensors, etc.) is often present that will be reused for future implants; care should be taken to ensure that these materials are not transected and are appropriately returned to the testing facility or company sponsor. Following external examination, the skin is reflected, and subcutaneous tissues are evaluated with particular attention given to the aforementioned incisions and exit sites. The abdominal cavity is then opened, and target abdominal organs are evaluated in situ before careful excision and set aside for further evaluation and eventual fixation. Evaluation of the remaining abdominal viscera is conducted, with a focus on clinically overlooked ailments that may have an impact on the study; this is particularly important in unscheduled early termination where the cause of unexpected illness or death is being determined.
In larger animals, the thoracic cavity is first examined following removal of the diaphragm from the abdominal side. Ruminants are commonly utilized for intrathoracic device studies; while many veterinary pathologists prefer to necropsy ruminants in the left lateral position to minimize obstruction of the viscera by the rumen, a right lateral approach is frequently necessary to properly evaluate intrathoracic devices implanted via left thoracotomy. This approach allows for preservation of device orientation relative to the thoracotomy incision; additionally, depending on the length of implant, scar tissue extending from the device to the thoracotomy site may add difficulty in approaching the device and thoracic contents from the left. Other approaches may be considered should the device warrant it, for example, a ventral thoracic midline or sternal incision for a device involving the internal thoracic arteries. The surgical incision may also be used to enter the body cavity in cases of perioperative death or short-term survival. Following removal of the diaphragm, a portion of the chest wall is removed and organs are examined in situ. Depending on the duration of the study and the type of device, fibrous adhesions between the thoracic viscera, wall, and the device may be severe enough to require removal en bloc (Figure 3). The device and associated tissues are photographed en bloc and carefully dissected away from one another. Care must be taken to photograph every aspect of the device and its association with the tissue at each step, for true device assessment end points may be masked by processes not directly initiated by the device. An area of consolidated pulmonary parenchyma, for example, may be unrelated to an adjacent intrathoracic device component, but instead due to aspiration pneumonia. After individual dissection from their association with the device, lungs should be photographed and examined for evidence of aspirated material, emboli, or other lesions. Other common findings with implanted thoracic devices include pulmonary edema and procedural atelectasis.
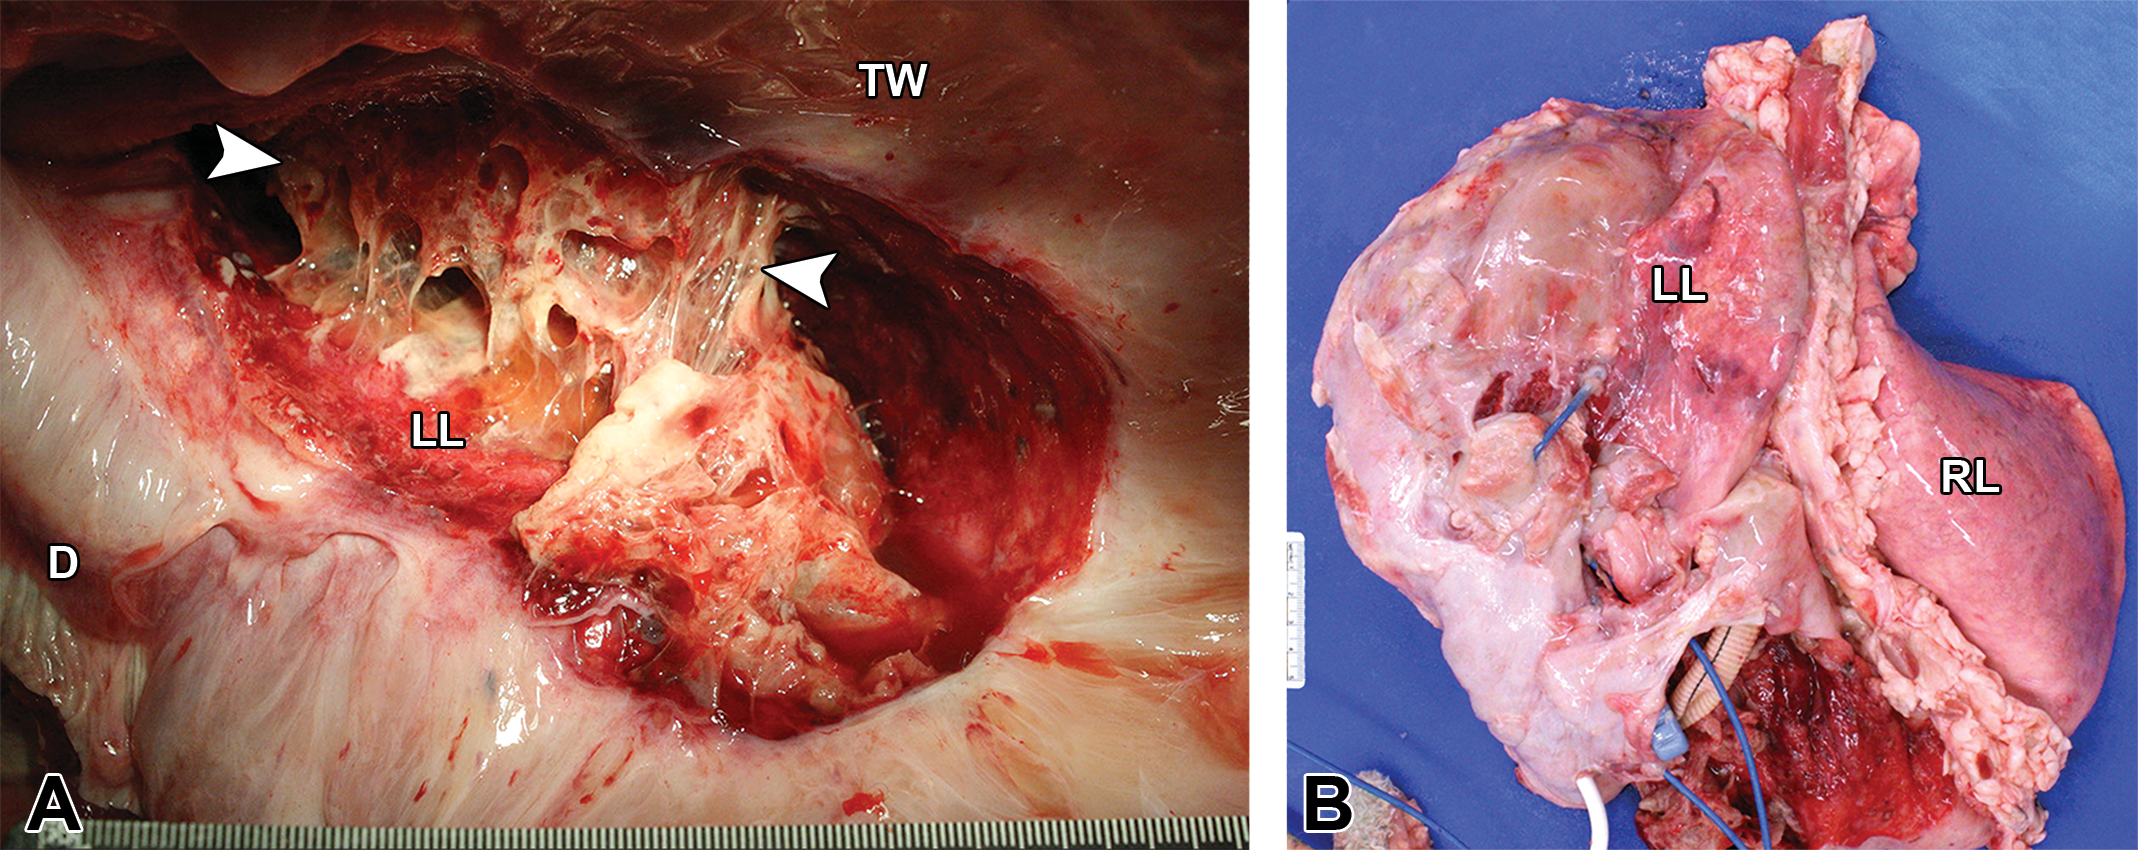
Thoracic content removal during necropsy and gross evaluation of an ovine specimen with a left-sided cardiovascular device approximately 30 days postimplantation. (A) A moderate to marked amount of loose, fibrinous, and collagenous connective tissue adheres the left lung to the thoracic wall. (B) Thoracic content removed en bloc with marked fibrinous and collagenous connective tissue obscuring the heart and device. Arrow heads = fibrous adhesions; D = diaphragm; LL = left lung; RL = right lung; TW = thoracic wall.
Challenges in the Traditional Pathology Assessment
As previously mentioned, the approach to the device assessment may be planned in a prestudy meeting with the sponsor and the pathologist; however, in pilot studies, the appropriate approach is often unknown until the necropsy begins. The unpredictable course of preclinical studies is often one of the greatest challenges the pathologist faces. Further, if additional tests not outlined in the animal use protocol (AUP) are considered after study initiation, the AUP must be amended and approved by the appropriate oversight personnel. In these cases (i.e., preclinical studies of newer class III medical devices without a predicate), it is best to begin with a pilot study involving low test article numbers to work through these challenges with the testing facility, study director, pathologist, and company sponsor to ensure that the study end points are being thoroughly addressed through the developed protocol.
Histology Techniques
Following the initial gross evaluation, the pathologist must decide whether the device-bearing tissue should be trimmed for histology before or after fixation. Additionally, the pathologist must decide whether to fix the tissues with the device en bloc, which is strongly suggested, or to dissect the device from the fresh tissue. Trimming sections prior to fixation invites risk of damaging the surrounding areas, but it should be noted that the presence of a certain device on a histological slide may not be beneficial for analysis, depending on the biomaterial used. Certain biomaterials may be degraded or dissolved during histology processing, and therefore their continued presence might not be necessary for later analysis. Regardless of the fixation order, precise trimming during gross evaluation must be completed to ensure that the correct areas of interest will be included on a final histology slide. It is especially important that thorough and detailed documentation is maintained during tissue grossing, so that if regulatory agencies question where a particular slide originated from, this documentation can be supplied; this may include photographic documentation of cassettes when warranted. Additional documentation is necessary to relay information to the histology lab, such as embedding instructions (e.g., on edge, as submitted), and the size of the slide necessary for proper tissue examination (i.e., 75 × 25 mm2 or 75 × 50 mm2). After trimming, tissue cassettes and accompanying documentation are sent to a histology lab for processing, embedding in either paraffin or plastic, sectioning, staining, and sometimes slide scanning for digital pathology examination or providing photomicrographs.
The typical stain used for histology slides is hematoxylin and eosin (H&E); H&E is the pathologists’ “bread-and-butter” stain that can generally allow a confident diagnosis. In device pathology, however, further analysis may call for the use of additional special stains to achieve certain end points (e.g., Stevenol’s blue or Goldner’s trichome for bone, Von Kossa for mineral, Movat’s or elastin trichome for elastic laminae, Masson’s trichome for fibrous connective tissue). Additionally, certain immunohistochemistry stains may be necessary in order to confirm the presence of certain biomarkers important to the healing response but must be chosen based on the device in question. The pathologist must stress the importance and necessity of these stains to a sponsor when warranted, as they generally cost more money and time to perform, but can be crucial for thorough analysis. In general, the stains needed will vary depending on the study and device and must be considered in light of overall study goals.
Paraffin Histology
Conventional paraffin histology is typically used for microscopic analysis of host tissues and soft components of medical devices. Paraffin histology is both a useful and effective tool in demonstrating the effect of a device and associated materials on the body and is an invaluable method for the pathologist to appreciate changes at a microscopic level in order to correlate gross findings and overall assess the device–tissue interface. Effects on downstream target organs may be visualized, as well as those on tissues immediately adjacent to the device. In VAD studies, for example, as a host begins to mount a response to an inflow cannula, the adjacent myocardium may either form a desirable pseudointima or it may serve as a nidus for thrombus formation. In general, the study time point must be considered when interpreting histology findings, as the body response to the implanted devices is a dynamic process.
Histology of downstream organs also provides valuable information as to how the host is responding to an implanted device, especially when changes in downstream organs can be directly correlated to the device. For example, in one particular case, material was found occluding the outflow graft of a VAD, and presumed renal infarcts were noted grossly as well (Figure 4). Histologic sections of the graft and kidneys revealed a mural thrombus in the graft with intralesional bacteria, as well as bacterial emboli and inflammation within the kidney. Histology in this case permitted the correlation between two potentially unrelated grossly remarkable areas and provided evidence that the bacterial infection within the outflow graft of the device had subsequently led to an embolic nephritis.
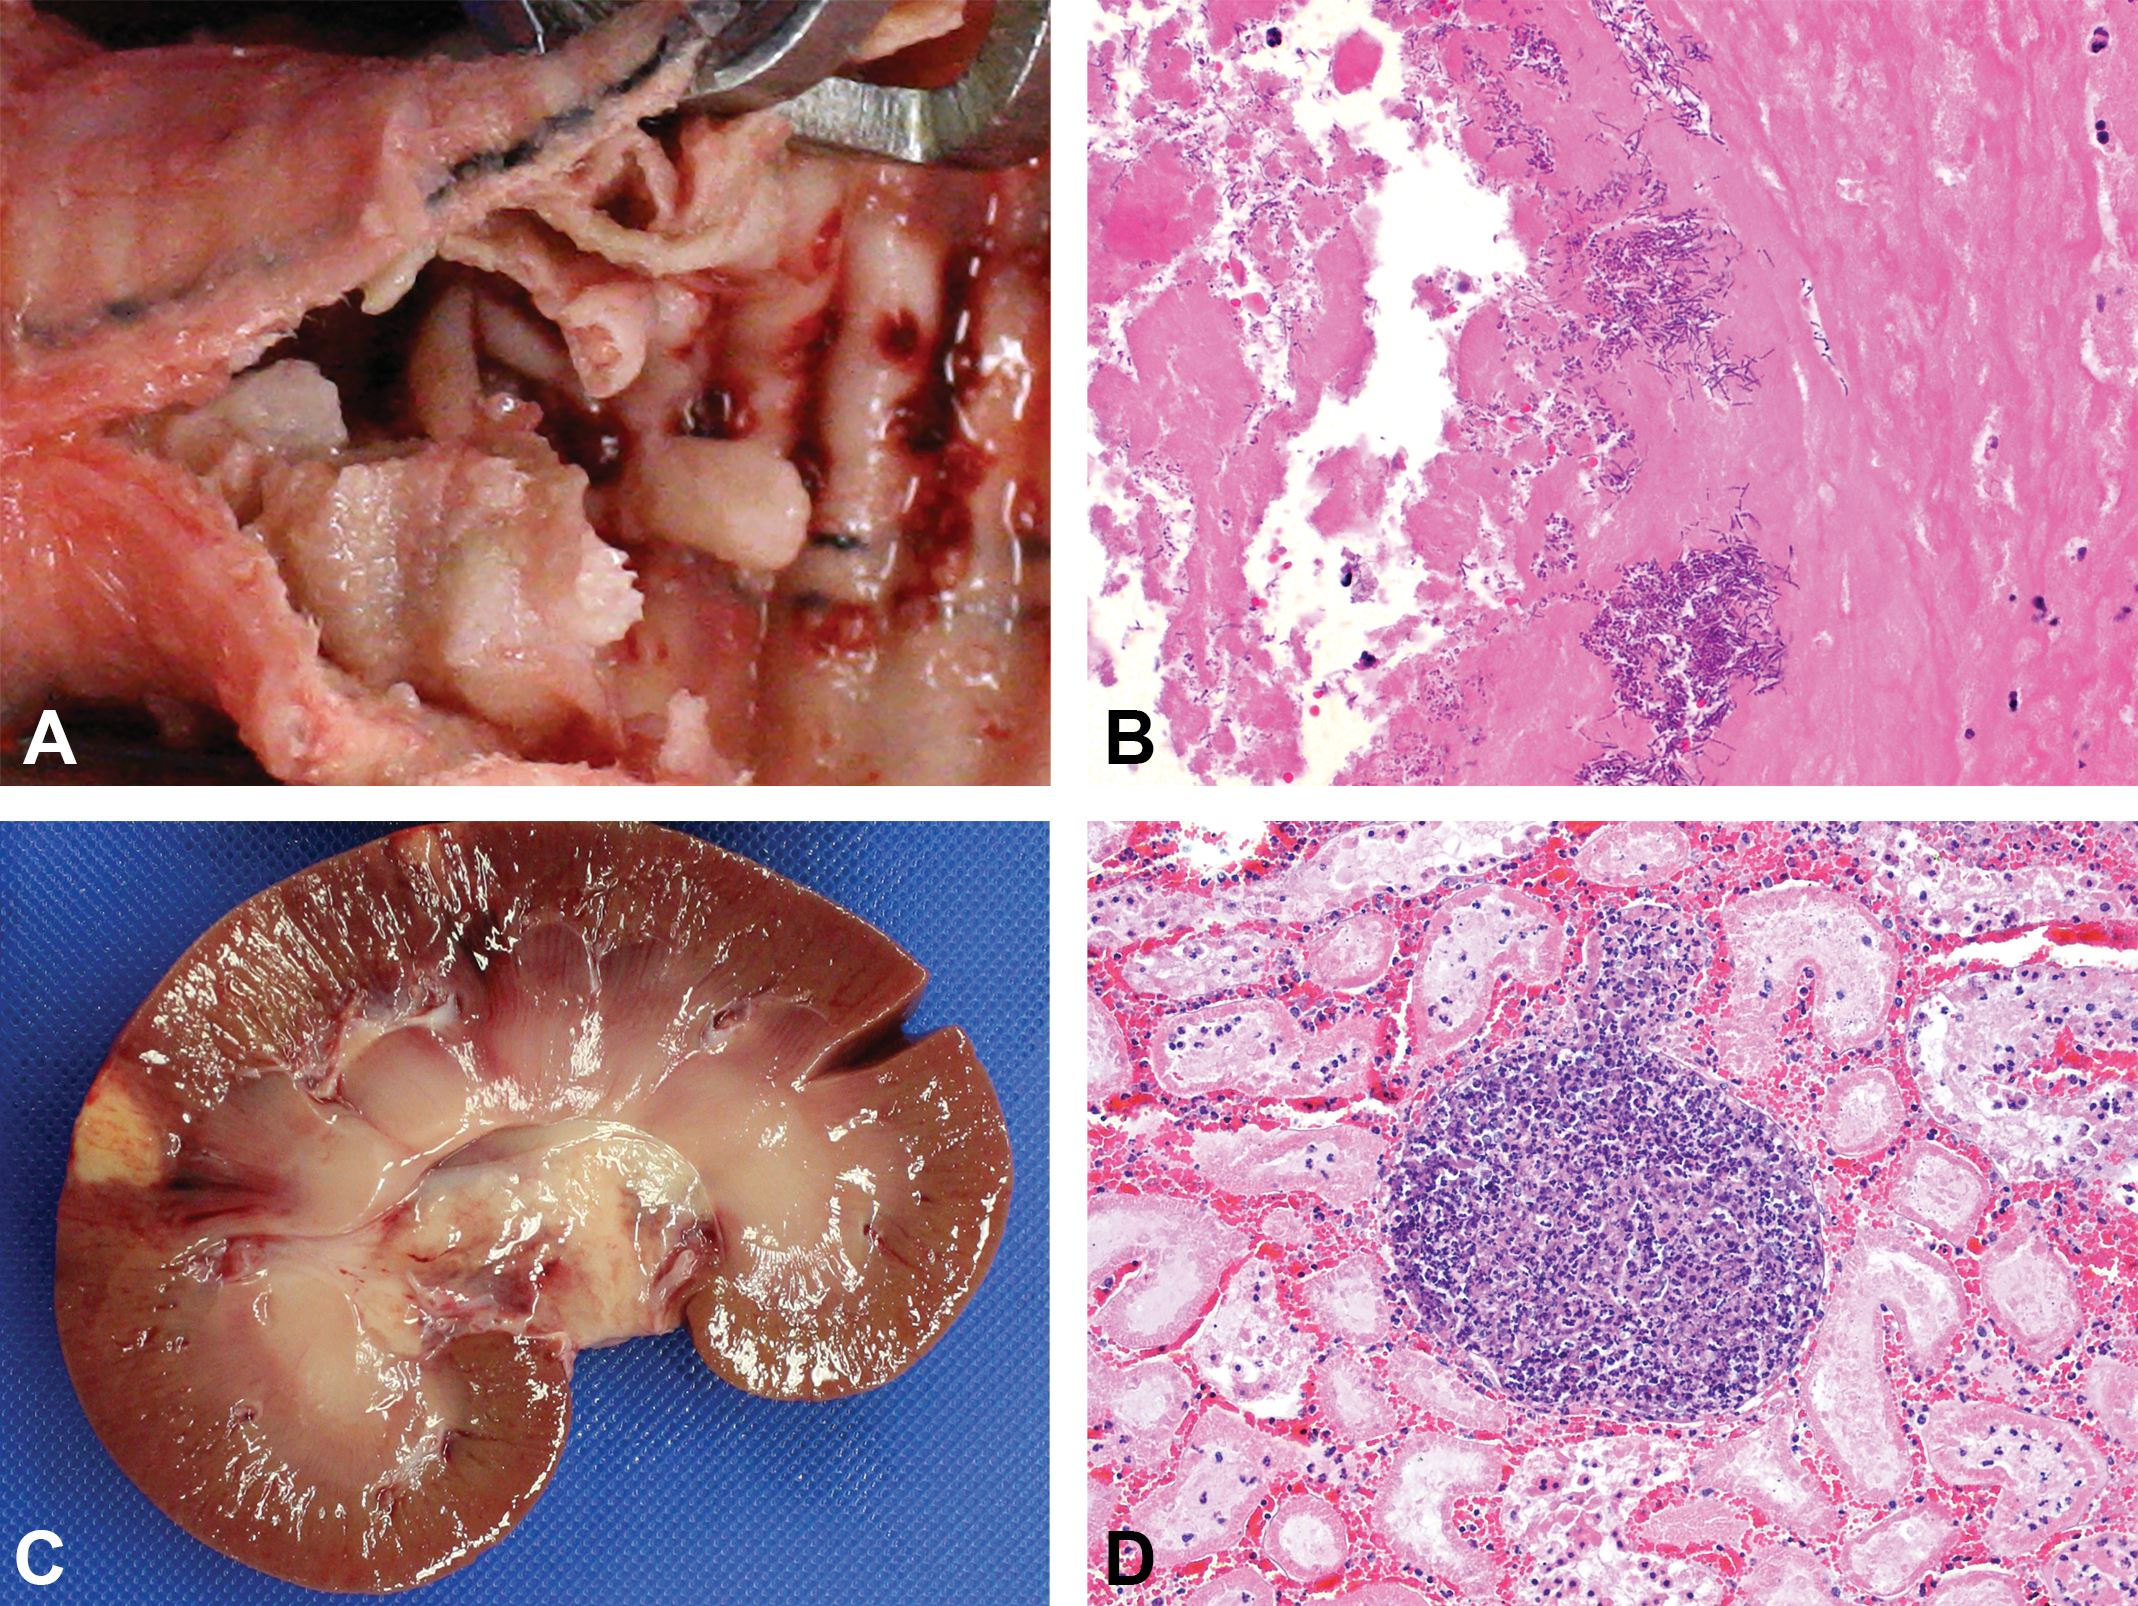
Findings from an ovine specimen with a left-sided ventricular assist device. (A) Tan, adherent material within the outflow graft. (B) Histological section of outflow graft material showing mixed colonies of bacteria embedded in a proteinaceous matrix (hematoxylin and eosin stain). (C) Two acute cortical infarcts. (D) Histological section of an acute embolic nephritis with tubular necrosis and hemorrhage (hematoxylin and eosin stain).
Plastic-embedded Histology
In typical pathologic settings, plastic histology has traditionally focused on the microscopic analysis of hard-tissue sections such as bone or dental samples. This technique works similarly for medical devices constructed of “hard” materials (metal, hard plastic, etc.) that cannot be separated from the adjacent peridevice capsule without altering the interface or cut on a traditional microtome and embedded in paraffin without significant damage to the blade (Roberts et al. 2013); examples include stents, valves, VAD components, and bone implants. While traditional paraffin histology allows for more detailed visualization of cellular components, the need to isolate soft tissue from metal or hard plastic device components during sectioning of paraffin embedded tissues may make it difficult to maintain tissue orientation and context relative to the device. Plastic histology can both preserve the device–tissue interface and allow for tissue identification while maintaining device regionality and context. This is especially useful when making observations for tissues that might have otherwise not been visible grossly (e.g., within internal device spaces) or where paraffin histology is not feasible or requires intricate dissection (e.g., tissue ingrowth into the device). Depending on the device in question, sponsors are likely to request plastic histology when specific parameters pertaining to device–tissue interactions can be correlated clinically or when these data are directly relevant to regulatory agencies, particularly for determining compatibility within a host. For example, plastic slides can provide microscopic insight into a vascular device’s role in a variety of outcomes, whether it be appropriate incorporation of the device into the native vessel with formation of a neointima or a less favorable inflammatory or thrombotic response. Plastic histology, however, must be conducted in a specialized lab that has the expertise and equipment to perform the embedding. Briefly, this processes starts with a graded tissue dehydration protocol starting with a ∼70% ethanol solution up to 100% ethanol. Following dehydration, the tissues are infiltrated using increasing concentrations of a methyl methacrylate (MMA) resin such as Technovit® 7200. Once the tissue has been adequately infiltrated, the tissue is then placed into a Light Polymerization Unit that is able to polymerize the resin using both yellow and blue light for up to 6 and 12 hours, respectively. After polymerization, the tissue block is then sectioned using a diamond saw, followed by microgrinding and polishing. The choice of plastic used for embedding such as glycolmethacrylate (GMA), polymethacrylate (PMA), MMA, and Spurr’s is dependent on the nature of the device/tissue (i.e., bone and metal in PMA) or the nature of the device/material (i.e., polymers in GMA or Spurr’s). The slide section thickness should be determined by the pathologist; slide thickness may be limited by the device thickness, but a range of 15 to 50 microns is typical (Rousselle and Wicks 2008). Thin sections are more technically demanding, but thicker sections may compromise the pathologist’s ability to differentiate cell types as well as clearly delineate cell numbers. Additionally, the use of plastic histology should be communicated to the sponsor early on, as plastic processing may add at least 4 to 6 weeks to the study.
Plastic histology also allows embedding of larger pieces of tissue en bloc, thus facilitating assessment of the extent of these pathological processes in tissues directly adjacent to the device as well as the surrounding areas. For example, in VAD studies, as stated previously, the formation of a pseudointima along sintered VAD surfaces adjacent to the myocardium is a desirable end point that indicates device compatibility with the host and the creation of an environment that mimics the interior lining of the heart. However, it is often difficult to grossly discriminate a pseudointima from an active or organizing thrombus along the VAD surface, especially in areas not easily accessible (e.g., interior surfaces of metal cannulas). Sponsors rely on the pathologist to confirm the identity of materials found within a VAD, and depending on the stage of evaluation, this information can impact the perception of device safety and possibly impact how patients are treated clinically. Plastic histology allows the pathologist to not only identify grossly observed materials as a pseudointima versus a thrombus but also allows them to identify the precise location of each material within the device and its position relative to the host. Engineers and device manufacturers can then correlate the location of thrombi/pseudointima within the device to certain flow patterns, which may lead to alterations in either the VAD design or the clinical approach in order to promote or diminish growth of the determined tissue.
One of the major challenges when utilizing plastic histology analysis is maximizing the information gained from the limited number of specimens that are typically available in preclinical and clinical studies. Plastic histology can be destructive to tissue if the processing guidelines are not followed correctly, and great care must be taken to avoid commonly encountered problems including inadequate tissue dehydration, inadequate tissue infiltration by the plastic resin, and grinding artifacts. Incomplete resin infiltration can compromise tissue preservation, which can lead to the loss of areas of interest as the tissue becomes soft and may be damaged during later processing as well as to the creation of artifactual spaces that form between the device and tissue. Tissues will also shrink slightly as an effect of plastic resin polymerization, regardless of the thoroughness of infiltration, which may result in the soft tissues pulling away from the hard components. Although this creates an artifact, the tissue retains its architecture and allows for a skilled pathologist to analyze the tissue and discern its original position and relationship with the device. Finally, plastic embedding may create microparticulates that are seen on the final histology slide. This material may be either a microgrinding artifact from the formation of microbubbles within the polymerized plastic, or material from the device itself.
Microscopic Analysis
Documentation from necropsy/gross evaluation of the device, as well as any additional study documentation and clinical data, must be provided to the pathologist so that correlations can be made between gross and histologic findings. H&E-stained slides are often adequate to address most pathologic end points and should always be completed regardless of any additional special stains requested. As the pathologist conducts his or her initial assessment, overall main histopathology objectives should be considered such as (1) device interface findings (inflammation, fibrosis, necrosis, infection, etc.), (2) damage to the nearby tissues (vasculitis, neurodegeneration, bone proliferation, etc.), and (3) organ pathology (identification of infarcts, chronic congestion, emboli, thrombi, etc.). Depending on the type of medical device, there may be published histopathologic quantification guidelines that can aid in determination of histopathology end points (e.g., Schwartz et al.’s [2008] histopathologic injury scoring metric for drug-eluting stents). The pathologist can then take their initial diagnosis and findings and perform further analysis in order to correlate microscopic assessments with clinical observations.
Particularly important in device pathology, histomorphometry is critical as it is what gives scientific rigor to device safety. As a pathologist reads a slide, these data are often collected using scoring worksheets that document different cell types, number, locations, or a subjective overall score which is dependent on the device in question and is added as an appendix to the final pathology report. As the medical device field grows each year, pathologists are constantly creating new qualitative/quantitative grading paradigms and worksheets for new and novel devices. Trends in scoring worksheets may be summarized in narratives with accompanying images as needed and is usually a component of the pathology report that is most helpful to sponsors. Additionally, histomorphometry correlates findings such as number of inflammatory cells present with stent narrowing, which can then be correlated with clinical parameters, such as percent lumen narrowing (stenosis). Histomorphometry findings are typically statistically analyzed so that assessments can be made across treatment groups to augment preclinical information on device safety.
In the final pathology report, photomicrographs are often inserted in order to demonstrate certain pathology findings. It may be necessary to include multiple examples of particularly complicated or concerning findings, especially if they include pathology end points that are critical to overall study objectives. Images should be labeled with a concise description that is expanded upon in the report, if the image includes nonobvious findings. Scale bars may be included on every image where measurements may be necessary to make a final assessment (i.e., photomicrographs, gross findings), and magnification and stain information should be included within the final report. Of note, measurements made from histological sections should be understood as different from what would be seen in real life due to tissue shrinking and expansion that occurs during processing for histology (Tran et al. 2015).
Advanced Imaging to Enhance Pathology Assessment
Advanced imaging techniques are useful tools for the medical device pathologist to enhance device assessment beyond the inherent limitations of a gross evaluation—not only in postexplant evaluation but throughout the duration of the preclinical study. Utilizing CT, traditional radiography, magnetic resonance imaging (MRI), fluoroscopy, optical coherence tomography (OCT), and ultrasound to image the device and surrounding tissues in vivo can provide reference for pathological findings and ultimately aid in the assessment of device safety and function. Transmission electron microscopy (TEM) may also be utilized to examine a biopsy of the tissues surrounding the device to provide ultrastructural context. Additionally, further advanced imaging of device and tissues postexplant with SEM, EDS, and micro-CT can be instrumental in assessing study end points and overall study objectives.
In Vivo Imaging
In preclinical and clinical studies, imaging techniques such as CT, radiography, MRI, fluoroscopy, OCT, and ultrasound can provide invaluable context for pathological findings by establishing device position and providing an overview of the patient/animal anatomy. Prior to the necropsy, it may be useful for the pathologist to view these data to guide dissection or target specific locations. Imaging in vivo prior to necropsy not only establishes device position but can also contribute to assessing device function. TEM of heart biopsy specimens, for example, can distinguish unhealthy versus remodeling versus healthy myocardium among VAD patients/specimens (Kinoshita et al. 1996) and provide insight into how the device is functioning and how the native heart tissues are responding.
Postexplant Imaging—Micro-CT for Pathological Analysis of Medical Devices
Micro-CT has emerged as a more advanced imaging modality for postexplant pathological evaluation of medical devices and tissues (e.g., vasculature, bones, and soft tissues; Campbell and Sophocleous 2014) as it provides nondestructive, slice-by-slice visualization of a specimen through the discrimination of attenuation levels by various materials (e.g., tissue vs. metal). This can then be used to assess tissue ingrowth, evaluate vessel patency and guide plastic histology; however care must be taken to avoid common complications (e.g., beam hardening) that can affect pathological end points.
The contrast between biologic soft tissues (lower density, lower X-ray attenuation) and hard tissues (bone) or metal devices (higher density, higher X-ray attenuation) can sometimes manifest as a beam-hardening artifact, appearing as dark and light streaks on a scan, which can obscure the data and preclude accurate measurements within reconstructed areas. For example, a common end point that can been hindered by beam hardening is quantifying the percent tissue ingrowth within porous devices (Figure 5a). To better visualize tissue delineation and reduce beam-hardening artifact, diffusible contrast agents may be used to stain the tissue and bridge the gap between varying densities. Iodine-based stains in particular have emerged as an effective postfixation tissue stain for enhancing micro-CT scanning, as they can be diffused quickly, are easily removed via perfusion of various substances (formalin, methanol, ethanol, water), and produce minimal effects on histological analysis (Gignac et al. 2016; Metscher 2009). The stained tissue will then have increased tissue contrast and reduced beam-hardening artifact, allowing more accurate slice-by-slice 3-D pathological analysis (Figure 5b). In effect, this method enables comprehensive full-volume visualization of the device–tissue interface (Figure 5c) with the ability to quantify data such as tissue ingrowth within porous metal devices.
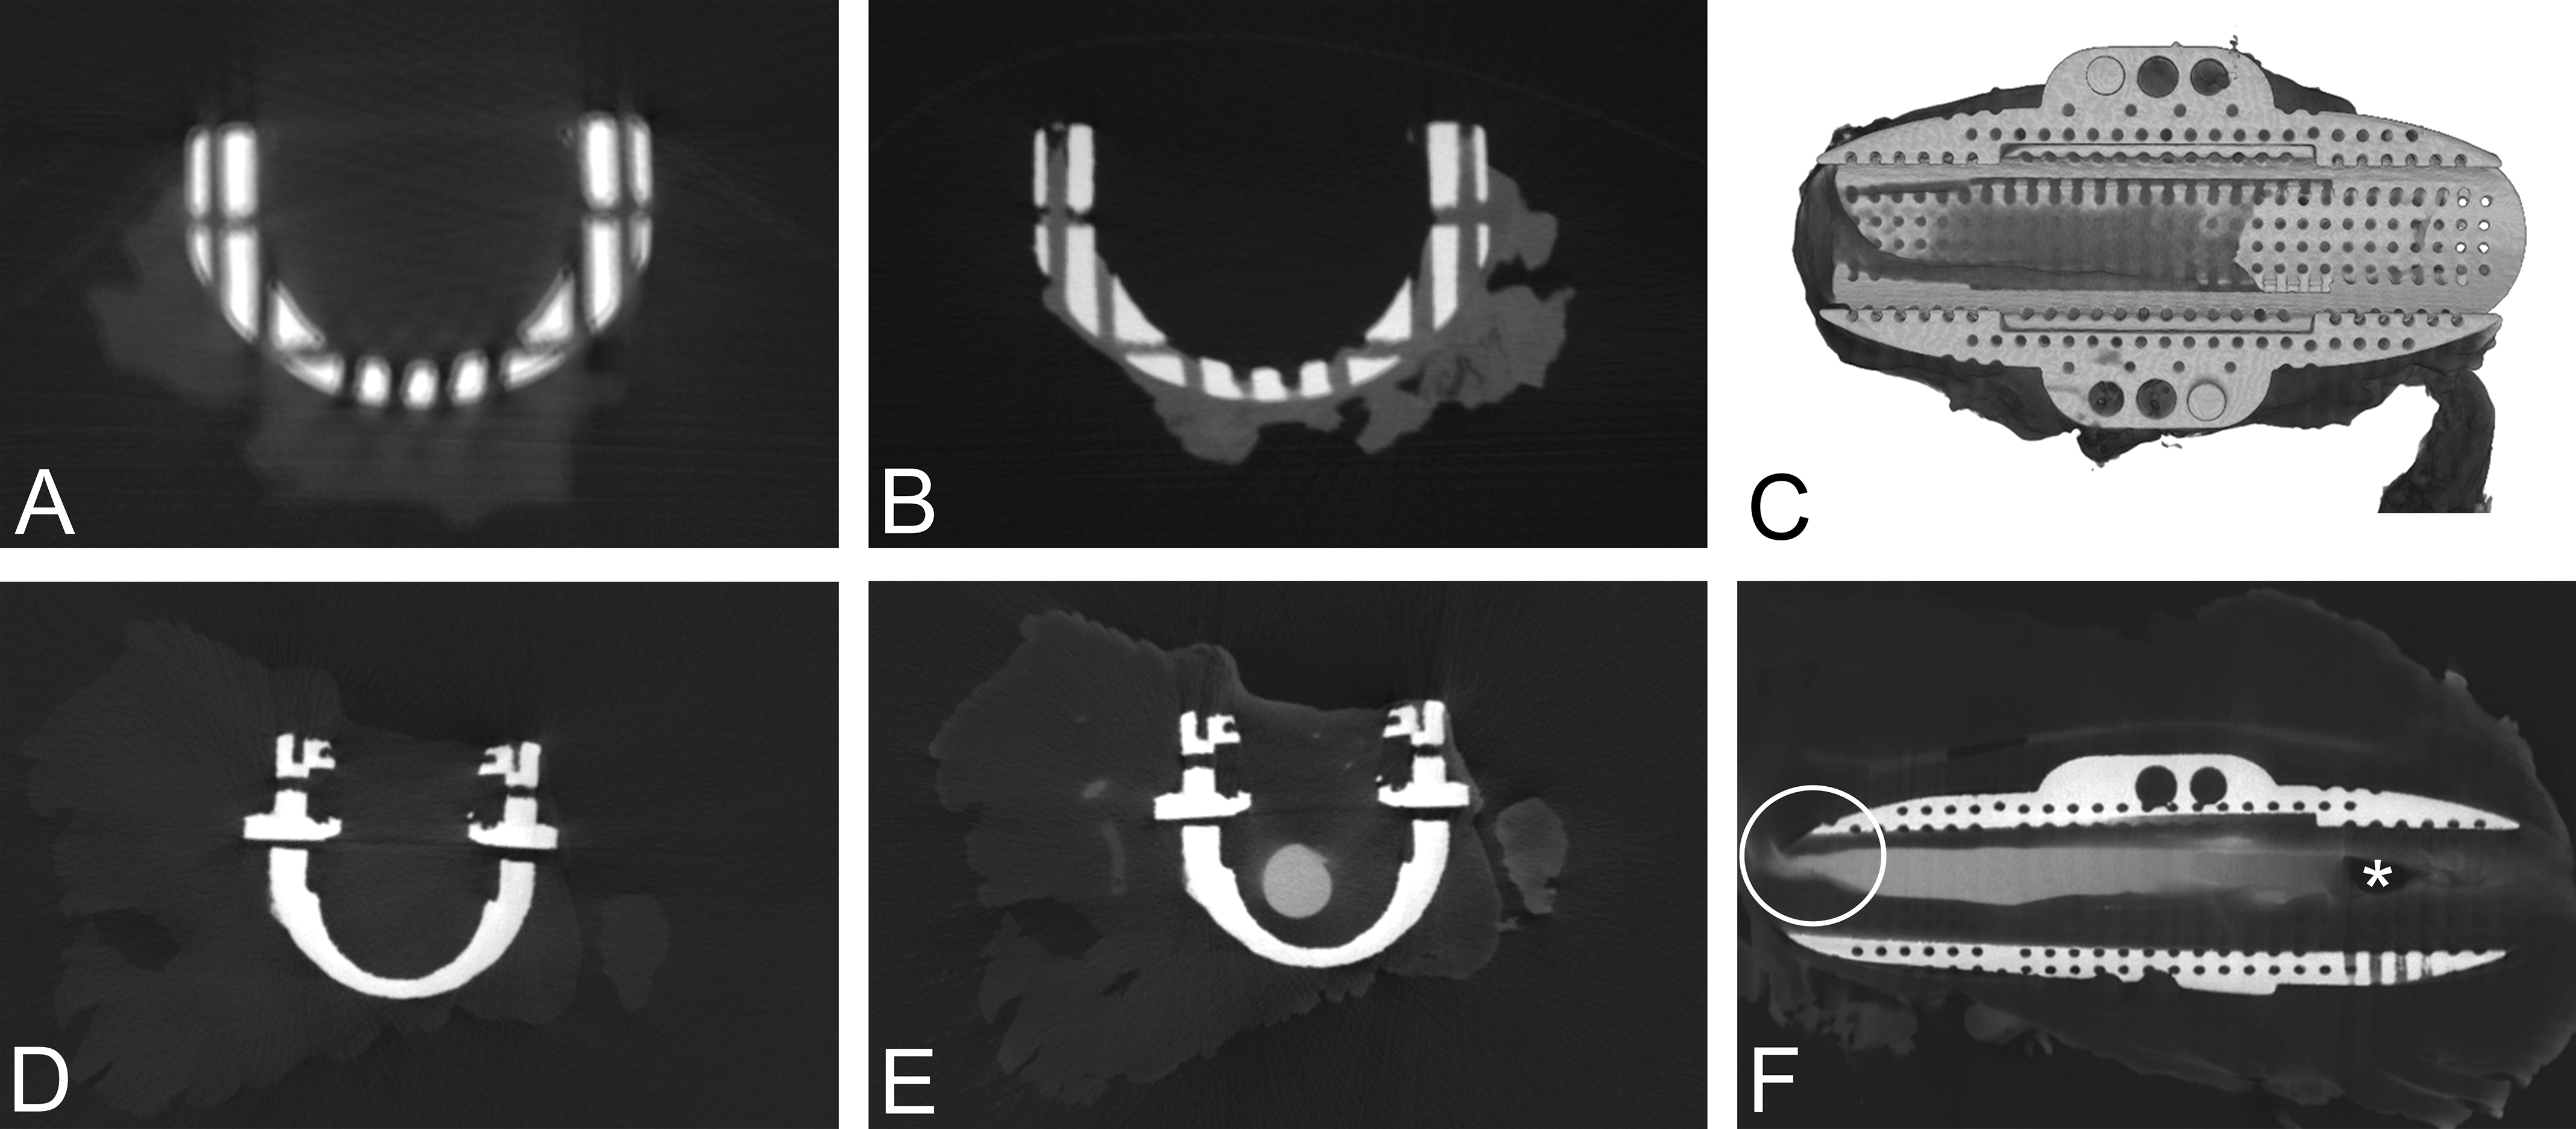
Common complications for micro-computed tomography (CT) pathological analysis. (A) Micro-CT slice demonstrating beam-hardening artifact manifested as dark and light streaks obscuring data within pores of the device. (B) Micro-CT slice of specimen soaked with a postfixation iodine-based stain illustrating improved tissue contrast and reduced beam-hardening artifact. (C) 3-D micro-CT reconstruction after employing a diffusible contrast agent. (D) Micro-CT slice prior to contrast enhancement demonstrating difficulty in delineation of lumen from tissue. (E) Micro-CT slice depicting improved lumen delineation after use of an iodine-based perfusable contrast agent. (F) 3-D micro-CT reconstruction after employing a perfusable contrast agent. Includes air bubble artifact (asterisk) and vessel narrowing due to improper collection upon surgical excision (circle).
In addition to assessing tissue ingrowth, micro-CT can be a useful tool for evaluating lumen patency and highlighting the microvasculature near the device. Assessing vessel patency is a crucial pathology end point for studies involving medical devices such as stents, vascular grafts, aneurysm filling devices, and others where maintaining vessel patency is crucial to proper device function. Metallic vascular support devices, for example, may be implanted in hemodialysis patients to ensure vascular access by maintaining vessel patency. In these types of devices, micro-CT can serve as a means for lumen visualization; however, traditional micro-CT often yields poor soft-tissue versus lumen contrast (Figure 5d). By using a radiodense, metal-based contrast perfusion agent to fill the vessel, high-density contrast replaces low-density air within the lumen, resulting in enhanced lumen visualization (Figure 5e).
The specific contrast agent used to enhance lumen visualization can vary depending on the specific study goals. Common perfusion-based contrasts include barium latex, Microfil®, and iodine-based agents (Gignac et al. 2016). Barium latex and Microfil® both fill the vessel lumen with a liquid radiopaque agent, leaving a cast of the vessel lumen when fully cured. However, this method of perfusion can result in inaccurate representation of lumen diameter due to cast shrinkage (Gignac et al. 2016). Although vessel dissection can still occur after perfusion, the procedural shrinking may preclude accurate assessment of lumen diameter and warrants consideration during pathological evaluation. Iodine-based perfusable contrast agents also enhance visualization of lumen patency and vessel delineation (Figure 5e), exhibit minimal residual tissue staining, and have limited interference with histology. However, for ex vivo vessel/device analysis, improper perfusion and vessel clamping during collection upon necropsy can create misleading vessel narrowing and occlusion due to air bubbles and collection artifact (Figure 5f). Without careful dissection and addition of pre-fixation contrast, the morphology of the lumen may appear inaccurate and lead to an incorrect conclusion of a device failure rather than the true iatrogenic cause. Fixation after specimen collection can further obscure luminal morphology via tissue thickening. Therefore, micro-CT scanning should occur prior to fixation to allow for accurate delineation of the vessel diameter and surrounding tissue encroachment. However, if endothelial sloughing is of concern, perfusing a small volume of fixative through the vessel may be useful. Ultimately, the pathologist should carefully handle the specimen from initial collection to fixation—in order to preserve the true luminal structure.
Micro-CT as a guide for histology and sectioning
Micro-CT can also be used as a guide for sectioning plastic histology. Specimens can be scanned with contrast enhancement, embedded in plastic, and then scanned again with an orientation marker (Figure 6a and b). Precise sectioning for creating histology slides (Figure 6c) can then occur by referencing areas of interest within the contrast-enhanced scan and taking measurements from the orientation marker in the corresponding plastic-embedded scan; it is helpful to print out a copy of the micro-CT reconstruction or radiograph of the plastic block to delineate the proposed sectioning planes (as in Figure 6a). Furthermore, micro-CT can verify effects of histological processing. As discussed above, processing tissue for plastic histology can result in tissue shrinkage (see black arrows, Figure 6c) and consequential induced artifact that can obscure sensitive morphometric measurements. However, by comparing the contrast-enhanced scan performed before plastic histology (Figure 6b) with the microscopic image (Figure 6c), it can be deduced that the shrinkage is not a result of device failure but rather is associated with plastic histology processing (i.e., alcohol processing and infiltration of plastic resin of postfixed tissues). Furthermore, the infiltration and grinding processing may leave resin/grinding debris on the slides. Comparing the micro-CT of the device before and after infiltration (and SEM/EDS of the section described below) can help distinguish processing/grinding artifact from device wear debris. As such and in general when plastic histology is performed, it is beneficial to obtain a micro-CT prior to plastic infiltration.
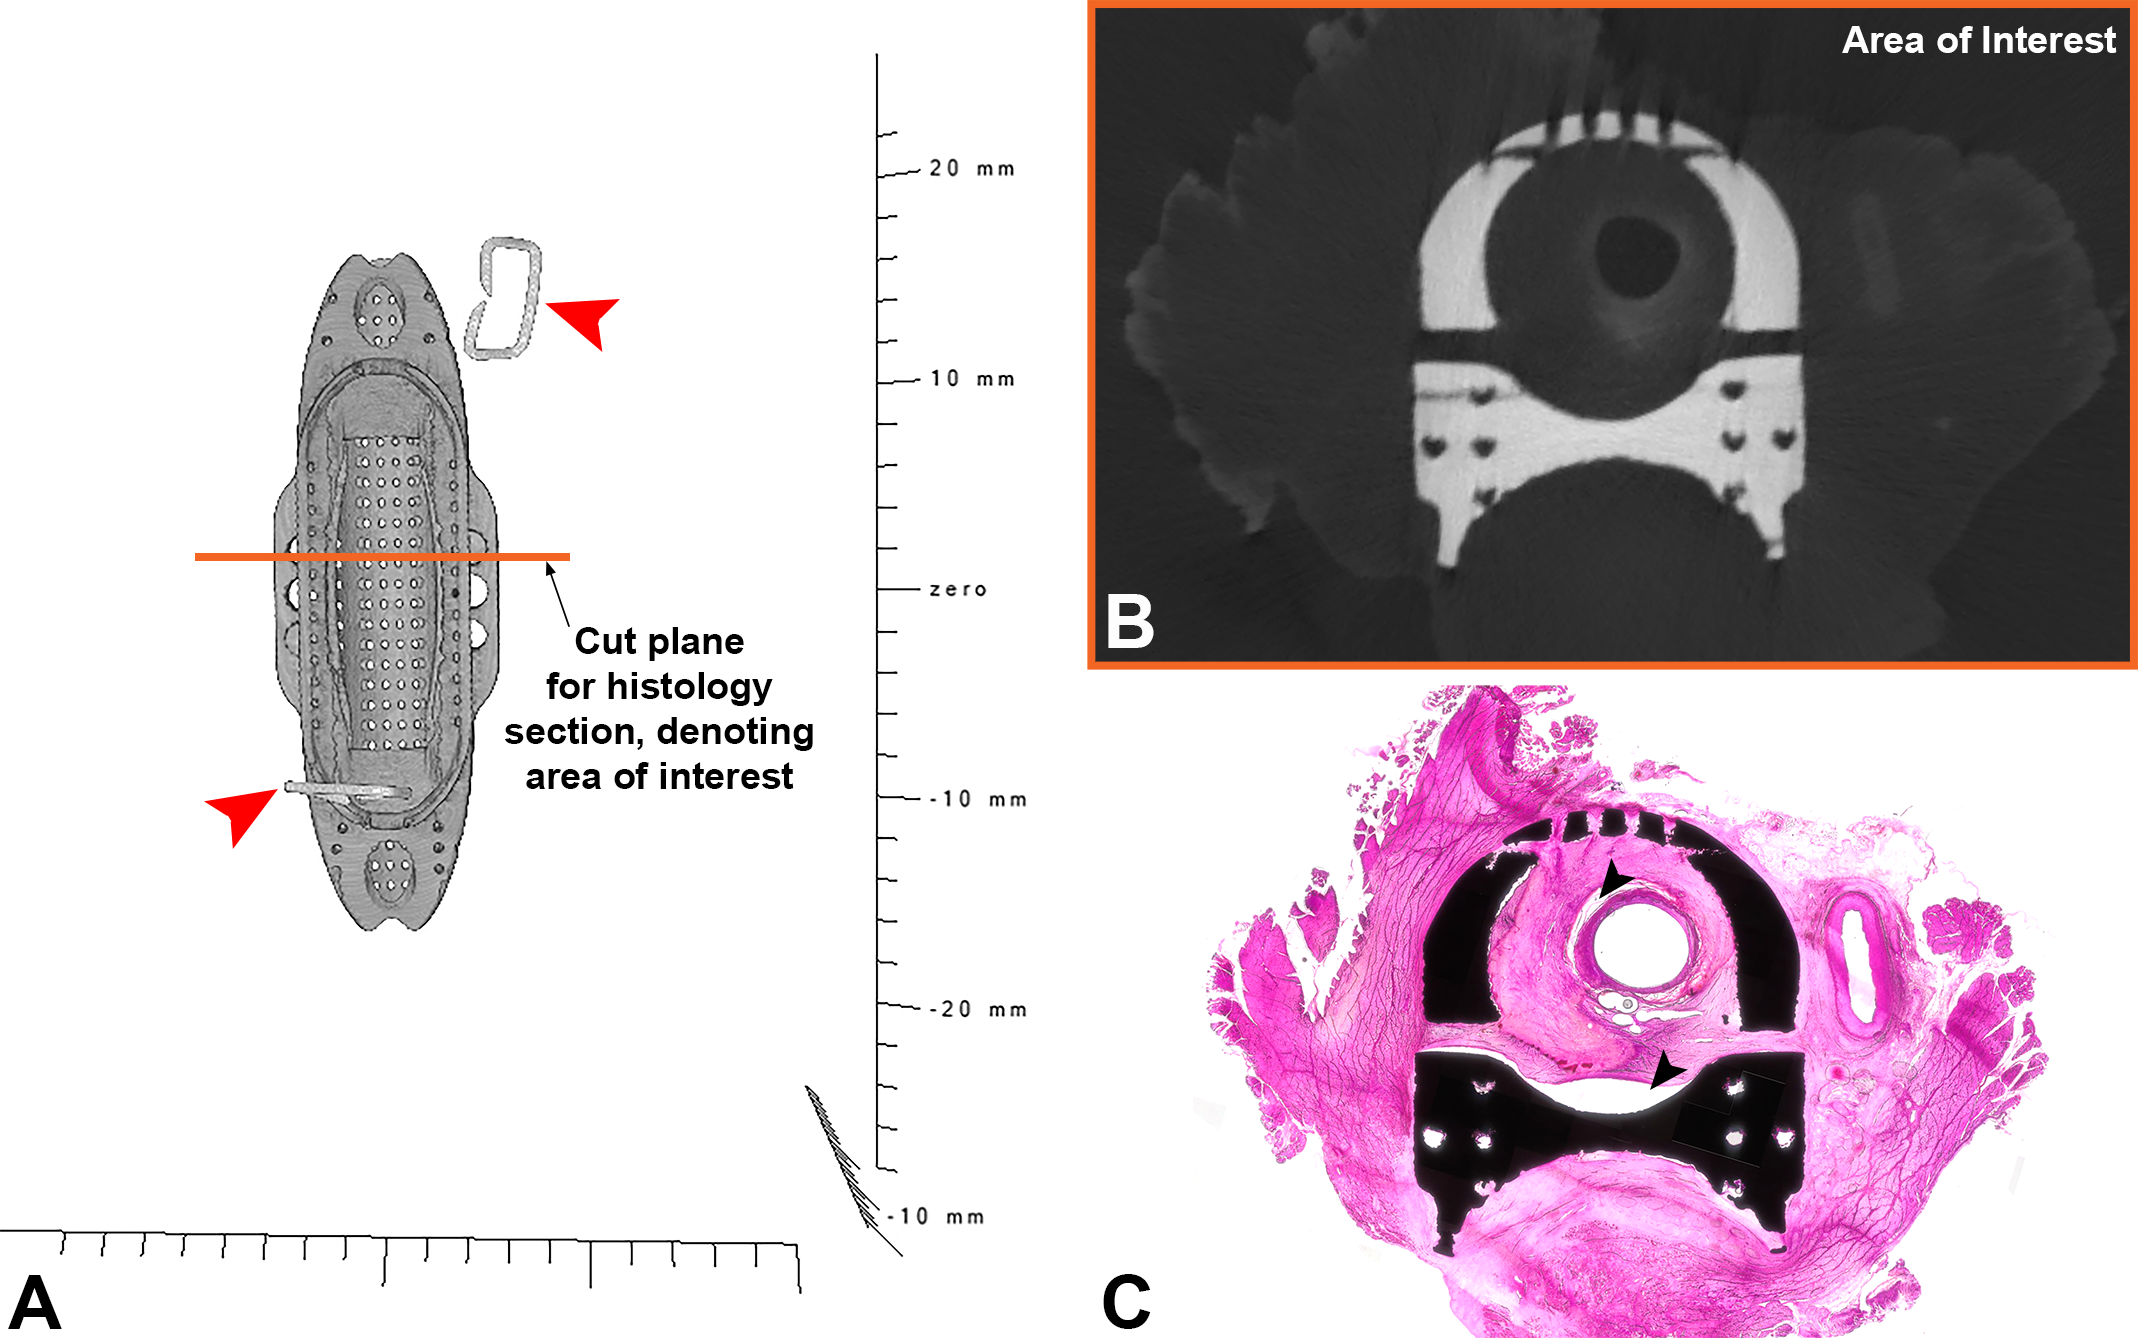
Micro-computed tomography (CT) as a guide for plastic histology. The area of interest for histologic investigation is determined by viewing slices of the contrast-enhanced micro-CT (prior to embedding in plastic). The tissue block with staples as orientation markers is infiltrated with plastic resin and imaged again (A; red arrows denote staples). The area of interest (B) is marked on the 3-D reconstruction of the plastic block (orange line in [A]). By measuring from orientation markers within the plastic block and micro-CT scan to the line marking the region of interest, the histology technician can obtain the approximate region of interest on a hematoxylin and eosin-stained microground section (C). Of note, comparing the histology slide to the micro-CT data before plastic embedding reveals tissue shrinkage (C; black arrows, processing artifact).
Postexplant Imaging—Electron Microscopy Analysis
Low-vacuum SEM is an ideal method for nondestructive surface visualization of biological specimens. As such, SEM is commonly used in medical device pathology in assessment of cellular response to device surfaces. SEM is particularly useful for evaluating neoendothelial formation versus fibrin deposition in stents (Silva et al. 2009, 2015), grafts, aneurysm occlusion devices (Rodriguez et al. 2014), and pressure sensors (Trainor et al. 2013), as well as to evaluate the mesothelial cell reaction to barrier devices used in surgery (Brochhausen et al. 2012). TEM allows for ultrastructural analysis and can be used to identify specific cell types based on morphology, but this method is destructive to the tissue and will be expensive. Specimens for TEM evaluation should be fixed immediately after collection in glutaraldehyde or Karnovsky’s solution, as formalin fixation will distort the cellular morphology and may inhibit analysis.
Tissue preparation for SEM depends on the type of microscope being used. Most specimens that have been air dried or have a robust outer surface are able to be imaged with a variable pressure SEM (Griffin 2007). Fully wet samples have been imaged with a “wet-SEM” technique as described by Thiberge et al. (2004). When utilizing an environmental SEM, however, formalin-fixed specimens need to be dehydrated by placing the specimen in a series of progressively increasing concentrations of alcohol and then carefully desiccated prior to SEM evaluation; too much desiccation can lead to iatrogenic alterations in morphology that might obscure pathologic findings. SEM is sensitive to oils, particulates, and any tissue stains, so it is best to perform SEM prior to histological evaluation. Additionally, to minimize contamination of the specimen, all instruments used in specimen handling should be rinsed in acetone, and use of cotton or gauze should be minimized, as fragments of cotton transferred to the specimen can obscure relevant findings.
Postexplant Imaging—SEM with EDS Analysis
In addition to being a nondestructive method for surface visualization, SEM allows for elemental analysis via EDS. However, high magnification and long observation times can result in damage to specimens, producing burn artifacts (i.e., localized rectangular areas of tissue destruction), which can obscure surface visualization from SEM imaging and misrepresent tissue topography. Care must be taken to avoid this, as damage of the tissue might impair evaluation of the healing response to an implant. Furthermore, dust, oils, gauze, and products of histological processing (e.g., staining) can confound EDS signals; therefore, evaluation must occur in a contaminant-free environment with careful planning. By employing meticulous practices, SEM/EDS can provide an enhanced pathological analysis of the device/tissue interface.
In conjunction with micro-CT, SEM and EDS may be used to distinguish between histology processing artifacts and device-related findings. While plastic histology permits evaluation of the device–tissue interface, as mentioned above, microgrinding plastic yields particulate matter (Figure 7a) that can manifest as concerning material of interest for the sponsor. This material can appear as a product of corrosion, suggesting device failure and poor biocompatibility due to implant erosion and inflammation (Manivasagam, Dhinasekaran, and Rajamanickam 2010). To ease sponsor concerns, SEM with EDS can be used to definitively identify confounding microparticulates. For example, when a Ti-6Al-4V metal alloy implant was imaged with SEM, a highly emissive particulate matter near the device–tissue interface was seen (Figure 7b), corresponding to the microparticulates within the aforementioned histology image (Figure 7a). To distinguish whether this material was from the plastic histologic processing or device related, elemental analysis by EDS was performed and revealed localized concentrations of titanium and aluminum with trace amounts of vanadium (Figures 7c–f). Per the manufacturing specifications, the Ti-6Al-4V metal alloy implant comprises approximately the same percent elemental concentrations as detected by EDS. Consequently, SEM/EDS analysis can both qualitatively and semiquantitatively verify the elemental identity of microparticulates. When this artifact is observed, it is important to distinguish whether the particulate material is device related or not. Additionally, further verification can occur through identifying the presence or absence of particulate matter via micro-CT scans prior to plastic histology processing. In the absence of high-density metal particulates within the scan, a high probability exists that the observed material of interest is grinding artifact rather than a product of corrosion.
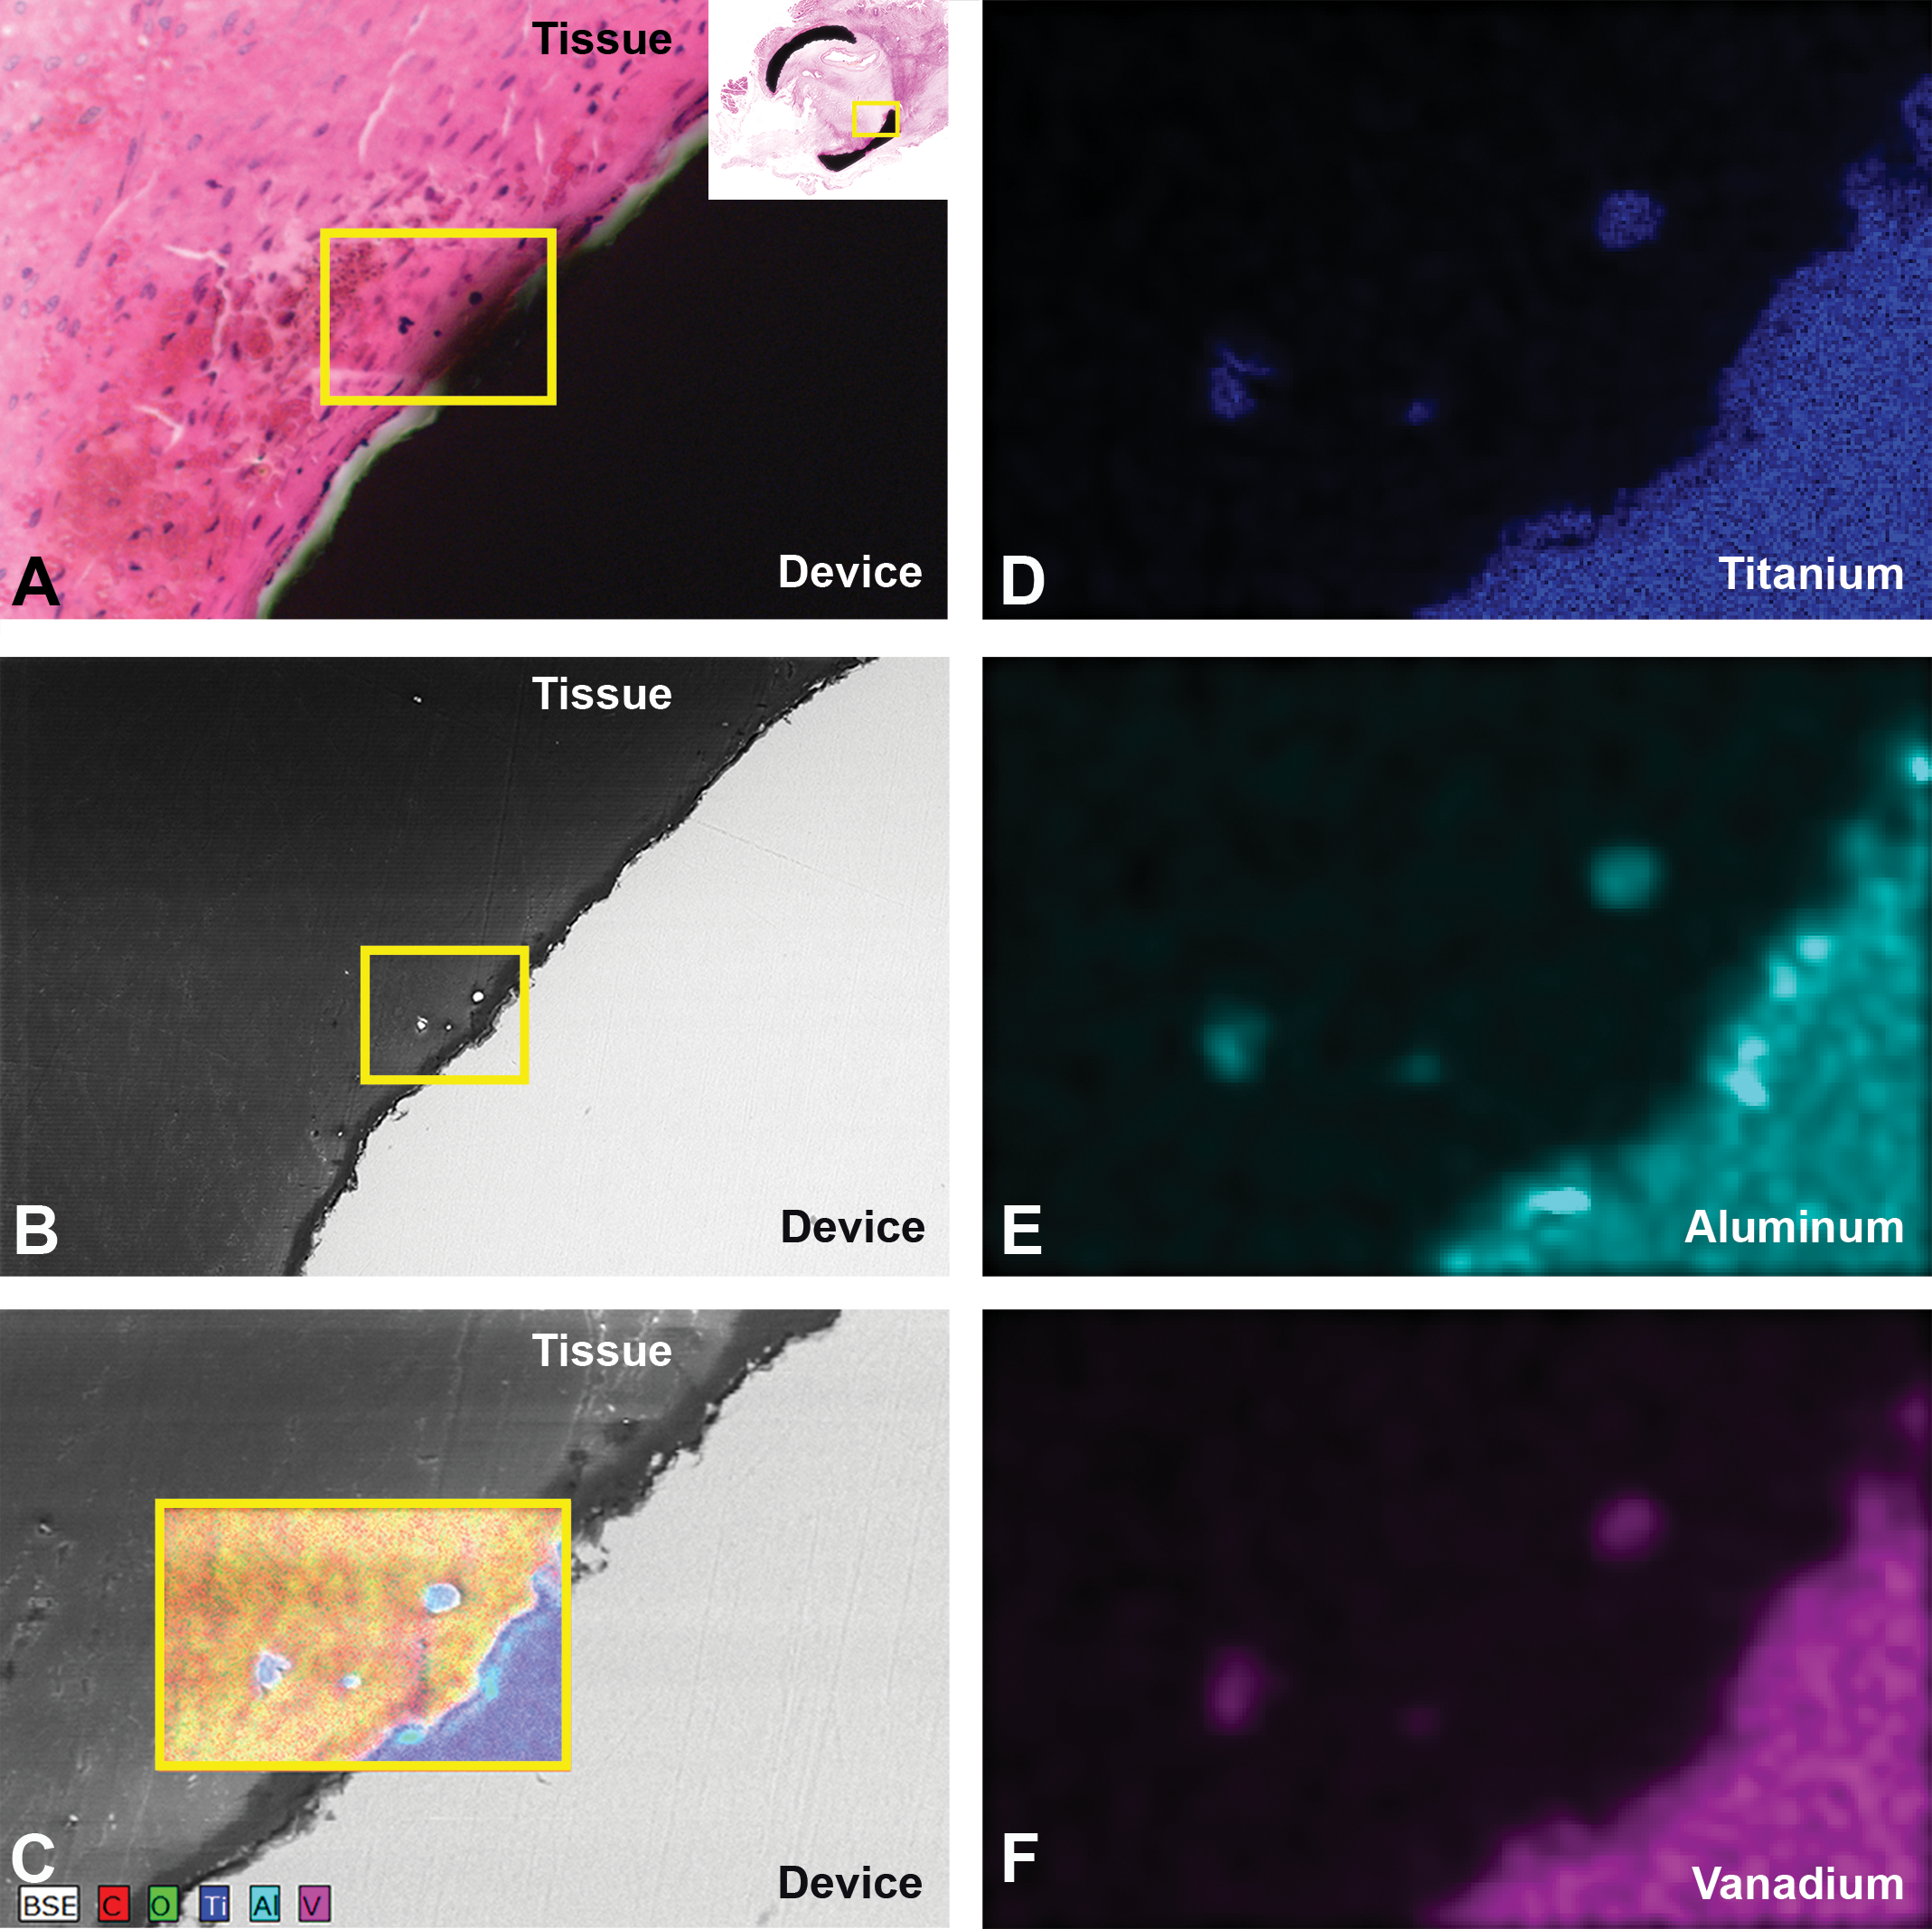
Distinguishing microgrinding artifact from confounding particulate material. (A) An hematoxylin and eosin-stained microscopic image illustrating black, punctate material within the tissue surrounding the device (yellow square). (B) Corresponding scanning electron microscopy image revealing highly emissive, oblong 2.5 × 5 µm particulate matter (yellow square). (C) Energy-dispersive X-ray spectroscopy mixed map demonstrating localization of titanium, aluminum, and vanadium within both the microparticulates and device surface. (D–F) Individual elemental maps for titanium, aluminum, and vanadium, respectively.
General Considerations for Advanced Imaging
As previously discussed, the variation in sample processing required for each imaging modality requires consideration of appropriate contrast agent perfusion, formalin/glutaraldehyde fixation, and dehydration and desiccation techniques. In order to provide the most effective device evaluation, the pathologist should make educated decisions about what imaging modalities to employ based on device characteristics and the overall goals of the study. If histology is ultimately desired, that will impact the contrast agent utilized, as some agents (barium latex) are not reversible, while others (Microfil®, iodine) have no or minimal impact on histology (Gignac et al. 2016). This requires detailed planning prior to initiating the pathology evaluation and involves determining the order of sample processing that ensures the most accurate and uncontaminated results. Additionally, these considerations should be discussed with the study sponsor during the protocol development, as many imaging techniques are expensive and require budgetary planning.
Conclusion
Comprehensive medical device pathology is critical in determining medical device safety and efficacy. Optimal device evaluation comprises a stepwise yet integrated approach to determine pathologic end points that will address sponsor related goals as well as identify and reconcile potential study limitations. Communication between the study pathologist, sponsor, and study director prior to study initiation is often the best way to establish key end points necessary to achieve study outcomes and to ascertain the best way to approach device explantation and evaluation. Thorough device evaluation may be accomplished by utilizing advanced imaging modalities in conjunction with traditional paraffin and plastic histology. While the specific techniques used must be tailored to each individual device, meticulous data collection and compilation will significantly ease submission to regulatory bodies. Above all, it is the pathologist’s responsibility to preserve study integrity while providing a complete and accurate assessment of medical device pathology.
Footnotes
Author Contributions
Authors contributed to conception or design (MF, NM, SLJ, FC, CK, AMG, FJC, BW); data acquisition, analysis, or interpretation (MF, NM, SLJ, FC, CK, CR, BB, AMG, SJ, AG, FJC, BW); drafting the manuscript (MF, NM, SLJ, FC, CK, CR, BB, AMG, SJ, AG, BW); and critically revising the manuscript (MF, NM, SLJ, AMG, FJC, BW). All authors gave final approval and agreed to be accountable for all aspects of work in ensuring that questions relating to the accuracy or integrity of any part of the work are appropriately investigated and resolved.
Declaration of Conflicting Interests
The author(s) declared no potential, real, or perceived conflicts of interest with respect to the research, authorship, and/or publication of this article.
Funding
The author(s) received no financial support for the research, authorship, and/or publication of this article.